
除了 Canvas 可組合項之外,Compose 還有數個實用的圖形 Modifiers,可協助您繪製自訂內容。這些輔助鍵很實用,因為可將其套用至任何可組合項。
繪圖輔助鍵
所有繪圖指令都是在 Compose 中使用繪圖輔助鍵完成。Compose 有三個主要繪圖輔助鍵:
繪圖的基本輔助鍵為 drawWithContent,可讓您決定可組合項的繪製順序,以及在輔助鍵內發出的繪圖指令。drawBehind 是 drawWithContent 周圍的便利包裝函式,其繪圖順序設為可組合元件內容的後方。drawWithCache 會在其中呼叫 onDrawBehind 或 onDrawWithContent,並提供快取機制,以便對其中建立的物件進行快取。
Modifier.drawWithContent:選擇繪圖順序
Modifier.drawWithContent 可讓您針對可組合項的內容前後執行 DrawScope 作業。請務必呼叫 drawContent,然後算繪可組合項的實際內容。透過這項輔助鍵,您可以在自訂繪圖作業之前或之後繪製內容,以便決定作業順序。
例如,如果您想在內容上方顯示放射漸層,以便在使用者介面上建立手電筒孔效果,您可以執行下列操作:
var pointerOffset by remember { mutableStateOf(Offset(0f, 0f)) } Column( modifier = Modifier .fillMaxSize() .pointerInput("dragging") { detectDragGestures { change, dragAmount -> pointerOffset += dragAmount } } .onSizeChanged { pointerOffset = Offset(it.width / 2f, it.height / 2f) } .drawWithContent { drawContent() // draws a fully black area with a small keyhole at pointerOffset that’ll show part of the UI. drawRect( Brush.radialGradient( listOf(Color.Transparent, Color.Black), center = pointerOffset, radius = 100.dp.toPx(), ) ) } ) { // Your composables here }
Modifier.drawBehind:可組合項後方的繪圖
Modifier.drawBehind 可讓您針對在螢幕上繪製的可組合內容後方執行 DrawScope 作業。如果您查看 Canvas 的實作,可能會發現這只是 Modifier.drawBehind 周圍的便利包裝函式。
如何在 Text 後方繪製圓角矩形:
Text( "Hello Compose!", modifier = Modifier .drawBehind { drawRoundRect( Color(0xFFBBAAEE), cornerRadius = CornerRadius(10.dp.toPx()) ) } .padding(4.dp) )
這會產生以下結果:

Modifier.drawWithCache:繪製與快取繪圖物件
Modifier.drawWithCache 會將其建立的物件保留在快取中。只要繪圖區域的大小相同,或者所讀取的任何狀態物件都未變更,則系統會快取物件。這個輔助鍵可用於改善繪製呼叫的效能,避免重新指派繪製時建立的物件 (例如:Brush, Shader, Path 等)。
或者,您也可以使用 remember (在輔助鍵之外) 快取物件。然而,並非如此,因為您不一定能始終存取該組合項。如果物件僅用於繪圖,則使用 drawWithCache 可能會更有效率。
舉例來說,如果您建立 Brush 以繪製 Text 後方的漸層,請使用 drawWithCache 快取 Brush 物件,直到繪圖區域的大小改變:
Text( "Hello Compose!", modifier = Modifier .drawWithCache { val brush = Brush.linearGradient( listOf( Color(0xFF9E82F0), Color(0xFF42A5F5) ) ) onDrawBehind { drawRoundRect( brush, cornerRadius = CornerRadius(10.dp.toPx()) ) } } )

圖形修飾符
Modifier.graphicsLayer:將轉換套用至可組合函式
Modifier.graphicsLayer 是一個輔助鍵,將可組合項的繪圖內容繪製到繪圖圖層中。圖層提供幾項不同的函式,例如:
- 隔離繪圖操作說明 (類似
RenderNode)。作為圖層一部分擷取到的繪圖操作說明可由算繪管道有效地重新發出,而無需重新執行應用程式程式碼。 - 轉換會套用至圖層中包含的所有繪圖操作說明。
- 可組合功能的光柵化。當圖層光柵化時,系統會執行其繪圖操作說明,並將輸出內容擷取到螢幕外的緩衝區中。針對後續頁框的緩衝處理,組合此類緩衝區比執行個別操作說明更快,但在套用縮放或旋轉等轉換時,此行為將作為點陣圖。
變形
Modifier.graphicsLayer 提供其繪圖操作說明隔離,舉例來說,您可以使用 Modifier.graphicsLayer 套用各種轉換作業。這些作業可以是動畫或修改,而不需要重新執行繪圖 lambda。
Modifier.graphicsLayer 不會變更可組合元件的測量大小或位置,因為它只會影響繪製階段。也就是說,如果可組合項在版面配置邊界外繪製,可能會重疊其他元件。
下列轉換可使用此輔助鍵套用:
規模:增加大小
scaleX 和 scaleY 分別為水平或垂直方向放大或縮小內容。1.0f 值表示縮放沒有變化,0.5f 值代表尺寸的一半。
Image( painter = painterResource(id = R.drawable.sunset), contentDescription = "Sunset", modifier = Modifier .graphicsLayer { this.scaleX = 1.2f this.scaleY = 0.8f } )
翻譯
translationX 和 translationY 可以使用 graphicsLayer 變更,translationX 會將可組合項向左或向右移動。translationY 可組合項可向上或向下移動。
Image( painter = painterResource(id = R.drawable.sunset), contentDescription = "Sunset", modifier = Modifier .graphicsLayer { this.translationX = 100.dp.toPx() this.translationY = 10.dp.toPx() } )
旋轉
設定 rotationX 可水平旋轉,rotationY 可垂直旋轉,rotationZ 則設為在 Z 軸旋轉 (標準旋轉)。這個值以度數 (0-360) 為單位。
Image( painter = painterResource(id = R.drawable.sunset), contentDescription = "Sunset", modifier = Modifier .graphicsLayer { this.rotationX = 90f this.rotationY = 275f this.rotationZ = 180f } )
來源
您可以指定 transformOrigin,並使用這個來源做為轉換的發生點。到目前為止,所有範例都使用了位於 (0.5f, 0.5f) 的 TransformOrigin.Center。如果您在 (0f, 0f) 指定來源,則轉換會從可組合項的左上角開始。
如果使用 rotationZ 轉換變更來源,可看到項目會圍繞可組合項的左上角旋轉:
Image( painter = painterResource(id = R.drawable.sunset), contentDescription = "Sunset", modifier = Modifier .graphicsLayer { this.transformOrigin = TransformOrigin(0f, 0f) this.rotationX = 90f this.rotationY = 275f this.rotationZ = 180f } )
短片和形狀
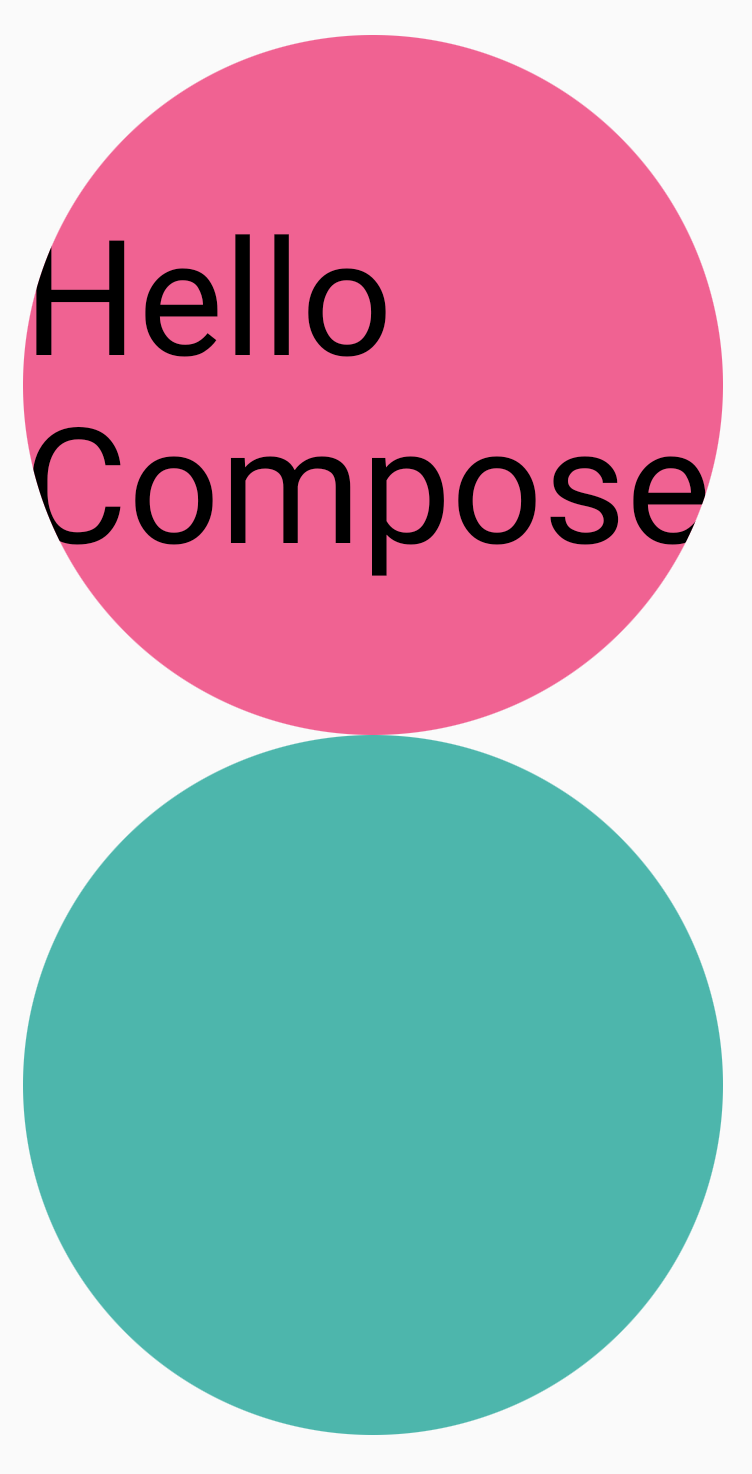
形狀會指定內容在 clip = true 時剪輯的外框。在這個範例中,我們設定了兩個方塊,其中有兩個不同的片段:一個使用 graphicsLayer 剪輯變數,另一個則使用便利的包裝函式 Modifier.clip。
Column(modifier = Modifier.padding(16.dp)) { Box( modifier = Modifier .size(200.dp) .graphicsLayer { clip = true shape = CircleShape } .background(Color(0xFFF06292)) ) { Text( "Hello Compose", style = TextStyle(color = Color.Black, fontSize = 46.sp), modifier = Modifier.align(Alignment.Center) ) } Box( modifier = Modifier .size(200.dp) .clip(CircleShape) .background(Color(0xFF4DB6AC)) ) }
第一個方塊的內容 (「Hello Compose」文字) 會裁剪成圓形形狀:
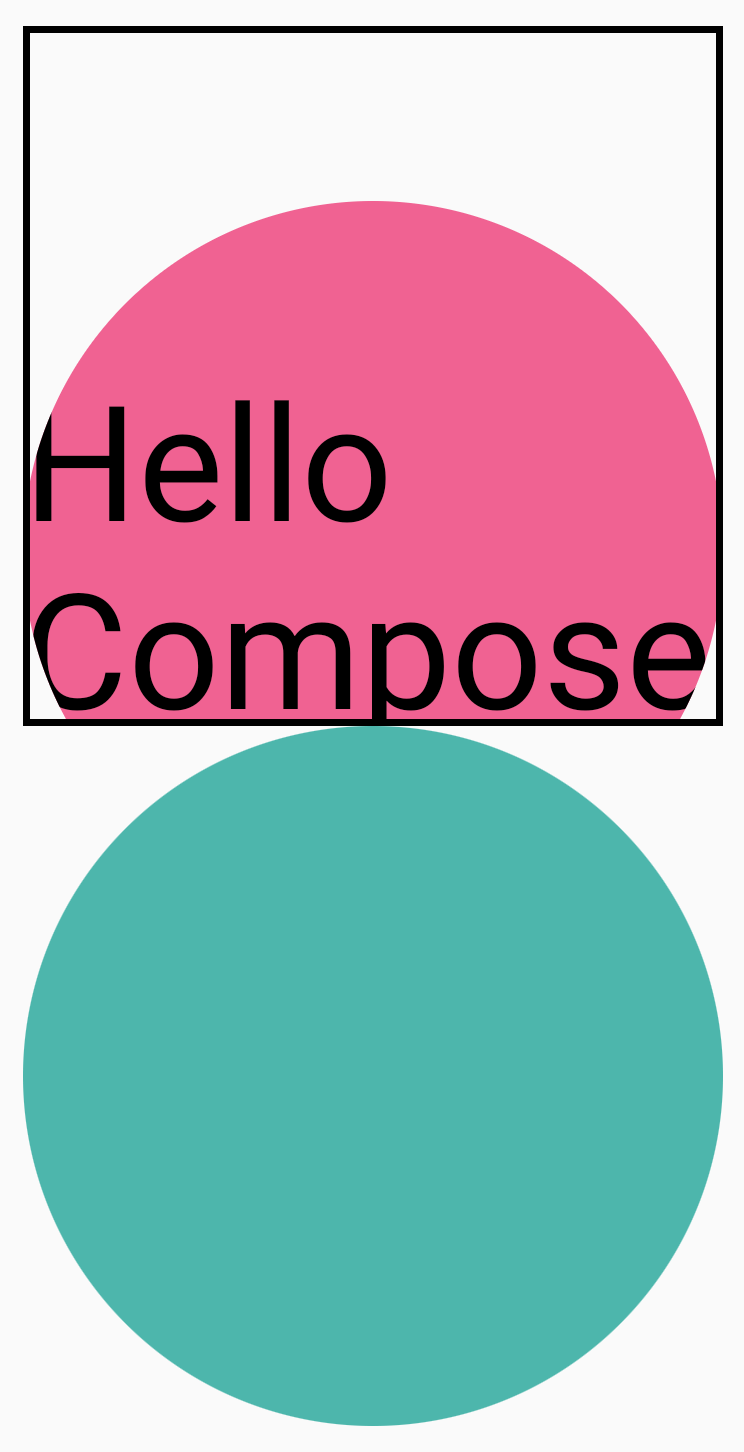
然後,如果將 translationY 套用至頂端粉紅色圓形,您會發現可組合項的邊界仍相同,但圓形會落在底圓形下方 (以及其邊界外)。
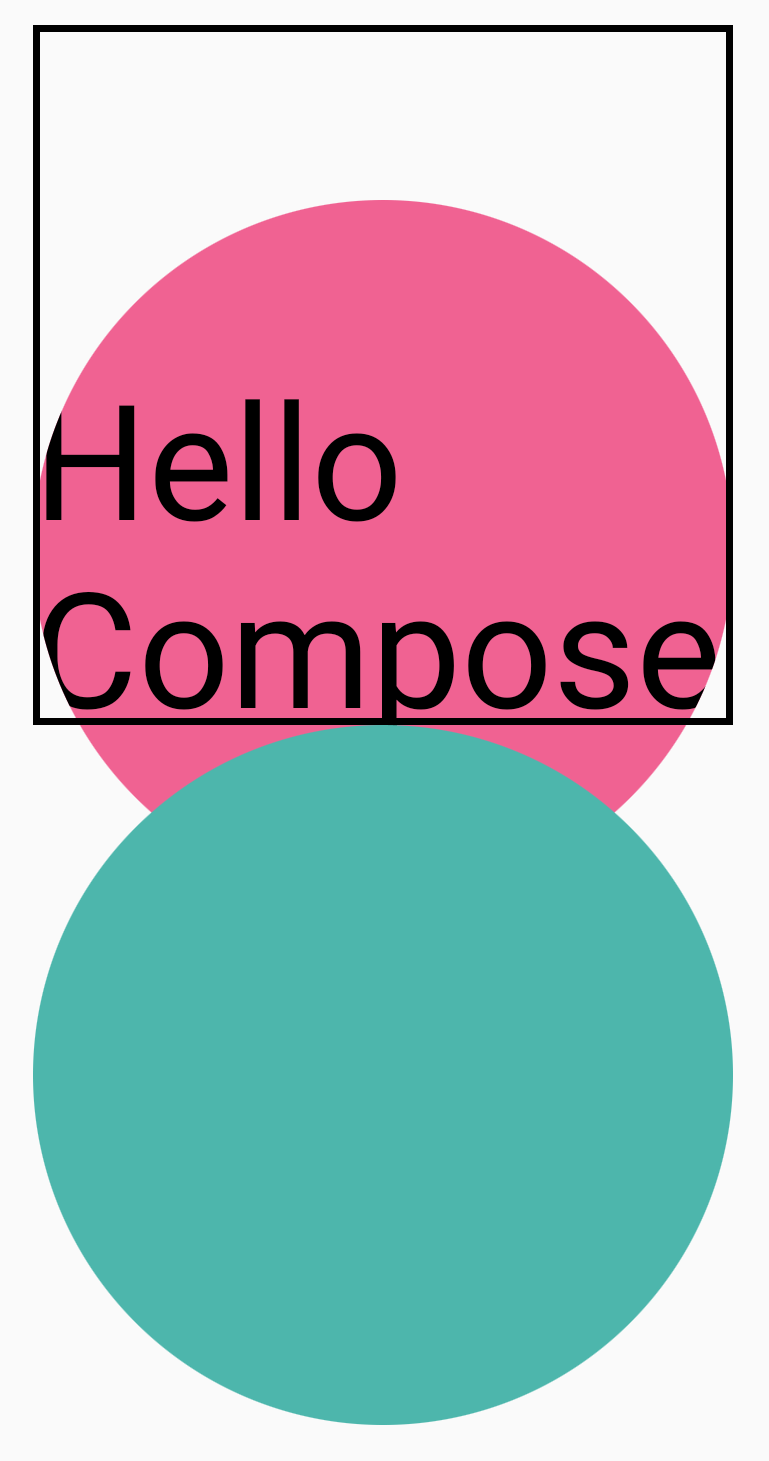
如要將可組合項剪輯至其繪製的區域,您可以在輔助鍵鏈結的開頭另外新增 Modifier.clip(RectangleShape)。然後,內容仍會保留在原始邊界內。
Column(modifier = Modifier.padding(16.dp)) { Box( modifier = Modifier .clip(RectangleShape) .size(200.dp) .border(2.dp, Color.Black) .graphicsLayer { clip = true shape = CircleShape translationY = 50.dp.toPx() } .background(Color(0xFFF06292)) ) { Text( "Hello Compose", style = TextStyle(color = Color.Black, fontSize = 46.sp), modifier = Modifier.align(Alignment.Center) ) } Box( modifier = Modifier .size(200.dp) .clip(RoundedCornerShape(500.dp)) .background(Color(0xFF4DB6AC)) ) }
Alpha 測試版
Modifier.graphicsLayer 可用來設定整個圖層的 alpha (透明度)。1.0f 完全不透明,0.0f 隱藏。
Image( painter = painterResource(id = R.drawable.sunset), contentDescription = "clock", modifier = Modifier .graphicsLayer { this.alpha = 0.5f } )
組合策略
使用 Alpha 值和透明度可能沒有像變更單一 Alpha 值來得簡單。除了變更 Alpha 以外,您也可以選擇在 graphicsLayer 上設定 CompositingStrategy。CompositingStrategy 用來確定可組合項內容如何與螢幕上已繪製的其他內容組合在一起。
這些不同策略包括:
自動 (預設)
撰寫策略取決於 graphicsLayer 參數的其餘部分。如果 Alpha 值低於 1.0f 或已設定 RenderEffect,它會將圖層算繪到螢幕外緩衝區。只要 Alpha 值小於 1f,系統就會自動建立合成層以算繪內容,然後將此螢幕外緩衝區繪製到對應的 Alpha。設定 RenderEffect 或過度捲動一律會將內容算繪到螢幕外緩衝區,不論 CompositingStrategy 設定為何。
螢幕外
在算繪至目的地之前,可組合項的內容一律以光柵化為螢幕外紋理或點陣圖。這適用於將 BlendMode 作業套用至遮蓋內容,以及算繪複雜的繪圖操作說明集時的效能。
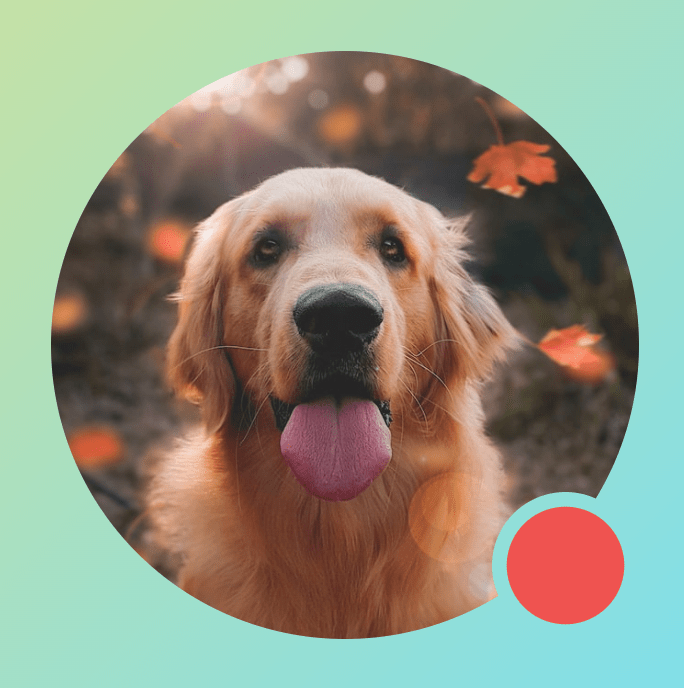
使用 CompositingStrategy.Offscreen 的範例為透過 BlendModes。查看下方範例,假設您想發出使用 BlendMode.Clear 的繪圖指令,以移除 Image 可組合項的部分內容。如果未將 compositingStrategy 設為 CompositingStrategy.Offscreen,BlendMode 會與其下方的所有內容互動。
Image( painter = painterResource(id = R.drawable.dog), contentDescription = "Dog", contentScale = ContentScale.Crop, modifier = Modifier .size(120.dp) .aspectRatio(1f) .background( Brush.linearGradient( listOf( Color(0xFFC5E1A5), Color(0xFF80DEEA) ) ) ) .padding(8.dp) .graphicsLayer { compositingStrategy = CompositingStrategy.Offscreen } .drawWithCache { val path = Path() path.addOval( Rect( topLeft = Offset.Zero, bottomRight = Offset(size.width, size.height) ) ) onDrawWithContent { clipPath(path) { // this draws the actual image - if you don't call drawContent, it wont // render anything this@onDrawWithContent.drawContent() } val dotSize = size.width / 8f // Clip a white border for the content drawCircle( Color.Black, radius = dotSize, center = Offset( x = size.width - dotSize, y = size.height - dotSize ), blendMode = BlendMode.Clear ) // draw the red circle indication drawCircle( Color(0xFFEF5350), radius = dotSize * 0.8f, center = Offset( x = size.width - dotSize, y = size.height - dotSize ) ) } } )
透過將 CompositingStrategy 設為 Offscreen,系統會建立執行指令所需的螢幕外紋理 (只是將 BlendMode 套用至這個可組合項的內容)。然後算繪已於螢幕上算繪的內容,不會影響已繪製的內容。
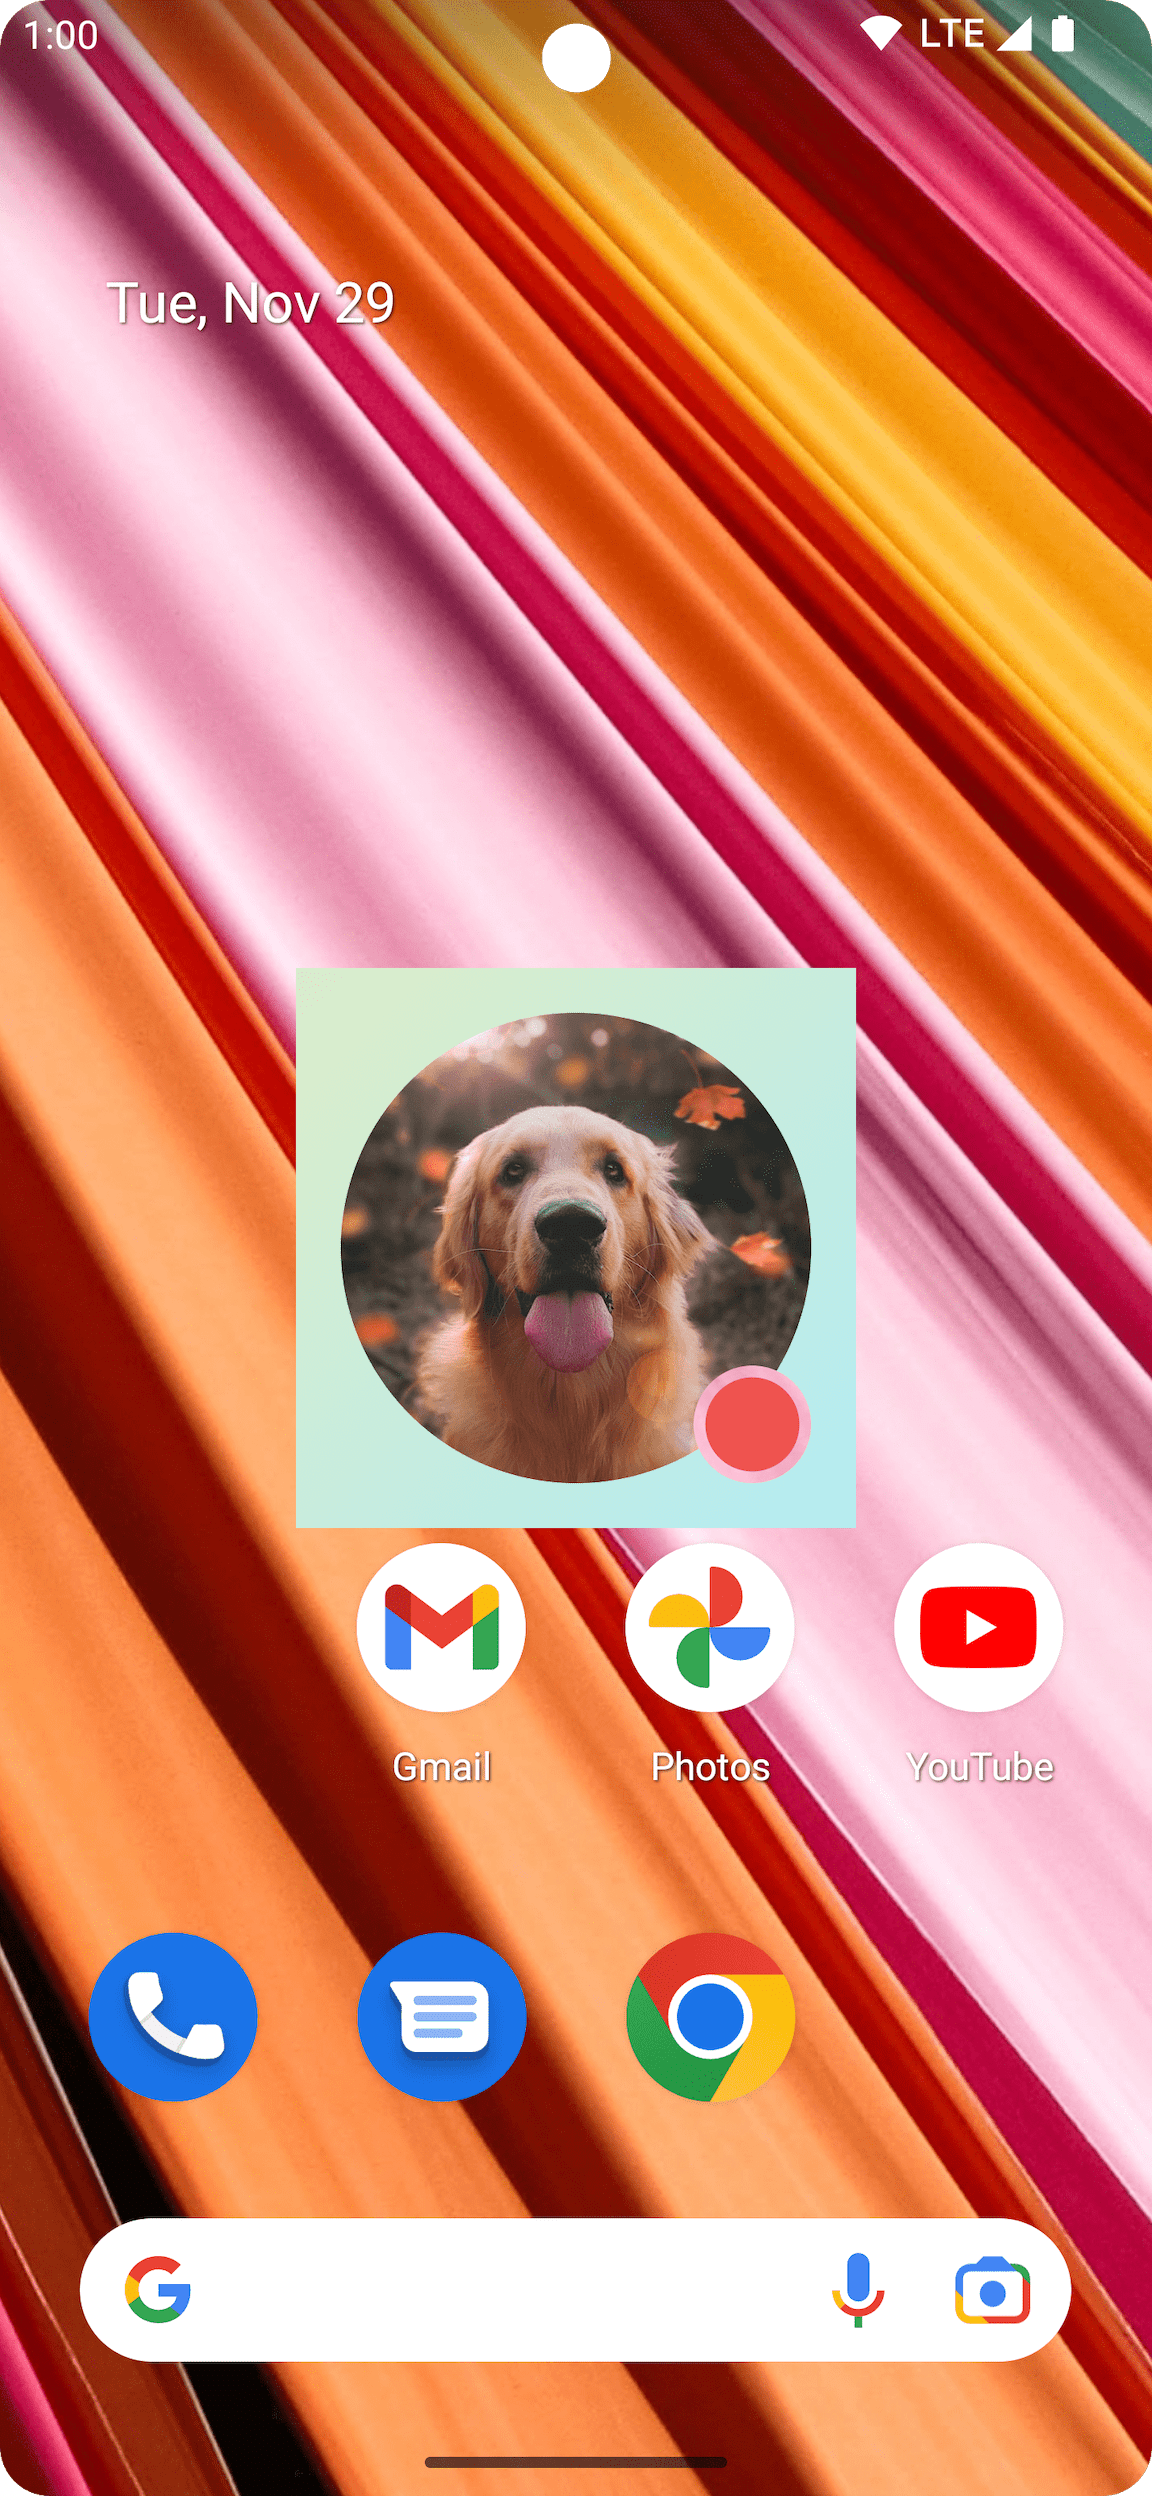
如果您並未使用 CompositingStrategy.Offscreen,則套用 BlendMode.Clear 的結果會清除目的地中的所有像素 (不論是否已設定),讓視窗的算繪緩衝區 (黑色) 變為可見。許多涉及 Alpha 的 BlendModes 在沒有螢幕外緩衝區的情況下無法正常運作。請注意紅色圓環周圍的黑色圓環:
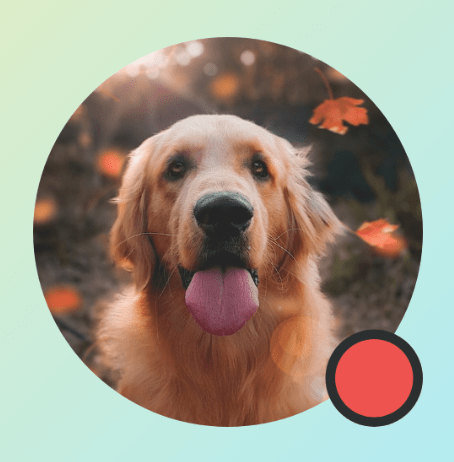
深入瞭解:如果應用程式使用半透明的視窗背景,而您沒有使用 CompositingStrategy.Offscreen,BlendMode 就會與整個應用程式互動。這會清除下方顯示的所有應用程式或桌布的像素,如以下範例所示:
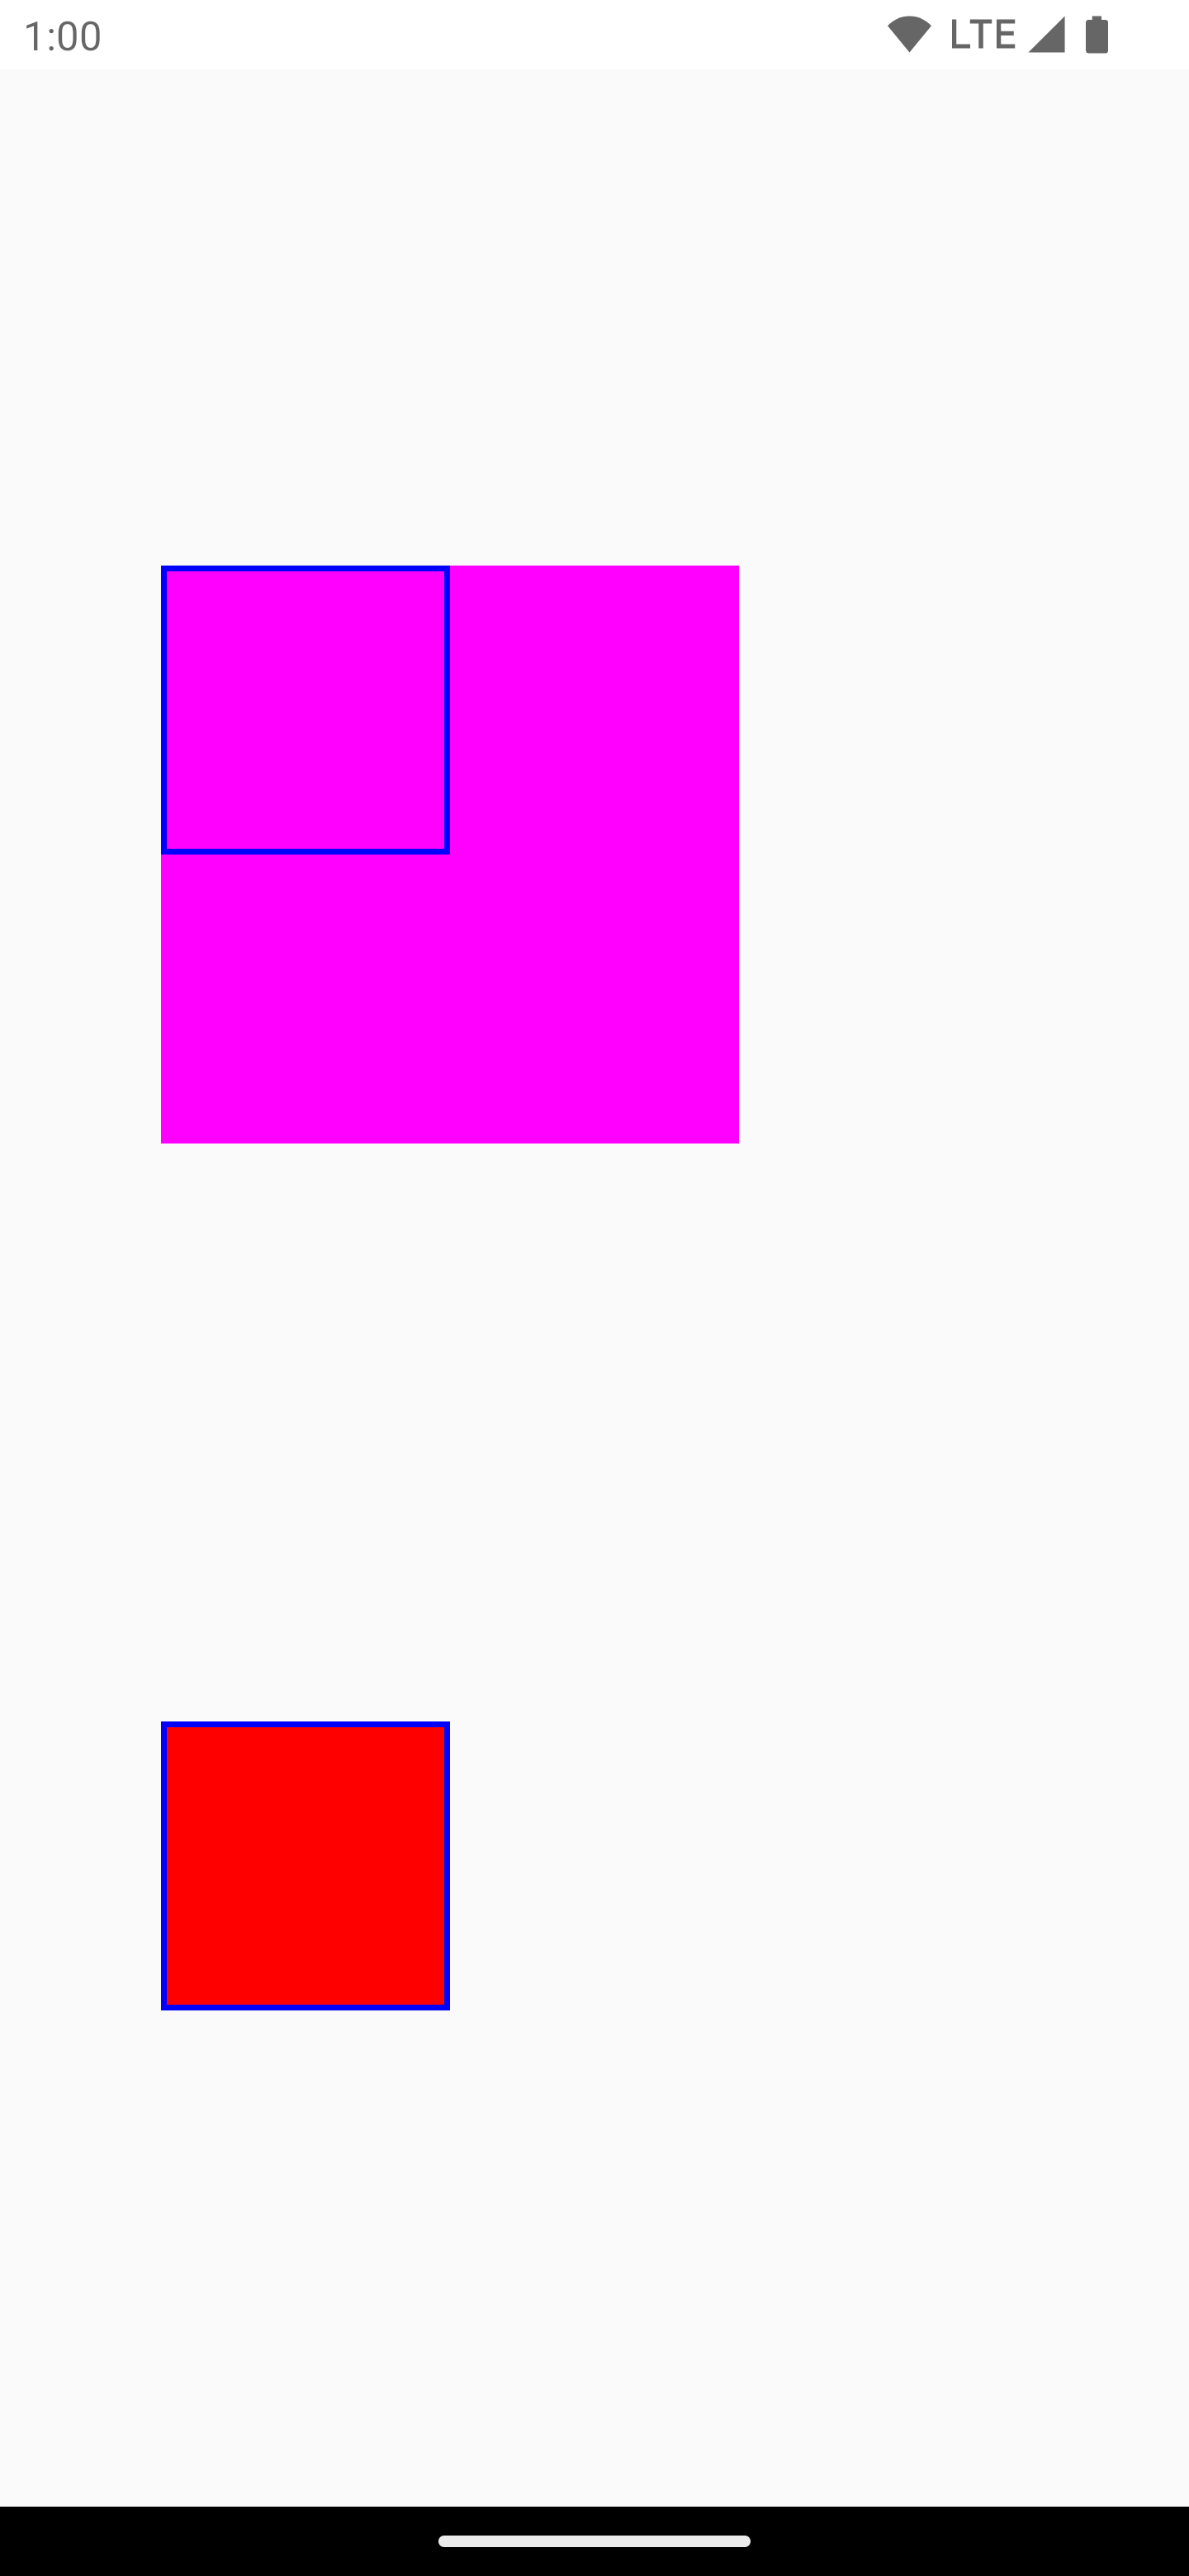
值得注意的是,使用 CompositingStrategy.Offscreen 時,系統會建立繪圖區域大小的螢幕外紋理,並將其算繪回螢幕上。根據預設,使用此策略完成的所有繪圖指令都會剪輯到這個地區。以下程式碼片段說明改用螢幕外紋理時的差異:
@Composable fun CompositingStrategyExamples() { Column( modifier = Modifier .fillMaxSize() .wrapContentSize(Alignment.Center) ) { // Does not clip content even with a graphics layer usage here. By default, graphicsLayer // does not allocate + rasterize content into a separate layer but instead is used // for isolation. That is draw invalidations made outside of this graphicsLayer will not // re-record the drawing instructions in this composable as they have not changed Canvas( modifier = Modifier .graphicsLayer() .size(100.dp) // Note size of 100 dp here .border(2.dp, color = Color.Blue) ) { // ... and drawing a size of 200 dp here outside the bounds drawRect(color = Color.Magenta, size = Size(200.dp.toPx(), 200.dp.toPx())) } Spacer(modifier = Modifier.size(300.dp)) /* Clips content as alpha usage here creates an offscreen buffer to rasterize content into first then draws to the original destination */ Canvas( modifier = Modifier // force to an offscreen buffer .graphicsLayer(compositingStrategy = CompositingStrategy.Offscreen) .size(100.dp) // Note size of 100 dp here .border(2.dp, color = Color.Blue) ) { /* ... and drawing a size of 200 dp. However, because of the CompositingStrategy.Offscreen usage above, the content gets clipped */ drawRect(color = Color.Red, size = Size(200.dp.toPx(), 200.dp.toPx())) } } }
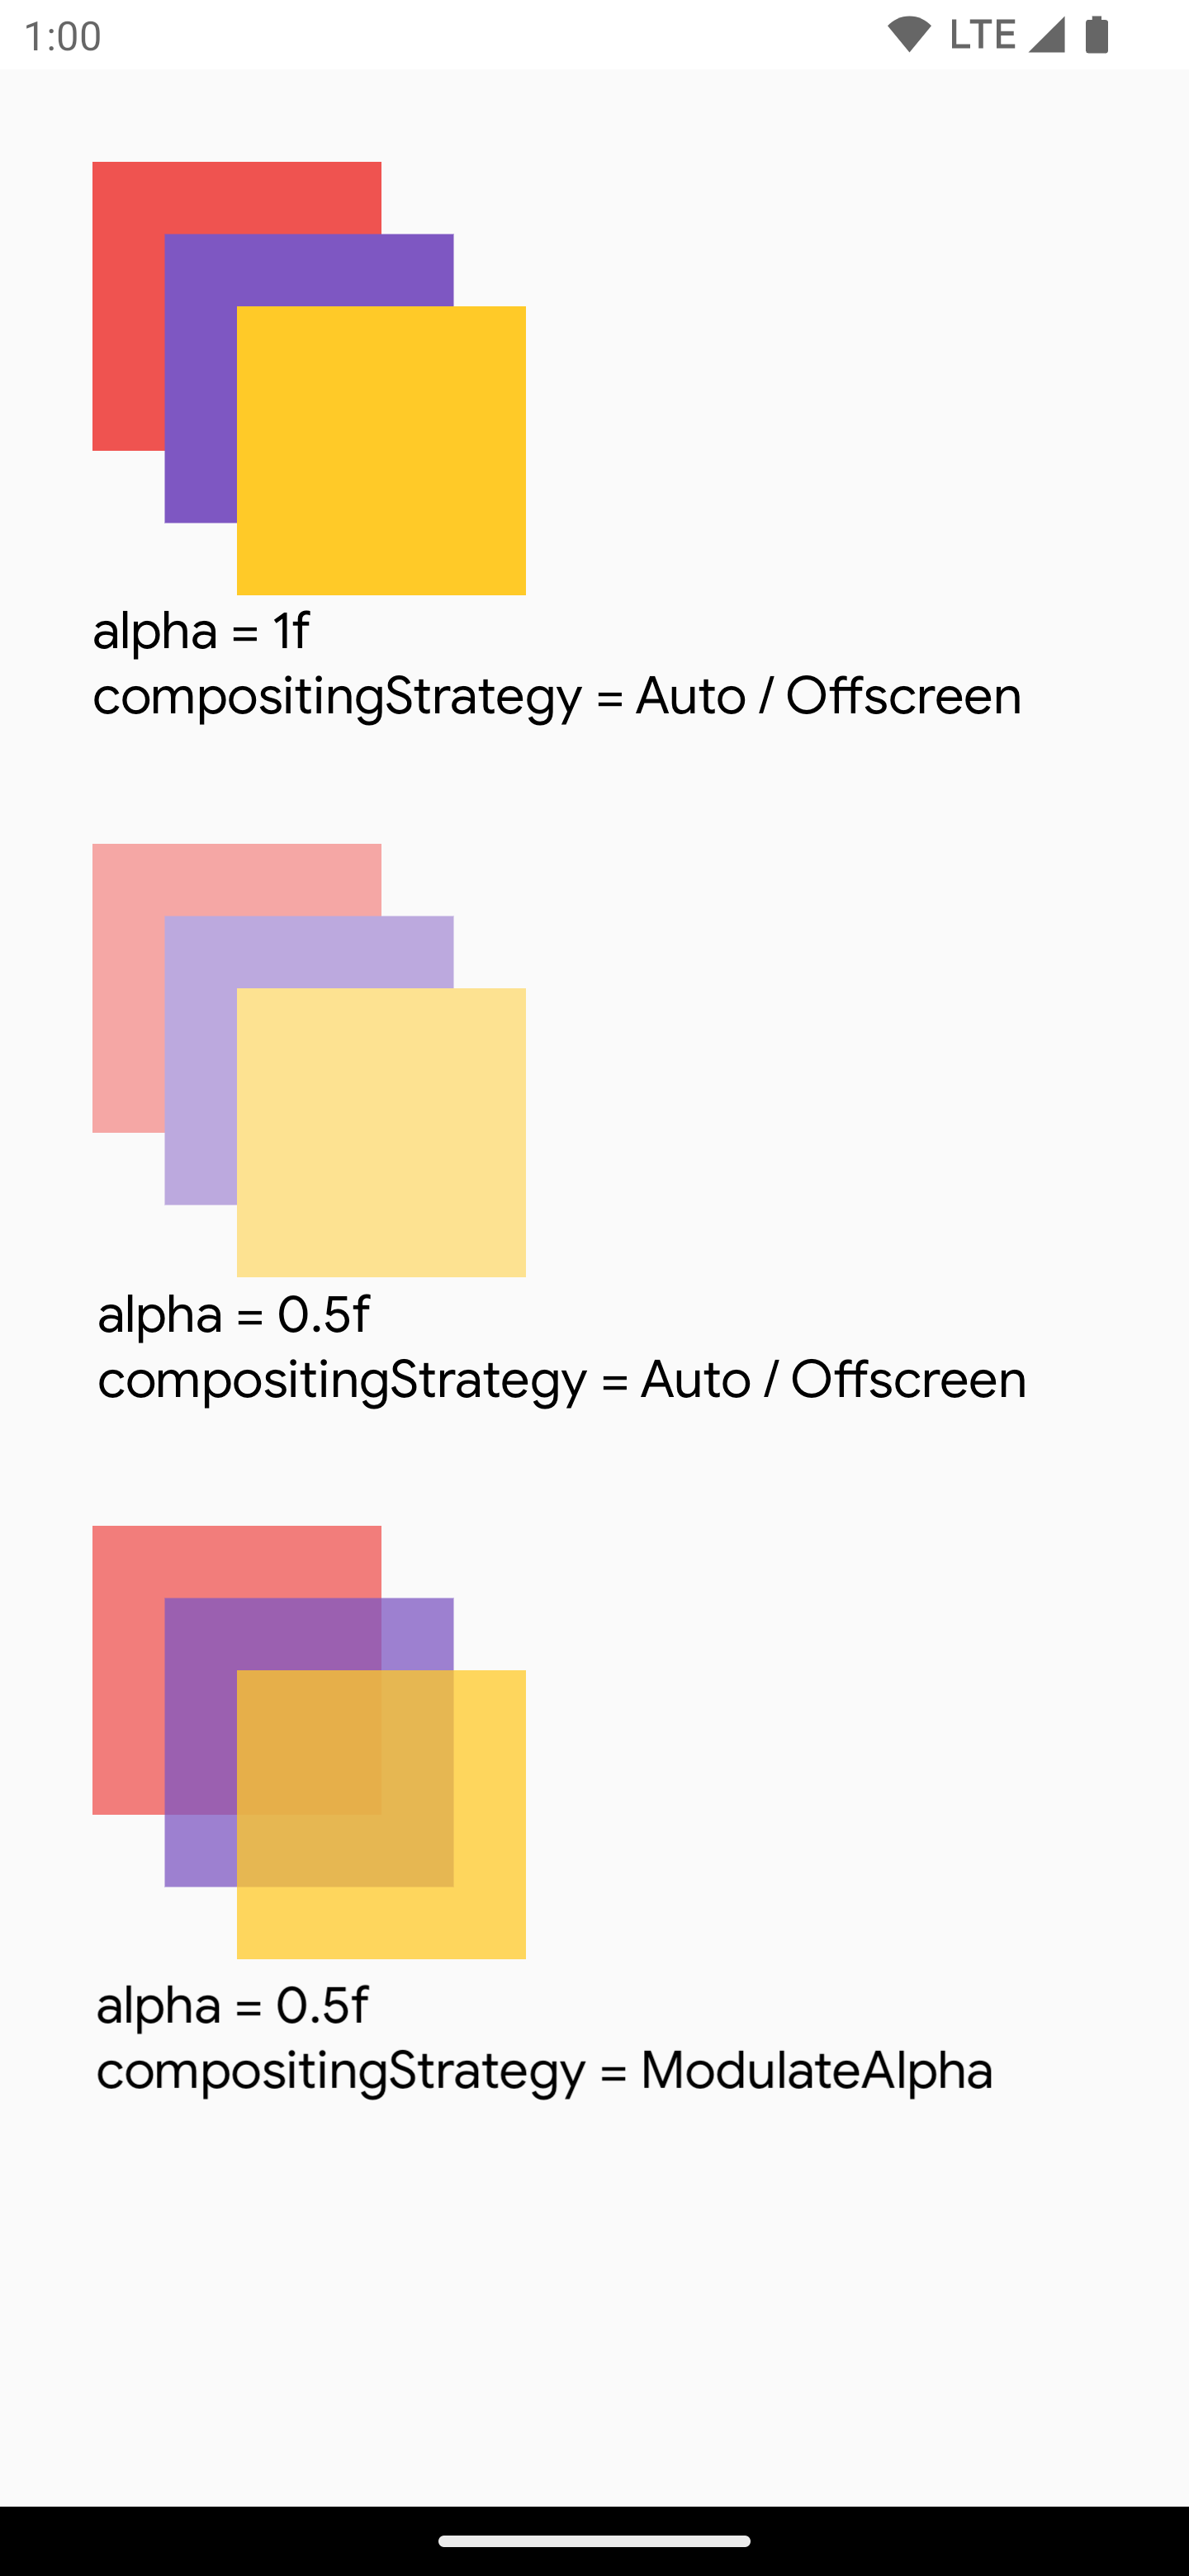
ModulateAlpha
此撰寫策略會針對 graphicsLayer 中記錄的每個繪圖操作說明修改 Alpha 版。除非設定了 RenderEffect,否則這項策略不會為低於 1.0f 的 Alpha 建立螢幕外緩衝區,以便提升 Alpha 算繪效率。但針對重疊內容提供不同的結果。對於事先知道內容不會重疊的使用情境,與 Alpha 值小於 1 的 CompositingStrategy.Auto 相比,此策略可提供更好的效能。
以下為不同組合策略的另一個範例:將不同的 Alpha 套用至可組合項的不同部分,然後套用 Modulate 策略:
@Preview @Composable fun CompositingStrategy_ModulateAlpha() { Column( modifier = Modifier .fillMaxSize() .padding(32.dp) ) { // Base drawing, no alpha applied Canvas( modifier = Modifier.size(200.dp) ) { drawSquares() } Spacer(modifier = Modifier.size(36.dp)) // Alpha 0.5f applied to whole composable Canvas( modifier = Modifier .size(200.dp) .graphicsLayer { alpha = 0.5f } ) { drawSquares() } Spacer(modifier = Modifier.size(36.dp)) // 0.75f alpha applied to each draw call when using ModulateAlpha Canvas( modifier = Modifier .size(200.dp) .graphicsLayer { compositingStrategy = CompositingStrategy.ModulateAlpha alpha = 0.75f } ) { drawSquares() } } } private fun DrawScope.drawSquares() { val size = Size(100.dp.toPx(), 100.dp.toPx()) drawRect(color = Red, size = size) drawRect( color = Purple, size = size, topLeft = Offset(size.width / 4f, size.height / 4f) ) drawRect( color = Yellow, size = size, topLeft = Offset(size.width / 4f * 2f, size.height / 4f * 2f) ) } val Purple = Color(0xFF7E57C2) val Yellow = Color(0xFFFFCA28) val Red = Color(0xFFEF5350)
將可組合函式的內容寫入點陣圖
常見用途是從可組合函式建立 Bitmap。如要將可組合函式的內容複製到 Bitmap,請使用 rememberGraphicsLayer() 建立 GraphicsLayer。
使用 drawWithContent() 和 graphicsLayer.record{} 將繪圖指令重新導向至新圖層。然後使用 drawLayer 在可見畫布中繪製圖層:
val coroutineScope = rememberCoroutineScope() val graphicsLayer = rememberGraphicsLayer() Box( modifier = Modifier .drawWithContent { // call record to capture the content in the graphics layer graphicsLayer.record { // draw the contents of the composable into the graphics layer this@drawWithContent.drawContent() } // draw the graphics layer on the visible canvas drawLayer(graphicsLayer) } .clickable { coroutineScope.launch { val bitmap = graphicsLayer.toImageBitmap() // do something with the newly acquired bitmap } } .background(Color.White) ) { Text("Hello Android", fontSize = 26.sp) }
您可以將點陣圖儲存到磁碟並分享。詳情請參閱完整範例程式碼片段。嘗試儲存到磁碟前,請務必檢查裝置權限。
自訂繪圖輔助鍵
如要建立自訂輔助鍵,請實作 DrawModifier 介面。這會讓您存取 ContentDrawScope,這與使用 Modifier.drawWithContent() 時公開的內容相同。接著,您可以將常見的繪圖作業擷取至自訂繪圖輔助鍵,以清理程式碼並提供方便的包裝函式。例如,Modifier.background() 是便利的 DrawModifier。
舉例來說,如果您想實作可垂直翻轉的 Modifier,您可以按照以下方式建立:
class FlippedModifier : DrawModifier { override fun ContentDrawScope.draw() { scale(1f, -1f) { this@draw.drawContent() } } } fun Modifier.flipped() = this.then(FlippedModifier())
然後在 Text 上套用這個翻轉輔助鍵:
Text( "Hello Compose!", modifier = Modifier .flipped() )
其他資源
如需更多使用 graphicsLayer 和自訂繪圖的範例,請參閱下列資源:
為您推薦
- 注意:系統會在 JavaScript 關閉時顯示連結文字
- Compose 中的圖形
- 自訂圖片 {:#customize-image}
- 適用於 Jetpack Compose 的 Kotlin