Android Studio is designed to make testing simple. It contains many features to simplify how you create, run, and analyze tests. You can set up tests that run on your local machine or instrumented tests that run on a device. You can easily run a single test or a specific group of tests on one or more devices. The test results are shown directly inside Android Studio.
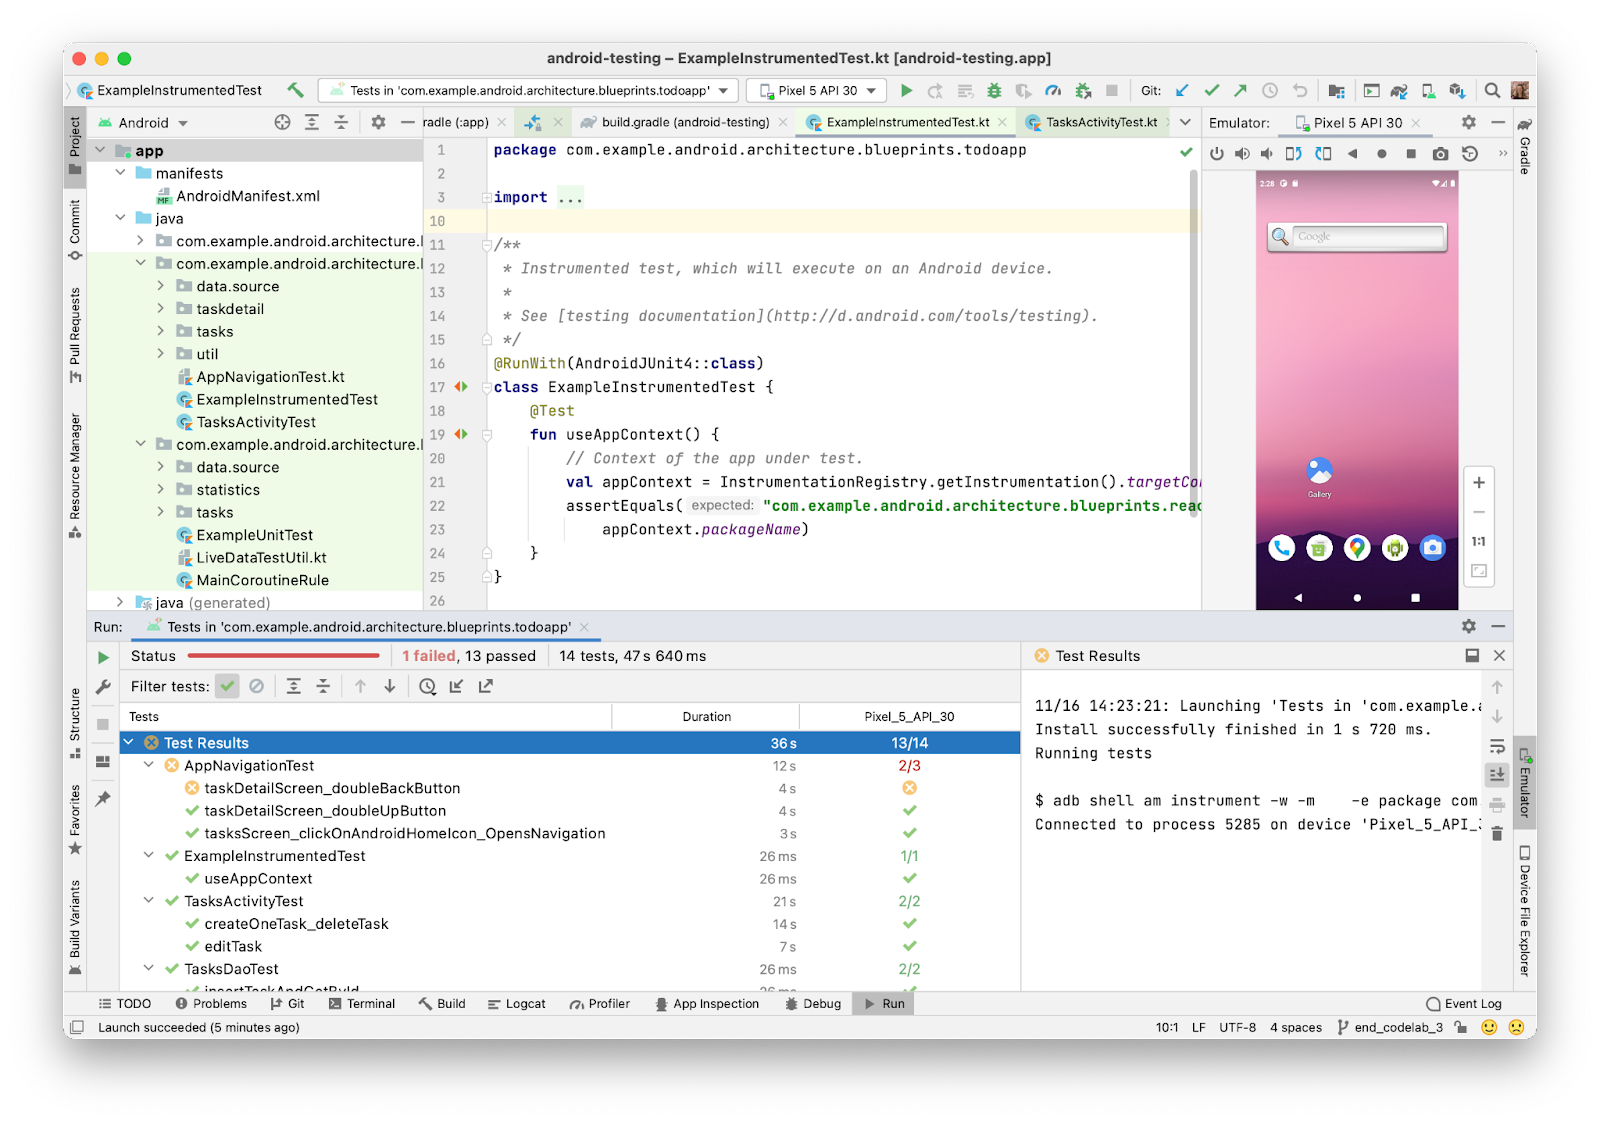
Figure 1. Android Studio showing test results overview.
This page is about how to manage tests in Android Studio. To learn how to write automated Android tests, see Test apps on Android.
Test types and locations
The location of your tests depends on the type of test you write. Android projects have default source code directories for local unit tests and instrumented tests.
Local unit tests are located at
module-name/src/test/java/. These are tests that
run on your machine's local Java Virtual Machine (JVM). Use these tests to
minimize execution time when your tests have no Android framework dependencies
or when you can create test doubles for the Android framework dependencies.
For more information on how to write local unit tests, see
Build local unit tests.
Instrumented tests are located at
$module-name/src/androidTest/java/.
These tests run on a hardware device or emulator. They have access to
Instrumentation APIs that give you
access to information, such as the Context
class, on the app you are testing, and let you control the app under test from your
test code. Instrumented tests are built into a separate APK, so they have their own
AndroidManifest.xml file. This file
is generated automatically, but you can create your own version at
$module-name/src/androidTest/AndroidManifest.xml,
which will be merged with the generated manifest. Use instrumented tests when
writing integration and functional UI tests to automate user interaction, or
when your tests have Android dependencies that you can’t create test doubles for.
For more information on how to write instrumented tests, see
Build instrumented tests
and Automate UI tests.
You can place your tests in build variant specific directories to test only
specific build variants. For example, you could place some local unit tests in
$module-name/src/testMyFlavor/java/ so the tests
target your app built with this flavor’s source code. For more information on
how to create these tailored tests, see
Create an instrumented test for a build variant.
When you create a new project or add an app module, Android Studio creates the test source sets listed earlier and includes an example test file in each. You can see them in the Project window as shown in figure 2.
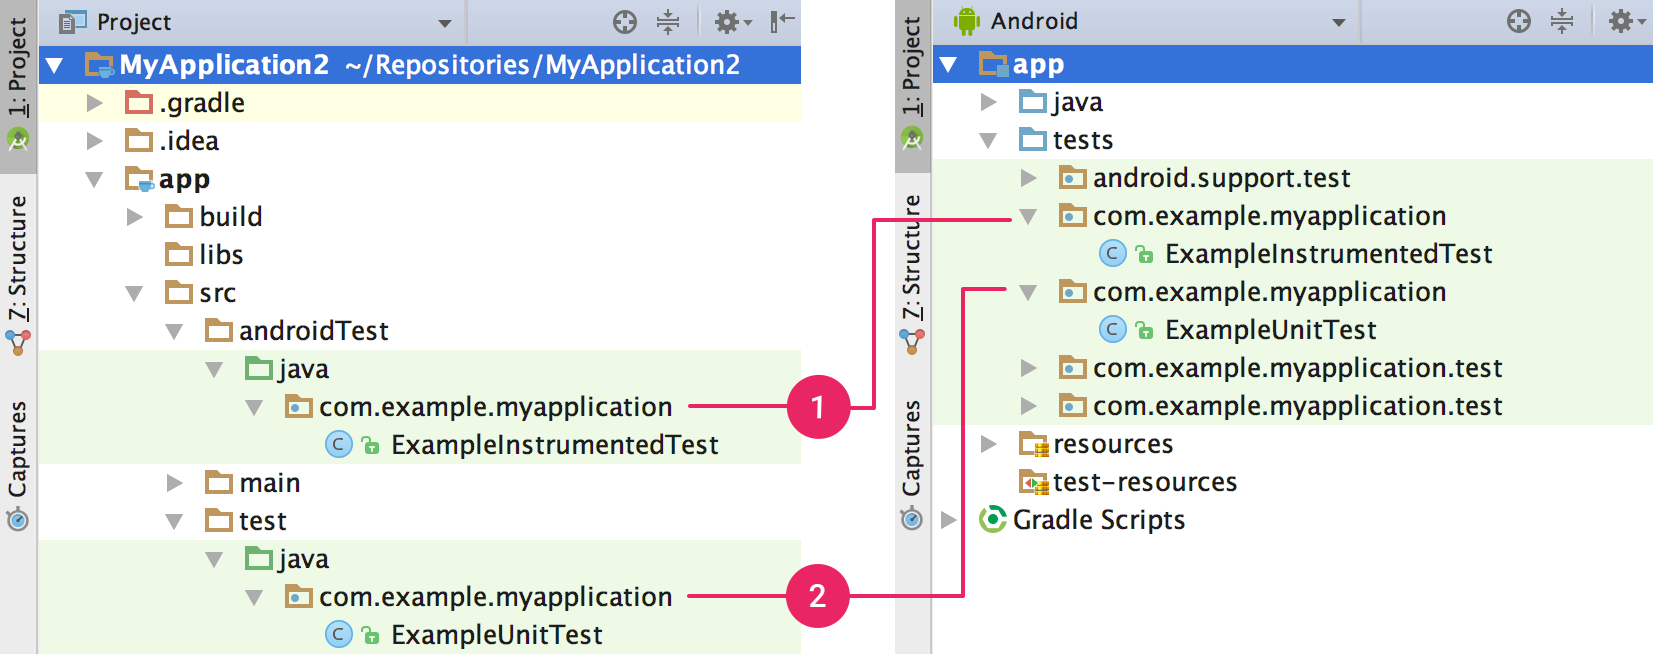
Figure 2. Your project's (1) instrumented tests and (2) local JVM tests are visible in either the Project view (left) or Android view (right).
Create new tests
You can add a new test for a specific class or method directly from its source code by following these steps:
- Open the source file that contains the code you want to test.
- Put your cursor in the name of the class or method you want to test, and press Control+Shift+T (Command+Shift+T on macOS).
- In the popup that appears, click Create New Test…
- In the Create Test dialog, choose JUnit4, edit the fields and methods you want to generate, and then click OK.
- In the Choose Destination Directory dialog, click the source set corresponding to the type of test you want to create: androidTest for an instrumented test or test for a local unit test. Then click OK.
Alternatively, you can create a generic test file in the appropriate test source set as follows:
- In the Project window on the left, click the drop-down menu and select the Android view.
- Right click on the java directory and select New > Java Class or New > Kotlin Class/File. Alternatively, you can select the java directory and use the Control+N (Command+N on macOS) shortcut.
- In the Choose Destination Directory dialog, click the source set corresponding to the type of test you want to create: androidTest for an instrumented test or test for a local unit test. Then click OK.
- Name the file and then click OK.
If your app doesn't compile after adding a test, make sure you have the right test library dependencies set up. See Build local tests and Build instrumented tests for the correct dependencies.
Run tests
Before running any tests, make sure your project is fully synchronized with
Gradle by clicking Sync Project
 in the toolbar. You can run tests with different levels of granularity:
To run all tests in a directory or file, open the Project window and do either of the following:
- Right-click on a directory or file and click Run
 .
. - Select the directory or file and use shortcut Control+Shift+R.
- Right-click on a directory or file and click Run
To run all tests in a class or a specific method, open the test file in the Code Editor and do either of the following:
- Press the Run test icon
 in the gutter.
 - Right-click on the test class or method and click Run
 .
. - Select the test class or method and use shortcut Control+Shift+R.
- Press the Run test icon
Your instrumented tests will run on a physical device or emulator. To learn more about setting up physical devices, see Run apps on a hardware device. To learn more about setting up emulators, see Run apps on the Android Emulator.
Configure the test run
By default, your tests run using Android Studio’s default run configuration. If you need to change some run settings such as the instrumentation runner and deployment options, you can edit the run configuration in the Run/Debug Configurations dialog (click Run > Edit Configurations).
Unified Gradle test runner
Android Gradle plugin 7.1.0 and Android Studio Bumblebee and higher use Gradle’s own implementation of the Android instrumented test runner to run instrumented tests. By using the same test runner, results are likely to be consistent whether you run using AGP from the command line, such as on a continuous integration server, or from Android Studio.
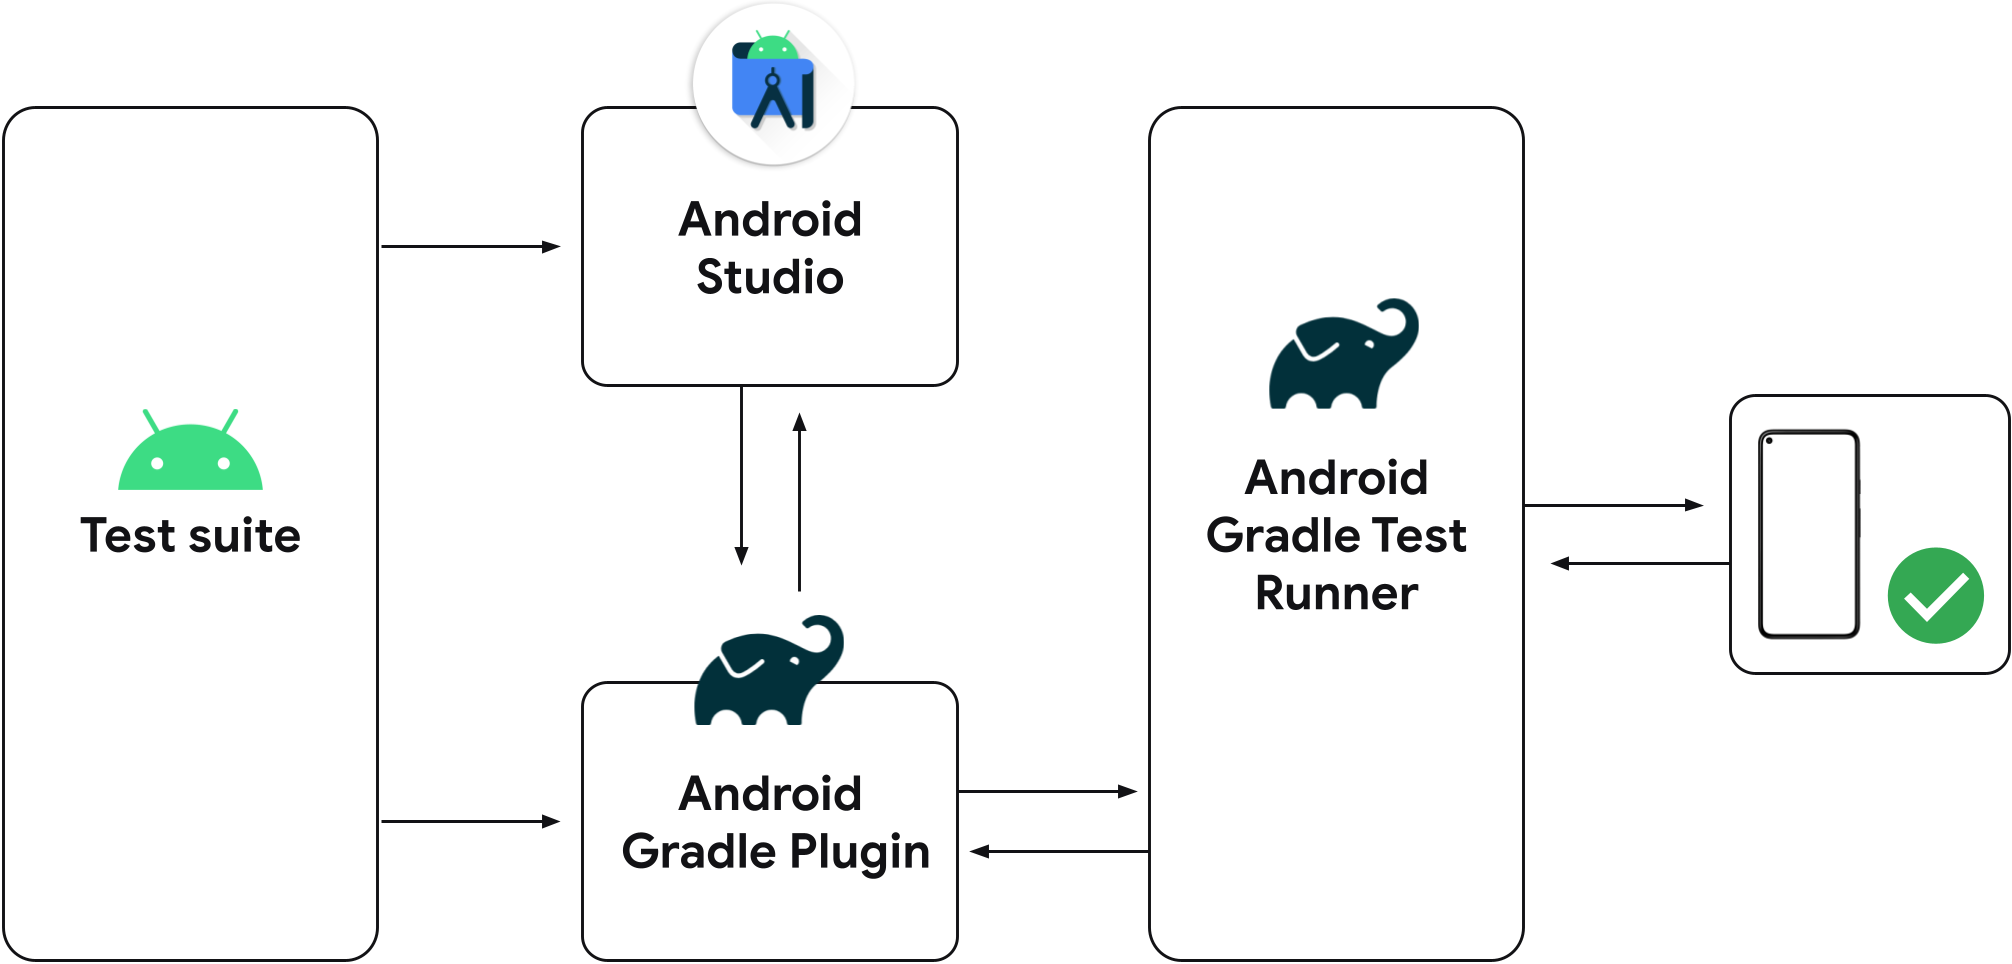
Figure 3. The Unified Gradle test runner.
Previous versions of Android Studio use the IntelliJ Android instrumented test runner instead of Gradle's Android instrumented test runner. So if you're not using the latest version of Android Studio, depending on whether you run your tests from Android Studio or from the command line using the Gradle plugin, you might see different test results, such as tests passing using one runner and failing on another.
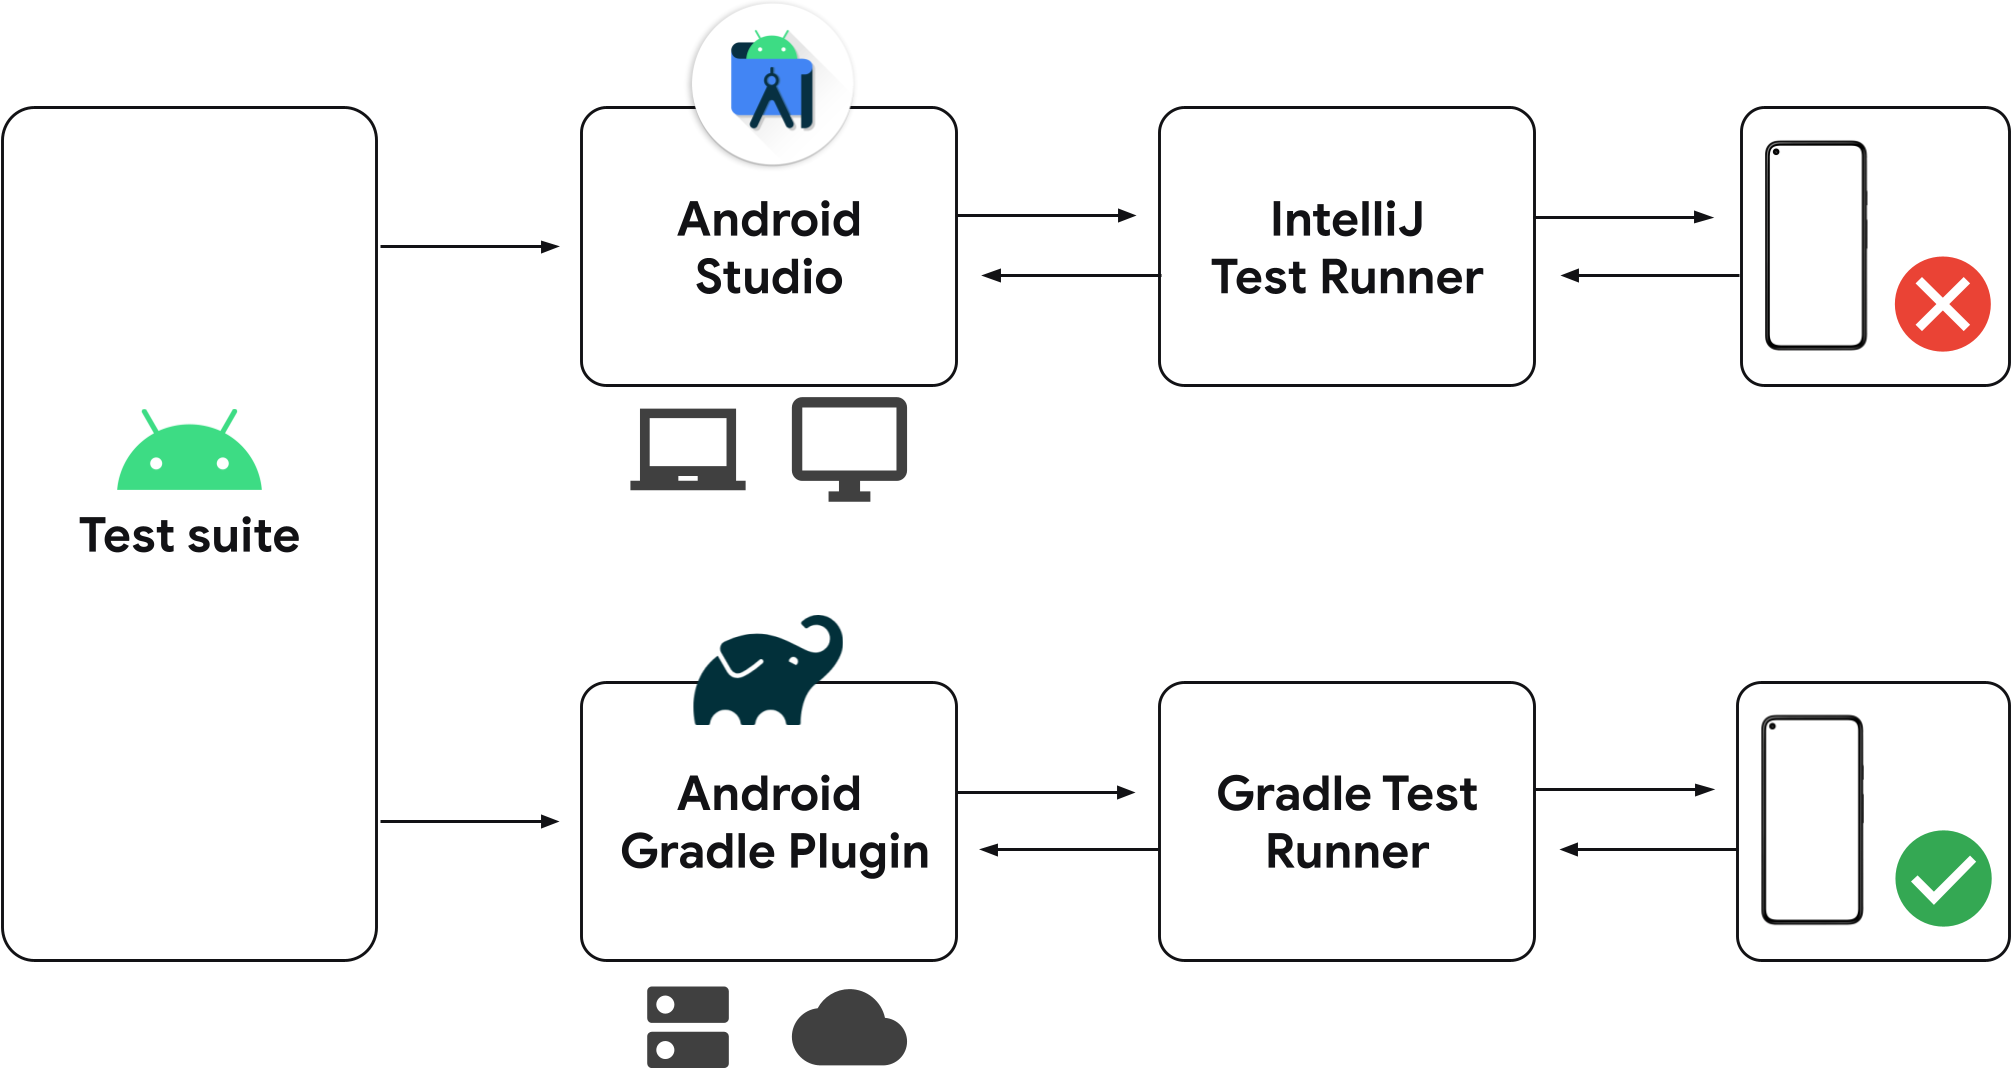
Figure 4. Discrete test runners in older versions of Android Studio.
If you already have instrumented test configurations saved to your project, they’ll use Gradle to run tests on your connected device. You can create a new instrumented test configuration using the gutter action next to your test class or method, as shown below.
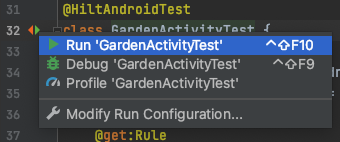
Figure 5. Run tests from gutter action.
When running your instrumented tests, you can confirm that Android Studio is using the Gradle test runner by inspecting the test output in the Test Matrix for Gradle task output.
Run across multiple devices in parallel
Instrumented tests by default run on one physical device or emulator. If you want to see how your tests behave on a larger set of devices, you can select more devices by following these steps:
Before running your tests, open the target device drop-down menu, and select Select Multiple Devices….
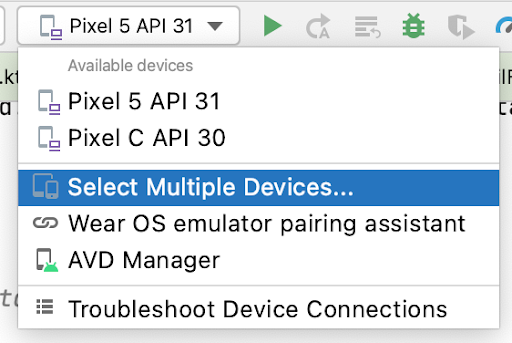
Figure 6. Select Multiple Devices drop-down menu.
Select the desired devices and click OK.
Make sure the text on the target drop-down menu is changed to Multiple Devices and click Run
 .
.The Test Matrix tool window shows the test results for each selected device configuration.
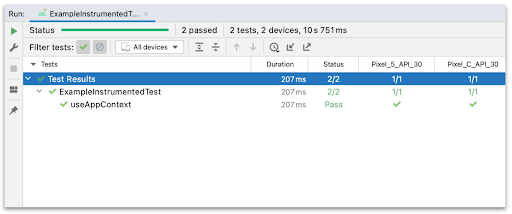
Figure 7. Test results in the Test Matrix tool window.
You can click on a specific test to inspect the result in the output pane. You can also sort the tests by clicking the various columns.
Run with Firebase Test Lab
Using Firebase Test Lab, you can simultaneously test your app on many popular Android devices and device configurations (different combinations of locale, orientation, screen size, and platform version). These tests run on physical and virtual devices in remote Google data centers. Test results provide test logs and include the details of any app failures.
To start using Firebase Test Lab, you need to do the following:
- Create a Google Account, if you don't have one already.
- In the Firebase console, click Create New Project.
Android Studio provides integrated tools that allow you to configure how you want to deploy your tests to Firebase Test Lab. After you have created a Firebase project, you can create a test configuration and run your tests:
- Click Run > Edit Configurations from the main menu.
- Click Add New Configuration
 and select Android Instrumented Tests.
 - Enter or select the details of your test, such as the test name, module type, test type, and test class.
- From the Target drop-down menu under Deployment Target Options, select Firebase Test Lab Device Matrix.
- If you are not logged in, click Sign in with Google and allow Android Studio to access your account.
- Next to Cloud Project, select your Firebase project from the list.
- Next to Matrix configuration, select one of the default configurations
from the drop-down or create your own by pressing
Open Dialog
 .
You can select one or more devices, Android versions, locales and screen
orientations that you want to test your app with. Firebase Test Lab will test
your app against every combination of your selections when generating test
results.
 - Click OK in the Run/Debug Configurations dialog to exit.
- Run your tests by clicking
Run
 .
.
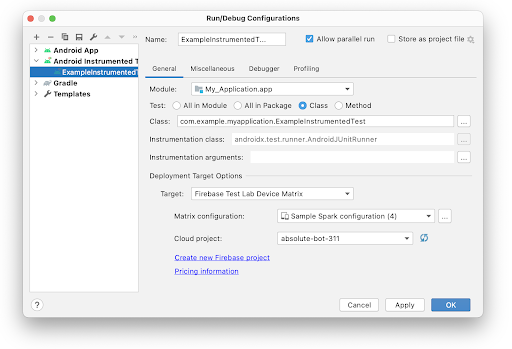
Figure 8. Creating a test configuration for Firebase Test Lab.
Analyze test results
When Firebase Test Lab completes running your tests, the Run window will
open to show the results, as shown in figure 9. You may need to click Show
Passed ![]() to see all your executed tests.
to see all your executed tests.
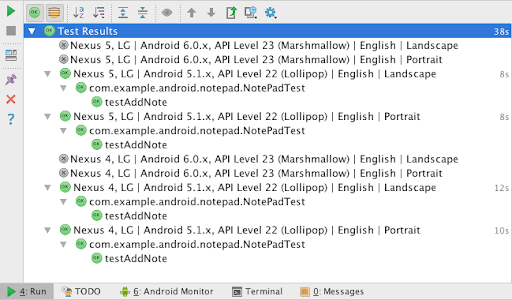
Figure 9. The results of instrumented tests using Firebase Test Lab.
You can also analyze your tests on the web by following the link displayed at the beginning of the test execution log in the Run window.
View test coverage
The test coverage tool is available for local unit tests to track the percentage and areas of your app code that your unit tests have covered. Use the test coverage tool to determine whether you have adequately tested the elements, classes, methods, and lines of code that make up your app.
To run tests with coverage, follow the same steps as described in
Run tests, only instead of clicking Run  , click Run
test-name with coverage
 ![]() . In the Project window, this option
might be hidden behind More Run/Debug. You can also configure the coverage
settings in the Run/Debug Configurations dialog, under the Code Coverage
tab.
. In the Project window, this option
might be hidden behind More Run/Debug. You can also configure the coverage
settings in the Run/Debug Configurations dialog, under the Code Coverage
tab.
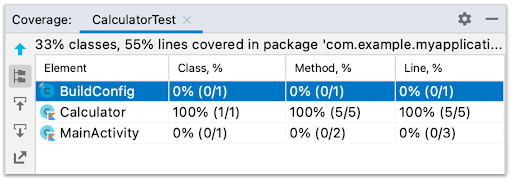
Figure 10. Code coverage percentages for an application.
View test results
When you run one or more tests from Android Studio, the results appear in the Run window. Figure 11 shows a successful test run.

Figure 11. Test results appear in the Run window.
The Run window displays the tests in a tree view on the left, and the results and messages for the current test suite in the output pane on the right. Use the toolbars, context menus, and status icons to manage the test results, as follows:
- Use the run toolbar to rerun the current test, stop the current test, rerun failed tests (not shown because it is available for unit tests only), pause output, and dump threads.
- Use the testing toolbar to filter and sort test results. You can also expand or collapse nodes, show test coverage, and import or export test results.
- Click the context menu to track the running test, show inline statistics, scroll to the stack trace, open the source code at an exception, auto scroll to the source, and select the first failed test when the test run completes.
- Test status icons indicate whether a test has an error, was ignored, failed, is in progress, has passed, is paused, was terminated, or was not run.
- Right-click a line in the tree view to display a context menu that lets you run the tests in debug mode, open the test source code file, or jump to the line in the source code being tested.
Analyze test failures
When one or more of your tests fails, the results window shows a warning sign and the number of failures (for example, "Tests failed: 1"):

Figure 12. Failed test details in the output pane.
When you click the failing test in the tree view on the left, the output pane on the right shows the details of that test. It shows the expected value next to the actual value, so you can compare them. The Click to see difference link opens a diff viewer where you can see the results side by side.
Learn more
This page covers the basic steps to follow when creating and running your first test using Android Studio. You can also choose to run tests from the command line. You can also check out the IntelliJ documentation on testing. For more information on how to configure your tests when creating a larger test suite, see Advanced test setup.
