相对布局
使用集合让一切井井有条
根据您的偏好保存内容并对其进行分类。
试用 Compose 方式
Jetpack Compose 是推荐在 Android 设备上使用的界面工具包。了解如何在 Compose 中使用布局。
<ph type="x-smartling-placeholder">
</ph>
Compose 中的 ConstraintLayout →
RelativeLayout
是一个以相对位置显示子视图的视图组。每个视图的位置可以指定为相对于同级元素的位置(例如,在另一个视图的左侧或下方)或相对于父级 RelativeLayout
区域的位置(例如在底部、左侧或中心对齐)。
注意:为获得更好的性能和工具支持,您应该改为使用 ConstraintLayout 构建布局。
RelativeLayout
是一个功能非常强大的界面设计实用工具,因为它可以消除嵌套视图组并使布局层次结构保持扁平化,从而提高性能。如果您发现自己使用了多个嵌套的 LinearLayout
组,只需用一个 RelativeLayout
就可以替换它们。
放置视图
RelativeLayout
可以指定子视图相对于父视图或彼此(通过 ID 指定)的位置。因此,您可以按照右边框对齐两个元素,或者使它们一上一下,屏幕居中,左侧居中,等等。默认情况下,所有子视图均绘制在布局的左上角,因此您必须使用 RelativeLayout.LayoutParams
中提供的各种布局属性定义每个视图的位置。
有很多布局属性可用于 RelativeLayout
中的视图,部分示例包括:
android:layout_alignParentTop
- 如果为
"true"
,会将此视图的上边缘与父视图的上边缘对齐。
android:layout_centerVertical
- 如果为
"true"
,会将此子级在父级内垂直居中。
android:layout_below
- 将此视图的上边缘放置在使用资源 ID 指定的视图下方。
android:layout_toRightOf
- 将此视图的左边缘放置在使用资源 ID 指定的视图右侧。
以上只是少数几个示例。所有布局属性都记录在 RelativeLayout.LayoutParams
。
每个布局属性的值要么是一个布尔值,用于启用相对于父级 RelativeLayout
的布局位置,要么是一个 ID,用于引用布局中作为视图放置依据的另一个视图。
在 XML 布局中,可以按照任何顺序声明对布局中其他视图的依赖关系。例如,即使“view2”是在层次结构中声明的最后一个视图,也可以声明“view1”位于“view2”之下。以下示例演示了这种情况。
示例
控制每个视图相对位置的每个属性都已突出显示。
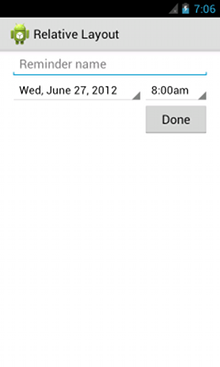
<?xml version="1.0" encoding="utf-8"?>
<RelativeLayout xmlns:android="http://schemas.android.com/apk/res/android"
android:layout_width="match_parent"
android:layout_height="match_parent"
android:paddingLeft="16dp"
android:paddingRight="16dp" >
<EditText
android:id="@+id/name"
android:layout_width="match_parent"
android:layout_height="wrap_content"
android:hint="@string/reminder" />
<Spinner
android:id="@+id/dates"
android:layout_width="0dp"
android:layout_height="wrap_content"
android:layout_below="@id/name"
android:layout_alignParentLeft="true"
android:layout_toLeftOf="@+id/times" />
<Spinner
android:id="@id/times"
android:layout_width="96dp"
android:layout_height="wrap_content"
android:layout_below="@id/name"
android:layout_alignParentRight="true" />
<Button
android:layout_width="96dp"
android:layout_height="wrap_content"
android:layout_below="@id/times"
android:layout_alignParentRight="true"
android:text="@string/done" />
</RelativeLayout>
如需详细了解可用于 RelativeLayout
的每个子视图的所有布局属性,请参阅 RelativeLayout.LayoutParams
。
本页面上的内容和代码示例受内容许可部分所述许可的限制。Java 和 OpenJDK 是 Oracle 和/或其关联公司的注册商标。
最后更新时间 (UTC):2025-07-27。
[null,null,["最后更新时间 (UTC):2025-07-27。"],[],[],null,["# Relative Layout\n\nTry the Compose way \nJetpack Compose is the recommended UI toolkit for Android. Learn how to work with layouts in Compose. \n[ConstraintLayout in Compose →](/jetpack/compose/layouts/constraintlayout) \n\n[RelativeLayout](/reference/android/widget/RelativeLayout) is a view group that displays child views in relative\npositions. The position of each view can be specified as relative to sibling elements (such as to\nthe left-of or below another view) or in positions relative to the parent [RelativeLayout](/reference/android/widget/RelativeLayout) area (such as aligned to the bottom, left or center).\n\n**Note:**\nFor better performance and tooling support, you should instead [build your layout with ConstraintLayout](/training/constraint-layout).\n\nA [RelativeLayout](/reference/android/widget/RelativeLayout) is a very powerful utility for designing a user interface\nbecause it can eliminate nested view groups and keep your layout hierarchy flat, which improves\nperformance. If you find yourself using several nested [LinearLayout](/reference/android/widget/LinearLayout) groups,\nyou may be able to replace them with a single [RelativeLayout](/reference/android/widget/RelativeLayout).\n\nPositioning Views\n-----------------\n\n[RelativeLayout](/reference/android/widget/RelativeLayout) lets child views specify their position relative to the\nparent view or to each other (specified by ID). So you can align two elements by right border, or\nmake one below another, centered in the screen, centered left, and so on. By default, all child\nviews are drawn at the top-left of the layout, so you must define the position of each view\nusing the various layout properties available from [RelativeLayout.LayoutParams](/reference/android/widget/RelativeLayout.LayoutParams).\n\nSome of the many layout properties available to views in a [RelativeLayout](/reference/android/widget/RelativeLayout)\ninclude:\n\n[`android:layout_alignParentTop`](/reference/android/widget/RelativeLayout.LayoutParams#attr_android:layout_alignParentTop)\n: If `\"true\"`, makes the top edge of this view match the top edge of the parent.\n\n[`android:layout_centerVertical`](/reference/android/widget/RelativeLayout.LayoutParams#attr_android:layout_centerVertical)\n: If `\"true\"`, centers this child vertically within its parent.\n\n[`android:layout_below`](/reference/android/widget/RelativeLayout.LayoutParams#attr_android:layout_below)\n: Positions the top edge of this view below the view specified with a resource ID.\n\n[`android:layout_toRightOf`](/reference/android/widget/RelativeLayout.LayoutParams#attr_android:layout_toRightOf)\n: Positions the left edge of this view to the right of the view specified with a resource ID.\n\nThese are just a few examples. All layout attributes are documented at [RelativeLayout.LayoutParams](/reference/android/widget/RelativeLayout.LayoutParams).\n\nThe value for each layout property is either a boolean to\nenable a layout position relative to the parent [RelativeLayout](/reference/android/widget/RelativeLayout) or an ID that\nreferences another view in the layout against which the view should be positioned.\n\nIn your XML layout, dependencies against other views in the layout can be declared in any order.\nFor example, you can declare that \"view1\" be positioned below \"view2\" even if \"view2\" is the last\nview declared in the hierarchy. The example below demonstrates such a scenario.\n\nExample\n-------\n\nEach of the attributes that control the relative position of each view are emphasized. \n\n```xml\n\u003c?xml version=\"1.0\" encoding=\"utf-8\"?\u003e\n\u003cRelativeLayout xmlns:android=\"http://schemas.android.com/apk/res/android\"\n android:layout_width=\"match_parent\"\n android:layout_height=\"match_parent\"\n android:paddingLeft=\"16dp\"\n android:paddingRight=\"16dp\" \u003e\n \u003cEditText\n android:id=\"@+id/name\"\n android:layout_width=\"match_parent\"\n android:layout_height=\"wrap_content\"\n android:hint=\"@string/reminder\" /\u003e\n \u003cSpinner\n android:id=\"@+id/dates\"\n android:layout_width=\"0dp\"\n android:layout_height=\"wrap_content\"\n android:layout_below=\"@id/name\"\n android:layout_alignParentLeft=\"true\"\n android:layout_toLeftOf=\"@+id/times\" /\u003e\n \u003cSpinner\n android:id=\"@id/times\"\n android:layout_width=\"96dp\"\n android:layout_height=\"wrap_content\"\n android:layout_below=\"@id/name\"\n android:layout_alignParentRight=\"true\" /\u003e\n \u003cButton\n android:layout_width=\"96dp\"\n android:layout_height=\"wrap_content\"\n android:layout_below=\"@id/times\"\n android:layout_alignParentRight=\"true\"\n android:text=\"@string/done\" /\u003e\n\u003c/RelativeLayout\u003e\n```\n\nFor details about all the layout attributes available to each child view of a [RelativeLayout](/reference/android/widget/RelativeLayout), see [RelativeLayout.LayoutParams](/reference/android/widget/RelativeLayout.LayoutParams)."]]