将字体添加为 XML 资源
使用集合让一切井井有条
根据您的偏好保存内容并对其进行分类。
试试 Compose 方式
Jetpack Compose 是推荐用于 Android 的界面工具包。了解如何在 Compose 中使用文本。
Android 8.0(API 级别 26)引入了 XML 中的字体,此功能允许您将字体用作资源。您可以在 res/font/
文件夹中添加 font
文件,将字体捆绑为资源。这些字体是在您的 R
文件中编译的,可直接在 Android Studio 中使用。您可以使用 font
资源类型访问字体资源。例如,要访问字体资源,请使用 @font/myfont
或 R.font.myfont
。
要在搭载 Android 4.1(API 级别 16)及更高版本的设备上使用 XML 功能中的字体,请使用支持库 26.0。如需详细了解如何使用支持库,请参阅使用支持库部分。
如需将字体添加为资源,请在 Android Studio 中执行以下步骤:
- 右键点击 res 文件夹,然后转到 New > Android resource directory。此时将显示 New Resource Directory 窗口。
- 在“Resource type”列表中,选择“font”,然后点击 OK。
注意:资源目录的名称必须为 font。
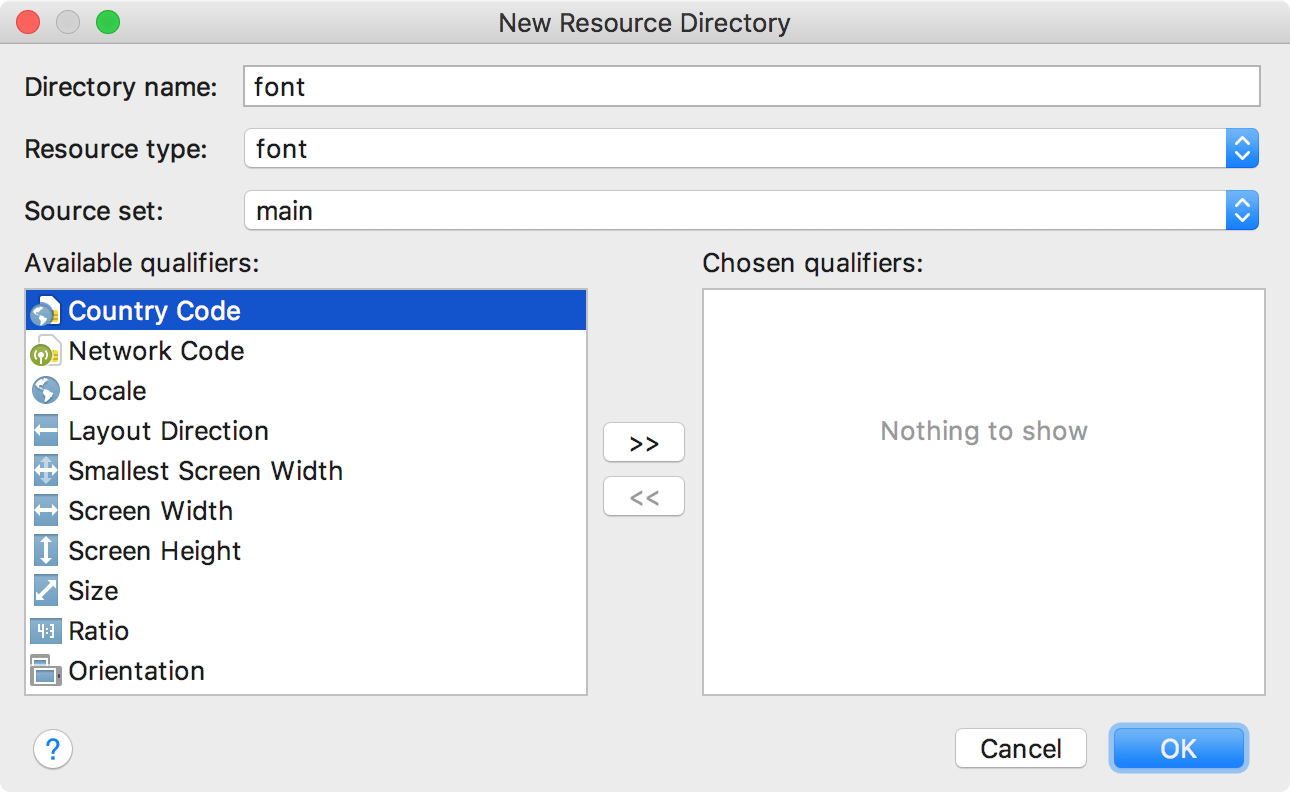
图 1. 添加字体资源目录。
- 在
font
文件夹中添加字体文件。
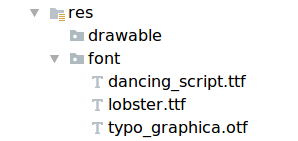
以下文件夹结构生成了 R.font.dancing_script
、R.font.lobster
和 R.font.typo_graphica
。
图 2. 在 res/font
目录中添加字体文件。
- 双击字体文件可在编辑器中预览文件的字体。
图 3.
预览字体文件。
创建字体系列
字体系列是一组字体文件及其样式和字体粗细详情。
在 Android 中,您可以创建新的字体系列作为 XML 资源,并将其作为单个单元使用,而不是将每个样式和字体粗细作为单独的资源引用。这样,系统就可以根据您使用的文本样式选择正确的字体。
如需创建字体系列,请在 Android Studio 中执行以下步骤:
- 右键点击
font
文件夹,然后依次选择 New > Font resource file。此时将显示“New Resource File”窗口。
- 输入文件名,然后点击 OK。新的字体资源 XML 会在编辑器中打开。
- 将各个字体文件、样式和粗细属性都封装在
<font>
元素中。以下 XML 演示了如何在字体资源 XML 中添加与字体相关的属性:
<?xml version="1.0" encoding="utf-8"?>
<font-family xmlns:android="http://schemas.android.com/apk/res/android">
<font
android:fontStyle="normal"
android:fontWeight="400"
android:font="@font/lobster_regular" />
<font
android:fontStyle="italic"
android:fontWeight="400"
android:font="@font/lobster_italic" />
</font-family>
在 XML 布局中使用字体
您可以使用 fontFamily
属性在 TextView
对象或样式中使用单个字体文件形式的字体或某个字体系列中的字体。
注意:如果您使用字体系列,TextView
会根据需要自行切换,以使用该系列中的字体文件。
向 TextView 添加字体
如需为 TextView
设置字体,请执行以下操作之一:
- 在布局 XML 文件中,将
fontFamily
属性设置为您要访问的字体文件。
<TextView
android:layout_width="wrap_content"
android:layout_height="wrap_content"
android:fontFamily="@font/lobster"/>
- 打开 Properties 窗口,为
TextView
设置字体。
- 选择一个视图以打开 Properties 窗口。
注意:Properties 窗口仅在设计编辑器打开时可用。选择窗口底部的 Design 标签。
- 展开 textAppearance 属性,然后从“fontFamily”列表中选择字体。
-
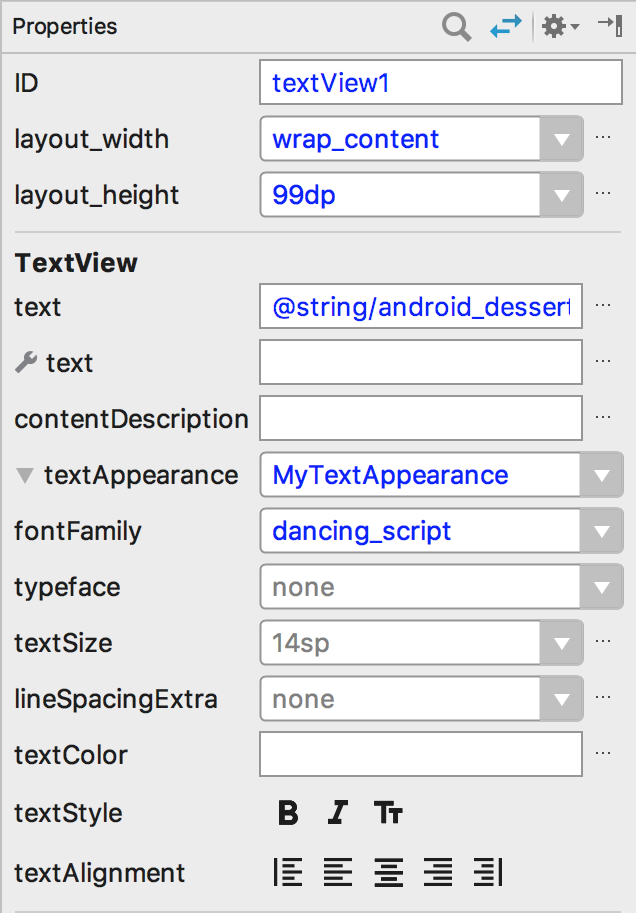
图 4.
从 Properties 窗口中选择字体。
借助 Android Studio 布局预览(如图 5 最右侧的窗格所示),您可以预览 TextView
中的字体集。
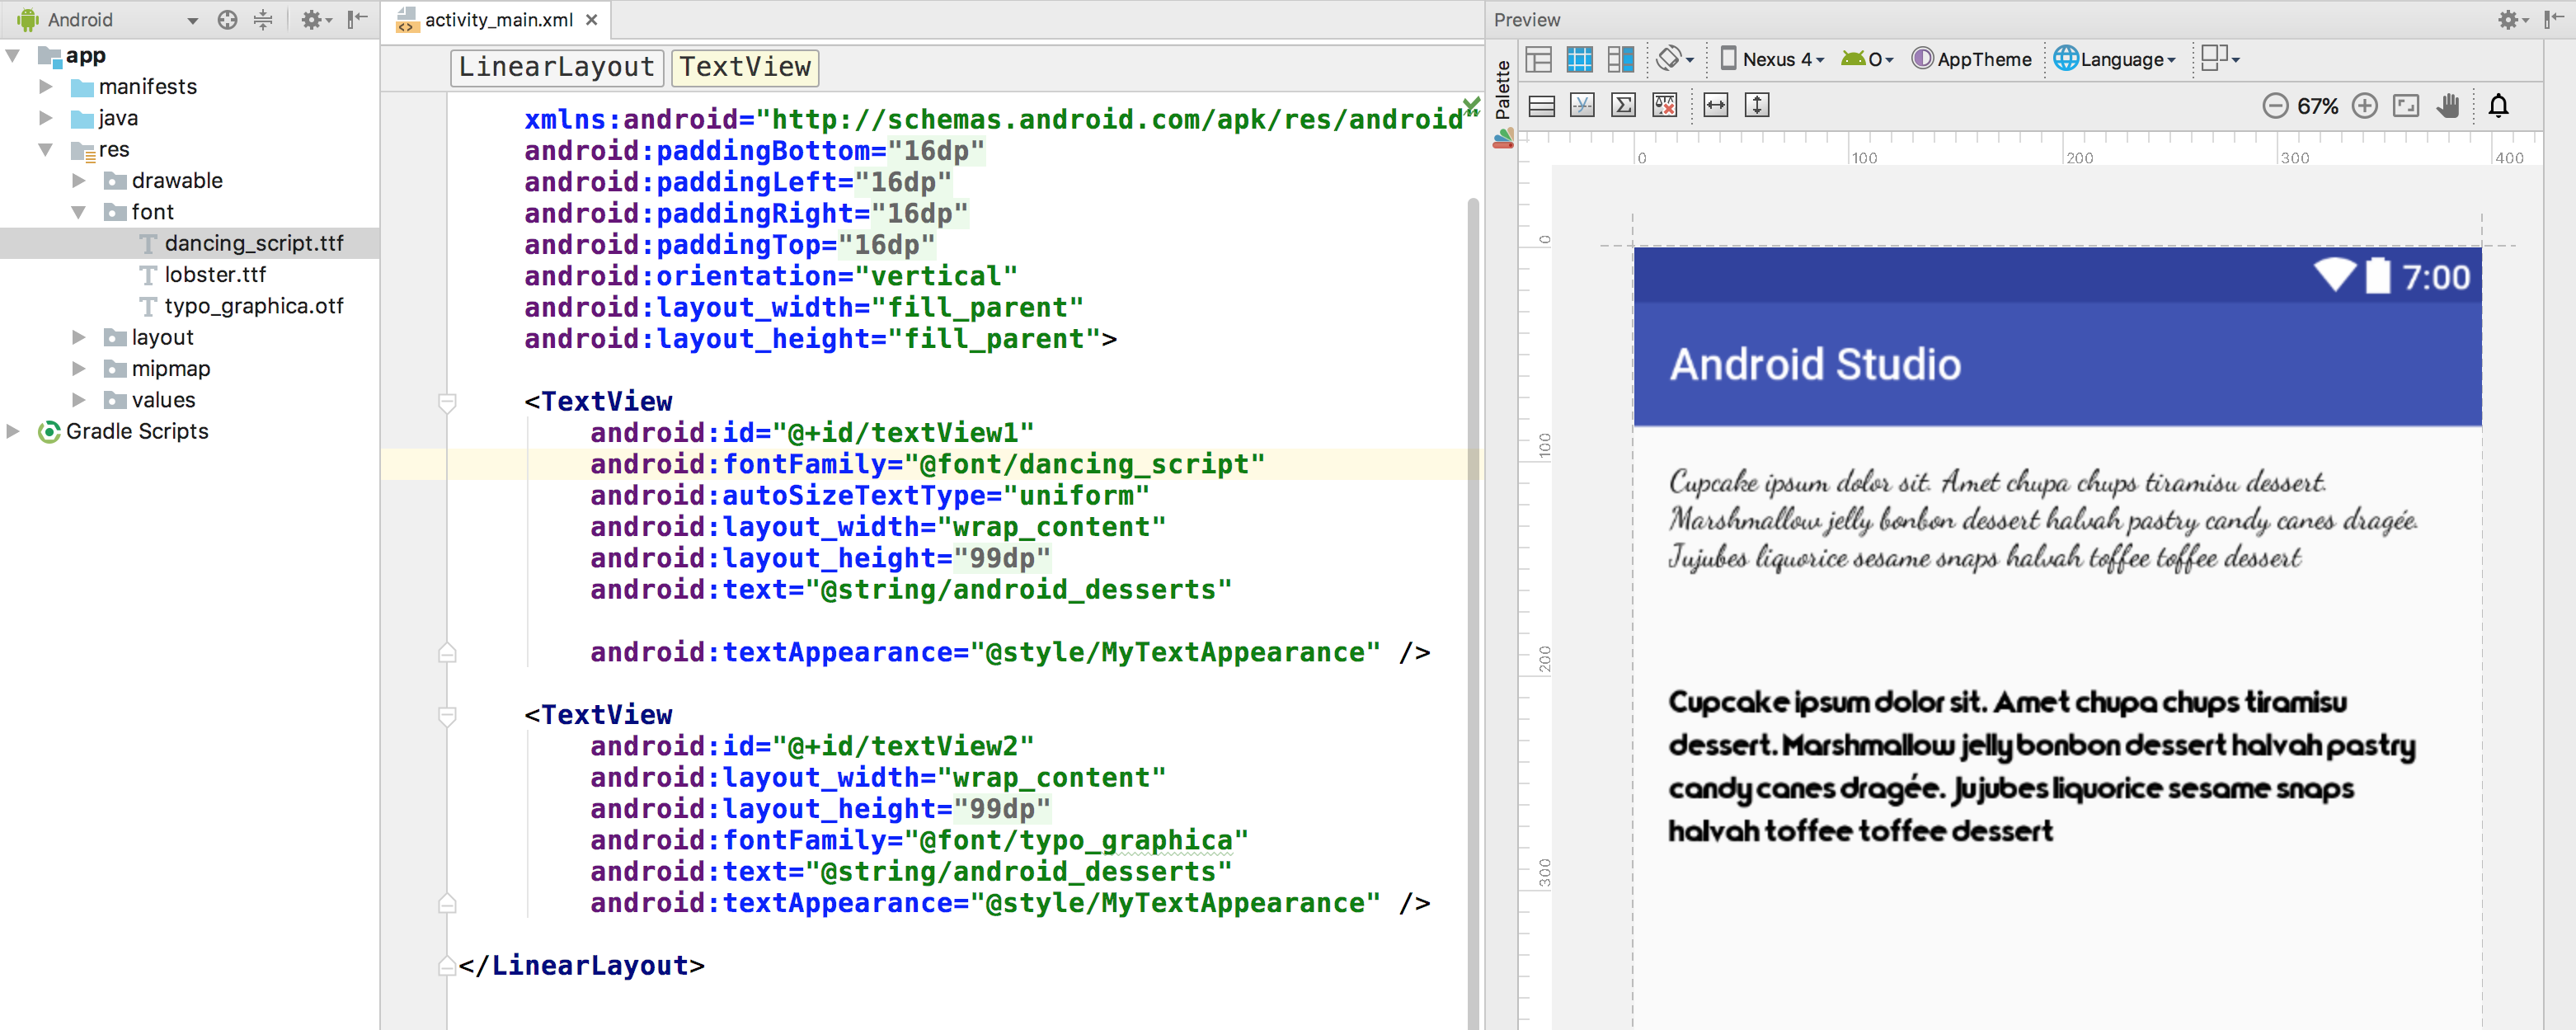
图 5.
在布局预览中预览字体。
向样式添加字体
打开 styles.xml
文件,并将 fontFamily
属性设置为您要访问的字体文件。
<style name="customfontstyle" parent="@android:style/TextAppearance.Small">
<item name="android:fontFamily">@font/lobster</item>
</style>
以编程方式使用字体
要以程序化方式检索字体,请调用 getFont(int)
方法,并提供要检索的字体的资源标识符。此方法会返回一个 Typeface
对象。虽然系统会根据字体信息选择最适合您的样式,但您可以使用 setTypeface(android.graphics.Typeface, int)
方法设置具有特定样式的字体。
注意:TextView
会为您执行此操作。
Kotlin
val typeface = resources.getFont(R.font.myfont)
textView.typeface = typeface
Java
Typeface typeface = getResources().getFont(R.font.myfont);
textView.setTypeface(typeface);
使用支持内容库
支持库 26.0 支持在搭载 Android 4.1(API 级别 16)及更高版本的设备上采用 XML 字体。
注意:当您通过支持库在 XML 布局中声明字体系列时,请使用 app 命名空间,以确保系统能够顺利加载字体。
<?xml version="1.0" encoding="utf-8"?>
<font-family xmlns:app="http://schemas.android.com/apk/res-auto">
<font app:fontStyle="normal" app:fontWeight="400" app:font="@font/myfont-Regular"/>
<font app:fontStyle="italic" app:fontWeight="400" app:font="@font/myfont-Italic" />
</font-family>
要以编程方式检索字体,请调用 ResourceCompat.getFont(Context, int)
方法,并提供 Context
的实例和资源标识符。
Kotlin
val typeface = ResourcesCompat.getFont(context, R.font.myfont)
Java
Typeface typeface = ResourcesCompat.getFont(context, R.font.myfont);
本页面上的内容和代码示例受内容许可部分所述许可的限制。Java 和 OpenJDK 是 Oracle 和/或其关联公司的注册商标。
最后更新时间 (UTC):2025-07-26。
[null,null,["最后更新时间 (UTC):2025-07-26。"],[],[],null,["# Add a font as an XML resource\n\nTry the Compose way \nJetpack Compose is the recommended UI toolkit for Android. Learn how to use text in Compose. \n[Set font →](/develop/ui/compose/text/fonts#set-font) \n\n\nAndroid 8.0 (API level 26) introduces fonts in XML, a feature that\nlets you use fonts as resources. You can add the `font` file in\nthe `res/font/` folder to bundle fonts as resources. These fonts\nare compiled in your `R` file and are automatically available in\nAndroid Studio. You can access the font resources using the `font` resource type. For\nexample, to access a font resource,\nuse `@font/myfont`, or `R.font.myfont`.\n\n\nTo use the fonts in XML feature on devices running Android 4.1\n(API level 16) and higher, use Support Library 26.0. For more information\non using the Support Library, refer to the\n[Use the Support Library](#using-support-lib) section.\n\n\nTo add fonts as resources, perform the following steps in Android\nStudio:\n\n\n1. Right-click the **res** folder and go to **New \\\u003e Android resource directory** . The **New Resource Directory** window appears.\n2. In the **Resource type** list, select **font** , then click **OK** .\n\n **Note** : The name of the resource directory must be\n **font**.\n\n\n **Figure 1.** Adding the font resource directory.\n3. Add your font files in the `font` folder.\n\n The folder structure below generates\n `R.font.dancing_script`, `R.font.lobster`, and\n `R.font.typo_graphica`.\n\n\n **Figure 2.** Adding the font files in the `res/font` directory.\n4. Double-click a font file to preview the file's fonts in the editor.\n\n **Figure 3.**\n Previewing the font file.\n\n### Create a font family\n\n\nA font family is a set of font files along with style and weight details.\nIn Android, you can create a new font family as an XML resource and access\nit as a single unit, instead of referencing each style and weight as\nseparate resources. By doing this, you let the system select the correct font\nbased on the text style you are using.\n\nTo create a font family, perform the following steps in Android Studio:\n\n1. Right-click the `font` folder and select **New \\\u003e Font resource file** . The **New Resource File** window appears.\n2. Enter the filename, then click **OK**. The new font resource XML opens in the editor.\n3. Enclose each font file, style, and weight attribute in the `\u003cfont\u003e` element. The following XML illustrates adding font-related attributes in the font resource XML: \n\n ```xml\n \u003c?xml version=\"1.0\" encoding=\"utf-8\"?\u003e\n \u003cfont-family xmlns:android=\"http://schemas.android.com/apk/res/android\"\u003e\n \u003cfont\n android:fontStyle=\"normal\"\n android:fontWeight=\"400\"\n android:font=\"@font/lobster_regular\" /\u003e\n \u003cfont\n android:fontStyle=\"italic\"\n android:fontWeight=\"400\"\n android:font=\"@font/lobster_italic\" /\u003e\n \u003c/font-family\u003e\n ```\n\n### Use fonts in XML layouts\n\n\nUse your fonts, either a single font file or a font from a\nfont family, in [TextView](/reference/android/widget/TextView)\nobjects or in styles by using the\n`fontFamily` attribute.\n\n**Note:** When you use a font family, the\n`TextView` switches on its own, as needed, to use the\nfont files from that family.\n\n#### Add fonts to a TextView\n\n\nTo set a font for a `TextView`, do one of the\nfollowing:\n\n- In the layout XML file, set the `fontFamily` attribute to the font file you want to access. \n\n ```xml\n \u003cTextView\n android:layout_width=\"wrap_content\"\n android:layout_height=\"wrap_content\"\n android:fontFamily=\"@font/lobster\"/\u003e\n ```\n- Open the **Properties** window to set the font for the `TextView`.\n 1. Select a view to open the **Properties** window.\n\n **Note:** The **Properties** window is available\n only when the design editor is open. Select the **Design** tab at\n the bottom of the window.\n 2. Expand the **textAppearance** property, and then select the font from the *fontFamily* list.\n 3.\n\n **Figure 4.**\n Selecting the font from the **Properties** window.\n\n\nThe Android Studio layout preview, shown in the rightmost pane in Figure 5,\nlets you preview the font set in the `TextView`.\n\n**Figure 5.**\nPreviewing fonts in layout preview.\n\n#### Add fonts to a style\n\nOpen the `styles.xml` file and set the `fontFamily`\nattribute to the font file you want to access.\n-\n\n ```xml\n \u003cstyle name=\"customfontstyle\" parent=\"@android:style/TextAppearance.Small\"\u003e\n \u003citem name=\"android:fontFamily\"\u003e@font/lobster\u003c/item\u003e\n \u003c/style\u003e\n ```\n\n### Use fonts programmatically\n\n- To retrieve fonts programmatically, call the [getFont(int)](/reference/android/content/res/Resources#getFont(int)) method and provide the resource identifier of the font you want to retrieve. This method returns a [Typeface](/reference/android/graphics/Typeface) object. Although the system picks the best style for you from the fonts' information, you can use the [setTypeface(android.graphics.Typeface, int)](/reference/android/widget/TextView#setTypeface(android.graphics.Typeface, int)) method to set the typeface with specific styles.\n- **Note:** The `TextView` does this for you. \n\n### Kotlin\n\n```kotlin\nval typeface = resources.getFont(R.font.myfont)\ntextView.typeface = typeface\n```\n\n### Java\n\n```java\nTypeface typeface = getResources().getFont(R.font.myfont);\ntextView.setTypeface(typeface);\n```\n\n### Use the Support Library\n\n- The Support Library 26.0 supports fonts in XML on devices running Android 4.1 (API level 16) and higher.\n- **Note** : When you declare font families in XML layout through the Support Library, use the **app** namespace to ensure that your fonts load. \n\n```xml\n\u003c?xml version=\"1.0\" encoding=\"utf-8\"?\u003e\n\u003cfont-family xmlns:app=\"http://schemas.android.com/apk/res-auto\"\u003e\n \u003cfont app:fontStyle=\"normal\" app:fontWeight=\"400\" app:font=\"@font/myfont-Regular\"/\u003e\n \u003cfont app:fontStyle=\"italic\" app:fontWeight=\"400\" app:font=\"@font/myfont-Italic\" /\u003e\n\u003c/font-family\u003e\n```\n- To retrieve fonts programmatically, call the `ResourceCompat.getFont(Context, int)` method and provide an instance of `Context` and the resource identifier. \n\n### Kotlin\n\n```kotlin\nval typeface = ResourcesCompat.getFont(context, R.font.myfont)\n```\n\n### Java\n\n```java\nTypeface typeface = ResourcesCompat.getFont(context, R.font.myfont);\n```"]]