
Android はシステムレベルで、ゲーム コントローラからの入力イベントコードを Android のキーコードおよび軸の値としてレポートします。ゲームでこれらのコードと値を受け取り、特定のゲーム内アクションに変換できます。
プレーヤーがゲーム コントローラと Android デバイスを物理的に接続するか、無線でペア設定すると、システムがコントローラを入力デバイスとして自動検出し、入力イベントのレポートを開始します。アクティブな Activity またはフォーカスされている View に以下のコールバック メソッドを実装することにより、ゲームでこれらの入力イベントを受け取ることができます(Activity または View(両方ではない)のコールバックを実装する必要があります)。
Activityさんからのメッセージ:dispatchGenericMotionEvent(android.view. MotionEvent)ジョイスティックの動きなどの一般的なモーション イベントを処理するために呼び出されます。
dispatchKeyEvent(android.view.KeyEvent)ゲームパッド ボタンや D-pad ボタンの押下やリリースなどのキーイベントを処理するために呼び出されます。
Viewさんからのメッセージ:onGenericMotionEvent(android.view.MotionEvent)ジョイスティックの動きなどの一般的なモーション イベントを処理するために呼び出されます。
onKeyDown(int, android.view.KeyEvent)ゲームパッド ボタンや D-pad ボタンなどの物理キーの押下を処理するために呼び出されます。
onKeyUp(int, android.view.KeyEvent)ゲームパッド ボタンや D-pad ボタンなどの物理キーのリリースを処理するために呼び出されます。
おすすめの方法は、ユーザーが操作する特定の View オブジェクトからイベントをキャプチャすることです。受け取った入力イベントのタイプに関する情報を取得するには、コールバックから得られる以下のオブジェクトを調べます。
KeyEvent- 十字キー(D-pad)およびゲームパッド ボタンのイベントを表すオブジェクト。キーイベントには、トリガーされた特定のボタン(
DPAD_DOWNやBUTTON_Aなど)を示すキーコードが含まれます。キーコードはgetKeyCode()を呼び出すことによって取得できます。また、onKeyDown()などのキーイベント コールバックで取得することもできます。 MotionEvent- ジョイスティックとショルダー トリガーの動きからの入力を記述するオブジェクト。モーション イベントには、アクション コードと一連の軸の値が含まれます。アクション コードでは、ジョイスティックの動きなど、発生した状態の変化が指定されます。軸の値は、特定の物理コントロールの位置やその他の動きに関するプロパティ(
AXIS_XやAXIS_RTRIGGERなど)を表します。アクション コードを取得するにはgetAction()を、軸の値を取得するにはgetAxisValue()を呼び出します。
このレッスンでは、上記の View のコールバック メソッドを実装し、KeyEvent および MotionEvent オブジェクトを処理することにより、最も一般的なタイプの物理コントロール(ゲームパッド ボタン、十字キー、ジョイスティック)からの入力をゲームの画面内で処理する方法に焦点を当てて説明します。
ゲーム コントローラが接続されていることを確認する
Android は入力イベントをレポートする際に、ゲーム コントローラ以外のデバイスからのイベントとゲーム コントローラからのイベントを区別しません。たとえば、タッチ スクリーンの操作ではタッチ面の X 座標を表す AXIS_X イベントが生成されますが、ジョイスティックの操作ではその X 位置を表す AXIS_X イベントが生成されます。ゲーム コントローラの入力を処理することが重要な場合、まず、入力イベントが関連するソースタイプからのものであることを確認する必要があります。
接続されている入力デバイスがゲーム コントローラであることを確認するには、getSources() を呼び出して、そのデバイスでサポートされている入力ソースタイプの複合ビット フィールドを取得します。さらに、以下のフィールドが設定されているかどうかをテストによって確認できます。
- ソースタイプ
SOURCE_GAMEPADは、入力デバイスにゲームパッド ボタン(BUTTON_Aなど)があることを示します。このソースタイプは厳密には、ゲーム コントローラに D-pad ボタンがあるかどうかは示しませんが、ほとんどのゲームパッドには通常、方向コントロールが搭載されています。 - ソースタイプが
SOURCE_DPADの場合、入力デバイスに D-pad ボタン(DPAD_UPなど)があることを示します。 - ソースタイプ
SOURCE_JOYSTICKは、入力デバイスにアナログのコントロール スティック(AXIS_XとAXIS_Yに沿った動きを記録するジョイスティックなど)があることを示します。
次のコード スニペットは、接続された入力デバイスがゲーム コントローラかどうかを確認するためのヘルパー メソッドを示しています。ゲーム コントローラの場合、このメソッドはゲーム コントローラのデバイス ID を取得します。これにより、各デバイス ID をゲームのプレーヤーに関連付けて、接続されている各プレーヤーのゲーム アクションを個別に処理することができます。1 台の Android デバイスに同時に接続されている複数のゲーム コントローラをサポートする方法について詳しくは、複数のゲーム コントローラをサポートするをご覧ください。
Kotlin
fun getGameControllerIds(): List<Int> {
    val gameControllerDeviceIds = mutableListOf<Int>()
    val deviceIds = InputDevice.getDeviceIds()
    deviceIds.forEach { deviceId ->
        InputDevice.getDevice(deviceId).apply {

            // Verify that the device has gamepad buttons, control sticks, or both.
            if (sources and InputDevice.SOURCE_GAMEPAD == InputDevice.SOURCE_GAMEPAD
                    || sources and InputDevice.SOURCE_JOYSTICK == InputDevice.SOURCE_JOYSTICK) {
                // This device is a game controller. Store its device ID.
                gameControllerDeviceIds
                        .takeIf { !it.contains(deviceId) }
                        ?.add(deviceId)
            }
        }
    }
    return gameControllerDeviceIds
}
Java
public ArrayList<Integer> getGameControllerIds() {
    ArrayList<Integer> gameControllerDeviceIds = new ArrayList<Integer>();
    int[] deviceIds = InputDevice.getDeviceIds();
    for (int deviceId : deviceIds) {
        InputDevice dev = InputDevice.getDevice(deviceId);
        int sources = dev.getSources();

        // Verify that the device has gamepad buttons, control sticks, or both.
        if (((sources & InputDevice.SOURCE_GAMEPAD) == InputDevice.SOURCE_GAMEPAD)
                || ((sources & InputDevice.SOURCE_JOYSTICK)
                == InputDevice.SOURCE_JOYSTICK)) {
            // This device is a game controller. Store its device ID.
            if (!gameControllerDeviceIds.contains(deviceId)) {
                gameControllerDeviceIds.add(deviceId);
            }
        }
    }
    return gameControllerDeviceIds;
}
また、接続されているゲーム コントローラでサポートされている個々の入力機能を確認することもできます。これは、たとえば、ゲームで理解できる物理コントロール セットからの入力のみを使用する場合に便利です。
接続されているゲーム コントローラで特定のキーコードまたは軸コードがサポートされているかどうかを確認するには、以下の手法を使用します。
- Android 4.4(API レベル 19)以降では、
hasKeys(int...)を呼び出すことで、接続されているゲーム コントローラでキーコードがサポートされているかどうかを確認できます。 - Android 3.1(API レベル 12)以降では、最初に
getMotionRanges()を呼び出すことで、接続されているゲーム コントローラでサポートされているすべての使用可能な軸を確認できます。さらに、返された各InputDevice.MotionRangeオブジェクトでgetAxis()を呼び出すと、その軸 ID を取得できます。
ゲームパッド ボタンの押下を処理する
図 1 に、Android における一般的なゲーム コントローラの物理コントロールへのキーコードおよび軸の値のマッピング方法を示します。
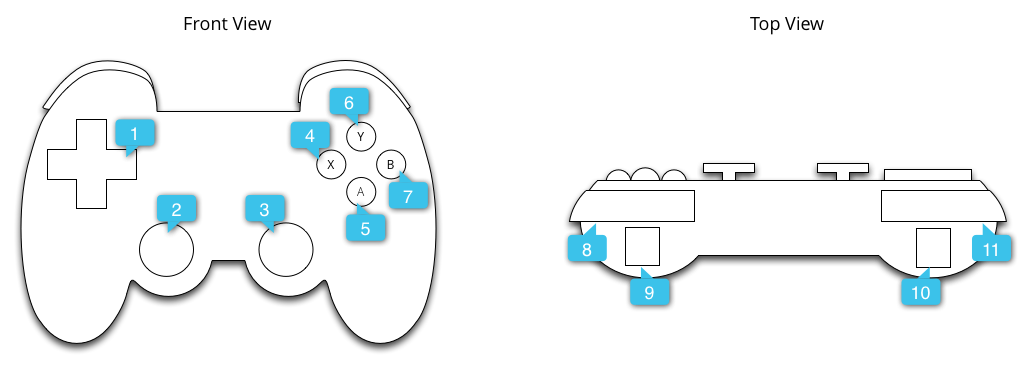
図の吹き出しについては、以下を参照してください。
ゲームパッド ボタンの押下によって生成される一般的なキーコードには、BUTTON_A、BUTTON_B、BUTTON_SELECT、BUTTON_START などがあります。一部のゲーム コントローラは、D-pad クロスバーの中心が押下されたときに DPAD_CENTER キーコードもトリガーします。ゲームでは、getKeyCode() を呼び出すことによってキーコードを調べることができます。また、onKeyDown() などのキーイベント コールバックを使用して調べることもできます。キーコードがゲームに関連するイベントを表している場合は、ゲーム アクションとして処理します。表 1 に、一般的なゲームパッド ボタン用として推奨されるゲーム アクションを示します。
表 1. ゲームパッド ボタンに推奨されるゲーム アクション。
| ゲーム アクション | ボタンのキーコード |
|---|---|
| メインメニューでゲームを開始する、ゲーム中に一時停止 / 一時停止解除する | BUTTON_START* |
| メニューを表示する | BUTTON_SELECT*、KEYCODE_MENU* |
| Android の「戻る」ナビゲーション動作と同じ(ナビゲーションの設計ガイドを参照) | KEYCODE_BACK |
| メニュー内の前の項目に戻る | BUTTON_B |
| 選択を確認するか、メインのゲーム アクションを実行する | BUTTON_A と DPAD_CENTER |
* ゲームは、スタートボタン、選択ボタン、メニューボタンがあるかどうかに依存してはなりません。
ヒント: ゲームに設定画面を用意して、ユーザーがゲーム アクションに対するゲーム コントローラのマッピングをカスタマイズできるようにすることを検討してください。
次のスニペットは、onKeyDown() をオーバーライドして、BUTTON_A ボタンと DPAD_CENTER ボタンの押下をゲーム アクションに関連付ける方法を示しています。
Kotlin
class GameView(...) : View(...) {
    ...

    override fun onKeyDown(keyCode: Int, event: KeyEvent): Boolean {
        var handled = false
        if (event.source and InputDevice.SOURCE_GAMEPAD == InputDevice.SOURCE_GAMEPAD) {
            if (event.repeatCount == 0) {
                when (keyCode) {
                    // Handle gamepad and D-pad button presses to navigate the ship
                    ...

                    else -> {
                        keyCode.takeIf { isFireKey(it) }?.run {
                            // Update the ship object to fire lasers
                            ...
                            handled = true
                        }
                    }
                }
            }
            if (handled) {
                return true
            }
        }
        return super.onKeyDown(keyCode, event)
    }

    // Here we treat Button_A and DPAD_CENTER as the primary action
    // keys for the game.
    private fun isFireKey(keyCode: Int): Boolean =
            keyCode == KeyEvent.KEYCODE_DPAD_CENTER || keyCode == KeyEvent.KEYCODE_BUTTON_A
}
Java
public class GameView extends View {
    ...

    @Override
    public boolean onKeyDown(int keyCode, KeyEvent event) {
        boolean handled = false;
        if ((event.getSource() & InputDevice.SOURCE_GAMEPAD)
                == InputDevice.SOURCE_GAMEPAD) {
            if (event.getRepeatCount() == 0) {
                switch (keyCode) {
                    // Handle gamepad and D-pad button presses to
                    // navigate the ship
                    ...

                    default:
                         if (isFireKey(keyCode)) {
                             // Update the ship object to fire lasers
                             ...
                             handled = true;
                         }
                     break;
                }
            }
            if (handled) {
                return true;
            }
        }
        return super.onKeyDown(keyCode, event);
    }

    private static boolean isFireKey(int keyCode) {
        // Here we treat Button_A and DPAD_CENTER as the primary action
        // keys for the game.
        return keyCode == KeyEvent.KEYCODE_DPAD_CENTER
                || keyCode == KeyEvent.KEYCODE_BUTTON_A;
    }
}
注: Android 4.2(API レベル 17)以前では、BUTTON_A はデフォルトで Android の「戻る」キーとして処理されます。アプリがこれらの Android バージョンをサポートしている場合は、BUTTON_A をメインのゲーム アクションとして処理するようにしてください。デバイスの現在の Android SDK バージョンを確認するには、Build.VERSION.SDK_INT の値を参照します。
十字キーの入力を処理する
4 方向の十字キー(D-pad)は、多くのゲーム コントローラで一般的な物理コントロールとして使用されています。Android は、D-pad の UP と DOWN の押下を -1.0(上)から 1.0(下)の範囲の AXIS_HAT_Y イベントとして、D-pad の LEFT と RIGHT の押下を -1.0(左)から 1.0(右)の範囲の AXIS_HAT_X イベントとしてレポートします。
D-pad の押下をキーコードでレポートするコントローラもあります。D-pad の押下を考慮する場合、表 2 で推奨されているように、ハット軸のイベントと D-pad のキーコードを同じ入力イベントとして扱う必要があります。
表 2. D-pad のキーコードとハット軸の値として推奨されるデフォルトのゲーム アクション
| ゲーム アクション | D-pad のキーコード | ハット軸のコード |
|---|---|---|
| 上に移動 | KEYCODE_DPAD_UP |
AXIS_HAT_Y(値が 0 から -1.0 の場合) |
| 下に移動 | KEYCODE_DPAD_DOWN |
AXIS_HAT_Y(値が 0 から 1.0 の場合) |
| 左に移動 | KEYCODE_DPAD_LEFT |
AXIS_HAT_X(値が 0 から -1.0 の場合) |
| 右に移動 | KEYCODE_DPAD_RIGHT |
AXIS_HAT_X(値が 0 から 1.0 の場合) |
次のコード スニペットは、入力イベントのハット軸とキーコードの値を確認して D-pad の方向を決定するためのヘルパークラスを示しています。
Kotlin
class Dpad {

    private var directionPressed = -1 // initialized to -1

    fun getDirectionPressed(event: InputEvent): Int {
        if (!isDpadDevice(event)) {
            return -1
        }

        // If the input event is a MotionEvent, check its hat axis values.
        (event as? MotionEvent)?.apply {

            // Use the hat axis value to find the D-pad direction
            val xaxis: Float = event.getAxisValue(MotionEvent.AXIS_HAT_X)
            val yaxis: Float = event.getAxisValue(MotionEvent.AXIS_HAT_Y)

            directionPressed = when {
                // Check if the AXIS_HAT_X value is -1 or 1, and set the D-pad
                // LEFT and RIGHT direction accordingly.
                xaxis.compareTo(-1.0f) == 0 -> Dpad.LEFT
                xaxis.compareTo(1.0f) == 0 -> Dpad.RIGHT
                // Check if the AXIS_HAT_Y value is -1 or 1, and set the D-pad
                // UP and DOWN direction accordingly.
                yaxis.compareTo(-1.0f) == 0 -> Dpad.UP
                yaxis.compareTo(1.0f) == 0 -> Dpad.DOWN
                else -> directionPressed
            }
        }
        // If the input event is a KeyEvent, check its key code.
        (event as? KeyEvent)?.apply {

            // Use the key code to find the D-pad direction.
            directionPressed = when(event.keyCode) {
                KeyEvent.KEYCODE_DPAD_LEFT -> Dpad.LEFT
                KeyEvent.KEYCODE_DPAD_RIGHT -> Dpad.RIGHT
                KeyEvent.KEYCODE_DPAD_UP -> Dpad.UP
                KeyEvent.KEYCODE_DPAD_DOWN -> Dpad.DOWN
                KeyEvent.KEYCODE_DPAD_CENTER ->  Dpad.CENTER
                else -> directionPressed
            }
        }
        return directionPressed
    }

    companion object {
        internal const val UP = 0
        internal const val LEFT = 1
        internal const val RIGHT = 2
        internal const val DOWN = 3
        internal const val CENTER = 4

        fun isDpadDevice(event: InputEvent): Boolean =
            // Check that input comes from a device with directional pads.
            event.source and InputDevice.SOURCE_DPAD != InputDevice.SOURCE_DPAD
    }
}
Java
public class Dpad {
    final static int UP       = 0;
    final static int LEFT     = 1;
    final static int RIGHT    = 2;
    final static int DOWN     = 3;
    final static int CENTER   = 4;

    int directionPressed = -1; // initialized to -1

    public int getDirectionPressed(InputEvent event) {
        if (!isDpadDevice(event)) {
           return -1;
        }

        // If the input event is a MotionEvent, check its hat axis values.
        if (event instanceof MotionEvent) {

            // Use the hat axis value to find the D-pad direction
            MotionEvent motionEvent = (MotionEvent) event;
            float xaxis = motionEvent.getAxisValue(MotionEvent.AXIS_HAT_X);
            float yaxis = motionEvent.getAxisValue(MotionEvent.AXIS_HAT_Y);

            // Check if the AXIS_HAT_X value is -1 or 1, and set the D-pad
            // LEFT and RIGHT direction accordingly.
            if (Float.compare(xaxis, -1.0f) == 0) {
                directionPressed =  Dpad.LEFT;
            } else if (Float.compare(xaxis, 1.0f) == 0) {
                directionPressed =  Dpad.RIGHT;
            }
            // Check if the AXIS_HAT_Y value is -1 or 1, and set the D-pad
            // UP and DOWN direction accordingly.
            else if (Float.compare(yaxis, -1.0f) == 0) {
                directionPressed =  Dpad.UP;
            } else if (Float.compare(yaxis, 1.0f) == 0) {
                directionPressed =  Dpad.DOWN;
            }
        }

        // If the input event is a KeyEvent, check its key code.
        else if (event instanceof KeyEvent) {

           // Use the key code to find the D-pad direction.
            KeyEvent keyEvent = (KeyEvent) event;
            if (keyEvent.getKeyCode() == KeyEvent.KEYCODE_DPAD_LEFT) {
                directionPressed = Dpad.LEFT;
            } else if (keyEvent.getKeyCode() == KeyEvent.KEYCODE_DPAD_RIGHT) {
                directionPressed = Dpad.RIGHT;
            } else if (keyEvent.getKeyCode() == KeyEvent.KEYCODE_DPAD_UP) {
                directionPressed = Dpad.UP;
            } else if (keyEvent.getKeyCode() == KeyEvent.KEYCODE_DPAD_DOWN) {
                directionPressed = Dpad.DOWN;
            } else if (keyEvent.getKeyCode() == KeyEvent.KEYCODE_DPAD_CENTER) {
                directionPressed = Dpad.CENTER;
            }
        }
        return directionPressed;
    }

    public static boolean isDpadDevice(InputEvent event) {
        // Check that input comes from a device with directional pads.
        if ((event.getSource() & InputDevice.SOURCE_DPAD)
             != InputDevice.SOURCE_DPAD) {
             return true;
         } else {
             return false;
         }
     }
}
このヘルパークラスは、ゲームで D-pad の入力を処理する場合に使用できます(onGenericMotionEvent() コールバックや onKeyDown() コールバックなど)。
例:
Kotlin
private val dpad = Dpad()
...
override fun onGenericMotionEvent(event: MotionEvent): Boolean {
    if (Dpad.isDpadDevice(event)) {
        when (dpad.getDirectionPressed(event)) {
            Dpad.LEFT -> {
                // Do something for LEFT direction press
                ...
                return true
            }
            Dpad.RIGHT -> {
                // Do something for RIGHT direction press
                ...
                return true
            }
            Dpad.UP -> {
                // Do something for UP direction press
                ...
                return true
            }
            ...
        }
    }

    // Check if this event is from a joystick movement and process accordingly.
    ...
}
Java
Dpad dpad = new Dpad();
...
@Override
public boolean onGenericMotionEvent(MotionEvent event) {

    // Check if this event if from a D-pad and process accordingly.
    if (Dpad.isDpadDevice(event)) {

       int press = dpad.getDirectionPressed(event);
       switch (press) {
            case LEFT:
                // Do something for LEFT direction press
                ...
                return true;
            case RIGHT:
                // Do something for RIGHT direction press
                ...
                return true;
            case UP:
                // Do something for UP direction press
                ...
                return true;
            ...
        }
    }

    // Check if this event is from a joystick movement and process accordingly.
    ...
}
ジョイスティックの動きを処理する
プレーヤーがゲーム コントローラのジョイスティックを動かすと、Android が ACTION_MOVE アクション コードとジョイスティックの軸の最新の位置を含む MotionEvent をレポートします。ゲームでは、MotionEvent から提供されるデータを使用して、対象のジョイスティックの動きが発生したかどうかを判断できます。
ジョイスティックのモーション イベントは、複数の動きのサンプルを 1 つのオブジェクトにまとめることがあるので注意してください。MotionEvent オブジェクトには、ジョイスティックの各軸の現在位置と、各軸の複数の履歴位置が含まれます。アクション コード ACTION_MOVE(ジョイスティックの動きなど)でモーション イベントをレポートする場合、Android は効率性向上のために軸の値をまとめて処理します。軸のこれまでの値は、現在の軸の値より古い個別の値セットと、以前のモーション イベントでレポートされた値より最近の値で構成されます。詳しくは、MotionEvent リファレンスをご覧ください。
履歴情報を使用することで、ジョイスティックの入力に基づくゲーム オブジェクトの動きをより正確にレンダリングできます。現在の値とこれまでの値を取得するには、getAxisValue() または getHistoricalAxisValue() を呼び出します。また、getHistorySize() を呼び出すことで、ジョイスティック イベントの履歴ポイント数を確認することもできます。
次のスニペットは、ジョイスティックの入力を処理するように onGenericMotionEvent() コールバックをオーバーライドする方法を示しています。軸のこれまでの値を処理してから現在の位置を処理する必要があります。
Kotlin
class GameView(...) : View(...) {

    override fun onGenericMotionEvent(event: MotionEvent): Boolean {

        // Check that the event came from a game controller
        return if (event.source and InputDevice.SOURCE_JOYSTICK == InputDevice.SOURCE_JOYSTICK
                && event.action == MotionEvent.ACTION_MOVE) {

            // Process the movements starting from the
            // earliest historical position in the batch
            (0 until event.historySize).forEach { i ->
                // Process the event at historical position i
                processJoystickInput(event, i)
            }

            // Process the current movement sample in the batch (position -1)
            processJoystickInput(event, -1)
            true
        } else {
            super.onGenericMotionEvent(event)
        }
    }
}
Java
public class GameView extends View {

    @Override
    public boolean onGenericMotionEvent(MotionEvent event) {

        // Check that the event came from a game controller
        if ((event.getSource() & InputDevice.SOURCE_JOYSTICK) ==
                InputDevice.SOURCE_JOYSTICK &&
                event.getAction() == MotionEvent.ACTION_MOVE) {

            // Process all historical movement samples in the batch
            final int historySize = event.getHistorySize();

            // Process the movements starting from the
            // earliest historical position in the batch
            for (int i = 0; i < historySize; i++) {
                // Process the event at historical position i
                processJoystickInput(event, i);
            }

            // Process the current movement sample in the batch (position -1)
            processJoystickInput(event, -1);
            return true;
        }
        return super.onGenericMotionEvent(event);
    }
}
ジョイスティックの入力を使用する前に、ジョイスティックの位置が中心かどうかを確認し、それに応じて軸の動きを計算する必要があります。通常、ジョイスティックには「フラット」な領域(軸の位置が中心とみなされる座標(0,0)付近の値の範囲)があります。Android からレポートされた軸の値がこのフラットな領域内の場合、コントローラが静止している(両方の軸方向の動きがない)とみなす必要があります。
次のスニペットは、各軸方向の動きを計算するヘルパー メソッドを示しています。このヘルパーは、後述する processJoystickInput() メソッドで呼び出します。
Kotlin
private fun getCenteredAxis(
        event: MotionEvent,
        device: InputDevice,
        axis: Int,
        historyPos: Int
): Float {
    val range: InputDevice.MotionRange? = device.getMotionRange(axis, event.source)

    // A joystick at rest does not always report an absolute position of
    // (0,0). Use the getFlat() method to determine the range of values
    // bounding the joystick axis center.
    range?.apply {
        val value: Float = if (historyPos < 0) {
            event.getAxisValue(axis)
        } else {
            event.getHistoricalAxisValue(axis, historyPos)
        }

        // Ignore axis values that are within the 'flat' region of the
        // joystick axis center.
        if (Math.abs(value) > flat) {
            return value
        }
    }
    return 0f
}
Java
private static float getCenteredAxis(MotionEvent event,
        InputDevice device, int axis, int historyPos) {
    final InputDevice.MotionRange range =
            device.getMotionRange(axis, event.getSource());

    // A joystick at rest does not always report an absolute position of
    // (0,0). Use the getFlat() method to determine the range of values
    // bounding the joystick axis center.
    if (range != null) {
        final float flat = range.getFlat();
        final float value =
                historyPos < 0 ? event.getAxisValue(axis):
                event.getHistoricalAxisValue(axis, historyPos);

        // Ignore axis values that are within the 'flat' region of the
        // joystick axis center.
        if (Math.abs(value) > flat) {
            return value;
        }
    }
    return 0;
}
まとめると、ゲーム内でジョイスティックの動きを処理する方法を以下に示します。
Kotlin
private fun processJoystickInput(event: MotionEvent, historyPos: Int) {

    val inputDevice = event.device

    // Calculate the horizontal distance to move by
    // using the input value from one of these physical controls:
    // the left control stick, hat axis, or the right control stick.
    var x: Float = getCenteredAxis(event, inputDevice, MotionEvent.AXIS_X, historyPos)
    if (x == 0f) {
        x = getCenteredAxis(event, inputDevice, MotionEvent.AXIS_HAT_X, historyPos)
    }
    if (x == 0f) {
        x = getCenteredAxis(event, inputDevice, MotionEvent.AXIS_Z, historyPos)
    }

    // Calculate the vertical distance to move by
    // using the input value from one of these physical controls:
    // the left control stick, hat switch, or the right control stick.
    var y: Float = getCenteredAxis(event, inputDevice, MotionEvent.AXIS_Y, historyPos)
    if (y == 0f) {
        y = getCenteredAxis(event, inputDevice, MotionEvent.AXIS_HAT_Y, historyPos)
    }
    if (y == 0f) {
        y = getCenteredAxis(event, inputDevice, MotionEvent.AXIS_RZ, historyPos)
    }

    // Update the ship object based on the new x and y values
}
Java
private void processJoystickInput(MotionEvent event,
        int historyPos) {

    InputDevice inputDevice = event.getDevice();

    // Calculate the horizontal distance to move by
    // using the input value from one of these physical controls:
    // the left control stick, hat axis, or the right control stick.
    float x = getCenteredAxis(event, inputDevice,
            MotionEvent.AXIS_X, historyPos);
    if (x == 0) {
        x = getCenteredAxis(event, inputDevice,
                MotionEvent.AXIS_HAT_X, historyPos);
    }
    if (x == 0) {
        x = getCenteredAxis(event, inputDevice,
                MotionEvent.AXIS_Z, historyPos);
    }

    // Calculate the vertical distance to move by
    // using the input value from one of these physical controls:
    // the left control stick, hat switch, or the right control stick.
    float y = getCenteredAxis(event, inputDevice,
            MotionEvent.AXIS_Y, historyPos);
    if (y == 0) {
        y = getCenteredAxis(event, inputDevice,
                MotionEvent.AXIS_HAT_Y, historyPos);
    }
    if (y == 0) {
        y = getCenteredAxis(event, inputDevice,
                MotionEvent.AXIS_RZ, historyPos);
    }

    // Update the ship object based on the new x and y values
}
1 つのジョイスティックでは実現できない高度な機能を備えたゲーム コントローラをサポートするには、以下のベスト プラクティスに従います。
- デュアル コントローラ スティックに対応する。多くのゲーム コントローラには左右にジョイスティックがあります。Android は左スティックについて、水平方向の動きを
AXIS_Xイベントとして、垂直方向の動きをAXIS_Yイベントとしてレポートします。右スティックの場合、Android は水平方向の動きをAXIS_Zイベントとして、垂直方向の動きをAXIS_RZイベントとしてレポートします。コードで両方のコントローラ スティックを処理してください。 -
ショルダー トリガーの押下を処理する(ゲームが
AXIS_イベントとKEYCODE_BUTTON_イベントで動作することを確認する)。一部のコントローラには左右にショルダー トリガーがあります。これらのトリガーが存在する場合、AXIS_*TRIGGERイベントまたはKEYCODE_BUTTON_*2イベント、またはその両方を出力します。左トリガーの場合はAXIS_LTRIGGERとKEYCODE_BUTTON_L2です。右トリガーの場合はAXIS_RTRIGGERとKEYCODE_BUTTON_R2です。軸イベントは、トリガーが 0~1 の範囲の値を出力した場合にのみ発生します。アナログ出力のあるコントローラの中には、軸イベントに加えてボタンイベントを出力するものもあります。すべての一般的なゲーム コントローラに対応するには、ゲームでAXIS_イベントとKEYCODE_BUTTON_イベントの両方をサポートする必要があります。ただし、コントローラが両方を報告する場合は、ゲームプレイに最も適したイベントを優先してください。Android 4.3(API レベル 18)以降では、AXIS_LTRIGGERを生成するコントローラもAXIS_BRAKE軸で同じ値をレポートします。AXIS_RTRIGGERとAXIS_GASの場合も同様です。Android は、0.0(リリース)から 1.0(完全に押下)の範囲の正規化数を使用して、すべてのアナログ トリガーの押下をレポートします。 -
エミュレートされた環境では、特定の動作やサポートが異なる場合があります。Google Play Games などのエミュレートされたプラットフォームは、ホスト オペレーティング システムの機能によって動作が若干異なる場合があります。たとえば、
AXIS_イベントとKEYCODE_BUTTON_イベントの両方を出力するコントローラでも、AXIS_イベントのみを出力するコントローラもあります。また、一部のコントローラはサポートされていないこともあります。