
AppSearch, डिवाइस पर मौजूद स्ट्रक्चर्ड डेटा को मैनेज करने के लिए, बेहतर परफ़ॉर्मेंस वाला सर्च टूल है. इसमें डेटा को इंडेक्स करने और पूरे टेक्स्ट को खोजने की सुविधा का इस्तेमाल करके डेटा को वापस पाने के लिए एपीआई शामिल हैं. ऐप्लिकेशन, ऐप्लिकेशन में खोजने की सुविधाएं देने के लिए, AppSearch का इस्तेमाल कर सकते हैं. इससे उपयोगकर्ता, ऑफ़लाइन होने पर भी कॉन्टेंट खोज सकते हैं.
AppSearch में ये सुविधाएं मिलती हैं:
- कम I/O इस्तेमाल के साथ, तेज़ी से लागू होने वाला और मोबाइल-फ़र्स्ट स्टोरेज
- बड़े डेटा सेट को इंडेक्स करने और उन पर क्वेरी करने के लिए काफ़ी असरदार
- कई भाषाओं में उपलब्ध, जैसे कि अंग्रेज़ी और स्पैनिश
- काम के होने के हिसाब से रैंकिंग और इस्तेमाल के आधार पर स्कोर
कम I/O इस्तेमाल की वजह से, AppSearch, SQLite की तुलना में बड़े डेटासेट को इंडेक्स करने और खोजने में कम समय लेता है. AppSearch, एक ही तरह की क्वेरी का इस्तेमाल करके, अलग-अलग तरह की क्वेरी को आसान बनाता है. वहीं, SQLite कई टेबल के नतीजों को मर्ज करता है.
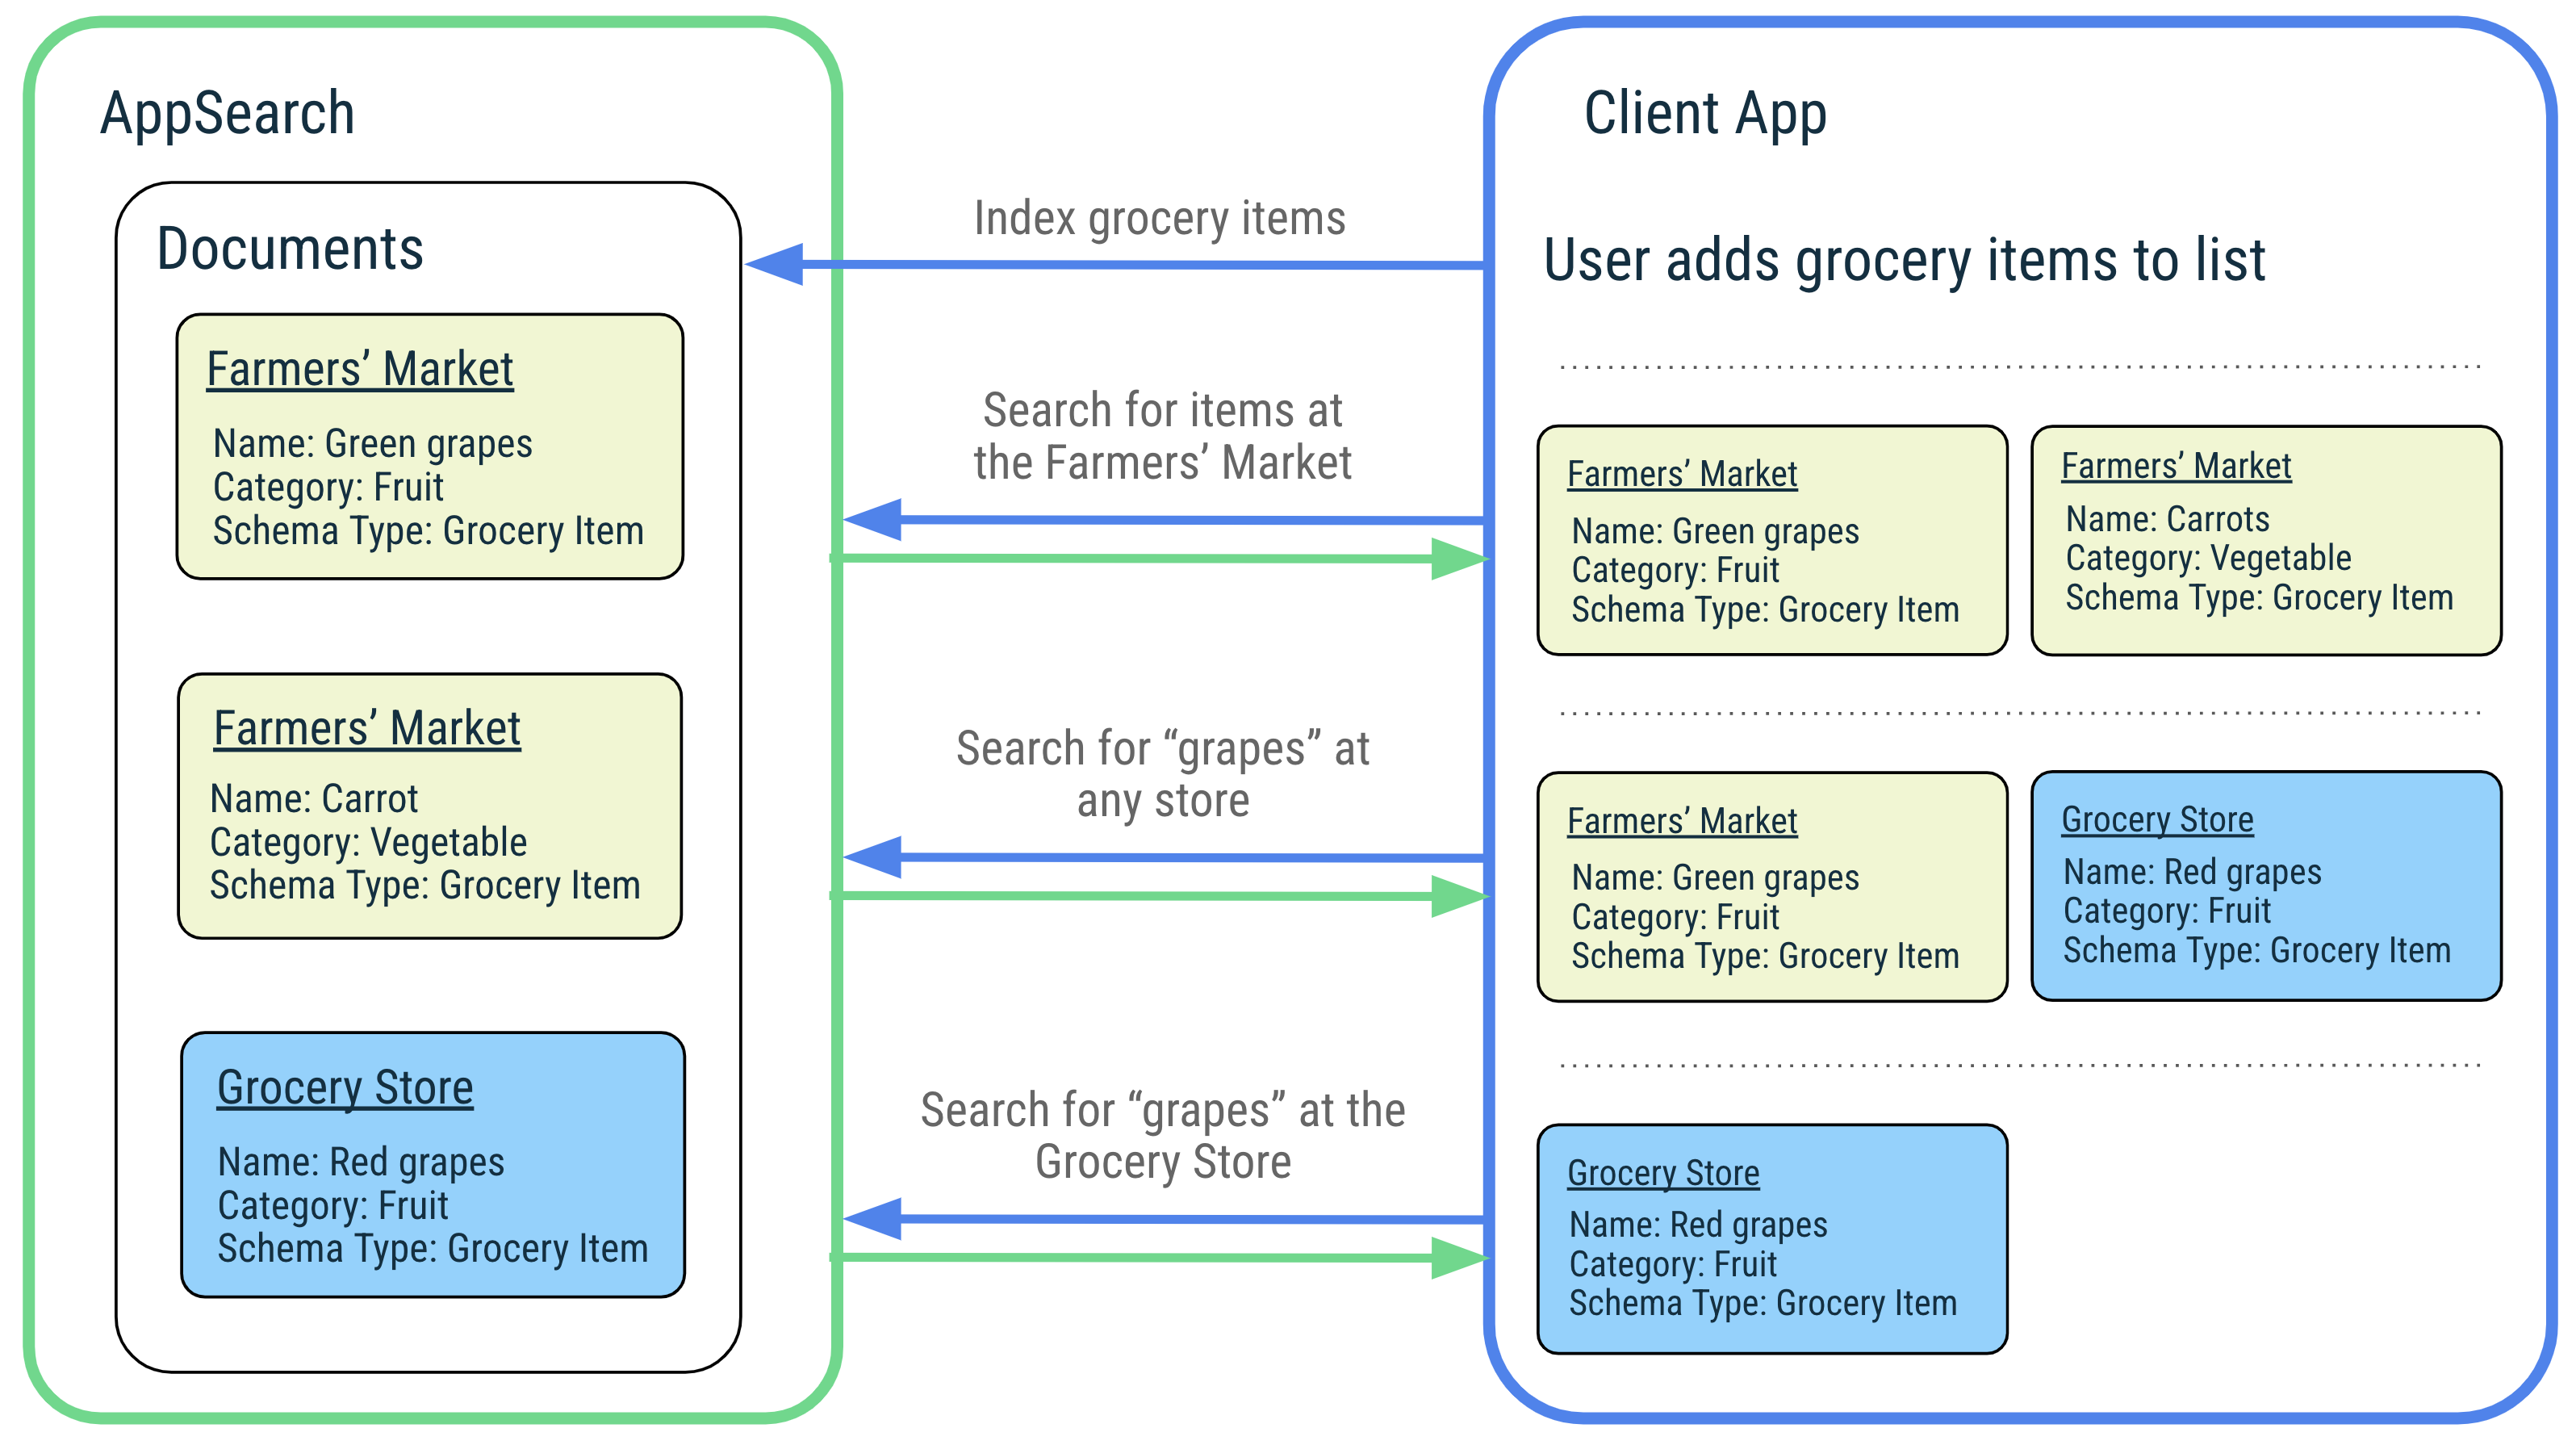
AppSearch की सुविधाओं के बारे में बताने के लिए, एक संगीत ऐप्लिकेशन का उदाहरण लें. यह ऐप्लिकेशन, उपयोगकर्ताओं के पसंदीदा गाने मैनेज करता है और उन्हें आसानी से खोजने की सुविधा देता है. लोग दुनिया भर के संगीत का आनंद लेते हैं. इसके लिए, वे अलग-अलग भाषाओं में गाने के टाइटल का इस्तेमाल करते हैं. AppSearch, इंडेक्स करने और क्वेरी करने के लिए, इन भाषाओं का इस्तेमाल करता है. जब कोई उपयोगकर्ता गाने के टाइटल या कलाकार के नाम से कोई गाना खोजता है, तो ऐप्लिकेशन उस अनुरोध को AppSearch को भेज देता है, ताकि मिलते-जुलते गाने तुरंत और आसानी से खोजे जा सकें. ऐप्लिकेशन, नतीजे दिखाता है, ताकि उपयोगकर्ता अपने पसंदीदा गाने तुरंत चला सकें.
सेटअप
अपने ऐप्लिकेशन में AppSearch का इस्तेमाल करने के लिए, अपने ऐप्लिकेशन की build.gradle फ़ाइल में ये डिपेंडेंसी जोड़ें:
ग्रूवी
dependencies {
    def appsearch_version = "1.1.0"

    implementation "androidx.appsearch:appsearch:$appsearch_version"
    // Use kapt instead of annotationProcessor if writing Kotlin classes
    annotationProcessor "androidx.appsearch:appsearch-compiler:$appsearch_version"

    implementation "androidx.appsearch:appsearch-local-storage:$appsearch_version"
    // PlatformStorage is compatible with Android 12+ devices, and offers additional features
    // to LocalStorage.
    implementation "androidx.appsearch:appsearch-platform-storage:$appsearch_version"

    // PlayServicesStorage is compatible with all devices that support Google Play Services on
    // all API levels. It offers the same features as PlatformStorage and is the recommended
    // solution for lower API levels on which PlatformStorage is not supported.
    implementation "androidx.appsearch:appsearch-play-services-storage:$appsearch_version"
}
Kotlin
dependencies {
    val appsearch_version = "1.1.0"

    implementation("androidx.appsearch:appsearch:$appsearch_version")
    // Use annotationProcessor instead of kapt if writing Java classes
    kapt("androidx.appsearch:appsearch-compiler:$appsearch_version")

    implementation("androidx.appsearch:appsearch-local-storage:$appsearch_version")
    // PlatformStorage is compatible with Android 12+ devices, and offers additional features
    // to LocalStorage.
    implementation("androidx.appsearch:appsearch-platform-storage:$appsearch_version")

    // PlayServicesStorage is compatible with all devices that support Google Play Services on
    // all API levels. It offers the same features as PlatformStorage and is the recommended
    // solution for lower API levels on which PlatformStorage is not supported.
    implementation("androidx.appsearch:appsearch-play-services-storage:$appsearch_version")

}
AppSearch के कॉन्सेप्ट
इस डायग्राम में, AppSearch के कॉन्सेप्ट और उनके इंटरैक्शन के बारे में बताया गया है.
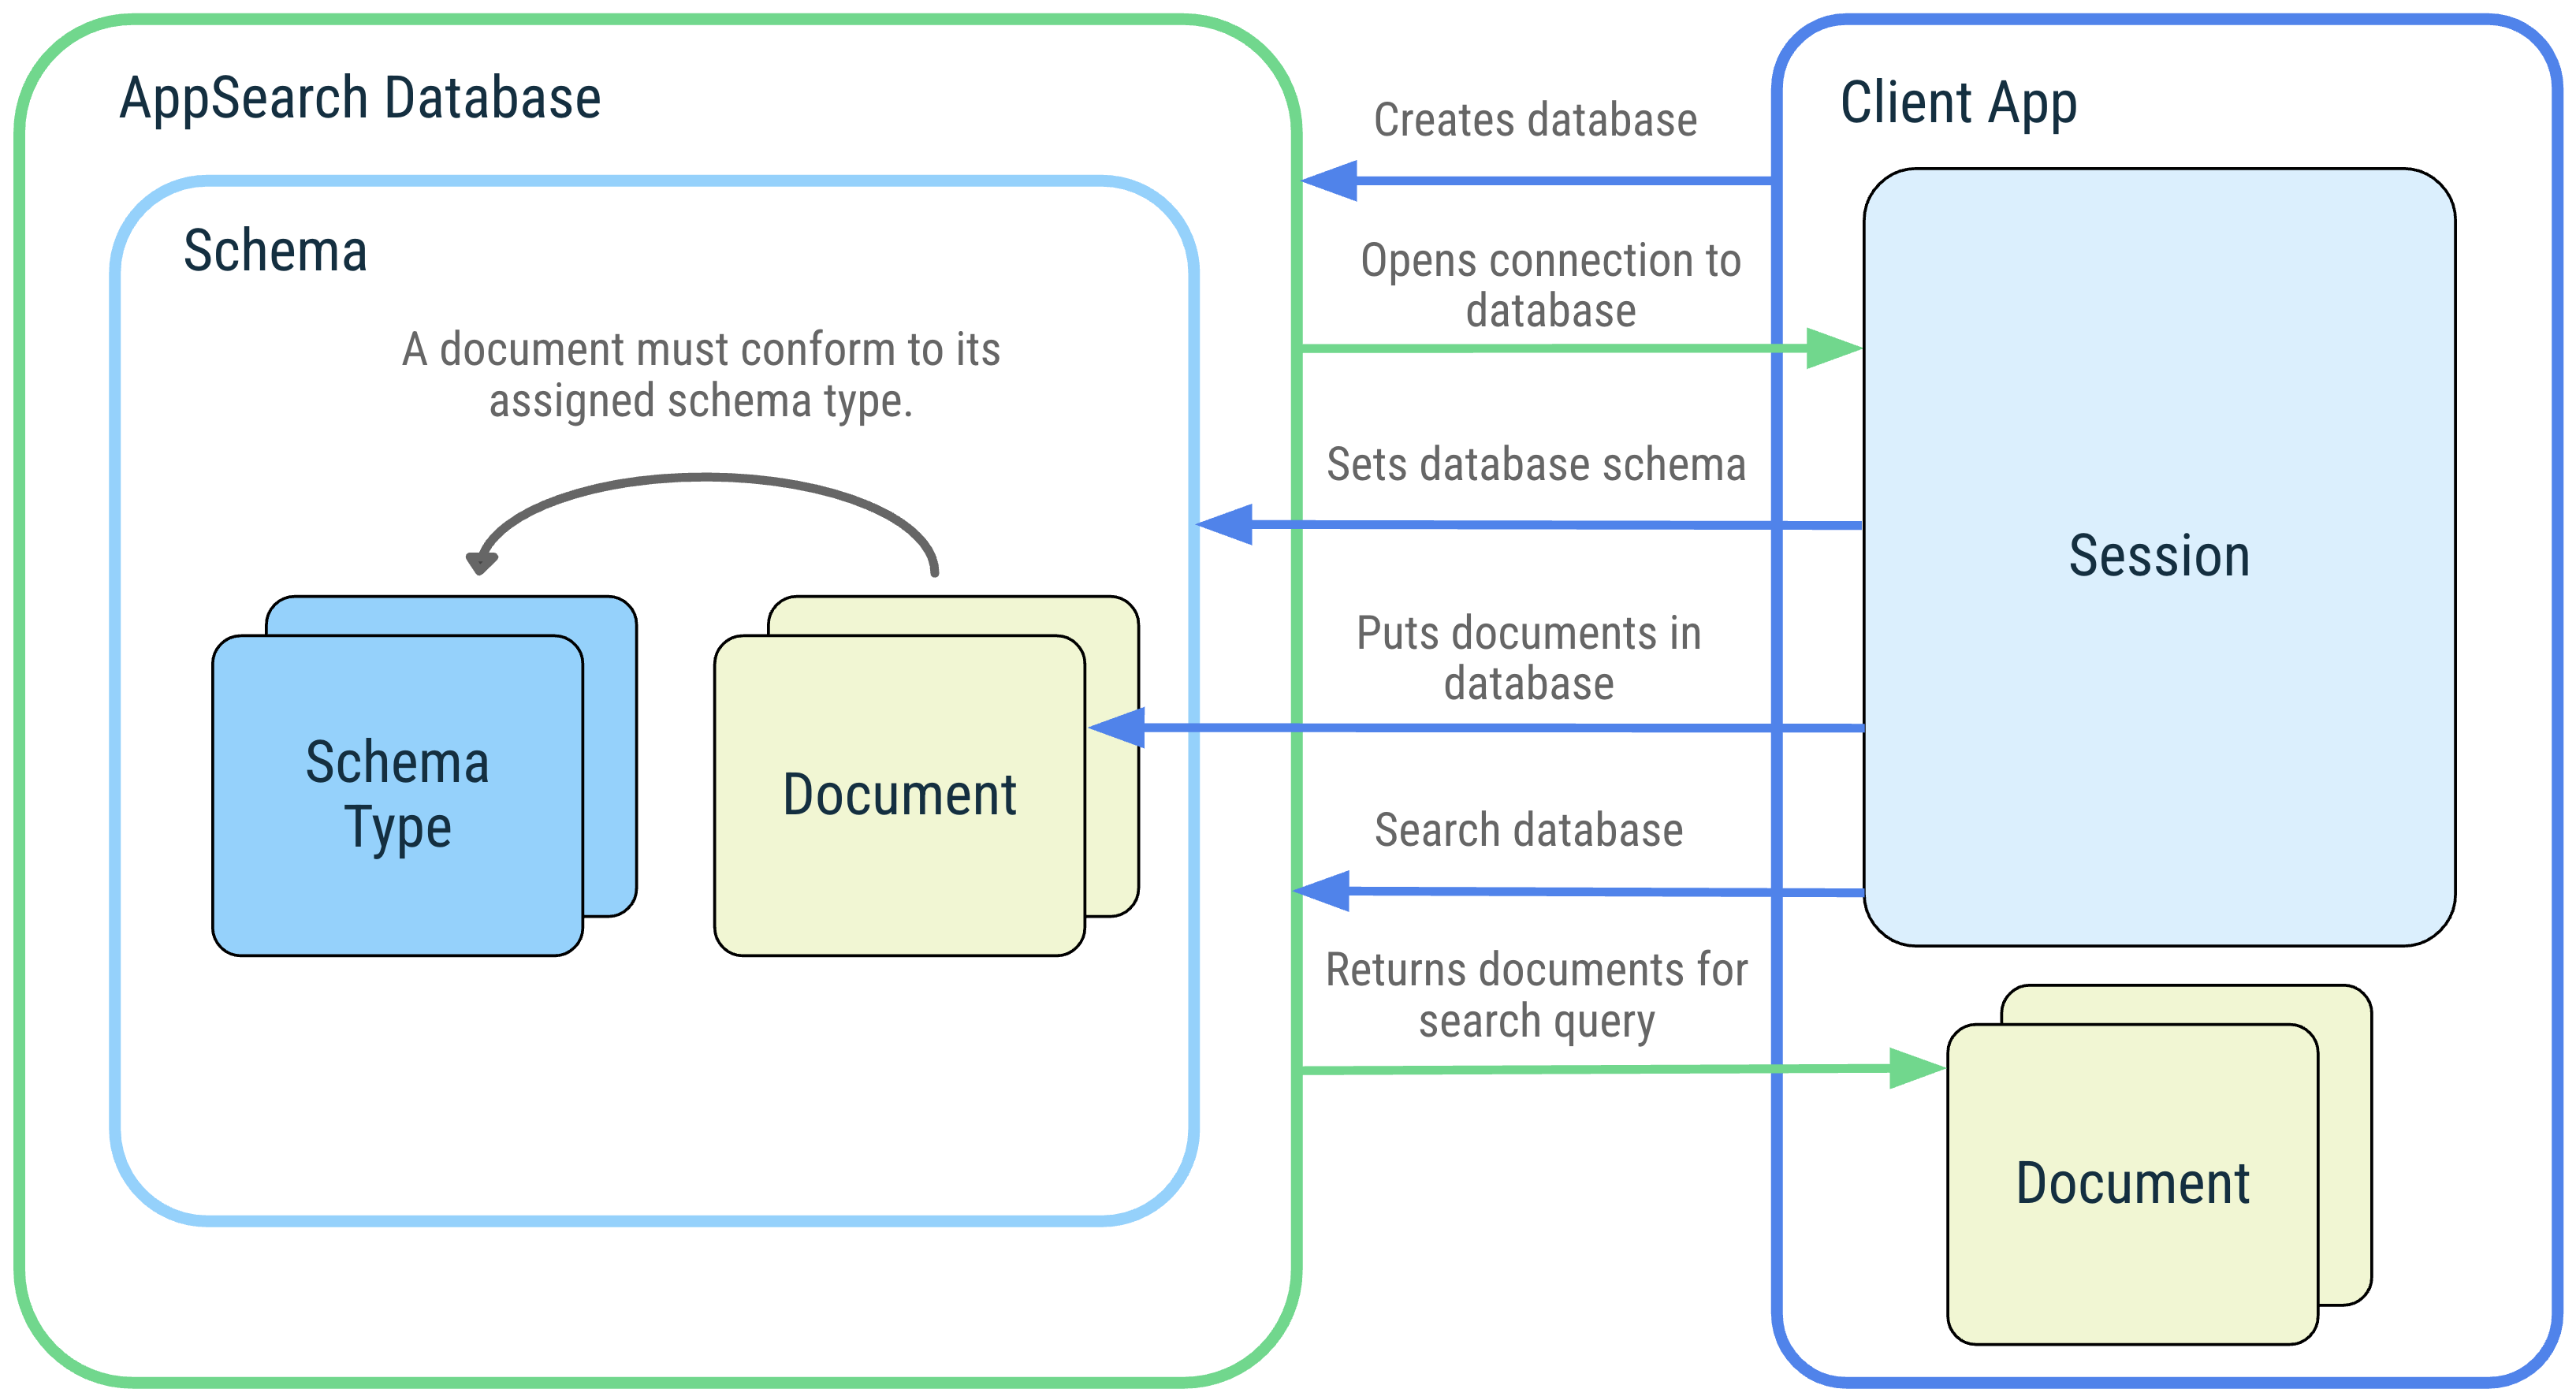 पहली इमेज. AppSearch के कॉन्सेप्ट का डायग्राम: AppSearch डेटाबेस, स्कीमा,
स्कीमा टाइप, दस्तावेज़, सेशन, और खोज.
पहली इमेज. AppSearch के कॉन्सेप्ट का डायग्राम: AppSearch डेटाबेस, स्कीमा,
स्कीमा टाइप, दस्तावेज़, सेशन, और खोज.
डेटाबेस और सेशन
AppSearch डेटाबेस, दस्तावेज़ों का एक कलेक्शन होता है. यह डेटाबेस स्कीमा के मुताबिक होता है. क्लाइंट ऐप्लिकेशन, अपने ऐप्लिकेशन कॉन्टेक्स्ट और डेटाबेस का नाम देकर डेटाबेस बनाते हैं. डेटाबेस को सिर्फ़ वह ऐप्लिकेशन खोल सकता है जिसकी मदद से उन्हें बनाया गया था. डेटाबेस खोलने पर, डेटाबेस के साथ इंटरैक्ट करने के लिए एक सेशन शुरू किया जाता है. सेशन, AppSearch API को कॉल करने के लिए एंट्री पॉइंट होता है और यह तब तक खुला रहता है, जब तक क्लाइंट ऐप्लिकेशन इसे बंद नहीं कर देता.
स्कीमा और स्कीमा टाइप
स्कीमा, AppSearch के डेटाबेस में डेटा के संगठनात्मक स्ट्रक्चर को दिखाता है.
स्कीमा, स्कीमा टाइप से बना होता है, जो अलग-अलग तरह के डेटा को दिखाता है. स्कीमा टाइप में ऐसी प्रॉपर्टी होती हैं जिनमें नाम, डेटा टाइप, और एलिमेंट की संख्या होती है. डेटाबेस स्कीमा में स्कीमा टाइप जोड़ने के बाद, उस स्कीमा टाइप के दस्तावेज़ बनाए जा सकते हैं और उन्हें डेटाबेस में जोड़ा जा सकता है.
दस्तावेज़
AppSearch में, डेटा की इकाई को दस्तावेज़ के तौर पर दिखाया जाता है. AppSearch डेटाबेस में मौजूद हर दस्तावेज़ की पहचान, उसके नेमस्पेस और आईडी से की जाती है. नेमस्पेस का इस्तेमाल, अलग-अलग सोर्स से डेटा को अलग करने के लिए किया जाता है. ऐसा तब किया जाता है, जब सिर्फ़ एक सोर्स से क्वेरी की जानी हो, जैसे कि उपयोगकर्ता खाते.
दस्तावेज़ों में, बनाने का टाइमस्टैंप, टाइम-टू-लिव (टीटीएल), और एक स्कोर होता है. इसका इस्तेमाल, दस्तावेज़ों को वापस पाने के दौरान रैंकिंग के लिए किया जा सकता है. किसी दस्तावेज़ को एक स्कीमा टाइप भी असाइन किया जाता है. इससे, उस दस्तावेज़ में मौजूद अन्य डेटा प्रॉपर्टी के बारे में पता चलता है.
दस्तावेज़ क्लास, किसी दस्तावेज़ का एब्स्ट्रैक्शन है. इसमें एनोटेट किए गए फ़ील्ड होते हैं, जो किसी दस्तावेज़ के कॉन्टेंट को दिखाते हैं. डिफ़ॉल्ट रूप से, दस्तावेज़ क्लास का नाम, स्कीमा टाइप का नाम सेट करता है.
खोजें
दस्तावेज़ों को इंडेक्स किया जाता है और क्वेरी देकर उन्हें खोजा जा सकता है. किसी दस्तावेज़ को खोज के नतीजों में शामिल करने के लिए, यह ज़रूरी है कि उसमें क्वेरी में शामिल शब्द मौजूद हों या वह खोज के लिए तय की गई शर्तों से मेल खाता हो. नतीजों को उनके स्कोर और रैंकिंग की रणनीति के आधार पर क्रम में लगाया जाता है. खोज के नतीजों को पेजों के तौर पर दिखाया जाता है. इन्हें क्रम से देखा जा सकता है.
AppSearch, खोज के लिए पसंद के मुताबिक बनाने की सुविधा देता है. जैसे, फ़िल्टर, पेज साइज़ कॉन्फ़िगरेशन, और स्निपेटिंग.
प्लैटफ़ॉर्म स्टोरेज, लोकल स्टोरेज या Play services स्टोरेज
AppSearch, स्टोरेज के लिए तीन समाधान उपलब्ध कराता है: LocalStorage, PlatformStorage, और
PlayServicesStorage. LocalStorage की मदद से, आपका ऐप्लिकेशन ऐप्लिकेशन के हिसाब से इंडेक्स मैनेज करता है. यह इंडेक्स, आपकी ऐप्लिकेशन डेटा डायरेक्ट्री में मौजूद होता है. PlatformStorage और PlayServicesStorage, दोनों के साथ आपका ऐप्लिकेशन, सिस्टम-वाइड सेंट्रल इंडेक्स में योगदान देता है. PlatformStorage का इंडेक्स, सिस्टम सर्वर में होस्ट किया जाता है और PlayServicesStorage का इंडेक्स, Google Play services के स्टोरेज में होस्ट किया जाता है. इन मुख्य इंडेक्स में डेटा का ऐक्सेस, सिर्फ़ उस डेटा तक सीमित है जिसे आपके ऐप्लिकेशन ने योगदान दिया है और जिसे किसी दूसरे ऐप्लिकेशन ने आपके साथ साफ़ तौर पर शेयर किया है. स्टोरेज के इन सभी विकल्पों में एक ही एपीआई का इस्तेमाल होता है. साथ ही, डिवाइस के वर्शन के हिसाब से, इन विकल्पों को एक-दूसरे से बदला जा सकता है:
Kotlin
if (BuildCompat.isAtLeastS()) {
    appSearchSessionFuture.setFuture(
        PlatformStorage.createSearchSession(
            PlatformStorage.SearchContext.Builder(mContext, DATABASE_NAME)
               .build()
        )
    )
} else {
    if (usePlayServicesStorageBelowS) {
        appSearchSessionFuture.setFuture(
            PlayServicesStorage.createSearchSession(
                PlayServicesStorage.SearchContext.Builder(mContext, DATABASE_NAME)
                    .build()
            )
        )
    } else {
        appSearchSessionFuture.setFuture(
            LocalStorage.createSearchSession(
                LocalStorage.SearchContext.Builder(mContext, DATABASE_NAME)
                    .build()
            )
        )
    }
}
Java
if (BuildCompat.isAtLeastS()) {
    mAppSearchSessionFuture.setFuture(PlatformStorage.createSearchSession(
            new PlatformStorage.SearchContext.Builder(mContext, DATABASE_NAME)
                    .build()));
} else {
    if (usePlayServicesStorageBelowS) {
        mAppSearchSessionFuture.setFuture(PlayServicesStorage.createSearchSession(
                new PlayServicesStorage.SearchContext.Builder(mContext, DATABASE_NAME)
                        .build()));
    } else {
        mAppSearchSessionFuture.setFuture(LocalStorage.createSearchSession(
                new LocalStorage.SearchContext.Builder(mContext, DATABASE_NAME)
                        .build()));
    }
}
PlatformStorage और PlayServicesStorage का इस्तेमाल करके, आपका ऐप्लिकेशन अन्य ऐप्लिकेशन के साथ डेटा को सुरक्षित तरीके से शेयर कर सकता है. इससे वे आपके ऐप्लिकेशन के डेटा को भी खोज सकते हैं. सर्टिफ़िकेट हैंडशेक का इस्तेमाल करके, ऐप्लिकेशन के डेटा को सिर्फ़ पढ़ने की अनुमति दी जाती है. इससे यह पक्का किया जाता है कि दूसरे ऐप्लिकेशन के पास डेटा पढ़ने की अनुमति है. setSchemaTypeVisibilityForPackage() के दस्तावेज़ में, इस एपीआई के बारे में ज़्यादा पढ़ें.
इसके अलावा, PlatformStorage की मदद से इंडेक्स किए गए डेटा को सिस्टम यूज़र इंटरफ़ेस (यूआई) के प्लैटफ़ॉर्म पर दिखाया जा सकता है. ऐप्लिकेशन, सिस्टम यूज़र इंटरफ़ेस (यूआई) के प्लैटफ़ॉर्म पर अपने कुछ या पूरे डेटा को दिखने से रोक सकते हैं. setSchemaTypeDisplayedBySystem() के दस्तावेज़ में, इस एपीआई के बारे में ज़्यादा पढ़ें.
| सुविधाएं | LocalStorage (Android 5.0 या इसके बाद के वर्शन के साथ काम करता है) |
PlatformStorage (Android 12 और इसके बाद के वर्शन के साथ काम करता है) |
PlayServicesStorage (Android 5.0 या इसके बाद के वर्शन के साथ काम करता है) |
|---|---|---|---|
| पूरे टेक्स्ट की बेहतर खोज | |||
| कई भाषाओं में उपलब्ध | |||
| बाइनरी साइज़ कम होना | |||
| ऐप्लिकेशन के बीच डेटा शेयर करना | |||
| सिस्टम यूज़र इंटरफ़ेस (यूआई) के प्लैटफ़ॉर्म पर डेटा दिखाने की सुविधा | |||
| दस्तावेज़ का साइज़ और संख्या, दोनों को इंडेक्स किया जा सकता है | |||
| बाइंडर के इंतज़ार के बिना तेज़ी से काम करना |
LocalStorage और PlatformStorage में से किसी एक को चुनते समय, कुछ और बातों का ध्यान रखना होगा. PlatformStorage, AppSearch सिस्टम सेवा के ऊपर Jetpack API को रैप करता है. इसलिए, LocalStorage का इस्तेमाल करने की तुलना में APK के साइज़ पर इसका कम असर पड़ता है. हालांकि, इसका मतलब यह भी है कि AppSearch सिस्टम सेवा को कॉल करते समय, AppSearch के ऑपरेशन में बाइंडर के इंतज़ार का समय भी जुड़ जाता है. PlatformStorage के साथ, AppSearch उन दस्तावेज़ों की संख्या और साइज़ को सीमित करता है जिन्हें कोई ऐप्लिकेशन इंडेक्स कर सकता है. इससे, बेहतर सेंट्रल इंडेक्स बनाने में मदद मिलती है. PlayServicesStorage पर भी वही सीमाएं लागू होती हैं जो PlatformStorage पर लागू होती हैं. साथ ही, यह सिर्फ़ उन डिवाइसों पर काम करता है जिन पर Google Play services मौजूद है.
AppSearch का इस्तेमाल शुरू करना
इस सेक्शन में दिए गए उदाहरण में, नोट रखने वाले किसी काल्पनिक ऐप्लिकेशन के साथ इंटिग्रेट करने के लिए, AppSearch API का इस्तेमाल करने का तरीका बताया गया है.
दस्तावेज़ क्लास लिखना
AppSearch के साथ इंटिग्रेट करने के लिए, सबसे पहले एक दस्तावेज़ क्लास लिखें. इससे, डेटाबेस में डाले जाने वाले डेटा के बारे में जानकारी मिलती है. @Document एनोटेशन का इस्तेमाल करके, किसी क्लास को दस्तावेज़ क्लास के तौर पर मार्क करें.दस्तावेज़ क्लास के इंस्टेंस का इस्तेमाल करके, डेटाबेस में दस्तावेज़ डाले जा सकते हैं और उनसे दस्तावेज़ वापस पाए जा सकते हैं.
यहां दिया गया कोड, नोट ऑब्जेक्ट के टेक्स्ट को इंडेक्स करने के लिए, @Document.StringProperty एनोटेट किए गए फ़ील्ड के साथ नोट दस्तावेज़ क्लास तय करता है.
Kotlin
@Document
public data class Note(

    // Required field for a document class. All documents MUST have a namespace.
    @Document.Namespace
    val namespace: String,

    // Required field for a document class. All documents MUST have an Id.
    @Document.Id
    val id: String,

    // Optional field for a document class, used to set the score of the
    // document. If this is not included in a document class, the score is set
    // to a default of 0.
    @Document.Score
    val score: Int,

    // Optional field for a document class, used to index a note's text for this
    // document class.
    @Document.StringProperty(indexingType = AppSearchSchema.StringPropertyConfig.INDEXING_TYPE_PREFIXES)
    val text: String
)
Java
@Document
public class Note {

  // Required field for a document class. All documents MUST have a namespace.
  @Document.Namespace
  private final String namespace;

  // Required field for a document class. All documents MUST have an Id.
  @Document.Id
  private final String id;

  // Optional field for a document class, used to set the score of the
  // document. If this is not included in a document class, the score is set
  // to a default of 0.
  @Document.Score
  private final int score;

  // Optional field for a document class, used to index a note's text for this
  // document class.
  @Document.StringProperty(indexingType = StringPropertyConfig.INDEXING_TYPE_PREFIXES)
  private final String text;

  Note(@NonNull String id, @NonNull String namespace, int score, @NonNull String text) {
    this.id = Objects.requireNonNull(id);
    this.namespace = Objects.requireNonNull(namespace);
    this.score = score;
    this.text = Objects.requireNonNull(text);
  }

  @NonNull
  public String getNamespace() {
    return namespace;
  }

  @NonNull
  public String getId() {
    return id;
  }

  public int getScore() {
    return score;
  }

  @NonNull
  public String getText() {
     return text;
  }
}
डेटाबेस खोलना
दस्तावेज़ों के साथ काम करने से पहले, आपको एक डेटाबेस बनाना होगा. नीचे दिया गया कोड, notes_app नाम वाला नया डेटाबेस बनाता है और AppSearchSession के लिए ListenableFuture पाता है. यह डेटाबेस से कनेक्शन दिखाता है और डेटाबेस के ऑपरेशन के लिए एपीआई उपलब्ध कराता है.
Kotlin
val context: Context = getApplicationContext()
val sessionFuture = LocalStorage.createSearchSession(
    LocalStorage.SearchContext.Builder(context, /*databaseName=*/"notes_app")
    .build()
)
Java
Context context = getApplicationContext();
ListenableFuture<AppSearchSession> sessionFuture = LocalStorage.createSearchSession(
       new LocalStorage.SearchContext.Builder(context, /*databaseName=*/ "notes_app")
               .build()
);
स्कीमा सेट करना
डेटाबेस में दस्तावेज़ डालने और उनसे दस्तावेज़ पाने से पहले, आपको स्कीमा सेट करना होगा. डेटाबेस स्कीमा में अलग-अलग तरह का स्ट्रक्चर्ड डेटा होता है. इसे "स्कीमा टाइप" कहा जाता है. नीचे दिया गया कोड, स्कीमा टाइप के तौर पर दस्तावेज़ क्लास को उपलब्ध कराकर स्कीमा सेट करता है.
Kotlin
val setSchemaRequest = SetSchemaRequest.Builder().addDocumentClasses(Note::class.java)
    .build()
val setSchemaFuture = Futures.transformAsync(
    sessionFuture,
    { session ->
        session?.setSchema(setSchemaRequest)
    }, mExecutor
)
Java
SetSchemaRequest setSchemaRequest = new SetSchemaRequest.Builder().addDocumentClasses(Note.class)
       .build();
ListenableFuture<SetSchemaResponse> setSchemaFuture =
       Futures.transformAsync(sessionFuture, session -> session.setSchema(setSchemaRequest), mExecutor);
डेटाबेस में कोई दस्तावेज़ डालना
स्कीमा टाइप जोड़ने के बाद, उस टाइप के दस्तावेज़ डेटाबेस में जोड़े जा सकते हैं.
यहां दिया गया कोड, Note दस्तावेज़ क्लास बिल्डर का इस्तेमाल करके, स्कीमा टाइप Note का दस्तावेज़ बनाता है. यह इस सैंपल के किसी भी उपयोगकर्ता को दिखाने के लिए, दस्तावेज़ नेमस्पेस user1 को सेट करता है. इसके बाद, दस्तावेज़ को डेटाबेस में डाला जाता है और पुट ऑपरेशन के नतीजे को प्रोसेस करने के लिए, एक लिसनर अटैच किया जाता है.
Kotlin
val note = Note(
    namespace="user1",
    id="noteId",
    score=10,
    text="Buy fresh fruit"
)

val putRequest = PutDocumentsRequest.Builder().addDocuments(note).build()
val putFuture = Futures.transformAsync(
    sessionFuture,
    { session ->
        session?.put(putRequest)
    }, mExecutor
)

Futures.addCallback(
    putFuture,
    object : FutureCallback<AppSearchBatchResult<String, Void>?> {
        override fun onSuccess(result: AppSearchBatchResult<String, Void>?) {

            // Gets map of successful results from Id to Void
            val successfulResults = result?.successes

            // Gets map of failed results from Id to AppSearchResult
            val failedResults = result?.failures
        }

        override fun onFailure(t: Throwable) {
            Log.e(TAG, "Failed to put documents.", t)
        }
    },
    mExecutor
)
Java
Note note = new Note(/*namespace=*/"user1", /*id=*/
                "noteId", /*score=*/ 10, /*text=*/ "Buy fresh fruit!");

PutDocumentsRequest putRequest = new PutDocumentsRequest.Builder().addDocuments(note)
       .build();
ListenableFuture<AppSearchBatchResult<String, Void>> putFuture =
       Futures.transformAsync(sessionFuture, session -> session.put(putRequest), mExecutor);

Futures.addCallback(putFuture, new FutureCallback<AppSearchBatchResult<String, Void>>() {
   @Override
   public void onSuccess(@Nullable AppSearchBatchResult<String, Void> result) {

     // Gets map of successful results from Id to Void
     Map<String, Void> successfulResults = result.getSuccesses();

     // Gets map of failed results from Id to AppSearchResult
     Map<String, AppSearchResult<Void>> failedResults = result.getFailures();
   }

   @Override
   public void onFailure(@NonNull Throwable t) {
      Log.e(TAG, "Failed to put documents.", t);
   }
}, mExecutor);
खोजें
इस सेक्शन में बताए गए खोज ऑपरेशन का इस्तेमाल करके, इंडेक्स किए गए दस्तावेज़ खोजे जा सकते हैं. यहां दिया गया कोड, user1 नेमस्पेस से जुड़े दस्तावेज़ों के लिए, डेटाबेस में "फल" शब्द से जुड़ी क्वेरी करता है.
Kotlin
val searchSpec = SearchSpec.Builder()
    .addFilterNamespaces("user1")
    .build();

val searchFuture = Futures.transform(
    sessionFuture,
    { session ->
        session?.search("fruit", searchSpec)
    },
    mExecutor
)
Futures.addCallback(
    searchFuture,
    object : FutureCallback<SearchResults> {
        override fun onSuccess(searchResults: SearchResults?) {
            iterateSearchResults(searchResults)
        }

        override fun onFailure(t: Throwable?) {
            Log.e("TAG", "Failed to search notes in AppSearch.", t)
        }
    },
    mExecutor
)
Java
SearchSpec searchSpec = new SearchSpec.Builder()
       .addFilterNamespaces("user1")
       .build();

ListenableFuture<SearchResults> searchFuture =
       Futures.transform(sessionFuture, session -> session.search("fruit", searchSpec),
       mExecutor);

Futures.addCallback(searchFuture,
       new FutureCallback<SearchResults>() {
           @Override
           public void onSuccess(@Nullable SearchResults searchResults) {
               iterateSearchResults(searchResults);
           }

           @Override
           public void onFailure(@NonNull Throwable t) {
               Log.e(TAG, "Failed to search notes in AppSearch.", t);
           }
       }, mExecutor);
SearchResults के ज़रिए बार-बार जाना
खोज के नतीजों में SearchResults का एक उदाहरण दिखता है. इससे SearchResult ऑब्जेक्ट के पेजों का ऐक्सेस मिलता है. हर SearchResult में, मैच होने वाला GenericDocument होता है. यह दस्तावेज़ का सामान्य फ़ॉर्मैट होता है, जिसमें सभी दस्तावेज़ों को बदला जाता है. नीचे दिया गया कोड, खोज के नतीजों का पहला पेज दिखाता है और नतीजे को फिर से Note दस्तावेज़ में बदल देता है.
Kotlin
Futures.transform(
    searchResults?.nextPage,
    { page: List<SearchResult>? ->
        // Gets GenericDocument from SearchResult.
        val genericDocument: GenericDocument = page!![0].genericDocument
        val schemaType = genericDocument.schemaType
        val note: Note? = try {
            if (schemaType == "Note") {
                // Converts GenericDocument object to Note object.
                genericDocument.toDocumentClass(Note::class.java)
            } else null
        } catch (e: AppSearchException) {
            Log.e(
                TAG,
                "Failed to convert GenericDocument to Note",
                e
            )
            null
        }
        note
    },
    mExecutor
)
Java
Futures.transform(searchResults.getNextPage(), page -> {
  // Gets GenericDocument from SearchResult.
  GenericDocument genericDocument = page.get(0).getGenericDocument();
  String schemaType = genericDocument.getSchemaType();

  Note note = null;

  if (schemaType.equals("Note")) {
    try {
      // Converts GenericDocument object to Note object.
      note = genericDocument.toDocumentClass(Note.class);
    } catch (AppSearchException e) {
      Log.e(TAG, "Failed to convert GenericDocument to Note", e);
    }
  }

  return note;
}, mExecutor);
दस्तावेज़ हटाना
जब कोई उपयोगकर्ता कोई नोट मिटाता है, तो ऐप्लिकेशन उससे जुड़े Note
दस्तावेज़ को डेटाबेस से मिटा देता है. इससे यह पक्का होता है कि नोट अब क्वेरी में नहीं दिखेगा. यहां दिया गया कोड, आईडी के हिसाब से डेटाबेस से Note दस्तावेज़ को हटाने का साफ़ तौर पर अनुरोध करता है.
Kotlin
val removeRequest = RemoveByDocumentIdRequest.Builder("user1")
    .addIds("noteId")
    .build()

val removeFuture = Futures.transformAsync(
    sessionFuture, { session ->
        session?.remove(removeRequest)
    },
    mExecutor
)
Java
RemoveByDocumentIdRequest removeRequest = new RemoveByDocumentIdRequest.Builder("user1")
       .addIds("noteId")
       .build();

ListenableFuture<AppSearchBatchResult<String, Void>> removeFuture =
       Futures.transformAsync(sessionFuture, session -> session.remove(removeRequest), mExecutor);
डिस्क पर सेव करना
डेटाबेस में किए गए अपडेट को समय-समय पर डिस्क में सेव किया जाना चाहिए. इसके लिए, requestFlush() को कॉल करें. यहां दिया गया कोड, requestFlush() को कॉल करता है. साथ ही, यह भी पता लगाता है कि कॉल पूरा हुआ या नहीं.
Kotlin
val requestFlushFuture = Futures.transformAsync(
    sessionFuture,
    { session -> session?.requestFlush() }, mExecutor
)

Futures.addCallback(requestFlushFuture, object : FutureCallback<Void?> {
    override fun onSuccess(result: Void?) {
        // Success! Database updates have been persisted to disk.
    }

    override fun onFailure(t: Throwable) {
        Log.e(TAG, "Failed to flush database updates.", t)
    }
}, mExecutor)
Java
ListenableFuture<Void> requestFlushFuture = Futures.transformAsync(sessionFuture,
        session -> session.requestFlush(), mExecutor);

Futures.addCallback(requestFlushFuture, new FutureCallback<Void>() {
    @Override
    public void onSuccess(@Nullable Void result) {
        // Success! Database updates have been persisted to disk.
    }

    @Override
    public void onFailure(@NonNull Throwable t) {
        Log.e(TAG, "Failed to flush database updates.", t);
    }
}, mExecutor);
सेशन बंद करना
जब कोई ऐप्लिकेशन किसी डेटाबेस ऑपरेशन को कॉल नहीं करेगा, तब AppSearchSession को बंद कर देना चाहिए. नीचे दिया गया कोड, पहले खोले गए AppSearch सेशन को बंद करता है और सभी अपडेट को डिस्क पर सेव करता है.
Kotlin
val closeFuture = Futures.transform<AppSearchSession, Unit>(sessionFuture,
    { session ->
        session?.close()
        Unit
    }, mExecutor
)
Java
ListenableFuture<Void> closeFuture = Futures.transform(sessionFuture, session -> {
   session.close();
   return null;
}, mExecutor);
अन्य संसाधन
AppSearch के बारे में ज़्यादा जानने के लिए, यहां दिए गए अन्य संसाधन देखें:
सैंपल
- Android AppSearch का सैंपल (Kotlin), एक नोट लेने वाला ऐप्लिकेशन है. यह उपयोगकर्ता के नोट को इंडेक्स करने के लिए, AppSearch का इस्तेमाल करता है. साथ ही, उपयोगकर्ताओं को अपने नोट खोजने की अनुमति देता है.
सुझाव या राय दें
इन संसाधनों की मदद से, अपने सुझाव, शिकायत या राय हमारे साथ शेयर करें:
गड़बड़ियों की शिकायत करें, ताकि हम उन्हें ठीक कर सकें.