קל לארגן דפים בעזרת אוספים
אפשר לשמור ולסווג תוכן על סמך ההעדפות שלך.
רכיב הניווט מאפשר להוסיף אנימציות של נכס ותצוגה
פעולות. רוצים ליצור אנימציות משלכם?
משאבי אנימציה.
הניווט כולל גם כמה אנימציות ברירת מחדל שיעזרו לכם להתחיל. כדי להוסיף
אנימציות לפעולה, מבצעים את הפעולות הבאות:
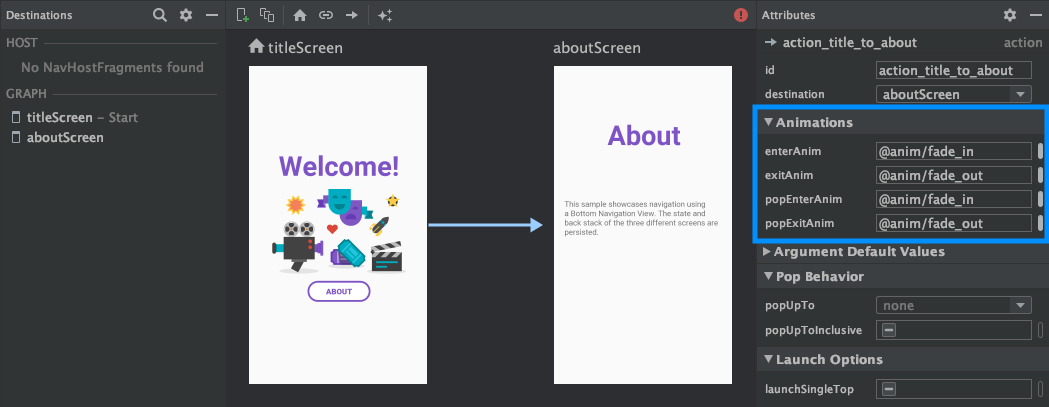
בעורך הניווט, לוחצים על הפעולה שבה האנימציה צריכה להופיע
יתרחשו.
בקטע אנימציות בחלונית מאפיינים, לוחצים על התפריט הנפתח.
החץ שליד האנימציה שרוצים להוסיף. אפשר לבחור מבין
מהסוגים הבאים:
הזנת יעד
יציאה מיעד
הזנת יעד דרך
pop action (פעולה בפופ) – פעולה
שמקפיץ יעדים נוספים מהמקבץ האחורי במהלך הניווט.
יציאה מיעד באמצעות פעולת פופ
בוחרים אנימציה מרשימת האנימציות שמופיעה בפרויקט.
איור 1. הקטע אנימציות
החלונית מאפיינים.
אחרי שמוסיפים אנימציות, לוחצים על הכרטיסייה טקסט כדי לעבור לטקסט ב-XML.
צפייה. ה-XML של האנימציות מופיע עכשיו
רכיב <action>. בדוגמה הבאה, specifyAmountFragment הוא
יעד המקור של הפעולה confirmationAction:
כשמשתפים תצוגה בין שני יעדים, אפשר להשתמש
מעבר של רכיב משותף כדי להגדיר את אופן המעבר בין התצוגה כאשר
ניווט מיעד אחד לאחר. מעברים בין רכיבים משותפים
הן חלק ממסגרת המעבר.
רכיבים משותפים מסופקים באופן פרוגרמטי ולא דרך
בקובץ XML לניווט. לכל יעד פעילות ויעד עם מקטעים יש מחלקה משנית
של Navigator.Extras
בממשק שתומך באפשרויות נוספות לניווט, כולל שיתוף
רכיבים. אפשר להעביר את הExtras האלה בזמן שיחה
navigate().
valextras=FragmentNavigatorExtras(view1to"hero_image")view.findNavController().navigate(R.id.confirmationAction,null,// Bundle of argsnull,// NavOptionsextras)
Java
FragmentNavigator.Extrasextras=newFragmentNavigator.Extras.Builder().addSharedElement(view1,"hero_image").build();Navigation.findNavController(view).navigate(R.id.details,null,// Bundle of argsnull,// NavOptionsextras);
// Rename the Pair class from the Android framework to avoid a name clashimportandroid.util.PairasUtilPair...valoptions=ActivityOptionsCompat.makeSceneTransitionAnimation(activity,UtilPair.create(view1,"hero_image"))valextras=ActivityNavigatorExtras(options)view.findNavController().navigate(R.id.details,null,// Bundle of argsnull,// NavOptionsextras)
Java
ActivityOptionsoptions=ActivityOptions.makeSceneTransitionAnimation(this,Pair.create(view1,"hero_image"));ActivityNavigatorExtrasextras=newActivityNavigatorExtras.Builder().setActivityOptions(options).build();Navigation.findNavController(view).navigate(R.id.details,null,// Bundle of argsnull,// NavOptionsextras);
דוגמאות התוכן והקוד שבדף הזה כפופות לרישיונות המפורטים בקטע רישיון לתוכן. Java ו-OpenJDK הם סימנים מסחריים או סימנים מסחריים רשומים של חברת Oracle ו/או של השותפים העצמאיים שלה.
עדכון אחרון: 2025-07-27 (שעון UTC).
[null,null,["עדכון אחרון: 2025-07-27 (שעון UTC)."],[],[],null,["# Animate transitions between destinations\n\nThe Navigation component lets you add both property and view animations to\nactions. To create your own animations, check out\n[Animation resources](/guide/topics/resources/animation-resource).\n\nNavigation also includes several default animations to get you started. To add\nanimations to an action, do the following:\n\n1. In the Navigation editor, click on the action where the animation should occur.\n2. In the **Animations** section of the **Attributes** panel, click the dropdown arrow next to the animation you'd like to add. You can choose between the following types:\n - Entering a destination\n - Exiting a destination\n - Entering a destination via a [*pop action*](/guide/navigation/navigation-navigate#pop), an action that pops additional destinations off of the back stack when navigating.\n - Exiting a destination via a pop action\n3. Choose an animation from the list of project animations that appears.\n\n**Figure 1.** The **Animations** section of the **Attributes** panel.\n\nOnce you've added animations, click the **Text** tab to toggle to the XML text\nview. The XML for the animations now appears in the corresponding\n`\u003caction\u003e` element. In the following example, `specifyAmountFragment` is the\nsource destination for the `confirmationAction` action: \n\n```xml\n\u003cfragment\n android:id=\"@+id/specifyAmountFragment\"\n android:name=\"com.example.buybuddy.buybuddy.SpecifyAmountFragment\"\n android:label=\"fragment_specify_amount\"\n tools:layout=\"@layout/fragment_specify_amount\"\u003e\n \u003caction\n android:id=\"@+id/confirmationAction\"\n app:destination=\"@id/confirmationFragment\"\n app:enterAnim=\"@anim/slide_in_right\"\n app:exitAnim=\"@anim/slide_out_left\"\n app:popEnterAnim=\"@anim/slide_in_left\"\n app:popExitAnim=\"@anim/slide_out_right\" /\u003e\n\u003c/fragment\u003e\n```\n\nAdd shared element transitions between destinations\n---------------------------------------------------\n\nWhen a view is shared between two destinations, you can use a\n*shared element transition* to define how the view transitions when\nnavigating from one destination to the other. Shared element transitions\nare part of the Transition Framework.\n| **Note:** When using shared elements transitions, you should **not** use the Animation Framework (`enterAnim`, `exitAnim`, and so on from the previous section). Instead, you should be using only the Transition Framework for setting your enter and exit transitions.\n\nShared elements are supplied programmatically rather than through your\nnavigation XML file. Activity and fragment destinations each have a subclass\nof the [`Navigator.Extras`](/reference/androidx/navigation/Navigator.Extras)\ninterface that accepts additional options for navigation, including shared\nelements. You can pass these `Extras` when calling\n[`navigate()`](/reference/androidx/navigation/NavController#navigate(int,%20android.os.Bundle,%20androidx.navigation.NavOptions,%20androidx.navigation.Navigator.Extras)).\n| **Note:** Be sure to familiarize yourself with shared element transitions before continuing. For fragment shared element transitions, see [Navigate between fragments using animations](/training/basics/fragments/animate). For activity shared element transitions, see [Start an activity using an animation](/training/transitions/start-activity#start-with-element).\n\n### Shared element transitions to a fragment destination\n\nThe [`FragmentNavigator.Extras`](/reference/androidx/navigation/fragment/FragmentNavigator.Extras)\nclass allows you to map shared elements from one destination to the next\nby their transition name, similar to using\n[`FragmentTransaction.addSharedElement()`](/reference/androidx/fragment/app/FragmentTransaction#addSharedElement(android.view.View,%20java.lang.String)).\nYou can then pass the extras to `navigate()`, as shown in the following\nexample: \n\n### Kotlin\n\n```kotlin\nval extras = FragmentNavigatorExtras(view1 to \"hero_image\")\n\nview.findNavController().navigate(\n R.id.confirmationAction,\n null, // Bundle of args\n null, // NavOptions\n extras)\n```\n\n### Java\n\n```java\nFragmentNavigator.Extras extras = new FragmentNavigator.Extras.Builder()\n .addSharedElement(view1, \"hero_image\")\n .build();\n\nNavigation.findNavController(view).navigate(\n R.id.details,\n null, // Bundle of args\n null, // NavOptions\n extras);\n```\n\n### Shared element transitions to an activity destination\n\nActivities rely on [ActivityOptionsCompat](https://developer.android.com/reference/androidx/core/app/ActivityOptionsCompat) to control Shared Element Transitions as detailed in the [Start an activity with a shared element](https://developer.android.com/training/transitions/start-activity#start-transition) documentation and as shown in the example below: \n\n### Kotlin\n\n```kotlin\n// Rename the Pair class from the Android framework to avoid a name clash\nimport android.util.Pair as UtilPair\n...\nval options = ActivityOptionsCompat.makeSceneTransitionAnimation(activity,\n UtilPair.create(view1, \"hero_image\"))\nval extras = ActivityNavigatorExtras(options)\nview.findNavController().navigate(\n R.id.details,\n null, // Bundle of args\n null, // NavOptions\n extras)\n```\n\n### Java\n\n```java\nActivityOptions options = ActivityOptions.makeSceneTransitionAnimation(this,\n Pair.create(view1, \"hero_image\"));\n\nActivityNavigatorExtras extras = new ActivityNavigatorExtras.Builder()\n .setActivityOptions(options)\n .build();\n\n\nNavigation.findNavController(view).navigate(\n R.id.details,\n null, // Bundle of args\n null, // NavOptions\n extras);\n```\n\nApply pop animations to activity transitions\n--------------------------------------------\n\nWhen you navigate to or from an `Activity`, pop animations are not applied\nautomatically. Instead, you must call\n[`ActivityNavigator.applyPopAnimationsToPendingTransition()`](/reference/androidx/navigation/ActivityNavigator#applyPopAnimationsToPendingTransition(android.app.Activity))\nfrom the target `Activity` destination where the animation should occur: \n\n### Kotlin\n\n```kotlin\noverride fun finish() {\n super.finish()\n ActivityNavigator.applyPopAnimationsToPendingTransition(this)\n}\n```\n\n### Java\n\n```java\n@Override\npublic void finish() {\n super.finish();\n ActivityNavigator.applyPopAnimationsToPendingTransition(this);\n}\n```"]]