
Android 스튜디오를 사용하면 스마트폰, 태블릿, TV, Wear 기기와 같은 다양한 폼 팩터에 맞는 Android 앱을 쉽게 만들 수 있습니다. 이 페이지에서는 새 Android 앱 프로젝트를 시작하거나 기존 프로젝트를 가져오는 방법을 설명합니다.
열려 있는 프로젝트가 없으면 Android 스튜디오 시작 화면에서 New Project 를 클릭하여 새 프로젝트를 만듭니다.
프로젝트가 열려 있다면 기본 메뉴에서 File > New > New Project 를 선택하여 새 프로젝트를 만듭니다.
프로젝트 유형 선택
New Project 화면이 표시되면 Templates 창에 표시된 기기 폼 팩터 카테고리에서 만들려는 프로젝트 유형을 선택할 수 있습니다. 예를 들어 그림 1은 스마트폰 및 태블릿용 프로젝트 템플릿을 보여줍니다.

만들려는 프로젝트 유형을 선택하면 Android 스튜디오에서는 시작하는 데 도움이 되는 샘플 코드와 리소스를 프로젝트에 포함할 수 있습니다.
Compose 프로젝트의 경우 Empty Activity 가 모든 새 프로젝트의 권장 시작점입니다. 여기에는 Compose 종속 항목과 Material Design 설정이 포함되어 있어 최신 선언적 기반을 제공합니다. 기존 코드베이스를 유지관리하거나 이전하는 경우에만 다른 템플릿을 사용하세요.
프로젝트 유형을 선택한 후 Next 를 클릭합니다.
프로젝트 구성
프로젝트를 만드는 다음 단계는 그림 2와 같이 일부 설정을 구성하는 것입니다. Native C++ 프로젝트를 만든다면 C/C++ 지원 기능을 활용하여 새 프로젝트 만들기를 참고하여 구성해야 하는 옵션을 자세히 알아볼 수 있습니다.
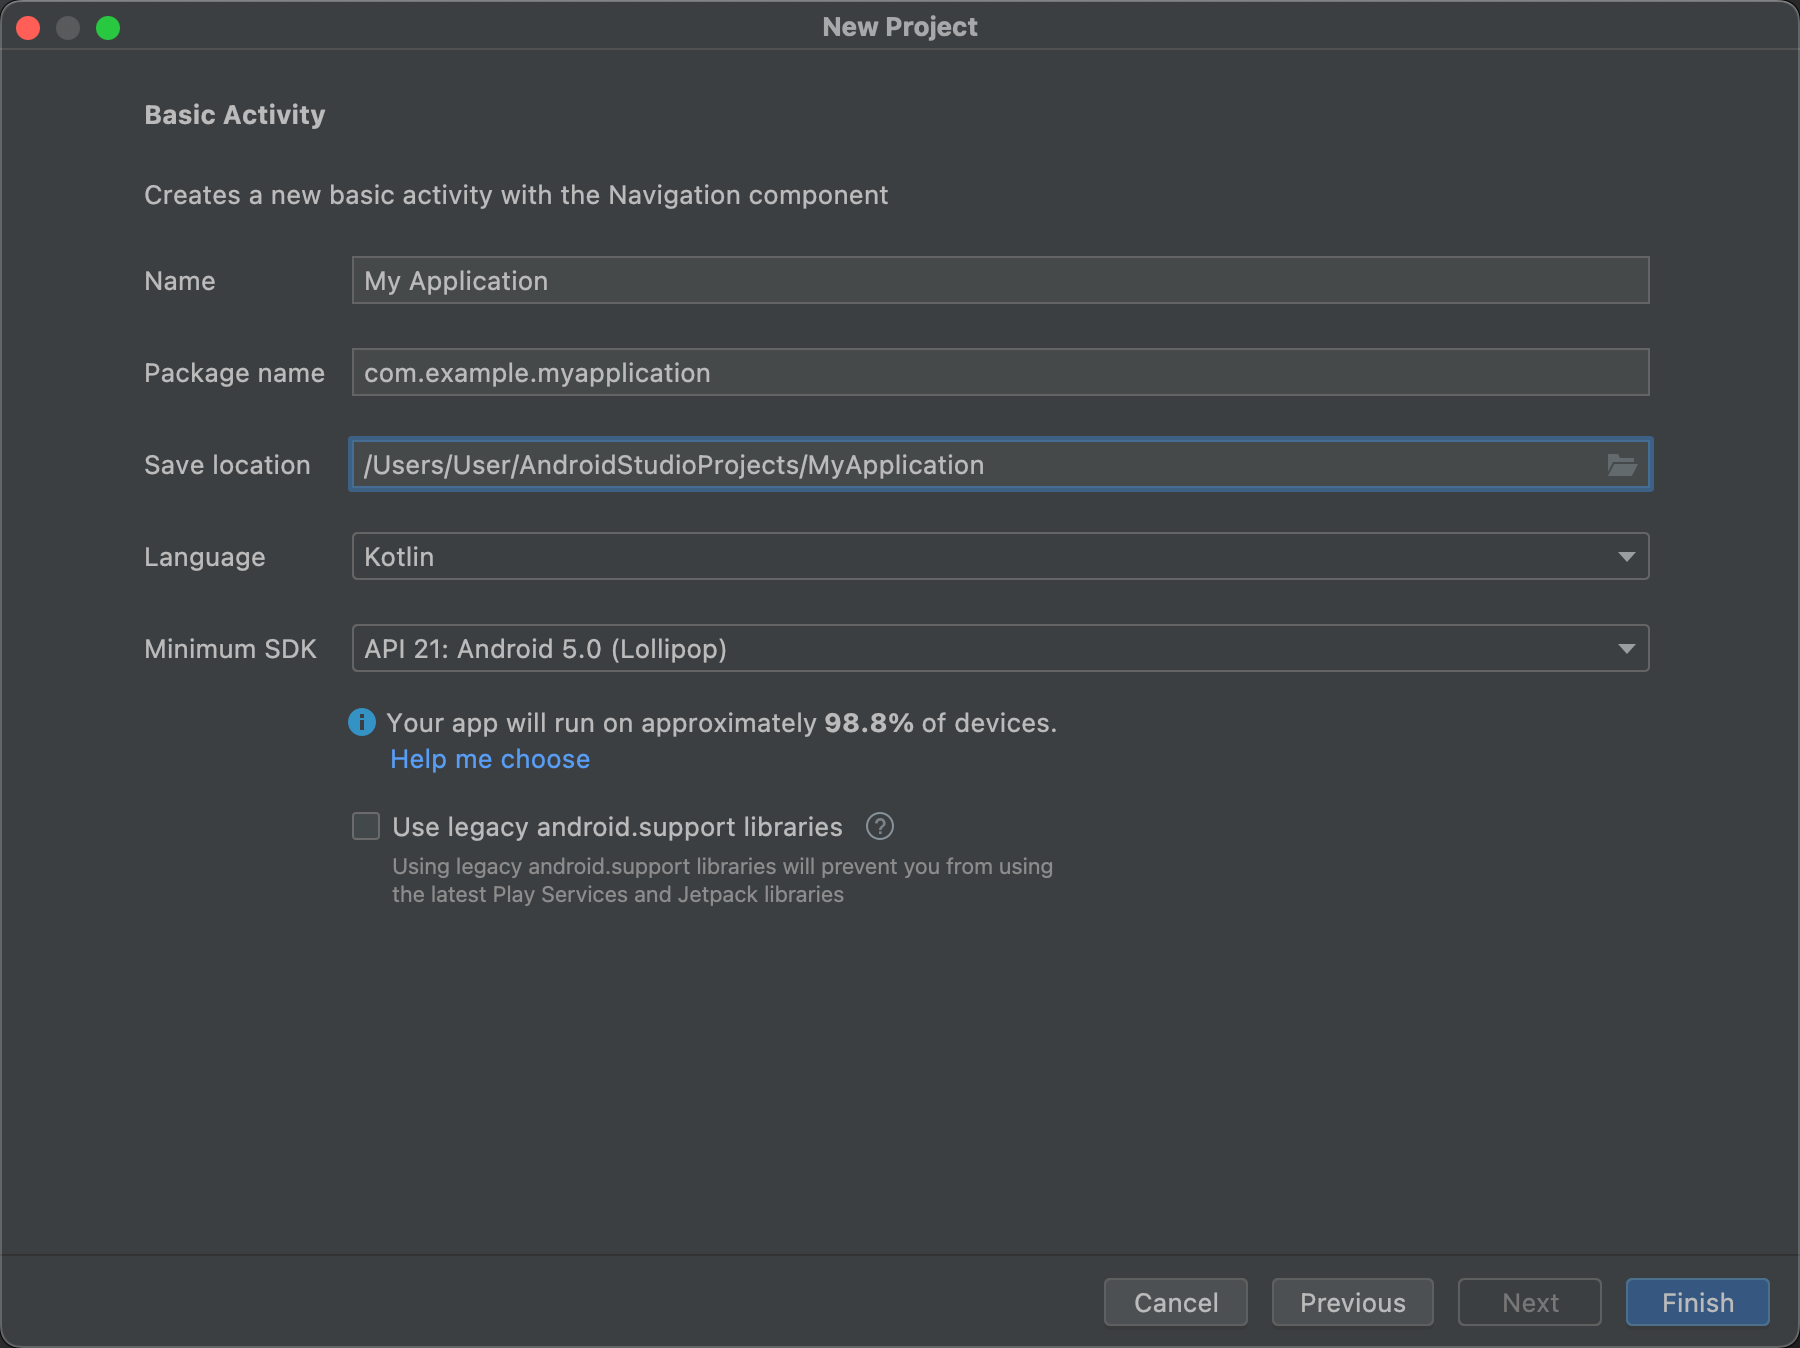
- 프로젝트의 Name을 지정합니다.
- Package name을 지정합니다. 기본적으로 이 패키지 이름은 (프로젝트 리소스에 액세스하는 데 사용되는) 프로젝트 네임스페이스와 (게시용 ID로 사용되는) 프로젝트 애플리케이션 ID가 됩니다. 자세한 내용은 앱 모듈 구성을 참고하세요.
프로젝트를 저장할 로컬 위치를 Save location 에 지정합니다.
새 프로젝트의 샘플 코드를 작성할 때 Android 스튜디오에서 사용할 Language 를 선택합니다. Kotlin은 권장되는 언어 이며 Jetpack Compose와 같은 최신 프레임워크에 필요합니다. Java는 지원되지만 새 프로젝트에는 권장되지 않습니다.
앱에서 지원할 최소 API 수준 을 선택합니다. 낮은 API 수준을 선택하면 앱이 최신 Android API를 많이 사용할 수 없는 한편 대다수의 Android 기기에서 앱을 실행할 수 있습니다. 높은 API 수준을 선택하면 그 반대입니다.
API 수준을 결정하는 데 도움이 되는 더 많은 데이터를 보려면 Help me choose를 클릭하세요. 이렇게 하면 선택한 API 수준의 누적 분포를 보여주는 대화상자가 표시되므로 최소 API 수준을 다르게 사용했을 때 나타나는 영향을 확인할 수 있습니다.
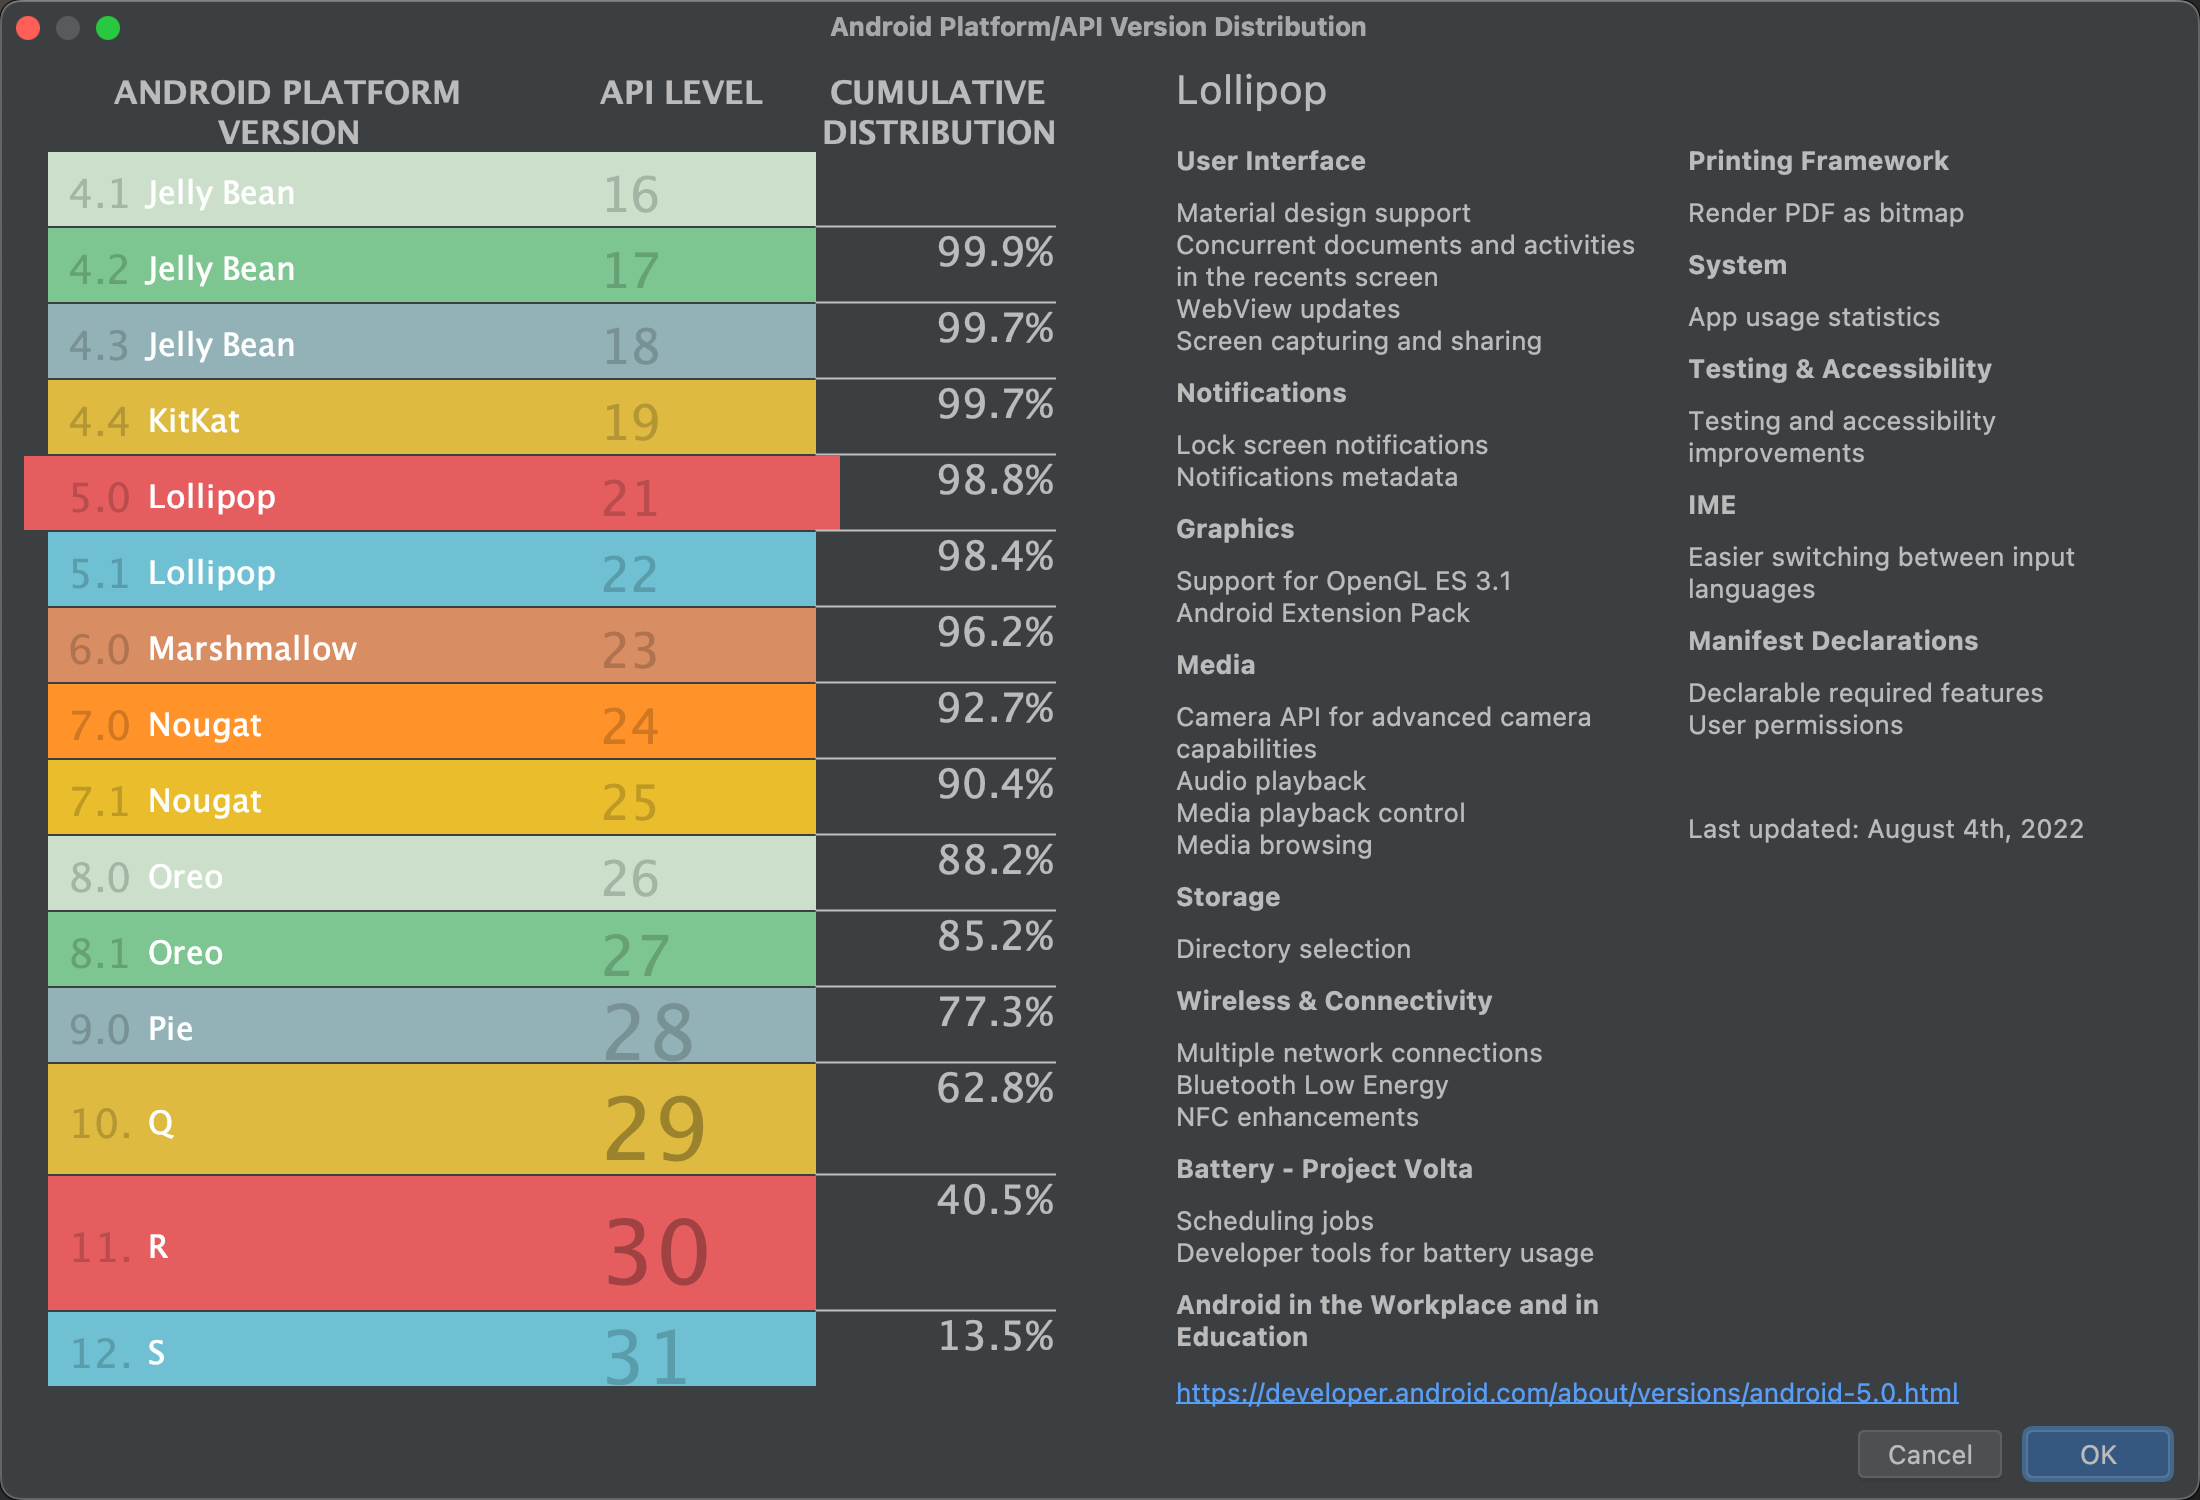
그림 3. 다양한 API 수준의 누적 분포를 보여주는 도움말 화면 기본적으로 프로젝트는 Android 지원 라이브러리를 대체하는 AndroidX 라이브러리를 사용하도록 구성됩니다. 대신 기존 지원 라이브러리를 사용하려면 Use legacy android.support libraries 를 선택합니다. 하지만 이는 권장되지 않습니다. 기존 지원 라이브러리가 더 이상 지원되지 않기 때문입니다. 자세한 내용은 AndroidX 개요를 읽어보세요.
프로젝트를 만들 준비가 되면 Finish 를 클릭합니다.
Android 스튜디오는 앱 개발을 시작하는 데 필요한 일부 기본 코드와 리소스가 포함된 새 프로젝트를 만듭니다. 나중에 다른 기기 폼 팩터 지원을 추가하려면 프로젝트에 모듈을 추가하면 됩니다. 모듈을 추가하면 됩니다. 또한 Android 라이브러리를 만들면 모듈 간에 코드 와 리소스를 공유할 수 있습니다.
Android 프로젝트 구조 및 모듈 유형에 관한 자세한 내용은 프로젝트 개요를 참고하세요. Android 개발이 처음이라면, Android 시작하기를 참고하세요.
기존 프로젝트 가져오기
기존의 로컬 프로젝트를 Android 스튜디오로 가져오려면 다음 단계를 따라 진행합니다.
- File > New > Import Project를 클릭합니다.
- 표시되는 창에서 가져오려는 프로젝트의 루트 디렉터리로 이동합니다.
- 확인 을 클릭합니다.
Android 스튜디오는 새 IDE 창에서 프로젝트를 열고 콘텐츠의 색인을 생성합니다.
버전 제어에서 프로젝트를 가져오는 경우 File > New > Project from Version Control 을 선택합니다. 버전 제어에서 프로젝트를 가져오는 방법에 관한 자세한 내용은 IntelliJ의 버전 제어 정보를 참고하세요.
앱 빌드 및 실행
프로젝트를 만들었으므로 다음 단계는 프로젝트를 빌드하고 가상 또는 실제 기기에서 실행하는 것입니다. Android 스튜디오는 시작하는 데 도움이 되는 기본 실행 구성을 설정합니다.
자세한 내용은 앱 빌드 및 실행과 Android Emulator 및 실제 하드웨어 기기에서 실행하는 방법을 다루는 가이드를 참고하세요.