크기 조절 가능한 비트맵 만들기(9-패치 파일)
컬렉션을 사용해 정리하기
내 환경설정을 기준으로 콘텐츠를 저장하고 분류하세요.
Draw 9-패치 도구는 Android 스튜디오에 포함된 WYSIWYG 편집기입니다. 이 도구를 사용하면 뷰의 콘텐츠와 화면의 크기를 수용하도록 자동으로 크기가 조절되는 비트맵 이미지를 만들 수 있습니다. 이미지 내에 그려진 표시기를 기반으로 이미지에서 선택된 부분을 가로 또는 세로로 확장할 수 있습니다.
Ninepatch 그래픽에 관한 소개와 그 작동 방식은 Ninepatch 드로어블을 참고하세요.
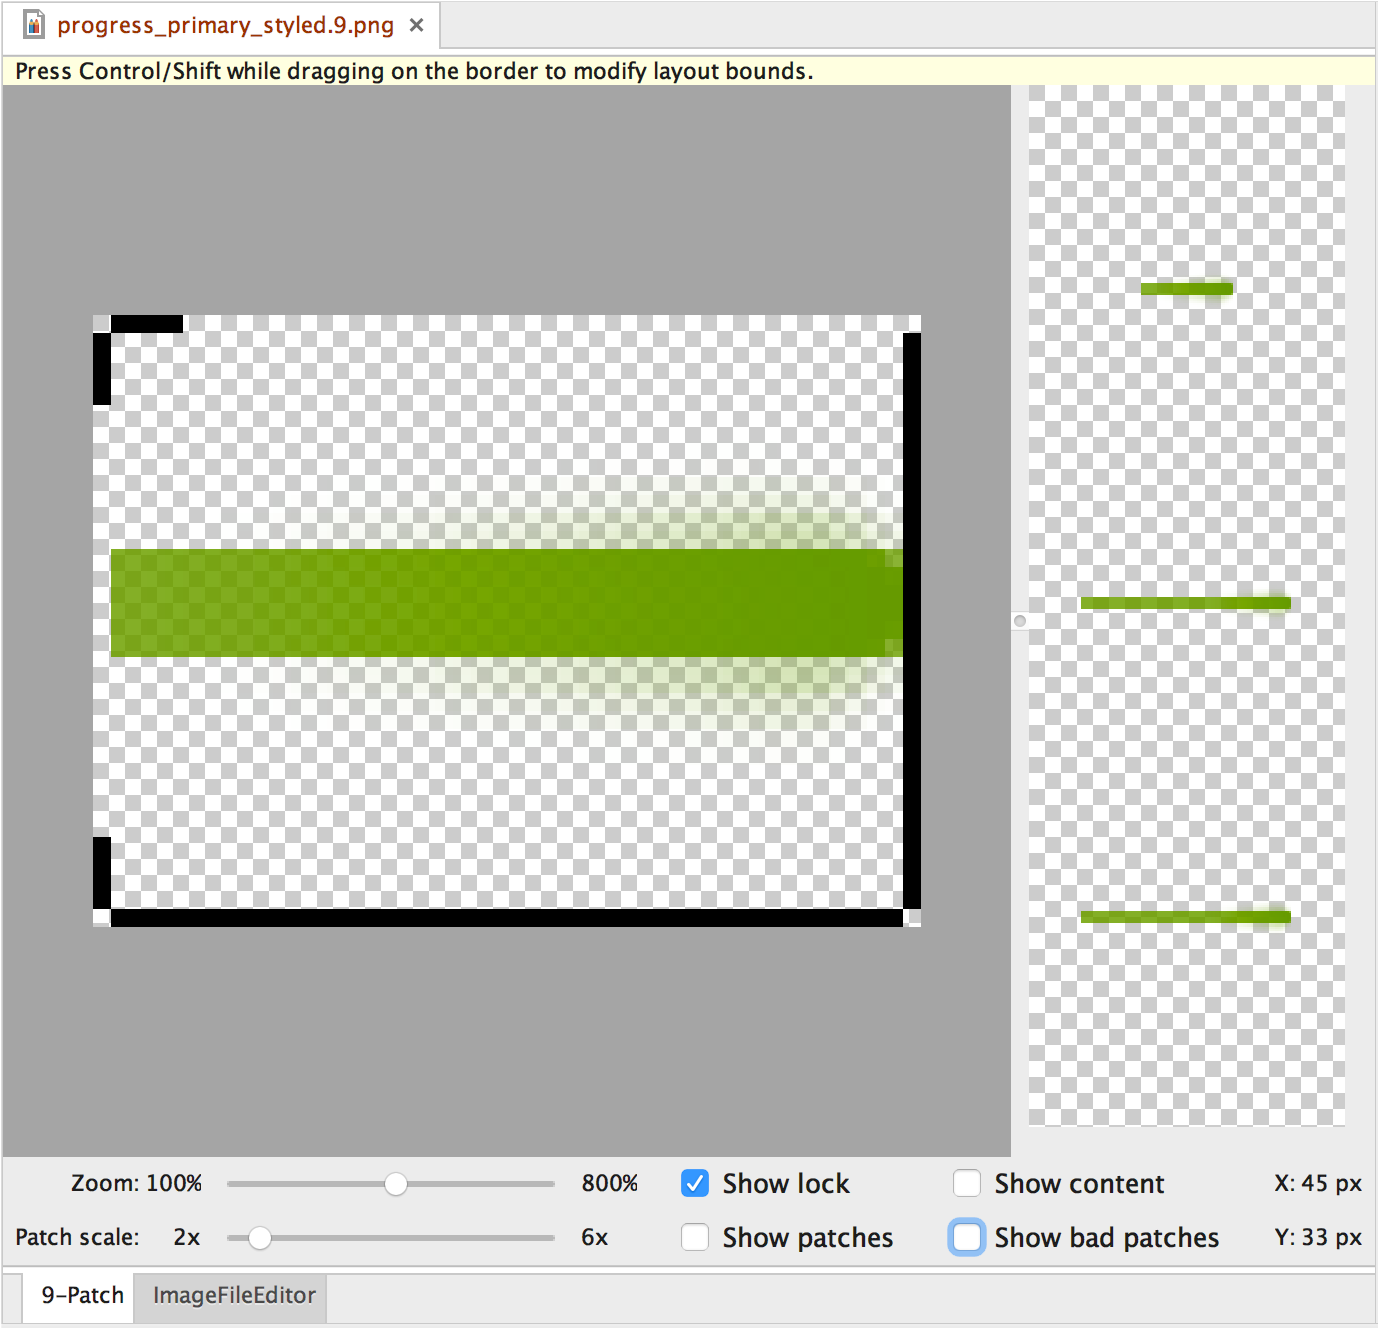
그림 1. NinePatch 이미지가 표시된 Android 스튜디오의 Draw 9-패치 도구
다음 단계를 따라 Android 스튜디오에서 Draw 9-패치 도구를 사용하여 Ninepatch 그래픽을 만드세요. Ninepatch 이미지를 만드는 데 사용할 PNG 이미지가 필요합니다.
- Android 스튜디오에서 NinePatch 이미지를 생성하려는 PNG 이미지를 마우스 오른쪽 버튼으로 클릭하고 Create 9-patch file을 클릭합니다.
- Ninepatch 이미지의 파일 이름을 입력하고 OK를 클릭합니다. 그러면 파일 확장자가
.9.png
인 이미지 파일이 생성됩니다.
- 새 NinePatch 파일을 더블클릭하여 Android 스튜디오에서 엽니다.
작업공간이 열리면 왼쪽 창의 그리기 영역에서 늘릴 수 있는 패치와 콘텐츠 영역의 선을 수정할 수 있습니다. 오른쪽 창은 그래픽을 늘렸을 때의 모습을 미리 볼 수 있는 미리보기 영역입니다.
- 1픽셀의 경계 범위 내부를 클릭하여 늘릴 수 있는 패치와 (선택적으로) 콘텐츠 영역을 정의하는 선을 그립니다.
마우스 오른쪽 버튼을 클릭하여 이전에 그린 선을 삭제합니다(Mac에서는 Shift 키를 누른 상태에서 클릭).
- 완료하면 File > Save를 클릭하여 변경사항을 저장합니다.
Android 스튜디오에서 기존 Ninepatch 파일을 열려면 파일을 더블클릭합니다.
NinePatch 그래픽의 배율이 올바로 낮아지는지 확인하려면 늘릴 수 있는 영역의 크기가 2x2픽셀 이상인지 확인하세요.
그렇지 않으면 해당 영역이 축소될 때 사라질 수 있습니다. 크기 조정 중 경계 부분의 색상이 변경될 수 있는 보간을 방지하려면 늘릴 수 있는 영역 전후의 그래픽에 1픽셀의 여유 공간을 추가로 제공합니다.
참고: 일반 PNG 파일(*.png
)은 이미지 주위에 빈 1픽셀 테두리가 추가되어 로드됩니다. 늘릴 수 있는 패치와 콘텐츠 영역을 테두리 내에서 그릴 수 있습니다.
이전에 저장된 Ninepatch 파일(*.9.png
)은 그리기 영역이 추가되지 않고 그대로 로드됩니다. 이미 존재하기 때문입니다.
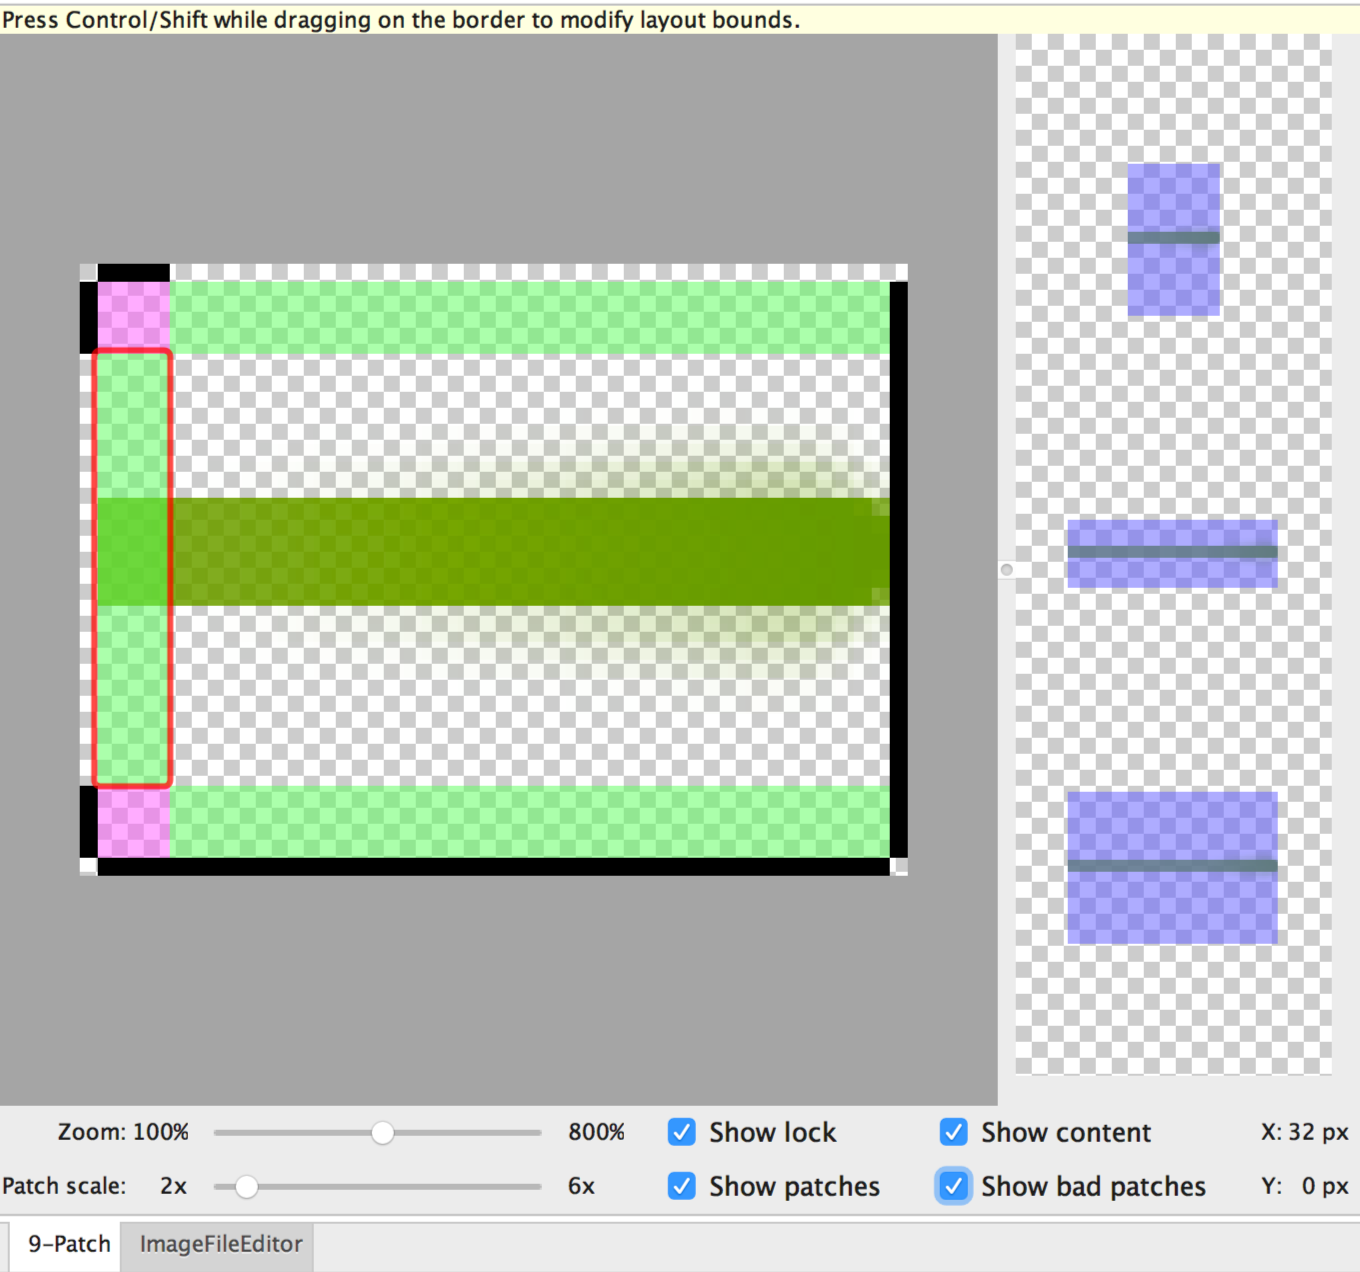
그림 2. 콘텐츠, 패치, 잘못된 패치를 보여주는 Android 스튜디오의 Ninepatch 이미지
다음과 같은 선택적 컨트롤이 있습니다.
- Zoom: 그리기 영역에서 그래픽의 확대/축소 수준을 조정합니다.
- Patch scale: 미리보기 영역에서 이미지의 크기를 조정합니다.
- Show lock: 그래픽 위에 마우스를 놓을 때 그릴 수 없는 영역을 시각화합니다.
- Show patches: 그리기 영역의 늘릴 수 있는 분홍색 패치를 미리 봅니다. 분홍색은 그림 2와 같이 늘릴 수 있는 패치를 나타냅니다.
- Show content: 미리보기 이미지에서 콘텐츠 영역을 강조표시합니다. 보라색은 그림 2와 같이 콘텐츠가 허용되는 영역을 나타냅니다.
- Show bad patches: 그림 2에 나오는 것처럼 늘렸을 때 그래픽에 아티팩트가 생길 수 있는 패치 영역 주변에 빨간색 테두리를 추가합니다. 잘못된 패치를 모두 제거하면 늘린 이미지의 시각적 일관성이 유지됩니다.
이 페이지에 나와 있는 콘텐츠와 코드 샘플에는 콘텐츠 라이선스에서 설명하는 라이선스가 적용됩니다. 자바 및 OpenJDK는 Oracle 및 Oracle 계열사의 상표 또는 등록 상표입니다.
최종 업데이트: 2025-07-27(UTC)
[null,null,["최종 업데이트: 2025-07-27(UTC)"],[],[],null,["# Create resizable bitmaps (9-patch files)\n\nThe Draw 9-patch tool is a WYSIWYG editor included in Android Studio. The tool lets you create\nbitmap images that automatically resize to accommodate the contents of the view and the size of\nthe screen. You can scale selected parts of the image horizontally or vertically based on indicators\ndrawn within the image.\n\nFor an introduction to NinePatch graphics and how they work, read\n[NinePatch drawables](/guide/topics/graphics/2d-graphics#nine-patch).\n\n**Figure 1.** Android Studio's\nDraw 9-patch tool displaying a NinePatch image.\n\nFollow these steps to create a NinePatch graphic using the Draw 9-patch tool in Android\nStudio. You'll need the PNG image that you'd like to create a NinePatch image from.\n\n1. In Android Studio, right-click the PNG image you'd like to create a NinePatch image from, then click **Create 9-patch file**.\n2. Enter a filename for your NinePatch image and click **OK** . Your image will be created with the `.9.png` file extension.\n3. Double-click your new NinePatch file to open it in Android Studio. \n\n In the workspace that opens, the left pane is your drawing area, where you can edit\n the lines for the stretchable patches and content area. The right\n pane is the preview area, where you can preview your graphic when stretched.\n4. Click within the 1-pixel perimeter to draw the lines that define the stretchable patches and (optional) the content area. \n\n Right-click to erase\n previously drawn lines (on Mac, hold Shift and click).\n5. When done, click **File** \\\u003e **Save** to save your changes.\n\nTo open an existing NinePatch file in Android\nStudio, double-click the file.\n\nTo make sure that your NinePatch graphics scale down properly, verify that any\nstretchable regions are at least 2x2 pixels in size.\nOtherwise, those regions may disappear when scaled down. To avoid interpolation during scaling\nthat may cause the color at the boundaries to change, provide 1 pixel of extra safe\nspace in the graphics before and after stretchable regions.\n\n**Note:** A normal PNG file (`*.png`) is\nloaded with an empty 1-pixel border added around the image. You can draw\nthe stretchable patches and content area within the border.\nA previously saved NinePatch file (`*.9.png`) is loaded as-is,\nwith no drawing area added because it already exists.\n\n**Figure 2.** A NinePatch image in Android Studio\nshowing content, patches, and bad patches.\n\nOptional controls include:\n\n- **Zoom**: Adjust the zoom level of the graphic in the drawing area.\n- **Patch scale**: Adjust the scale of the images in the preview area.\n- **Show lock**: Visualize the non-drawable area of the graphic on mouse-over.\n- **Show patches**: Preview the pink stretchable patches in the drawing area. Pink indicates a stretchable patch, as shown in figure 2.\n- **Show content**: Highlight the content area in the preview images. Purple indicates the area where content is allowed, as shown in figure 2.\n- **Show bad patches**: Adds a red border around patch areas that may produce artifacts in the graphic when stretched, as shown in figure 2. If you eliminate all bad patches, you will maintain the visual coherence of your stretched image."]]