
Технология глубоких ссылок позволяет напрямую перенаправлять пользователей в ваше приложение из веб-браузеров, уведомлений, социальных сетей, рекламы и других источников. Глубокие ссылки обеспечивают прямые переходы между приложениями и веб-сайтами, что помогает повысить вовлеченность пользователей за счет контекстного, целевого контента.
В этом руководстве объясняется, как работает глубокая перелинковка, а также как создавать и тестировать прямые ссылки на ваш контент.
Для прямых ссылок, ведущих на ваш собственный веб-сайт или домен, мы рекомендуем использовать App Links, которые обеспечивают бесперебойную и надежную работу для ваших пользователей.
Как работает глубокая ссылка
Глубокие ссылки — это общая системная функция Android, поддерживаемая во всех версиях и на всех устройствах. Она использует систему Intents Android для перенаправления глубоких ссылок на заинтересованные приложения. Приложения, которые хотят обрабатывать определенный URI глубокой ссылки, объявляют соответствующий фильтр Intent в своих файлах манифеста приложения.
Во время выполнения, когда пользователь нажимает на ссылку, Android запускает Intent и пытается перенаправить его в приложение. Поскольку несколько приложений могут объявлять фильтры Intent, соответствующие заданному URI, Android выполняет следующие действия в указанном порядке для перенаправления Intent:
- Откройте приложение по умолчанию, которое может обрабатывать данный URI, если таковое было указано.
- Откройте единственное доступное приложение, которое может обрабатывать этот URI.
- Предоставьте пользователю возможность выбрать приложение в диалоговом окне уточнения .
Это означает, что, даже если ваши фильтры намерений соответствуют заданному URI, нет гарантии, что система направит намерение прямой ссылки в ваше приложение. Пользователь играет ключевую роль в управлении тем, какое приложение обработает намерение, что дает ему контроль и возможность выбора. Для большего контроля над прямыми ссылками на ваш собственный веб-сайт и домены попробуйте использовать ссылки приложений.
В диалоговом окне Android пользователь может увидеть все установленные приложения, зарегистрированные для обработки интента глубокой ссылки. Пользователь также может выбрать приложение в качестве приложения по умолчанию для этого типа ссылок. После того, как пользователь выберет приложение по умолчанию, система больше не будет отображать диалоговое окно для этого конкретного интента, и выбранное приложение будет открываться автоматически.
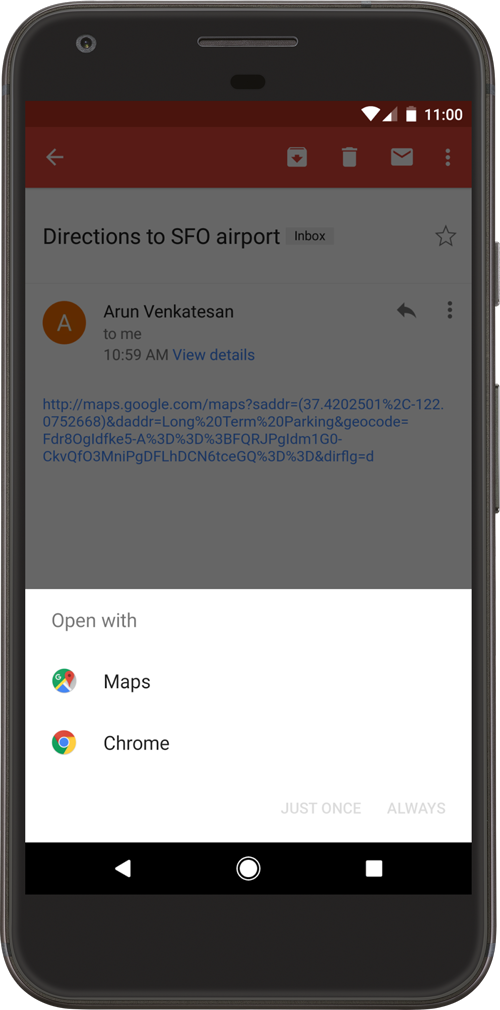
Рисунок 1. Диалог разрешения неоднозначности.
Поведение диалогового окна уточнения ссылок менялось в зависимости от версии Android. Например, в Android 12 и выше веб-ссылки, не являющиеся проверенными ссылками на приложения, обычно открываются в веб-браузере по умолчанию, тогда как в более ранних версиях диалоговое окно уточнения ссылок могло появиться, если приложение могло обработать данную веб-ссылку.
Примечание : Начиная с Android 12 (уровень API 31), универсальный веб-интент разрешается в активность вашего приложения только в том случае, если ваше приложение одобрено для конкретного домена, указанного в этом веб-интенте. Если ваше приложение не одобрено для этого домена, веб-интент разрешается в браузерное приложение пользователя по умолчанию.
Типы глубоких ссылок
На Android можно поддерживать три типа глубоких ссылок:
- Пользовательские прямые ссылки : это прямые ссылки, использующие пользовательскую схему URI (
example://products/123), чтобы перенаправить пользователя непосредственно к определенному контенту внутри приложения. Они эффективны для внутренней навигации или ссылок из контролируемых вами источников, но не являются стандартными веб-ссылками и могут вызвать диалоговое окно уточнения, если другое приложение зарегистрирует ту же пользовательскую схему. - Веб-ссылки : это прямые ссылки, использующие стандартные схемы
httpиhttps. Они более универсальны, поскольку представляют собой стандартные URL-адреса, но на Android 12 и выше они почти всегда будут вызывать диалоговое окно уточнения, что означает, что они, скорее всего, будут обрабатываться веб-браузером пользователя по умолчанию, а не перенаправляться в ваше приложение. - Ссылки на приложения : доступны начиная с Android 6.0 (уровень API 23), это проверенные веб-ссылки. С помощью сопоставления веб-сайтов вы можете доказать системе Android, что являетесь владельцем домена. После проверки система автоматически перенаправляет ссылки с этого домена непосредственно в ваше приложение, минуя диалоговое окно уточнения. Это обеспечивает надежный и бесперебойный пользовательский опыт.
Добавьте фильтры намерений для входящих ссылок.
Чтобы создать ссылку на контент вашего приложения, добавьте в манифест фильтр намерений, содержащий следующие элементы и значения атрибутов:
Укажите действие ACTION_VIEW для интента, чтобы фильтр интента был доступен из поиска Google.
Добавьте один или несколько тегов <data> , каждый из которых представляет собой формат URI, указывающий на активность. Как минимум, тег <data> должен содержать атрибут android:scheme .
Вы можете добавить дополнительные атрибуты, чтобы еще точнее определить тип URI, который принимает активность. Например, у вас может быть несколько активностей, принимающих похожие URI, но отличающихся просто именем пути. В этом случае используйте атрибут android:path или его варианты pathPattern или pathPrefix , чтобы различать, какую активность система должна открывать для разных путей URI.
Добавьте категорию BROWSABLE . Она необходима для того, чтобы фильтр намерений был доступен из веб-браузера. Без неё переход по ссылке в браузере не приведёт к вашему приложению.
Также добавьте категорию DEFAULT . Это позволит вашему приложению реагировать на неявные намерения. Без этого активность может быть запущена только в том случае, если намерение указывает имя компонента вашего приложения.
Следующий фрагмент XML-кода показывает, как можно указать фильтр намерений в манифесте для создания глубоких ссылок. URI "example://gizmos" и "http://www.example.com/gizmos" оба ведут к этому действию.
<activity
    android:name="com.example.android.GizmosActivity"
    android:label="@string/title_gizmos" >
    <intent-filter android:label="@string/filter_view_http_gizmos">
        <action android:name="android.intent.action.VIEW" />
        <category android:name="android.intent.category.DEFAULT" />
        <category android:name="android.intent.category.BROWSABLE" />
        <!-- Accepts URIs that begin with "http://www.example.com/gizmos” -->
        <data android:scheme="http"
              android:host="www.example.com"
              android:pathPrefix="/gizmos" />
        <!-- note that the leading "/" is required for pathPrefix-->
    </intent-filter>
    <intent-filter android:label="@string/filter_view_example_gizmos">
        <action android:name="android.intent.action.VIEW" />
        <category android:name="android.intent.category.DEFAULT" />
        <category android:name="android.intent.category.BROWSABLE" />
        <!-- Accepts URIs that begin with "example://gizmos” -->
        <data android:scheme="example"
              android:host="gizmos" />
    </intent-filter>
</activity>
Обратите внимание, что два фильтра намерений отличаются только элементом <data> . Хотя в один фильтр можно включить несколько элементов <data> , важно создавать отдельные фильтры, если вы хотите задать уникальные URL-адреса (например, определенную комбинацию scheme и host ), поскольку несколько элементов <data> в одном фильтре намерений фактически объединяются, чтобы учесть все вариации их объединенных атрибутов. Например, рассмотрим следующее:
<intent-filter>
  ...
  <data android:scheme="https" android:host="www.example.com" />
  <data android:scheme="app" android:host="open.my.app" />
</intent-filter>
Может показаться, что поддерживаются только https://www.example.com и app://open.my.app . Однако на самом деле поддерживаются эти два адреса, а также следующие: app://www.example.com и https://open.my.app .
Внимание : если несколько действий содержат фильтры намерений, которые ссылаются на одну и ту же проверенную ссылку на приложение Android, то нет гарантии, какое именно действие обработает эту ссылку.
После добавления в манифест приложения фильтров намерений с URI для содержимого активности, Android сможет направлять в ваше приложение любое Intent , имеющее соответствующие URI.
Чтобы узнать больше о настройке фильтров намерений, см. раздел «Разрешить другим приложениям запускать вашу активность» .
Считывание данных из входящих интентов.
Как только система запустит вашу активность через фильтр намерений, вы можете использовать данные, предоставленные Intent , чтобы определить, что вам нужно отобразить. Вызовите методы getData() и getAction() чтобы получить данные и действие, связанные с входящим Intent . Вы можете вызывать эти методы в любое время в течение жизненного цикла активности, но обычно это следует делать во время ранних коллбэков, таких как onCreate() или onStart .
Вот фрагмент кода, демонстрирующий, как получить данные из Intent :
Котлин
override fun onCreate(savedInstanceState: Bundle?) {
    super.onCreate(savedInstanceState)
    setContentView(R.layout.main)

    val action: String? = intent?.action
    val data: Uri? = intent?.data
}
Java
@Override
public void onCreate(Bundle savedInstanceState) {
    super.onCreate(savedInstanceState);
    setContentView(R.layout.main);

    Intent intent = getIntent();
    String action = intent.getAction();
    Uri data = intent.getData();
}
Следуйте этим рекомендациям, чтобы улучшить пользовательский опыт:
- Прямая ссылка должна вести пользователей непосредственно к контенту без каких-либо подсказок, промежуточных страниц или авторизации. Убедитесь, что пользователи могут видеть контент приложения, даже если они никогда ранее не открывали это приложение. Допустимо запрашивать у пользователей подтверждение при последующих взаимодействиях или при открытии приложения из лаунчера.
- Следуйте рекомендациям по дизайну, описанным в разделе «Навигация с помощью кнопок «Назад» и «Вверх»» , чтобы ваше приложение соответствовало ожиданиям пользователей в отношении обратной навигации после того, как они попадут в приложение по прямой ссылке.
Проверьте свои прямые ссылки
Вы можете использовать Android Debug Bridge с инструментом Activity Manager (am), чтобы проверить, что указанные вами URI фильтров намерений для глубоких ссылок ведут к правильной активности приложения. Вы можете запустить команду adb на устройстве или эмуляторе.
Общий синтаксис для проверки URI фильтра намерений с помощью adb выглядит следующим образом:
$ adb shell am start
        -W -a android.intent.action.VIEW
        -d <URI> <PACKAGE>
Например, следующая команда пытается просмотреть активность целевого приложения, связанную с указанным URI.
$ adb shell am start
        -W -a android.intent.action.VIEW
        -d "example://gizmos" com.example.android
Примечание : При определении коллекции примитивных типов в маршруте, например, **@Serializable data class Product(val colors: List)** , автоматически генерируемый формат URL-адреса для глубокой ссылки будет **basePath?colors={value**} . Если вы попытаетесь указать URI с несколькими параметрами запроса (например, **basepath?colors=red&colors=blue** ), необходимо экранировать амперсанд (например, **basepath?colors=red\&colors=blue** ).
В манифесте и обработчике намерений, которые вы устанавливаете, определяется связь между вашим приложением и веб-сайтом, а также то, что делать с входящими ссылками. Однако, чтобы система рассматривала ваше приложение как обработчик по умолчанию для набора URI, необходимо также запросить у системы проверку этой связи. В руководстве «Проверка ссылок приложения» объясняется, как реализовать эту проверку.
Чтобы узнать больше об интентах и ссылках на приложения, ознакомьтесь со следующими ресурсами:
- Намерения и фильтры намерений
- Разрешите другим приложениям запускать вашу активность.
- Добавление ссылок в Android-приложения с помощью Android Studio