Android 其中一項最重要的功能,就是應用程式會根據要執行的「動作」,將使用者導向其他應用程式。舉例來說,如果您想要在地圖上顯示商家地址,您並不需要在您的應用程式中建立地圖。不過,您倒是可以使用 Intent 來提出要求來查看地址。接下來,Android 系統會啟動一個應用程式,以在地圖上顯示地址。
如第一個類別「打造第一個應用程式」一文所述,您必須使用意圖在自己的應用程式中瀏覽不同活動。為此,您通常可以使用「明確意圖」,這種意圖會為要啟動的元件定義確切類別名稱。然而,如果希望個別應用程式執行某個動作 (例如「查看地圖」),則必須使用「隱含意圖」。
本課程說明如何針對特定動作建立隱含意圖,以及如何使用隱含意圖,在其他應用程式中啟動會執行該動作的活動。另請參閱嵌入的影片,瞭解為何必須將隱含意圖納入執行階段檢查。
建立隱含意圖
隱式意圖並不會依宣告元件的類別名稱去啟動,而是宣告要執行的動作。動作會指定要執行的作業,例如「檢視」、「編輯」、「傳送」或「取得」資料。
將意圖動作與資料建立關聯
意圖通常也包含與動作相關的資料,例如您要查看的地址或是要傳送的電子郵件。視您要建立的意圖而定,資料可能為 Uri、其中一種資料類型,或意圖完全不需要資料。
如果資料是 Uri,您可以透過簡單的 Intent() 建構函式去定義動作和資料。
舉例來說,以下是如何使用 Uri 資料建立一個撥打指定電話號碼的意圖:
Kotlin
val callIntent: Intent = Uri.parse("tel:5551234").let { number ->
    Intent(Intent.ACTION_DIAL, number)
}
Java
Uri number = Uri.parse("tel:5551234");
Intent callIntent = new Intent(Intent.ACTION_DIAL, number);
當應用程式用 startActivity() 來呼叫這個意圖之後,「電話」應用程式就會撥打給定的電話號碼。
還有幾個其他意圖及其動作和 Uri 資料配對:
查看地圖
Kotlin
// Map point based on address
val mapIntent: Intent = Uri.parse(
        "geo:0,0?q=1600+Amphitheatre+Parkway,+Mountain+View,+California"
).let { location ->
    // Or map point based on latitude/longitude
    // val location: Uri = Uri.parse("geo:37.422219,-122.08364?z=14") // z param is zoom level
    Intent(Intent.ACTION_VIEW, location)
}
Java
// Map point based on address
Uri location = Uri.parse("geo:0,0?q=1600+Amphitheatre+Parkway,+Mountain+View,+California");
// Or map point based on latitude/longitude
// Uri location = Uri.parse("geo:37.422219,-122.08364?z=14"); // z param is zoom level
Intent mapIntent = new Intent(Intent.ACTION_VIEW, location);
查看網頁
Kotlin
val webIntent: Intent = Uri.parse("https://www.android.com").let { webpage ->
    Intent(Intent.ACTION_VIEW, webpage)
}
Java
Uri webpage = Uri.parse("https://www.android.com");
Intent webIntent = new Intent(Intent.ACTION_VIEW, webpage);
在意圖中新增額外資料
其他類型的隱含意圖會要求提供不同資料類型的「額外」資料 (例如字串)。您可以使用多種 putExtra() 方法新增一或多個額外資料。
根據預設,系統會根據意圖的 Uri 資料,決定意圖所需的適當 MIME 類型。如果您沒有在意圖中加入 Uri,通常應使用 setType() 來指定與意圖相關的資料類型。設定 MIME 類型還能進一步指定哪些種類的活動應接收意圖。
以下列出其他的意圖,用新增額外資料以指定所需動作:
傳送含有附件的電子郵件
Kotlin
Intent(Intent.ACTION_SEND).apply {
    // The intent does not have a URI, so declare the "text/plain" MIME type
    type = "text/plain"
    putExtra(Intent.EXTRA_EMAIL, arrayOf("jan@example.com")) // recipients
    putExtra(Intent.EXTRA_SUBJECT, "Email subject")
    putExtra(Intent.EXTRA_TEXT, "Email message text")
    putExtra(Intent.EXTRA_STREAM, Uri.parse("content://path/to/email/attachment"))
    // You can also attach multiple items by passing an ArrayList of Uris
}
Java
Intent emailIntent = new Intent(Intent.ACTION_SEND);
// The intent does not have a URI, so declare the "text/plain" MIME type
emailIntent.setType(HTTP.PLAIN_TEXT_TYPE);
emailIntent.putExtra(Intent.EXTRA_EMAIL, new String[] {"jan@example.com"}); // recipients
emailIntent.putExtra(Intent.EXTRA_SUBJECT, "Email subject");
emailIntent.putExtra(Intent.EXTRA_TEXT, "Email message text");
emailIntent.putExtra(Intent.EXTRA_STREAM, Uri.parse("content://path/to/email/attachment"));
// You can also attach multiple items by passing an ArrayList of Uris
建立日曆活動
注意:只有 API 等級 14 或以上的版本可支援日曆活動的意圖。
Kotlin
// Event is on January 23, 2021 -- from 7:30 AM to 10:30 AM.
Intent(Intent.ACTION_INSERT, Events.CONTENT_URI).apply {
    val beginTime: Calendar = Calendar.getInstance().apply {
        set(2021, 0, 23, 7, 30)
    }
    val endTime = Calendar.getInstance().apply {
        set(2021, 0, 23, 10, 30)
    }
    putExtra(CalendarContract.EXTRA_EVENT_BEGIN_TIME, beginTime.timeInMillis)
    putExtra(CalendarContract.EXTRA_EVENT_END_TIME, endTime.timeInMillis)
    putExtra(Events.TITLE, "Ninja class")
    putExtra(Events.EVENT_LOCATION, "Secret dojo")
}
Java
// Event is on January 23, 2021 -- from 7:30 AM to 10:30 AM.
Intent calendarIntent = new Intent(Intent.ACTION_INSERT, Events.CONTENT_URI);
Calendar beginTime = Calendar.getInstance();
beginTime.set(2021, 0, 23, 7, 30);
Calendar endTime = Calendar.getInstance();
endTime.set(2021, 0, 23, 10, 30);
calendarIntent.putExtra(CalendarContract.EXTRA_EVENT_BEGIN_TIME, beginTime.getTimeInMillis());
calendarIntent.putExtra(CalendarContract.EXTRA_EVENT_END_TIME, endTime.getTimeInMillis());
calendarIntent.putExtra(Events.TITLE, "Ninja class");
calendarIntent.putExtra(Events.EVENT_LOCATION, "Secret dojo");
注意:請盡可能具體說明 Intent 很重要。舉例來說,如要使用 ACTION_VIEW 意圖顯示映像檔,請指定 image/* MIME 類型。這樣可以防止應用程式被意圖啟動後,「查看」其他資料的類型(例如地圖)。
以意圖啟動活動
建立 Intent 並設定額外資訊後,請呼叫 startActivity() 並將其傳送至系統:
Kotlin
startActivity(intent)
Java
startActivity(intent);
處理應用程式無法接收意圖的情況
雖然安裝在裝置上的其他應用程式 (如電話、電子郵件或日曆應用程式) 能順利處理許多意圖,應用程式仍應做好準備,即使沒有活動也要能處理應用程式意圖。當您呼叫意圖時,請準備好擷取 ActivityNotFoundException;如果沒有其他可處理應用程式意圖的活動,就會發生此情況:
Kotlin
try {
    startActivity(intent)
} catch (e: ActivityNotFoundException) {
    // Define what your app should do if no activity can handle the intent.
}
Java
try {
    startActivity(intent);
} catch (ActivityNotFoundException e) {
    // Define what your app should do if no activity can handle the intent.
}
瞭解例外狀況後,請決定應用程式接下來應採取的行動。後續步驟取決於您試圖叫用的意圖的特性。舉例來說,如果知道特定應用程式可以處理意圖,請提供使用者下載應用程式的連結。進一步瞭解如何連結到 Google Play 中的產品。
消歧對話方塊
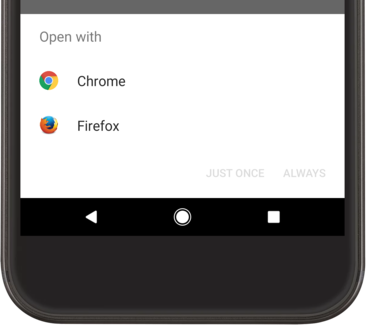
如果系統發現有多項活動可處理意圖,就會顯示對話方塊 (有時稱為「消歧對話方塊」),讓使用者選擇要使用的應用程式,如圖 1 所示。如果只有一個活動處理意圖,系統會立即啟動該活動。

圖 1. 有多個應用程式能夠處理同個意圖時,系統顯示的選取對話方塊範例。
完整範例
以下完整範例說明如何建立意圖查看地圖,並確認有應用程式可處理該意圖,然後啟動應用程式:
Kotlin
// Build the intent.
val location = Uri.parse("geo:0,0?q=1600+Amphitheatre+Parkway,+Mountain+View,+California")
val mapIntent = Intent(Intent.ACTION_VIEW, location)

// Try to invoke the intent.
try {
    startActivity(mapIntent)
} catch (e: ActivityNotFoundException) {
    // Define what your app should do if no activity can handle the intent.
}
Java
// Build the intent.
Uri location = Uri.parse("geo:0,0?q=1600+Amphitheatre+Parkway,+Mountain+View,+California");
Intent mapIntent = new Intent(Intent.ACTION_VIEW, location);

// Try to invoke the intent.
try {
    startActivity(mapIntent);
} catch (ActivityNotFoundException e) {
    // Define what your app should do if no activity can handle the intent.
}
顯示應用程式選擇工具

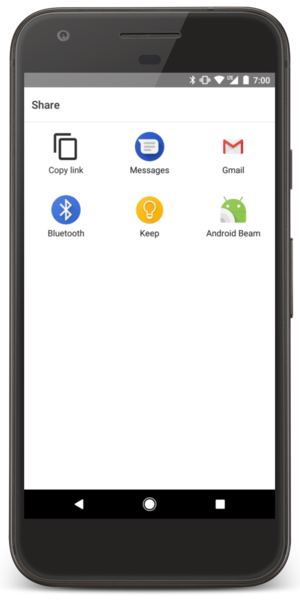
圖 2. 選擇工具對話方塊。
請注意,如果啟動活動的方法是將 Intent 傳遞至 startActivity(),且有多個應用程式會回應意圖,使用者即可選取對話方塊底部的核取方塊,選擇要預設使用的應用程式,如圖 1 所示。當使用者通常都想使用同一款應用程式執行動作時,例如可能只使用一個網路瀏覽器開啟網頁,或以偏好的某個相機拍照,這種做法就很實用。
不過,如果要執行的動作可由多個應用程式處理,且使用者可能每次都選用不同的應用程式 (例如「分享」動作,使用者可能會有多個應用程式可用來分享項目),您應明確顯示選擇工具對話方塊,如圖 2 所示。選擇工具對話方塊會強制使用者,每次選取該動作使用的應用程式(使用者無法選取動作的預設應用程式)。
如要顯示選擇工具,請使用 createChooser() 建立 Intent,並傳送至 startActivity()。例如:
Kotlin
val intent = Intent(Intent.ACTION_SEND)

// Create intent to show chooser
val chooser = Intent.createChooser(intent, /* title */ null)

// Try to invoke the intent.
try {
    startActivity(chooser)
} catch (e: ActivityNotFoundException) {
    // Define what your app should do if no activity can handle the intent.
}
Java
Intent intent = new Intent(Intent.ACTION_SEND);

// Create intent to show chooser
Intent chooser = Intent.createChooser(intent, /* title */ null);

// Try to invoke the intent.
try {
    startActivity(chooser);
} catch (ActivityNotFoundException e) {
    // Define what your app should do if no activity can handle the intent.
}
這會顯示內含應用程式清單的對話方塊,這些應用程式會回應傳遞至
createChooser() 方法的意圖。如果動作不是
ACTION_SEND 或
ACTION_SEND_MULTIPLE,則可提供 title 參數。

