
在搭載 Android 15 以上版本的裝置上,只要指定 SDK 35 以上版本,應用程式就會採用無邊框畫面。視窗會繪製在系統資訊列後方,涵蓋整個螢幕的寬度和高度。系統資訊列包括狀態列、說明文字列和導覽列。
許多應用程式都有頂端應用程式列。頂端應用程式列應延伸至螢幕頂端邊緣,並顯示在狀態列後方。(選用) 頂端應用程式列可以在內容捲動時縮小至狀態列的高度。
許多應用程式也有底部應用程式列或底部導覽列。這些長條也應延伸至螢幕底部邊緣,並顯示在導覽列後方。否則,應用程式應在導覽列後方顯示捲動內容。
在應用程式中導入無邊框版面配置時,請注意下列事項:
- 啟用無邊框螢幕
- 實作自動調整版面配置,針對不同板型規格提供最佳使用者體驗
- 處理任何視覺重疊
- 考慮在系統資訊列後方顯示半透明遮罩
啟用無邊框顯示
如果應用程式以 SDK 35 以上版本為目標,Android 15 以上版本的裝置會自動啟用無邊框模式。
如要在舊版 Android 上啟用無邊框效果,請在 Activity 的 onCreate 中手動呼叫 enableEdgeToEdge。
Kotlin
 override fun onCreate(savedInstanceState: Bundle?) {
         super.onCreate(savedInstanceState)
         WindowCompat.enableEdgeToEdge(window)
        ...
      }
Java
 @Override
      protected void onCreate(@Nullable Bundle savedInstanceState) {
        super.onCreate(savedInstanceState);
        WindowCompat.enableEdgeToEdge(getWindow());
        ...
      }
根據預設,enableEdgeToEdge() 會將系統資訊列設為透明,但三按鈕操作模式除外,因為狀態列會顯示半透明的遮罩。系統圖示和半透明遮罩的顏色會根據系統的淺色或深色主題調整。
如要在應用程式中啟用無邊框顯示,但不使用 enableEdgeToEdge() 函式,請參閱「手動設定無邊框顯示」。
使用插邊處理重疊
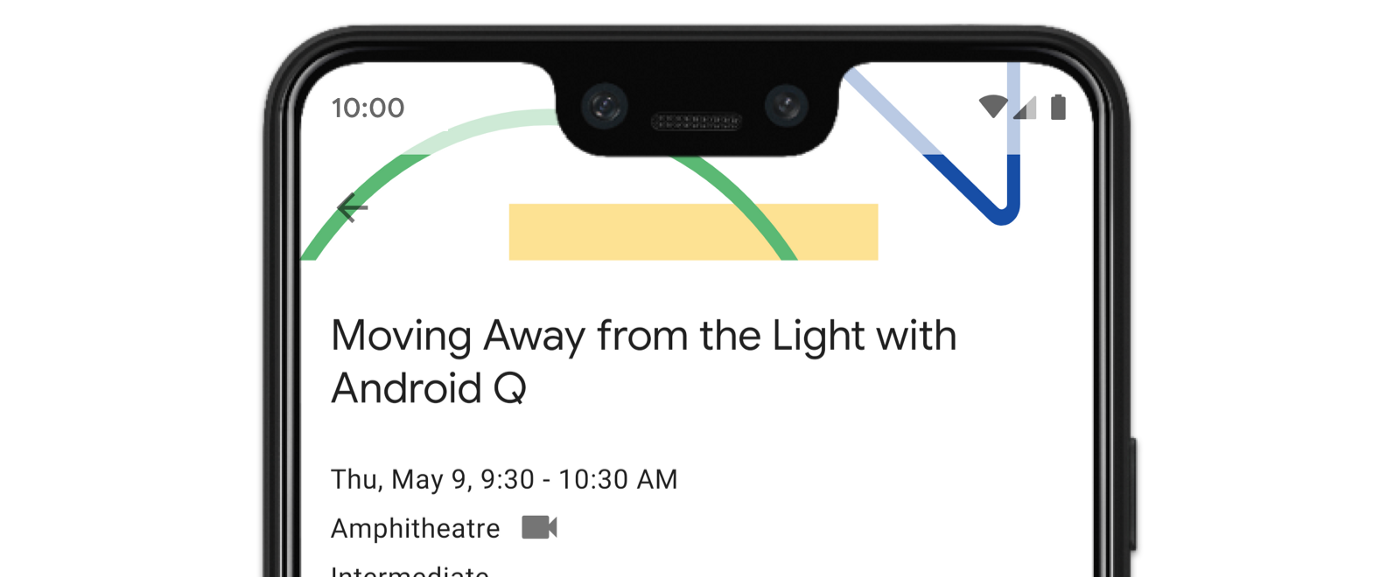
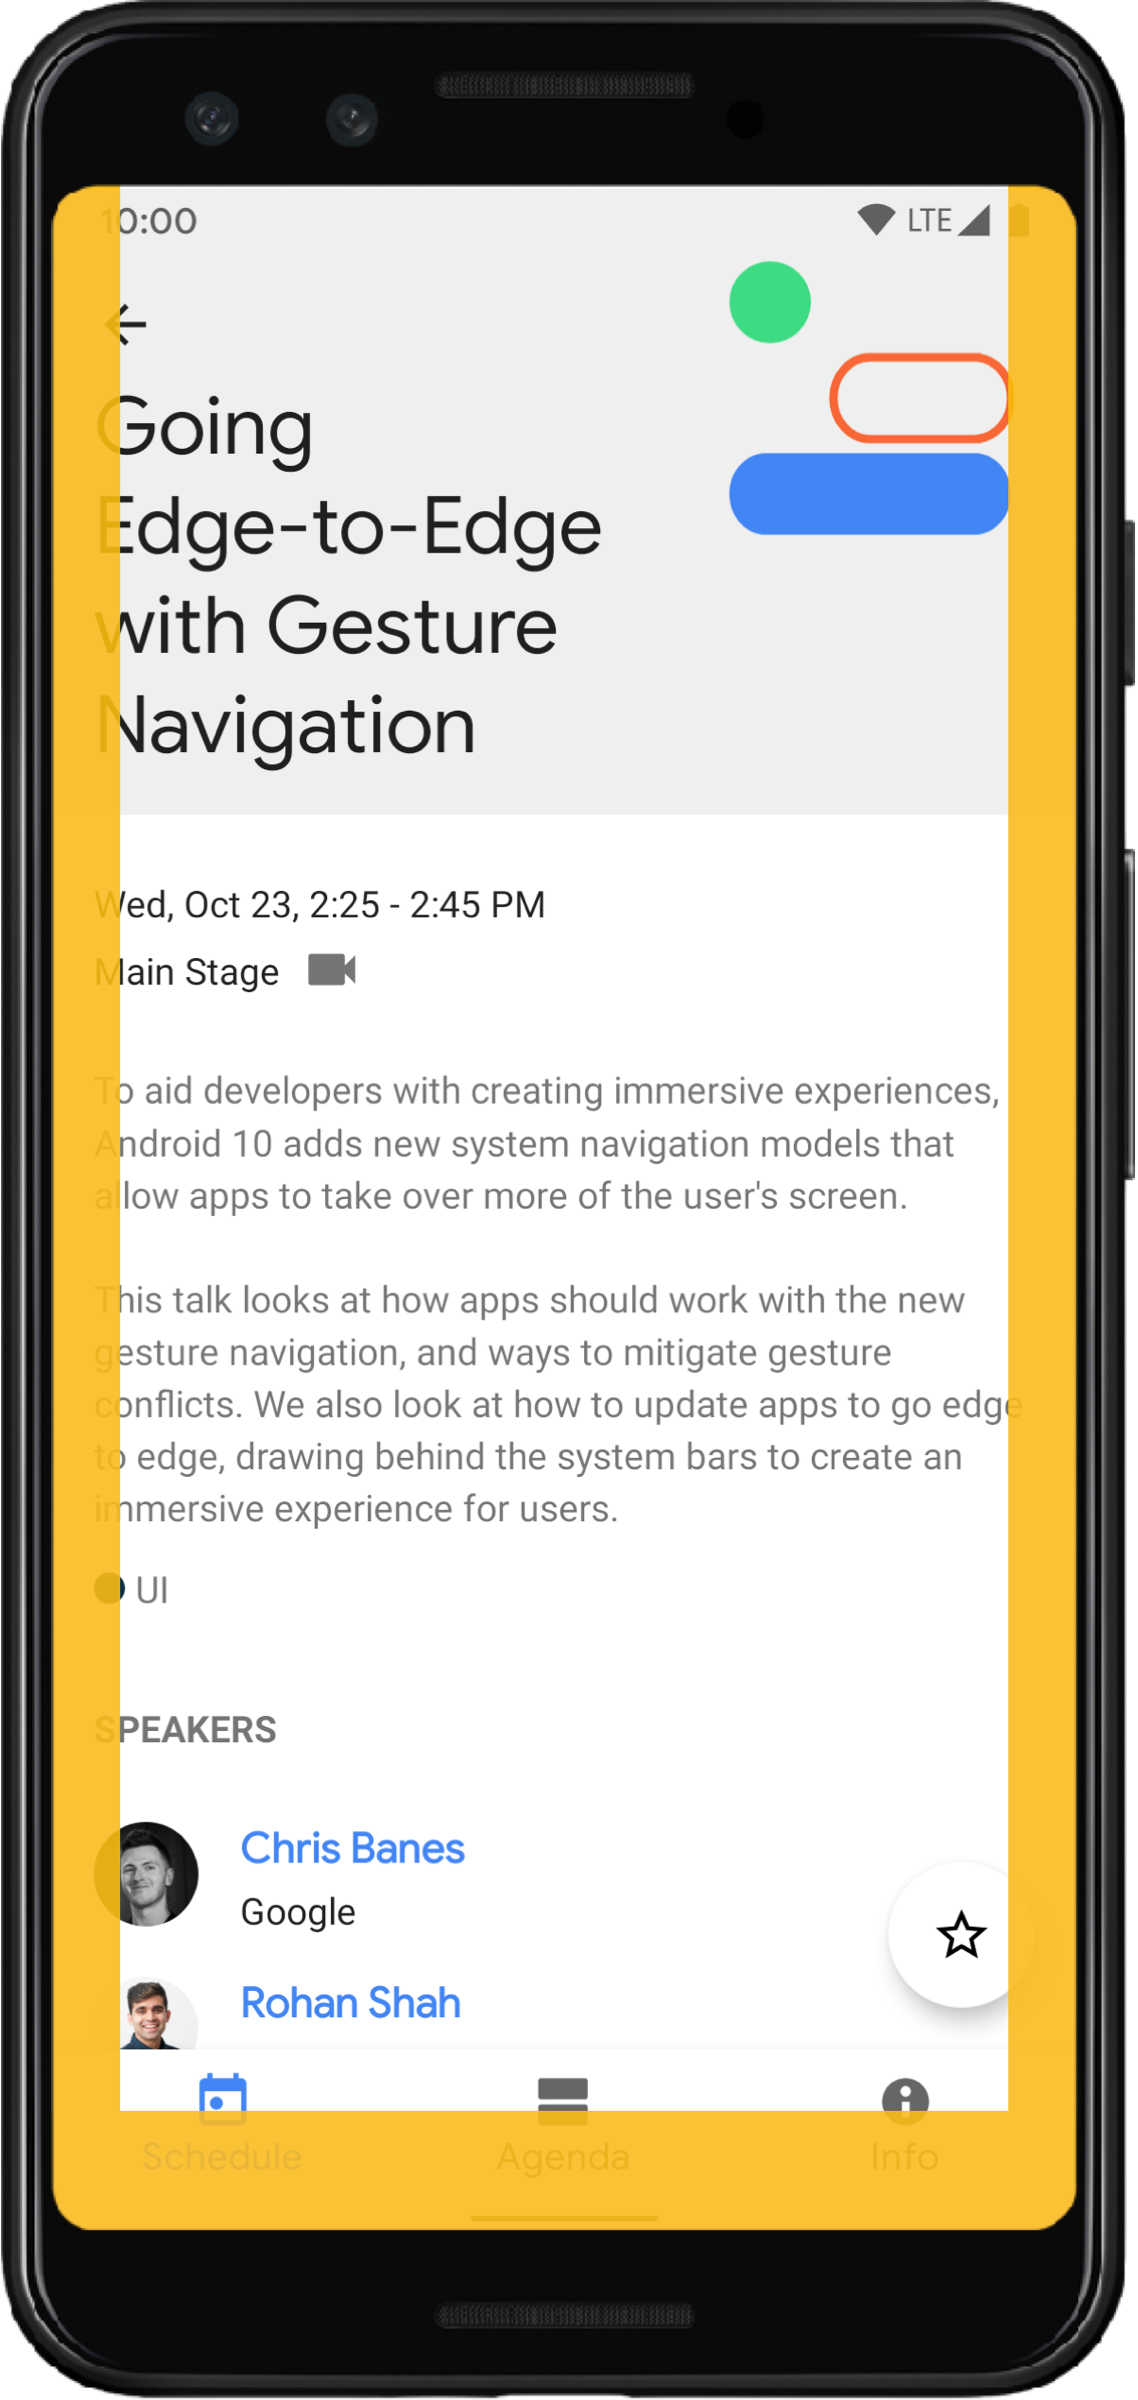
如圖 3 所示,應用程式的部分檢視區塊可能會繪製在系統資訊列後方。
您可以對插邊做出反應,藉此解決重疊問題。插邊會指定螢幕的哪些部分與系統 UI (例如導覽列或狀態列) 相交。交集可能表示顯示在內容上方,但也可能向應用程式回報系統手勢。
適用於無邊框顯示應用程式的插邊類型如下:
系統資訊列插邊:最適合可輕觸的檢視區塊,且系統資訊列不得遮蔽這些檢視區塊。
螢幕凹口插邊:適用於可能因裝置形狀而出現螢幕凹口的區域。
系統手勢插邊:系統使用的手勢導覽區域,優先於應用程式。
系統資訊列插邊
系統資訊列插邊是最常用的插邊類型。這些插邊代表系統 UI 在應用程式上方 Z 軸顯示的區域。最好使用這些插邊移動或填補應用程式中可輕觸的檢視區塊,確保系統資訊列不會遮住這些檢視區塊。
舉例來說,圖 3 中的懸浮動作按鈕 (FAB) 部分遭到導覽列遮蔽:
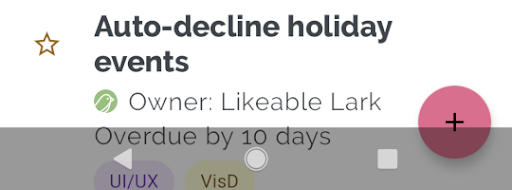
如要避免在手勢模式或按鈕模式中發生這類視覺重疊情形,可以使用 getInsets(int) 搭配 WindowInsetsCompat.Type.systemBars() 增加檢視區塊的邊界。
以下程式碼範例說明如何實作系統資訊列插邊:
Kotlin
ViewCompat.setOnApplyWindowInsetsListener(fab) { v, windowInsets ->
  val insets = windowInsets.getInsets(WindowInsetsCompat.Type.systemBars())
  // Apply the insets as a margin to the view. This solution sets
  // only the bottom, left, and right dimensions, but you can apply whichever
  // insets are appropriate to your layout. You can also update the view padding
  // if that's more appropriate.
  v.updateLayoutParams<MarginLayoutParams> {
      leftMargin = insets.left
      bottomMargin = insets.bottom
      rightMargin = insets.right
  }

  // Return CONSUMED if you don't want the window insets to keep passing
  // down to descendant views.
  WindowInsetsCompat.CONSUMED
}
Java
ViewCompat.setOnApplyWindowInsetsListener(fab, (v, windowInsets) -> {
  Insets insets = windowInsets.getInsets(WindowInsetsCompat.Type.systemBars());
  // Apply the insets as a margin to the view. This solution sets only the
  // bottom, left, and right dimensions, but you can apply whichever insets are
  // appropriate to your layout. You can also update the view padding if that's
  // more appropriate.
  MarginLayoutParams mlp = (MarginLayoutParams) v.getLayoutParams();
  mlp.leftMargin = insets.left;
  mlp.bottomMargin = insets.bottom;
  mlp.rightMargin = insets.right;
  v.setLayoutParams(mlp);

  // Return CONSUMED if you don't want the window insets to keep passing
  // down to descendant views.
    return WindowInsetsCompat.CONSUMED;
});
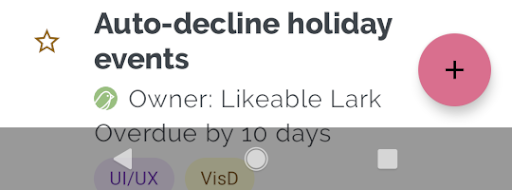
如果將這個解決方案套用至圖 3 所示的範例,按鈕模式就不會出現視覺重疊,如圖 4 所示:
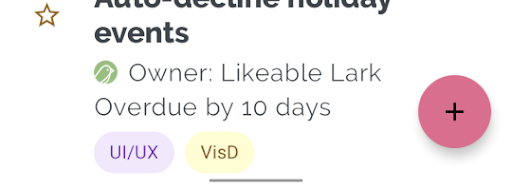
手勢操作模式也適用相同原則,如圖 5 所示:
螢幕凹口插邊
部分裝置有螢幕凹口,通常,凹口位於螢幕頂端,並包含在狀態列中。如果裝置螢幕處於橫向模式,凹口可能會位於垂直邊緣。視應用程式在螢幕上顯示的內容而定,您應實作邊框間距,避免顯示器凹口,因為應用程式預設會在顯示器凹口中繪製內容。
舉例來說,許多應用程式畫面都會顯示項目清單。請勿使用螢幕凹口或系統列遮蓋清單項目。
Kotlin
ViewCompat.setOnApplyWindowInsetsListener(binding.recyclerView) { v, insets ->
  val bars = insets.getInsets(
    WindowInsetsCompat.Type.systemBars()
      or WindowInsetsCompat.Type.displayCutout()
  )
  v.updatePadding(
    left = bars.left,
    top = bars.top,
    right = bars.right,
    bottom = bars.bottom,
  )
  WindowInsetsCompat.CONSUMED
}
Java
ViewCompat.setOnApplyWindowInsetsListener(mBinding.recyclerView, (v, insets) -> {
  Insets bars = insets.getInsets(
    WindowInsetsCompat.Type.systemBars()
    | WindowInsetsCompat.Type.displayCutout()
  );
  v.setPadding(bars.left, bars.top, bars.right, bars.bottom);
  return WindowInsetsCompat.CONSUMED;
});
方法是取得系統資訊列和螢幕凹口型態的邏輯 or,判斷 WindowInsetsCompat 的值。
將 clipToPadding 設為 RecyclerView,讓邊框間距隨著清單項目捲動。這樣一來,使用者捲動時,項目就會顯示在系統資訊列後方,如下方範例所示。
<androidx.recyclerview.widget.RecyclerView
    android:id="@+id/recycler_view"
    android:layout_width="match_parent"
    android:layout_height="match_parent"
    android:clipToPadding="false"
    app:layoutManager="androidx.recyclerview.widget.LinearLayoutManager" />
系統手勢插邊
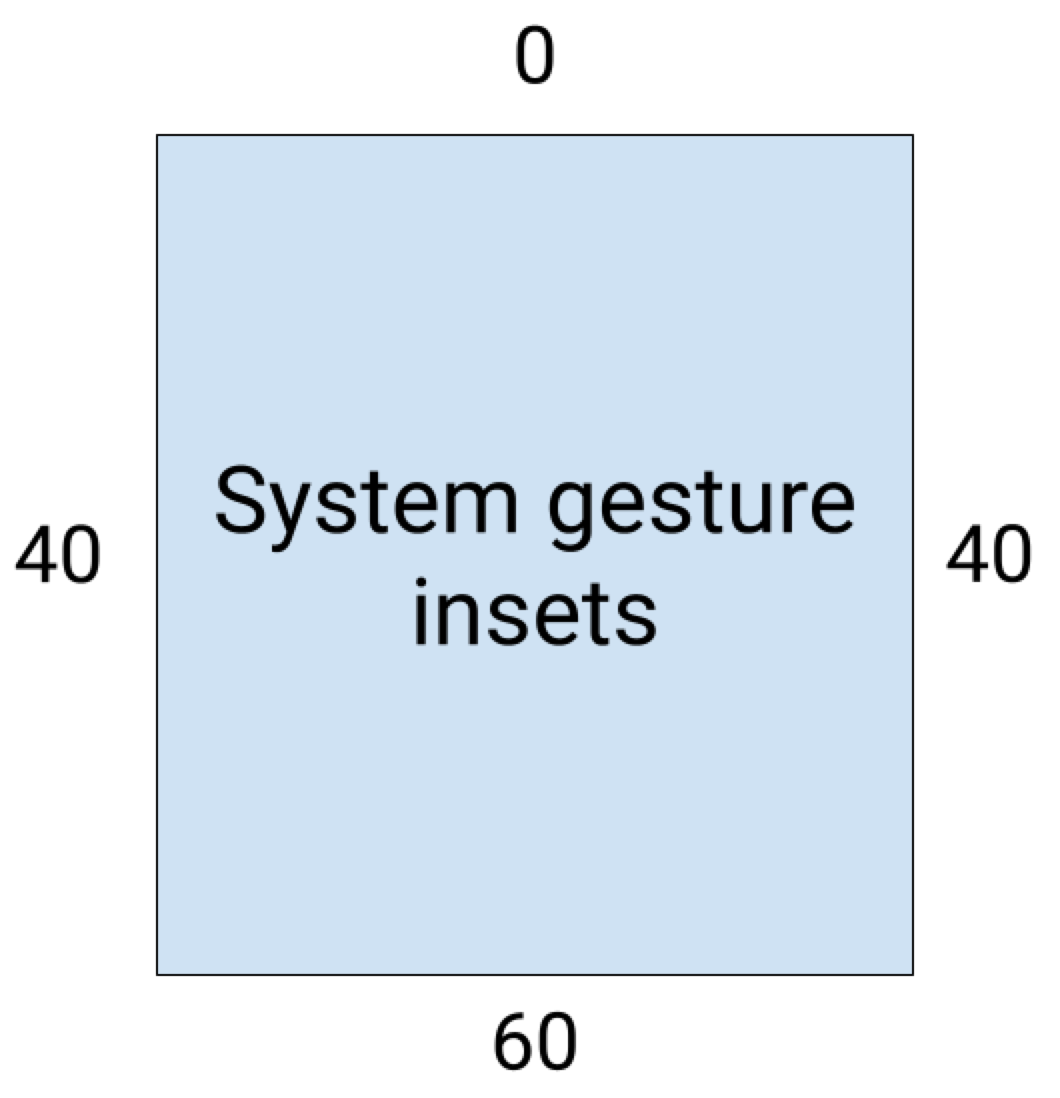
系統手勢插邊代表視窗區域,系統手勢的優先順序高於應用程式。圖 6 中以橘色顯示這些區域:
與系統資訊列插邊一樣,您可以使用 WindowInsetsCompat.Type.systemGestures() 避免系統手勢插邊重疊 getInsets(int)。
使用這些插邊,將可滑動的檢視區塊移開邊緣或填補邊緣。常見用途包括底部功能表、遊戲中的滑動操作,以及使用 ViewPager2 實作的輪播效果。
在 Android 10 以上版本中,系統手勢插邊包含主畫面手勢的底部插邊,以及返回手勢的左右插邊:
以下程式碼範例說明如何實作系統手勢插邊:
Kotlin
ViewCompat.setOnApplyWindowInsetsListener(view) { view, windowInsets ->
    val insets = windowInsets.getInsets(WindowInsetsCompat.Type.systemGestures())
    // Apply the insets as padding to the view. Here, set all the dimensions
    // as appropriate to your layout. You can also update the view's margin if
    // more appropriate.
    view.updatePadding(insets.left, insets.top, insets.right, insets.bottom)

    // Return CONSUMED if you don't want the window insets to keep passing down
    // to descendant views.
    WindowInsetsCompat.CONSUMED
}
Java
ViewCompat.setOnApplyWindowInsetsListener(view, (v, windowInsets) -> {
    Insets insets = windowInsets.getInsets(WindowInsetsCompat.Type.systemGestures());
    // Apply the insets as padding to the view. Here, set all the dimensions
    // as appropriate to your layout. You can also update the view's margin if
    // more appropriate.
    view.setPadding(insets.left, insets.top, insets.right, insets.bottom);

    // Return CONSUMED if you don't want the window insets to keep passing down
    // to descendant views.
    return WindowInsetsCompat.CONSUMED;
});
Material Design 元件
許多以 Views 為基礎的
Android Material 元件
(com.google.android.material) 會自動處理插邊,包括
BottomAppBar、
BottomNavigationView、
NavigationRailView
和 NavigationView
不過,AppBarLayout 不會自動處理插邊。新增 android:fitsSystemWindows="true" 以處理頂端插邊。
請參閱這篇文章,瞭解如何使用 Compose 中的 Material Design 元件處理插邊。
回溯相容的插邊調度
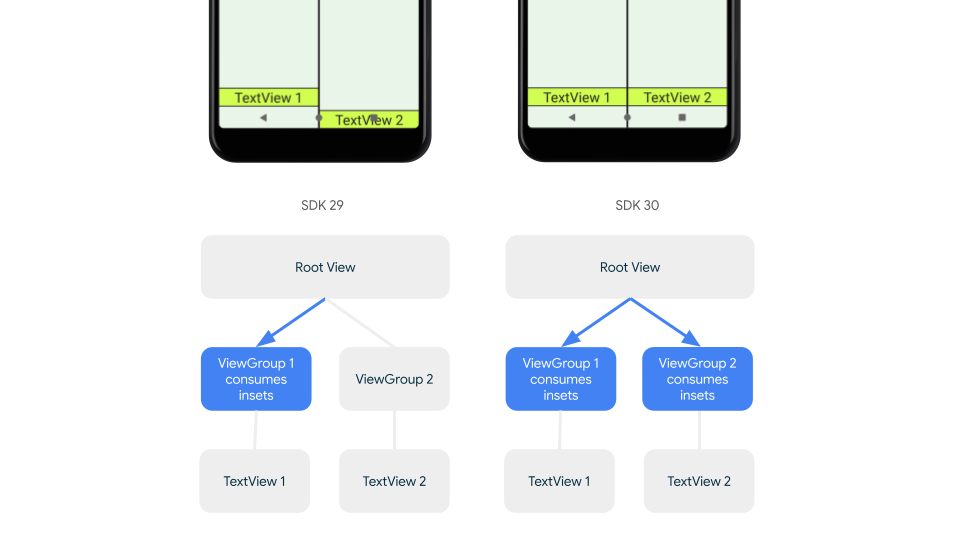
如要停止將插邊傳送至子項檢視區塊,並避免過度填補,可以使用 WindowInsetsCompat.CONSUMED 常數消耗插邊。不過,在搭載 Android 10 (API 級別 29 以下) 的裝置上,呼叫 WindowInsetsCompat.CONSUMED 後,插邊不會分派給同層級項目,這可能會導致非預期的視覺重疊。
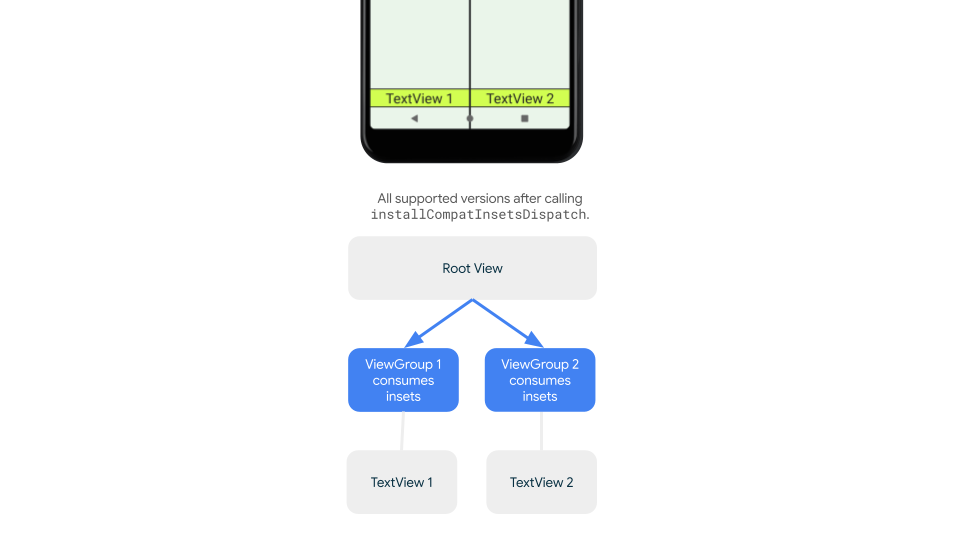
如要確認插邊是否已傳送至所有支援的 Android 版本,請在取用插邊前使用 ViewGroupCompat#installCompatInsetsDispatch,這項功能適用於 AndroidX Core 和 Core-ktx 1.16.0-alpha01 以上版本。
Kotlin
// Use the i.d. assigned to your layout's root view, e.g. R.id.main
val rootView = findViewById(R.id.main)
// Call before consuming insets
ViewGroupCompat.installCompatInsetsDispatch(rootView)
Java
// Use the i.d. assigned to your layout's root view, e.g. R.id.main
LinearLayout rootView = findViewById(R.id.main);
// Call before consuming insets
ViewGroupCompat.installCompatInsetsDispatch(rootView);
沉浸模式
部分內容適合以全螢幕模式觀看,讓使用者獲得更身歷其境的體驗。您可以使用 WindowInsetsController 和 WindowInsetsControllerCompat 程式庫,在沉浸模式下隱藏系統資訊列:
Kotlin
val windowInsetsController =
      WindowCompat.getInsetsController(window, window.decorView)

// Hide the system bars.
windowInsetsController.hide(Type.systemBars())

// Show the system bars.
windowInsetsController.show(Type.systemBars())
Java
Window window = getWindow();
WindowInsetsControllerCompat windowInsetsController =
      WindowCompat.getInsetsController(window, window.getDecorView());
if (windowInsetsController == null) {
    return;
  }
// Hide the system bars.
windowInsetsController.hide(WindowInsetsCompat.Type.systemBars());

// Show the system bars.
windowInsetsController.show(WindowInsetsCompat.Type.systemBars());
如要進一步瞭解如何實作這項功能,請參閱「在沈浸模式下隱藏系統資訊列」。
系統資訊列圖示
呼叫 enableEdgeToEdge 可確保裝置主題變更時,系統資訊列圖示顏色會更新。
採用無邊框設計時,您可能需要手動更新系統資訊列圖示顏色,確保與應用程式背景形成對比。舉例來說,如要建立淺色狀態列圖示,請執行下列操作:
Kotlin
WindowCompat.getInsetsController(window, window.decorView)
    .isAppearanceLightStatusBars = false
Java
WindowCompat.getInsetsController(window, window.getDecorView())
    .setAppearanceLightStatusBars(false);
系統資訊列保護機制
應用程式指定 SDK 35 以上版本後,系統就會強制執行無邊框設計。
系統狀態列和手勢操作列為透明,但三按鈕操作列為半透明。呼叫 enableEdgeToEdge,設為回溯相容。
不過,系統預設值可能不適用於所有用途。請參閱 Android 系統資訊列設計指南和無邊框設計,判斷是否要使用透明或半透明的系統資訊列。
建立透明的系統資訊列
如要建立透明狀態列,請指定 Android 15 (SDK 35) 以上版本,或針對舊版呼叫 enableEdgeToEdge() 並使用預設引數。
如要建立透明的手勢操作導覽列,請指定 Android 15 以上版本,或針對舊版呼叫 enableEdgeToEdge() 並使用預設引數。如果是三按鈕導覽列,請將 Window.setNavigationBarContrastEnforced 設為 false,否則系統會套用半透明的遮罩。
建立半透明系統資訊列
如要建立半透明狀態列,請按照下列步驟操作:
- 將
androidx-core依附元件更新至 1.16.0-beta01 以上版本 - 將 XML 版面配置包裝在
androidx.core.view.insets.ProtectionLayout中,並指派 ID。 - 以程式輔助方式存取
ProtectionLayout,設定保護措施,並指定側邊和狀態列的GradientProtection。
<androidx.core.view.insets.ProtectionLayout xmlns:android="http://schemas.android.com/apk/res/android" android:id="@+id/list_protection" android:layout_width="match_parent" android:layout_height="match_parent"> <ScrollView android:id="@+id/item_list" android:clipToPadding="false" android:layout_width="match_parent" android:layout_height="match_parent"> <!--items--> </ScrollView> </androidx.core.view.insets.ProtectionLayout>
findViewById<ProtectionLayout>(R.id.list_protection) .setProtections( listOf( GradientProtection( WindowInsetsCompat.Side.TOP, // Ideally, this is the pane's background color paneBackgroundColor ) ) )
請確認傳遞至 GradientProtection 的 ColorInt 與內容背景相符。舉例來說,在摺疊式裝置上顯示的清單詳細資料版面配置,清單面板和詳細資料面板可能會有不同顏色的 GradientProtections。
請勿建立半透明的手勢操作導覽列。如要建立半透明的三按鈕導覽列,請執行下列其中一項操作:
- 如果版面配置已包裝在
ProtectionView中,您可以將額外的ColorProtection或GradientProtection傳遞至setProtections方法。請先確認window.isNavigationBarContrastEnforced = false,再執行這項操作。 - 否則,請設定
window.isNavigationBarContrastEnforced = true。如果應用程式呼叫enableEdgeToEdge, window.isNavigationBarContrastEnforced = true是預設行為。
其他提示
處理插邊時的其他提示。
無邊框顯示捲動內容
請檢查最後一個清單項目是否遭到 RecyclerView 或 NestedScrollView 中的系統資訊列遮住,方法是處理插邊並將 clipToPadding 設為 false。
以下影片顯示 RecyclerView 停用 (左側) 和啟用 (右側) 無邊框螢幕:
如需程式碼範例,請參閱「使用 RecyclerView 建立動態清單」一節中的程式碼片段。
讓全螢幕對話方塊無邊框
如要讓全螢幕對話方塊顯示在螢幕邊框,請在 Dialog 上呼叫 enableEdgeToEdge。
Kotlin
class MyAlertDialogFragment : DialogFragment() {
    override fun onStart(){
        super.onStart()
        dialog?.window?.let { WindowCompat.enableEdgeToEdge(it) }
    }
    ...
}
Java
public class MyAlertDialogFragment extends DialogFragment {
    @Override
    public void onStart() {
        super.onStart();
        Dialog dialog = getDialog();
        if (dialog != null) {
            Window window = dialog.getWindow();
            if (window != null) {
                WindowCompat.enableEdgeToEdge(window);
            }
        }
    }
    ...
}
其他資源
如要進一步瞭解如何採用無邊框設計,請參閱下列參考資料。
網誌
設計
其他說明文件
影片