
Hộp thoại là một cửa sổ nhỏ nhắc người dùng đưa ra quyết định hoặc nhập thông tin bổ sung. Một hộp thoại sẽ không lấp đầy màn hình và thường dùng cho các sự kiện phương thức yêu cầu người dùng thực hiện hành động trước khi có thể tiếp tục.

Lớp Dialog là lớp cơ sở cho hộp thoại, nhưng đừng tạo bản sao của Dialog một cách trực tiếp. Thay vào đó, hãy sử dụng một trong các lớp con sau:
AlertDialog- Một hộp thoại có thể hiển thị một tiêu đề, tối đa ba nút, một danh sách các mục có thể chọn hoặc bố cục tuỳ chỉnh.
DatePickerDialoghoặcTimePickerDialog- Hộp thoại có giao diện người dùng được xác định trước cho phép người dùng chọn ngày hoặc giờ.
Các lớp này xác định kiểu và cấu trúc cho hộp thoại. Bạn cũng cần có một DialogFragment làm vùng chứa cho hộp thoại. Lớp DialogFragment cung cấp mọi chức năng điều khiển cần thiết để tạo hộp thoại và quản lý giao diện của hộp thoại, thay vì các phương thức gọi trên đối tượng Dialog.
Việc sử dụng DialogFragment để quản lý hộp thoại giúp hộp thoại xử lý chính xác các sự kiện trong vòng đời, chẳng hạn như khi người dùng nhấn nút Quay lại hoặc xoay màn hình. Lớp DialogFragment cũng cho phép bạn sử dụng lại giao diện người dùng của hộp thoại dưới dạng một thành phần có thể nhúng trong giao diện người dùng lớn hơn – giống như một Fragment truyền thống – chẳng hạn như khi bạn muốn giao diện người dùng của hộp thoại xuất hiện khác nhau trên màn hình lớn và màn hình nhỏ.
Các phần sau trong tài liệu này mô tả cách sử dụng DialogFragment kết hợp với đối tượng AlertDialog. Nếu bạn muốn tạo bộ chọn ngày hoặc giờ, hãy đọc bài viết Thêm bộ chọn vào ứng dụng của bạn.
Tạo một mảnh hộp thoại
Bằng cách mở rộng DialogFragment và tạo một AlertDialog trong phương thức gọi lại onCreateDialog(), bạn có thể thực hiện nhiều thiết kế hộp thoại, bao gồm bố cục tuỳ chỉnh và các thiết kế đã mô tả trong Hộp thoại Material Design.
Ví dụ: dưới đây là một AlertDialog cơ bản được quản lý trong một DialogFragment:
Kotlin
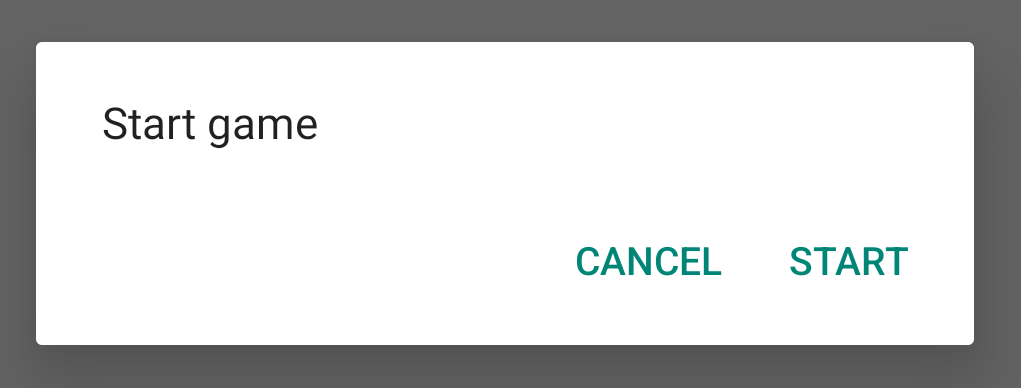
class StartGameDialogFragment : DialogFragment() {
    override fun onCreateDialog(savedInstanceState: Bundle?): Dialog {
        return activity?.let {
            // Use the Builder class for convenient dialog construction.
            val builder = AlertDialog.Builder(it)
            builder.setMessage("Start game")
                .setPositiveButton("Start") { dialog, id ->
                    // START THE GAME!
                }
                .setNegativeButton("Cancel") { dialog, id ->
                    // User cancelled the dialog.
                }
            // Create the AlertDialog object and return it.
            builder.create()
        } ?: throw IllegalStateException("Activity cannot be null")
    }
}

class OldXmlActivity : AppCompatActivity() {
    override fun onCreate(savedInstanceState: Bundle?) {
        super.onCreate(savedInstanceState)
        setContentView(R.layout.activity_old_xml)

        StartGameDialogFragment().show(supportFragmentManager, "GAME_DIALOG")
    }
}
Java
public class StartGameDialogFragment extends DialogFragment {
    @Override
    public Dialog onCreateDialog(Bundle savedInstanceState) {
        // Use the Builder class for convenient dialog construction.
        AlertDialog.Builder builder = new AlertDialog.Builder(getActivity());
        builder.setMessage(R.string.dialog_start_game)
               .setPositiveButton(R.string.start, new DialogInterface.OnClickListener() {
                   public void onClick(DialogInterface dialog, int id) {
                       // START THE GAME!
                   }
               })
               .setNegativeButton(R.string.cancel, new DialogInterface.OnClickListener() {
                   public void onClick(DialogInterface dialog, int id) {
                       // User cancels the dialog.
                   }
               });
        // Create the AlertDialog object and return it.
        return builder.create();
    }
}
// ...

StartGameDialogFragment().show(supportFragmentManager, "GAME_DIALOG");
Khi bạn tạo một phiên bản của lớp này và gọi show() trên đối tượng đó, hộp thoại sẽ xuất hiện như minh hoạ trong hình sau.
Phần tiếp theo cung cấp thêm thông tin chi tiết về cách sử dụng các API AlertDialog.Builder
để tạo hộp thoại.
Tuỳ thuộc vào độ phức tạp của hộp thoại, bạn có thể triển khai nhiều phương thức gọi lại khác trong DialogFragment, bao gồm tất cả các phương thức cơ bản trong vòng đời mảnh.
Xây dựng hộp thoại thông báo
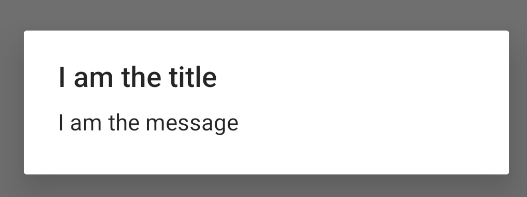
Lớp AlertDialog cho phép bạn tạo nhiều kiểu thiết kế hộp thoại và thường là lớp hộp thoại duy nhất mà bạn cần. Như minh hoạ trong hình sau, hộp thoại cảnh báo có 3 khu vực:
- Tiêu đề: đây là thông tin không bắt buộc và chỉ được dùng khi vùng nội dung có một thông báo chi tiết, danh sách hoặc bố cục tuỳ chỉnh. Nếu bạn cần đưa ra một thông báo hoặc câu hỏi đơn giản, thì tiêu đề là không cần thiết.
- Vùng nội dung: vùng này có thể hiển thị thông báo, danh sách hoặc bố cục tuỳ chỉnh khác.
- Nút hành động: có thể có tối đa 3 nút hành động trong một hộp thoại.
Lớp AlertDialog.Builder cung cấp các API cho phép bạn tạo một AlertDialog với các loại nội dung này, bao gồm cả bố cục tuỳ chỉnh.
Để tạo AlertDialog, hãy làm như sau:
Kotlin
val builder: AlertDialog.Builder = AlertDialog.Builder(context)
builder
    .setMessage("I am the message")
    .setTitle("I am the title")

val dialog: AlertDialog = builder.create()
dialog.show()
Java
// 1. Instantiate an AlertDialog.Builder with its constructor.
AlertDialog.Builder builder = new AlertDialog.Builder(getActivity());

// 2. Chain together various setter methods to set the dialog characteristics.
builder.setMessage(R.string.dialog_message)
       .setTitle(R.string.dialog_title);

// 3. Get the AlertDialog.
AlertDialog dialog = builder.create();
Đoạn mã trước đó tạo ra hộp thoại này:
Thêm nút
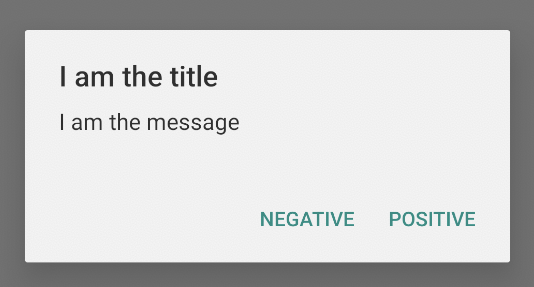
Để thêm các nút hành động như các nút trong hình 2, hãy gọi phương thức setPositiveButton() và setNegativeButton():
Kotlin
val builder: AlertDialog.Builder = AlertDialog.Builder(context)
builder
    .setMessage("I am the message")
    .setTitle("I am the title")
    .setPositiveButton("Positive") { dialog, which ->
        // Do something.
    }
    .setNegativeButton("Negative") { dialog, which ->
        // Do something else.
    }

val dialog: AlertDialog = builder.create()
dialog.show()
Java
AlertDialog.Builder builder = new AlertDialog.Builder(getActivity());
// Add the buttons.
builder.setPositiveButton(R.string.ok, new DialogInterface.OnClickListener() {
           public void onClick(DialogInterface dialog, int id) {
               // User taps OK button.
           }
       });
builder.setNegativeButton(R.string.cancel, new DialogInterface.OnClickListener() {
           public void onClick(DialogInterface dialog, int id) {
               // User cancels the dialog.
           }
       });
// Set other dialog properties.
...

// Create the AlertDialog.
AlertDialog dialog = builder.create();
Các phương thức set...Button() yêu cầu tiêu đề cho nút (do tài nguyên chuỗi cung cấp) và DialogInterface.OnClickListener xác định hành động cần thực hiện khi người dùng nhấn vào nút.
Bạn có thể thêm 3 nút hành động:
- Tích cực: dùng nút này để chấp nhận và tiếp tục hành động (thao tác "OK").
- Tiêu cực: dùng nút này để huỷ thao tác.
- Trung lập: sử dụng nút này khi người dùng không muốn tiếp tục hành động nhưng không nhất thiết muốn huỷ. Nút này xuất hiện giữa nút tích cực và tiêu cực. Ví dụ: hành động có thể là "Nhắc tôi sau".
Bạn chỉ có thể thêm 1 nút của mỗi loại nút vào AlertDialog. Ví dụ: bạn không được có nhiều hơn một nút "tích cực".
Đoạn mã trước đó sẽ cung cấp cho bạn một hộp thoại cảnh báo như sau:
Thêm danh sách
Có 3 loại danh sách dành cho các API AlertDialog:
- Danh sách truyền thống có một lựa chọn.
- Danh sách cố định có một lựa chọn (nút chọn).
- Danh sách cố định có nhiều lựa chọn (hộp đánh dấu).
Để tạo danh sách một lựa chọn giống như danh sách trong hình 5, hãy sử dụng phương thức setItems():
Kotlin
val builder: AlertDialog.Builder = AlertDialog.Builder(context)
builder
    .setTitle("I am the title")
    .setPositiveButton("Positive") { dialog, which ->
        // Do something.
    }
    .setNegativeButton("Negative") { dialog, which ->
        // Do something else.
    }
    .setItems(arrayOf("Item One", "Item Two", "Item Three")) { dialog, which ->
        // Do something on item tapped.
    }

val dialog: AlertDialog = builder.create()
dialog.show()
Java
@Override
public Dialog onCreateDialog(Bundle savedInstanceState) {
    AlertDialog.Builder builder = new AlertDialog.Builder(getActivity());
    builder.setTitle(R.string.pick_color)
           .setItems(R.array.colors_array, new DialogInterface.OnClickListener() {
               public void onClick(DialogInterface dialog, int which) {
               // The 'which' argument contains the index position of the selected item.
           }
    });
    return builder.create();
}
Đoạn mã này tạo ra một hộp thoại như sau:
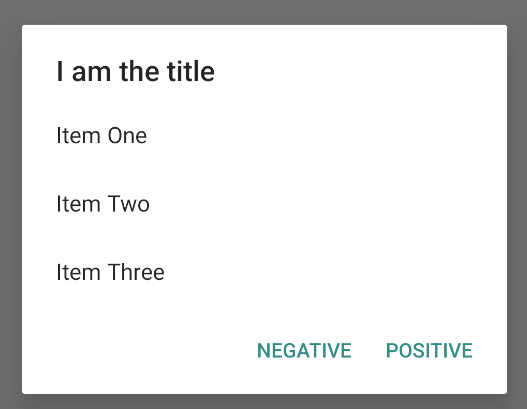
Vì danh sách này xuất hiện trong khu vực nội dung của hộp thoại, nên hộp thoại không thể hiển thị cả thông báo và danh sách. Đặt tiêu đề cho hộp thoại bằng setTitle().
Để chỉ định các mục cho danh sách, hãy gọi setItems(), chuyển một mảng. Ngoài ra, bạn có thể chỉ định một danh sách bằng cách sử dụng setAdapter().
Cách này sẽ cho phép bạn sao lưu danh sách bằng dữ liệu động (chẳng hạn như từ cơ sở dữ liệu) bằng cách dùng ListAdapter.
Nếu bạn sao lưu danh sách bằng ListAdapter, hãy luôn sử dụng Loader để nội dung tải không đồng bộ. Điều này được mô tả cụ thể hơn trong bài viết Tạo bố cục bằng bộ chuyển đổi và Trình tải.
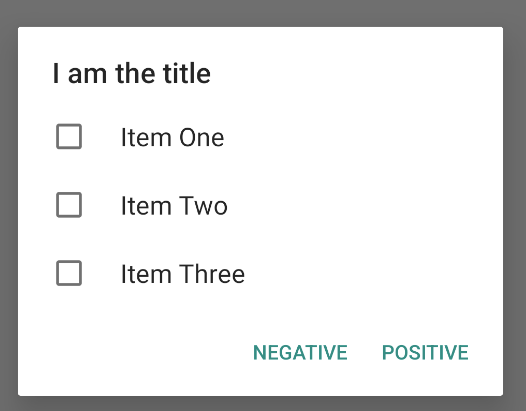
Thêm danh sách cố định gồm một hoặc nhiều lựa chọn
Để thêm danh sách các mục có nhiều lựa chọn (hộp đánh dấu) hoặc các mục có một lựa chọn (nút chọn), hãy sử dụng phương thức setMultiChoiceItems() hoặc setSingleChoiceItems() tương ứng.
Ví dụ: dưới đây là cách bạn có thể tạo danh sách có nhiều lựa chọn như danh sách hiển thị trong hình 6, danh sách này lưu các mục đã chọn trong một ArrayList:
Kotlin
val builder: AlertDialog.Builder = AlertDialog.Builder(context)
builder
    .setTitle("I am the title")
    .setPositiveButton("Positive") { dialog, which ->
        // Do something.
    }
    .setNegativeButton("Negative") { dialog, which ->
        // Do something else.
    }
    .setMultiChoiceItems(
        arrayOf("Item One", "Item Two", "Item Three"), null) { dialog, which, isChecked ->
        // Do something.
    }

val dialog: AlertDialog = builder.create()
dialog.show()
Java
@Override
public Dialog onCreateDialog(Bundle savedInstanceState) {
    selectedItems = new ArrayList();  // Where we track the selected items
    AlertDialog.Builder builder = new AlertDialog.Builder(getActivity());
    // Set the dialog title.
    builder.setTitle(R.string.pick_toppings)
    // Specify the list array, the items to be selected by default (null for
    // none), and the listener through which to receive callbacks when items
    // are selected.
           .setMultiChoiceItems(R.array.toppings, null,
                      new DialogInterface.OnMultiChoiceClickListener() {
               @Override
               public void onClick(DialogInterface dialog, int which,
                       boolean isChecked) {
                   if (isChecked) {
                       // If the user checks the item, add it to the selected
                       // items.
                       selectedItems.add(which);
                   } else if (selectedItems.contains(which)) {
                       // If the item is already in the array, remove it.
                       selectedItems.remove(which);
                   }
               }
           })
    // Set the action buttons
           .setPositiveButton(R.string.ok, new DialogInterface.OnClickListener() {
               @Override
               public void onClick(DialogInterface dialog, int id) {
                   // User taps OK, so save the selectedItems results
                   // somewhere or return them to the component that opens the
                   // dialog.
                   ...
               }
           })
           .setNegativeButton(R.string.cancel, new DialogInterface.OnClickListener() {
               @Override
               public void onClick(DialogInterface dialog, int id) {
                   ...
               }
           });

    return builder.create();
}
Bạn có thể nhận được hộp thoại cảnh báo có một lựa chọn như sau:
Kotlin
val builder: AlertDialog.Builder = AlertDialog.Builder(context)
builder
    .setTitle("I am the title")
    .setPositiveButton("Positive") { dialog, which ->
        // Do something.
    }
    .setNegativeButton("Negative") { dialog, which ->
        // Do something else.
    }
    .setSingleChoiceItems(
        arrayOf("Item One", "Item Two", "Item Three"), 0
    ) { dialog, which ->
        // Do something.
    }

val dialog: AlertDialog = builder.create()
dialog.show()
Java
        String[] choices = {"Item One", "Item Two", "Item Three"};

        AlertDialog.Builder builder = AlertDialog.Builder(context);
        builder
                .setTitle("I am the title")
                .setPositiveButton("Positive", (dialog, which) -> {

                })
                .setNegativeButton("Negative", (dialog, which) -> {

                })
                .setSingleChoiceItems(choices, 0, (dialog, which) -> {

                });

        AlertDialog dialog = builder.create();
        dialog.show();
Điều này dẫn đến ví dụ sau:

Tạo bố cục tuỳ chỉnh
Nếu bạn muốn có một bố cục tuỳ chỉnh trong hộp thoại, hãy tạo một bố cục và thêm bố cục đó vào AlertDialog bằng cách gọi setView() trên đối tượng AlertDialog.Builder.

Theo mặc định, bố cục tuỳ chỉnh sẽ lấp đầy cửa sổ hộp thoại, nhưng bạn vẫn có thể sử dụng các phương thức AlertDialog.Builder để thêm nút và tiêu đề.
Ví dụ: đây là tệp bố cục cho bố cục hộp thoại tuỳ chỉnh ở trên:
res/layout/Dialog_signin.xml
<LinearLayout xmlns:android="http://schemas.android.com/apk/res/android"
    android:orientation="vertical"
    android:layout_width="wrap_content"
    android:layout_height="wrap_content">
    <ImageView
        android:src="@drawable/header_logo"
        android:layout_width="match_parent"
        android:layout_height="64dp"
        android:scaleType="center"
        android:background="#FFFFBB33"
        android:contentDescription="@string/app_name" />
    <EditText
        android:id="@+id/username"
        android:inputType="textEmailAddress"
        android:layout_width="match_parent"
        android:layout_height="wrap_content"
        android:layout_marginTop="16dp"
        android:layout_marginLeft="4dp"
        android:layout_marginRight="4dp"
        android:layout_marginBottom="4dp"
        android:hint="@string/username" />
    <EditText
        android:id="@+id/password"
        android:inputType="textPassword"
        android:layout_width="match_parent"
        android:layout_height="wrap_content"
        android:layout_marginTop="4dp"
        android:layout_marginLeft="4dp"
        android:layout_marginRight="4dp"
        android:layout_marginBottom="16dp"
        android:fontFamily="sans-serif"
        android:hint="@string/password"/>
</LinearLayout>
Để tăng cường bố cục trong DialogFragment, hãy tải LayoutInflater bằng getLayoutInflater() và gọi inflate().
Tham số đầu tiên là mã tài nguyên bố cục và tham số thứ hai là một khung hiển thị gốc cho bố cục. Sau đó, bạn có thể gọi setView() để đặt bố cục trong hộp thoại. Lệnh này được minh hoạ trong ví dụ sau:
Kotlin
override fun onCreateDialog(savedInstanceState: Bundle?): Dialog {
    return activity?.let {
        val builder = AlertDialog.Builder(it)
        // Get the layout inflater.
        val inflater = requireActivity().layoutInflater;

        // Inflate and set the layout for the dialog.
        // Pass null as the parent view because it's going in the dialog
        // layout.
        builder.setView(inflater.inflate(R.layout.dialog_signin, null))
                // Add action buttons.
                .setPositiveButton(R.string.signin,
                        DialogInterface.OnClickListener { dialog, id ->
                            // Sign in the user.
                        })
                .setNegativeButton(R.string.cancel,
                        DialogInterface.OnClickListener { dialog, id ->
                            getDialog().cancel()
                        })
        builder.create()
    } ?: throw IllegalStateException("Activity cannot be null")
}
Java
@Override
public Dialog onCreateDialog(Bundle savedInstanceState) {
    AlertDialog.Builder builder = new AlertDialog.Builder(getActivity());
    // Get the layout inflater.
    LayoutInflater inflater = requireActivity().getLayoutInflater();

    // Inflate and set the layout for the dialog.
    // Pass null as the parent view because it's going in the dialog layout.
    builder.setView(inflater.inflate(R.layout.dialog_signin, null))
    // Add action buttons
           .setPositiveButton(R.string.signin, new DialogInterface.OnClickListener() {
               @Override
               public void onClick(DialogInterface dialog, int id) {
                   // Sign in the user.
               }
           })
           .setNegativeButton(R.string.cancel, new DialogInterface.OnClickListener() {
               public void onClick(DialogInterface dialog, int id) {
                   LoginDialogFragment.this.getDialog().cancel();
               }
           });
    return builder.create();
}
Nếu muốn có hộp thoại tuỳ chỉnh, bạn có thể hiển thị Activity dưới dạng hộp thoại thay vì sử dụng các API Dialog. Tạo một hoạt động và đặt giao diện của hoạt động đó thành Theme.Holo.Dialog trong phần tử tệp kê khai của <activity>:
<activity android:theme="@android:style/Theme.Holo.Dialog" >
Hoạt động giờ sẽ hiển thị trong cửa sổ hộp thoại thay vì hiển thị toàn màn hình.
Chuyển sự kiện trở lại máy chủ hộp thoại
Khi người dùng nhấn vào một trong các nút hành động của hộp thoại hoặc chọn một mục trong danh sách, DialogFragment có thể tự thực hiện hành động cần thiết, nhưng thông thường bạn muốn phân phối sự kiện đó đến hoạt động hoặc mảnh mở hộp thoại. Để thực hiện việc này, hãy xác định một giao diện kèm theo phương thức cho từng loại sự kiện nhấp chuột. Sau đó, hãy triển khai giao diện đó trong thành phần máy chủ nhận các sự kiện hành động từ hộp thoại.
Ví dụ: đây là DialogFragment xác định một giao diện mà qua đó mảnh sẽ phân phối các sự kiện trở lại hoạt động lưu trữ:
Kotlin
class NoticeDialogFragment : DialogFragment() {
    // Use this instance of the interface to deliver action events.
    internal lateinit var listener: NoticeDialogListener

    // The activity that creates an instance of this dialog fragment must
    // implement this interface to receive event callbacks. Each method passes
    // the DialogFragment in case the host needs to query it.
    interface NoticeDialogListener {
        fun onDialogPositiveClick(dialog: DialogFragment)
        fun onDialogNegativeClick(dialog: DialogFragment)
    }

    // Override the Fragment.onAttach() method to instantiate the
    // NoticeDialogListener.
    override fun onAttach(context: Context) {
        super.onAttach(context)
        // Verify that the host activity implements the callback interface.
        try {
            // Instantiate the NoticeDialogListener so you can send events to
            // the host.
            listener = context as NoticeDialogListener
        } catch (e: ClassCastException) {
            // The activity doesn't implement the interface. Throw exception.
            throw ClassCastException((context.toString() +
                    " must implement NoticeDialogListener"))
        }
    }
}
Java
public class NoticeDialogFragment extends DialogFragment {

    // The activity that creates an instance of this dialog fragment must
    // implement this interface to receive event callbacks. Each method passes
    // the DialogFragment in case the host needs to query it.
    public interface NoticeDialogListener {
        public void onDialogPositiveClick(DialogFragment dialog);
        public void onDialogNegativeClick(DialogFragment dialog);
    }

    // Use this instance of the interface to deliver action events.
    NoticeDialogListener listener;

    // Override the Fragment.onAttach() method to instantiate the
    // NoticeDialogListener.
    @Override
    public void onAttach(Context context) {
        super.onAttach(context);
        // Verify that the host activity implements the callback interface.
        try {
            // Instantiate the NoticeDialogListener so you can send events to
            // the host.
            listener = (NoticeDialogListener) context;
        } catch (ClassCastException e) {
            // The activity doesn't implement the interface. Throw exception.
            throw new ClassCastException(activity.toString()
                    + " must implement NoticeDialogListener");
        }
    }
    ...
}
Hoạt động lưu trữ hộp thoại sẽ tạo một bản sao của hộp thoại bằng hàm khởi tạo của mảnh hộp thoại và tiếp nhận các sự kiện của hộp thoại thông qua một hoạt động triển khai giao diện NoticeDialogListener:
Kotlin
class MainActivity : FragmentActivity(),
        NoticeDialogFragment.NoticeDialogListener {

    fun showNoticeDialog() {
        // Create an instance of the dialog fragment and show it.
        val dialog = NoticeDialogFragment()
        dialog.show(supportFragmentManager, "NoticeDialogFragment")
    }

    // The dialog fragment receives a reference to this Activity through the
    // Fragment.onAttach() callback, which it uses to call the following
    // methods defined by the NoticeDialogFragment.NoticeDialogListener
    // interface.
    override fun onDialogPositiveClick(dialog: DialogFragment) {
        // User taps the dialog's positive button.
    }

    override fun onDialogNegativeClick(dialog: DialogFragment) {
        // User taps the dialog's negative button.
    }
}
Java
public class MainActivity extends FragmentActivity
                          implements NoticeDialogFragment.NoticeDialogListener{
    ...
    public void showNoticeDialog() {
        // Create an instance of the dialog fragment and show it.
        DialogFragment dialog = new NoticeDialogFragment();
        dialog.show(getSupportFragmentManager(), "NoticeDialogFragment");
    }

    // The dialog fragment receives a reference to this Activity through the
    // Fragment.onAttach() callback, which it uses to call the following
    // methods defined by the NoticeDialogFragment.NoticeDialogListener
    // interface.
    @Override
    public void onDialogPositiveClick(DialogFragment dialog) {
        // User taps the dialog's positive button.
        ...
    }

    @Override
    public void onDialogNegativeClick(DialogFragment dialog) {
        // User taps the dialog's negative button.
        ...
    }
}
Do hoạt động lưu trữ triển khai NoticeDialogListener (được thực thi bằng phương thức gọi lại onAttach() trong ví dụ trước) nên mảnh hộp thoại có thể sử dụng các phương thức gọi lại giao diện để phân phối sự kiện nhấp chuột đến hoạt động:
Kotlin
    override fun onCreateDialog(savedInstanceState: Bundle): Dialog {
        return activity?.let {
            // Build the dialog and set up the button click handlers.
            val builder = AlertDialog.Builder(it)

            builder.setMessage(R.string.dialog_start_game)
                    .setPositiveButton(R.string.start,
                            DialogInterface.OnClickListener { dialog, id ->
                                // Send the positive button event back to the
                                // host activity.
                                listener.onDialogPositiveClick(this)
                            })
                    .setNegativeButton(R.string.cancel,
                            DialogInterface.OnClickListener { dialog, id ->
                                // Send the negative button event back to the
                                // host activity.
                                listener.onDialogNegativeClick(this)
                            })

            builder.create()
        } ?: throw IllegalStateException("Activity cannot be null")
    }
Java
public class NoticeDialogFragment extends DialogFragment {
    ...
    @Override
    public Dialog onCreateDialog(Bundle savedInstanceState) {
        // Build the dialog and set up the button click handlers.
        AlertDialog.Builder builder = new AlertDialog.Builder(getActivity());
        builder.setMessage(R.string.dialog_start_game)
               .setPositiveButton(R.string.start, new DialogInterface.OnClickListener() {
                   public void onClick(DialogInterface dialog, int id) {
                       // Send the positive button event back to the host activity.
                       listener.onDialogPositiveClick(NoticeDialogFragment.this);
                   }
               })
               .setNegativeButton(R.string.cancel, new DialogInterface.OnClickListener() {
                   public void onClick(DialogInterface dialog, int id) {
                       // Send the negative button event back to the host activity.
                       listener.onDialogNegativeClick(NoticeDialogFragment.this);
                   }
               });
        return builder.create();
    }
}
Hiện hộp thoại
Khi bạn muốn hiển thị hộp thoại, hãy tạo một bản sao của DialogFragment và gọi show(), chuyển FragmentManager và tên thẻ cho mảnh hộp thoại.
Bạn có thể nhận FragmentManager bằng cách gọi getSupportFragmentManager() từ FragmentActivity hoặc bằng cách gọi getParentFragmentManager() từ Fragment. Hãy xem ví dụ sau:
Kotlin
fun confirmStartGame() {
    val newFragment = StartGameDialogFragment()
    newFragment.show(supportFragmentManager, "game")
}
Java
public void confirmStartGame() {
    DialogFragment newFragment = new StartGameDialogFragment();
    newFragment.show(getSupportFragmentManager(), "game");
}
Đối số thứ hai, "game", là một tên thẻ duy nhất mà hệ thống dùng để lưu và khôi phục trạng thái của mảnh khi cần thiết. Thẻ này cũng cho phép bạn xử lý mảnh bằng cách gọi findFragmentByTag().
Hiển thị hộp thoại ở chế độ toàn màn hình hoặc dưới dạng một mảnh được nhúng
Trong một số trường hợp, bạn có thể muốn một phần trong thiết kế giao diện người dùng của mình xuất hiện dưới dạng hộp thoại, còn trong những trường hợp khác, phần đó sẽ xuất hiện dưới dạng một mảnh được nhúng hoặc toàn màn hình. Bạn cũng có thể muốn nó xuất hiện theo cách khác tuỳ thuộc vào kích thước màn hình của thiết bị. Lớp DialogFragment mang đến sự linh hoạt để thực hiện việc này, vì lớp này có thể hoạt động như một Fragment có thể nhúng.
Tuy nhiên, bạn không thể sử dụng AlertDialog.Builder hoặc các đối tượng Dialog khác để tạo hộp thoại trong trường hợp này. Nếu bạn muốn DialogFragment có thể nhúng được, hãy xác định giao diện người dùng của hộp thoại trong một bố cục, rồi tải bố cục đó trong lệnh gọi lại onCreateView().
Dưới đây là ví dụ về DialogFragment có thể xuất hiện dưới dạng hộp thoại hoặc một mảnh có thể nhúng, sử dụng bố cục có tên là purchase_items.xml:
Kotlin
class CustomDialogFragment : DialogFragment() {

    // The system calls this to get the DialogFragment's layout, regardless of
    // whether it's being displayed as a dialog or an embedded fragment.
    override fun onCreateView(
            inflater: LayoutInflater,
            container: ViewGroup?,
            savedInstanceState: Bundle?
    ): View {
        // Inflate the layout to use as a dialog or embedded fragment.
        return inflater.inflate(R.layout.purchase_items, container, false)
    }

    // The system calls this only when creating the layout in a dialog.
    override fun onCreateDialog(savedInstanceState: Bundle): Dialog {
        // The only reason you might override this method when using
        // onCreateView() is to modify the dialog characteristics. For example,
        // the dialog includes a title by default, but your custom layout might
        // not need it. Here, you can remove the dialog title, but you must
        // call the superclass to get the Dialog.
        val dialog = super.onCreateDialog(savedInstanceState)
        dialog.requestWindowFeature(Window.FEATURE_NO_TITLE)
        return dialog
    }
}
Java
public class CustomDialogFragment extends DialogFragment {
    // The system calls this to get the DialogFragment's layout, regardless of
    // whether it's being displayed as a dialog or an embedded fragment.
    @Override
    public View onCreateView(LayoutInflater inflater, ViewGroup container,
            Bundle savedInstanceState) {
        // Inflate the layout to use as a dialog or embedded fragment.
        return inflater.inflate(R.layout.purchase_items, container, false);
    }

    // The system calls this only when creating the layout in a dialog.
    @Override
    public Dialog onCreateDialog(Bundle savedInstanceState) {
        // The only reason you might override this method when using
        // onCreateView() is to modify the dialog characteristics. For example,
        // the dialog includes a title by default, but your custom layout might
        // not need it. Here, you can remove the dialog title, but you must
        // call the superclass to get the Dialog.
        Dialog dialog = super.onCreateDialog(savedInstanceState);
        dialog.requestWindowFeature(Window.FEATURE_NO_TITLE);
        return dialog;
    }
}
Ví dụ sau đây xác định xem có hiển thị mảnh dưới dạng hộp thoại hay giao diện người dùng toàn màn hình hay không, dựa trên kích thước màn hình:
Kotlin
fun showDialog() {
    val fragmentManager = supportFragmentManager
    val newFragment = CustomDialogFragment()
    if (isLargeLayout) {
        // The device is using a large layout, so show the fragment as a
        // dialog.
        newFragment.show(fragmentManager, "dialog")
    } else {
        // The device is smaller, so show the fragment fullscreen.
        val transaction = fragmentManager.beginTransaction()
        // For a polished look, specify a transition animation.
        transaction.setTransition(FragmentTransaction.TRANSIT_FRAGMENT_OPEN)
        // To make it fullscreen, use the 'content' root view as the container
        // for the fragment, which is always the root view for the activity.
        transaction
                .add(android.R.id.content, newFragment)
                .addToBackStack(null)
                .commit()
    }
}
Java
public void showDialog() {
    FragmentManager fragmentManager = getSupportFragmentManager();
    CustomDialogFragment newFragment = new CustomDialogFragment();

    if (isLargeLayout) {
        // The device is using a large layout, so show the fragment as a
        // dialog.
        newFragment.show(fragmentManager, "dialog");
    } else {
        // The device is smaller, so show the fragment fullscreen.
        FragmentTransaction transaction = fragmentManager.beginTransaction();
        // For a polished look, specify a transition animation.
        transaction.setTransition(FragmentTransaction.TRANSIT_FRAGMENT_OPEN);
        // To make it fullscreen, use the 'content' root view as the container
        // for the fragment, which is always the root view for the activity.
        transaction.add(android.R.id.content, newFragment)
                   .addToBackStack(null).commit();
    }
}
Để biết thêm thông tin về cách thực hiện giao dịch mảnh, hãy xem bài viết Mảnh.
Trong ví dụ này, boolean mIsLargeLayout chỉ định liệu thiết bị hiện tại có cần sử dụng thiết kế bố cục lớn của ứng dụng hay không, và do đó, mảnh này sẽ hiển thị dưới dạng hộp thoại thay vì toàn màn hình. Cách tốt nhất để đặt loại boolean này là khai báo giá trị tài nguyên bool với giá trị tài nguyên thay thế cho nhiều kích thước màn hình. Ví dụ: dưới đây là 2
phiên bản của tài nguyên bool cho nhiều kích thước màn hình:
res/values/bools.xml
<!-- Default boolean values -->
<resources>
    <bool name="large_layout">false</bool>
</resources>
res/values-large/bools.xml
<!-- Large screen boolean values -->
<resources>
    <bool name="large_layout">true</bool>
</resources>
Sau đó, bạn có thể khởi chạy giá trị mIsLargeLayout trong phương thức onCreate() của hoạt động, như minh hoạ trong ví dụ sau:
Kotlin
override fun onCreate(savedInstanceState: Bundle?) {
    super.onCreate(savedInstanceState)
    setContentView(R.layout.activity_main)

    isLargeLayout = resources.getBoolean(R.bool.large_layout)
}
Java
boolean isLargeLayout;

@Override
public void onCreate(Bundle savedInstanceState) {
    super.onCreate(savedInstanceState);
    setContentView(R.layout.activity_main);

    isLargeLayout = getResources().getBoolean(R.bool.large_layout);
}
Hiển thị một hoạt động dưới dạng hộp thoại trên màn hình lớn
Thay vì hiển thị hộp thoại dưới dạng giao diện người dùng toàn màn hình trên màn hình nhỏ, bạn có thể có được kết quả tương tự bằng cách hiển thị Activity dưới dạng hộp thoại trên màn hình lớn. Phương pháp bạn chọn tuỳ thuộc vào thiết kế của ứng dụng, nhưng việc hiển thị một hoạt động dưới dạng hộp thoại thường hữu ích khi ứng dụng của bạn được thiết kế cho các màn hình nhỏ và bạn muốn cải thiện trải nghiệm trên máy tính bảng bằng cách hiển thị một hoạt động ngắn hạn dưới dạng hộp thoại.
Để chỉ hiển thị một hoạt động dưới dạng hộp thoại trên màn hình lớn, hãy áp dụng giao diện Theme.Holo.DialogWhenLarge cho phần tử tệp kê khai <activity>:
<activity android:theme="@android:style/Theme.Holo.DialogWhenLarge" >
Để biết thêm thông tin về cách định kiểu cho các hoạt động bằng giao diện, hãy xem phần Kiểu và giao diện.
Đóng hộp thoại
Khi người dùng nhấn vào một nút hành động được tạo bằng AlertDialog.Builder, hệ thống sẽ đóng hộp thoại đó cho bạn.
Hệ thống cũng sẽ đóng hộp thoại khi người dùng nhấn vào một mục trong danh sách hộp thoại, trừ phi danh sách sử dụng các nút chọn hoặc hộp đánh dấu. Nếu không, bạn có thể đóng hộp thoại theo cách thủ công bằng cách gọi dismiss() trên DialogFragment.
Nếu cần thực hiện một số thao tác khi hộp thoại biến mất, bạn có thể triển khai phương thức onDismiss() trong DialogFragment.
Bạn cũng có thể huỷ hộp thoại. Đây là một sự kiện đặc biệt cho biết rằng người dùng đang rời khỏi hộp thoại mà không hoàn thành tác vụ. Điều này xảy ra nếu người dùng nhấn nút Quay lại hoặc nhấn vào màn hình bên ngoài khu vực hộp thoại hoặc nếu bạn gọi cancel() một cách rõ ràng trên Dialog, chẳng hạn như để phản hồi nút "Huỷ" trong hộp thoại.
Như trong ví dụ trước, bạn có thể phản hồi sự kiện huỷ bằng cách triển khai onCancel() trong lớp DialogFragment.