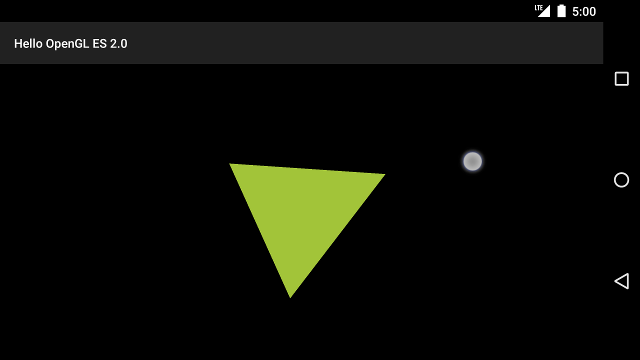
घूमने वाले ट्राईऐंगल जैसे प्रीसेट प्रोग्राम के मुताबिक, ऑब्जेक्ट को मूव करने में मदद मिलती है
कुछ ध्यान मिल रहा है, लेकिन क्या होगा अगर आप उपयोगकर्ताओं को अपने OpenGL ES ग्राफ़िक्स के साथ इंटरैक्ट करना चाहें?
OpenGL ES ऐप्लिकेशन को टच इंटरैक्टिव बनाने की सबसे अहम बात यह है कि
इसे बदलने के लिए GLSurfaceView
टच इवेंट को सुनने के लिए onTouchEvent().
इस लेसन में बताया गया है कि टच इवेंट को कैसे सुनें, ताकि उपयोगकर्ता OpenGL ES ऑब्जेक्ट को घुमा सकें.
टच लिसनर सेटअप करें
अपने OpenGL ES ऐप्लिकेशन को टच इवेंट का जवाब देने के लिए, आपको
onTouchEvent() तरीका
GLSurfaceView क्लास. नीचे दिए गए उदाहरण में बताया गया है कि कैसे सुनें
MotionEvent.ACTION_MOVE इवेंट और उनका अनुवाद इस भाषा में करें
किसी आकृति के लिए घूर्णन का कोण.
Kotlin
private const val TOUCH_SCALE_FACTOR: Float = 180.0f / 320f
...
private var previousX: Float = 0f
private var previousY: Float = 0f

override fun onTouchEvent(e: MotionEvent): Boolean {
    // MotionEvent reports input details from the touch screen
    // and other input controls. In this case, you are only
    // interested in events where the touch position changed.

    val x: Float = e.x
    val y: Float = e.y

    when (e.action) {
        MotionEvent.ACTION_MOVE -> {

            var dx: Float = x - previousX
            var dy: Float = y - previousY

            // reverse direction of rotation above the mid-line
            if (y > height / 2) {
                dx *= -1
            }

            // reverse direction of rotation to left of the mid-line
            if (x < width / 2) {
                dy *= -1
            }

            renderer.angle += (dx + dy) * TOUCH_SCALE_FACTOR
            requestRender()
        }
    }

    previousX = x
    previousY = y
    return true
}
Java
private final float TOUCH_SCALE_FACTOR = 180.0f / 320;
private float previousX;
private float previousY;

@Override
public boolean onTouchEvent(MotionEvent e) {
    // MotionEvent reports input details from the touch screen
    // and other input controls. In this case, you are only
    // interested in events where the touch position changed.

    float x = e.getX();
    float y = e.getY();

    switch (e.getAction()) {
        case MotionEvent.ACTION_MOVE:

            float dx = x - previousX;
            float dy = y - previousY;

            // reverse direction of rotation above the mid-line
            if (y > getHeight() / 2) {
              dx = dx * -1 ;
            }

            // reverse direction of rotation to left of the mid-line
            if (x < getWidth() / 2) {
              dy = dy * -1 ;
            }

            renderer.setAngle(
                    renderer.getAngle() +
                    ((dx + dy) * TOUCH_SCALE_FACTOR));
            requestRender();
    }

    previousX = x;
    previousY = y;
    return true;
}
ध्यान दें कि घूर्णन कोण की गणना करने के बाद, यह विधि कॉल
requestRender() को
रेंडरर को बताएं कि यह फ़्रेम को रेंडर करने का समय है. इस उदाहरण में, यह तरीका सबसे बेहतर है
क्योंकि जब तक रोटेशन में कोई बदलाव नहीं होता, तब तक फ़्रेम को फिर से बनाने की ज़रूरत नहीं है. हालांकि, यह
दक्षता पर तब तक कोई प्रभाव नहीं पड़ता जब तक कि आप यह अनुरोध नहीं करते कि रेंडरर केवल तब
setRenderMode() का इस्तेमाल करके डेटा बदल जाता है
तरीका है, तो पक्का करें कि रेंडरर में इस लाइन के बारे में टिप्पणी न की गई हो:
Kotlin
class MyGlSurfaceView(context: Context) : GLSurfaceView(context) {

    init {
        // Render the view only when there is a change in the drawing data
        renderMode = GLSurfaceView.RENDERMODE_WHEN_DIRTY
    }
}
Java
public MyGLSurfaceView(Context context) {
    ...
    // Render the view only when there is a change in the drawing data
    setRenderMode(GLSurfaceView.RENDERMODE_WHEN_DIRTY);
}
घूमने का ऐंगल दिखाएं
ऊपर दिए गए उदाहरण कोड के लिए यह आवश्यक है कि आप अपने रेंडरर के माध्यम से रोटेशन कोण को
सार्वजनिक सदस्य जोड़ना. रेंडरर कोड, मुख्य उपयोगकर्ता के थ्रेड से अलग थ्रेड पर चल रहा है
इंटरफ़ेस थ्रेड के लिए अपना पासवर्ड ठीक करना होगा, तो आपको इस सार्वजनिक वैरिएबल को volatile के रूप में एलान करना होगा.
यहां वैरिएबल के बारे में बताने और गेटर और सेटर पेयर को दिखाने के लिए कोड दिया गया है:
Kotlin
class MyGLRenderer4 : GLSurfaceView.Renderer {

    @Volatile
    var angle: Float = 0f
}
Java
public class MyGLRenderer implements GLSurfaceView.Renderer {
    ...

    public volatile float mAngle;

    public float getAngle() {
        return mAngle;
    }

    public void setAngle(float angle) {
        mAngle = angle;
    }
}
रोटेशन लागू करें
टच इनपुट से जनरेट हुआ रोटेशन लागू करने के लिए, उस कोड को टिप्पणी करें जो कोण जनरेट करता है और कोई ऐसा वैरिएबल जोड़ें जिसमें टच इनपुट से जनरेट किया गया कोण शामिल हो:
Kotlin
override fun onDrawFrame(gl: GL10) {
    ...
    val scratch = FloatArray(16)

    // Create a rotation for the triangle
    // long time = SystemClock.uptimeMillis() % 4000L;
    // float angle = 0.090f * ((int) time);
    Matrix.setRotateM(rotationMatrix, 0, angle, 0f, 0f, -1.0f)

    // Combine the rotation matrix with the projection and camera view
    // Note that the mvpMatrix factor *must be first* in order
    // for the matrix multiplication product to be correct.
    Matrix.multiplyMM(scratch, 0, mvpMatrix, 0, rotationMatrix, 0)

    // Draw triangle
    triangle.draw(scratch)
}
Java
public void onDrawFrame(GL10 gl) {
    ...
    float[] scratch = new float[16];

    // Create a rotation for the triangle
    // long time = SystemClock.uptimeMillis() % 4000L;
    // float angle = 0.090f * ((int) time);
    Matrix.setRotateM(rotationMatrix, 0, mAngle, 0, 0, -1.0f);

    // Combine the rotation matrix with the projection and camera view
    // Note that the vPMatrix factor *must be first* in order
    // for the matrix multiplication product to be correct.
    Matrix.multiplyMM(scratch, 0, vPMatrix, 0, rotationMatrix, 0);

    // Draw triangle
    mTriangle.draw(scratch);
}
ऊपर बताए गए चरणों को पूरा करने के बाद, प्रोग्राम चलाएं और अपनी उंगली को त्रिभुज को घुमाने के लिए स्क्रीन:

पहला डायग्राम. टच इनपुट के ज़रिए त्रिभुज को घुमाया जा रहा है (गोल वृत्त टच दिखाता है स्थान).
