應用程式小工具是迷你應用程式檢視畫面,可內嵌到其他應用程式 (例如主畫面),並定期接收更新。這些檢視畫面在使用者介面中稱為「小工具」,您可以透過應用程式小工具供應器 (或「小工具供應器」) 發布小工具。應用程式元件會保留其他小工具,稱為應用程式小工具主機 (或小工具主機)。圖 1 顯示音樂小工具範例:

本文說明如何使用小工具供應器發布小工具。如要進一步瞭解如何建立自己的 AppWidgetHost 來代管應用程式小工具,請參閱「建構小工具主機」。
如要瞭解如何設計小工具,請參閱「應用程式小工具總覽」。
小工具元件
如要建立小工具,您需要下列基本元件:
AppWidgetProviderInfo物件- :說明小工具的中繼資料,例如小工具的版面配置、更新頻率和
AppWidgetProvider類別。AppWidgetProviderInfo是在 XML 中定義,如本文所述。 AppWidgetProvider類別- 定義基本方法,讓您透過程式輔助與小工具介面互動。透過這個接收器,您可以在小工具更新、啟用、停用或刪除時收到廣播。您可以在資訊清單中
AppWidgetProvider宣告,然後實作,如本文所述。 - 查看版面配置
- 定義小工具的初始版面配置。如本文所述,版面配置是以 XML 定義。
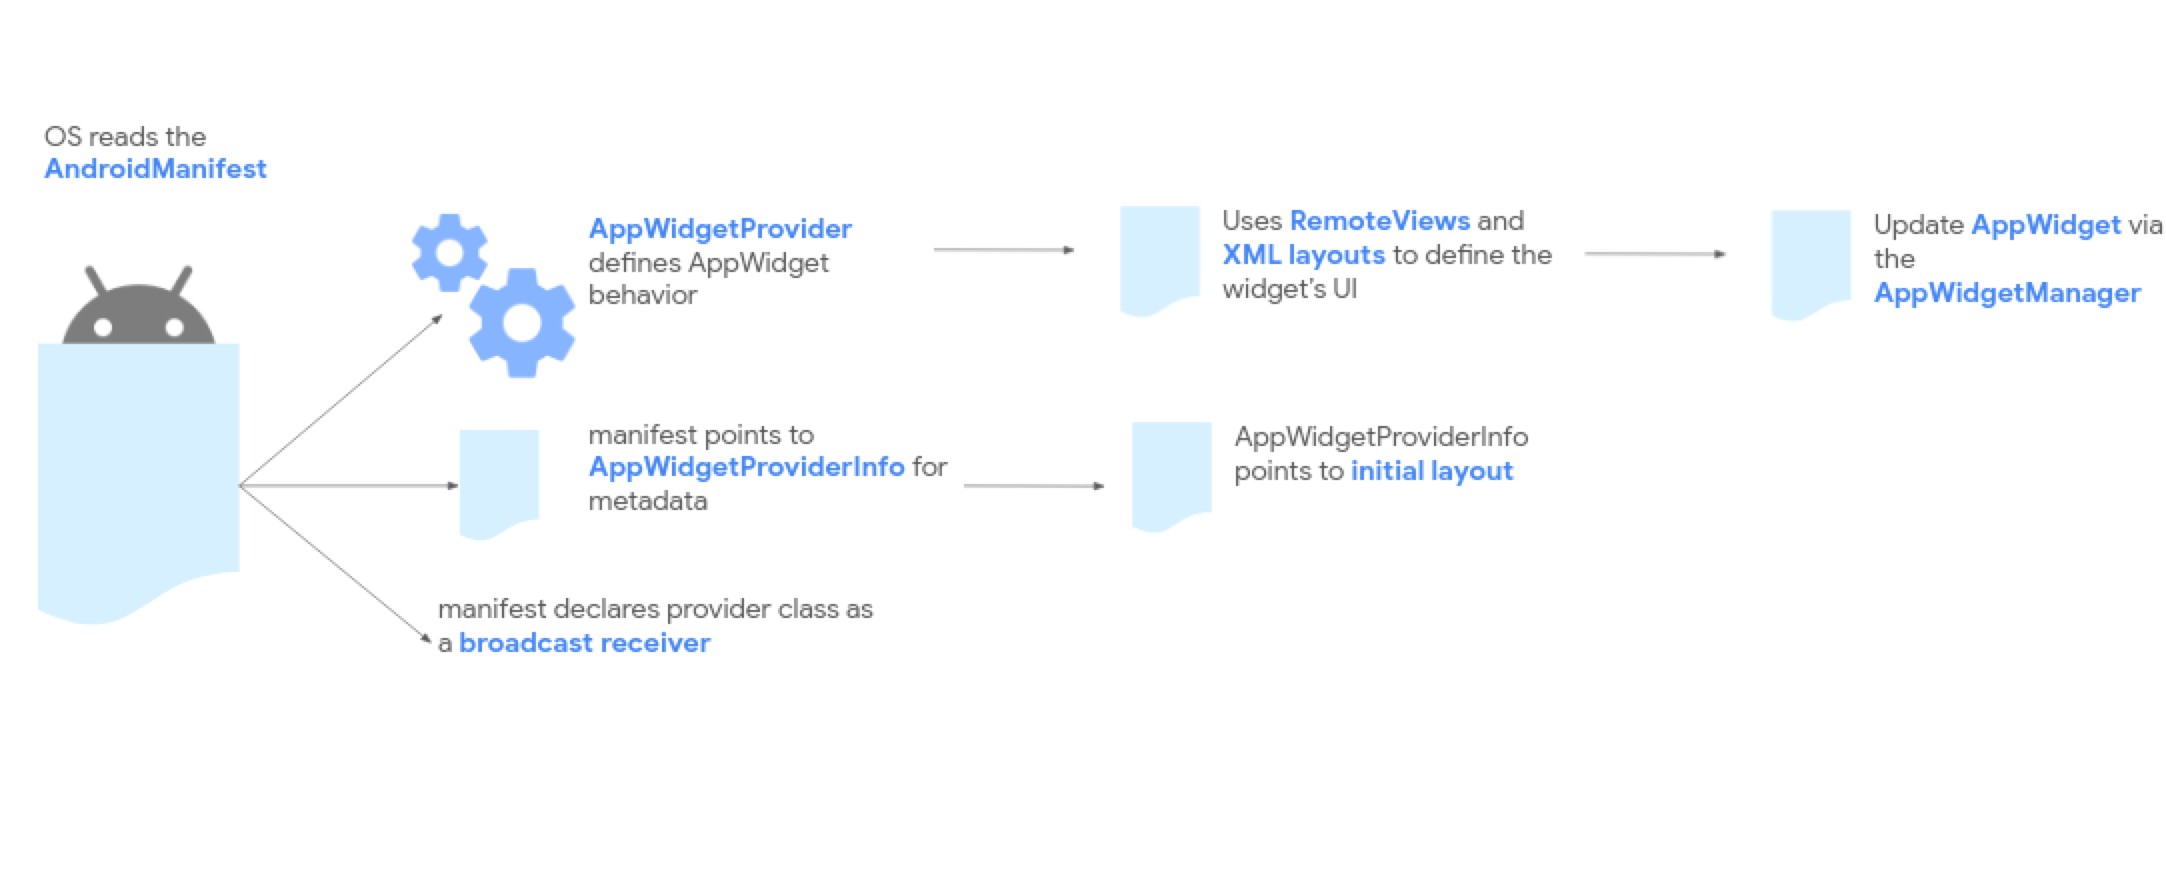
圖 2 顯示這些元件如何融入整體應用程式小工具處理流程。

如果小工具需要使用者設定,請實作應用程式小工具設定活動。使用者可透過這項活動修改小工具設定,例如時鐘小工具的時區。
- 從 Android 12 (API 級別 31) 開始,您可以提供預設設定,並允許使用者稍後重新設定小工具。詳情請參閱「使用小工具的預設設定」和「允許使用者重新設定已放置的小工具」。
- 在 Android 11 (API 級別 30) 以下版本中,使用者每次將小工具新增至主畫面時,系統都會啟動這項活動。
我們也建議進行下列改善:彈性小工具版面配置、其他強化功能、進階小工具、集合小工具,以及建構小工具主機。
宣告 AppWidgetProviderInfo XML
AppWidgetProviderInfo 物件會定義小工具的基本特質。使用單一 <appwidget-provider> 元素在 XML 資源檔案中定義 AppWidgetProviderInfo 物件,然後儲存至專案的 res/xml/ 資料夾。
例如:
<appwidget-provider xmlns:android="http://schemas.android.com/apk/res/android"
    android:minWidth="40dp"
    android:minHeight="40dp"
    android:targetCellWidth="1"
    android:targetCellHeight="1"
    android:maxResizeWidth="250dp"
    android:maxResizeHeight="120dp"
    android:updatePeriodMillis="86400000"
    android:description="@string/example_appwidget_description"
    android:previewLayout="@layout/example_appwidget_preview"
    android:initialLayout="@layout/example_loading_appwidget"
    android:configure="com.example.android.ExampleAppWidgetConfigurationActivity"
    android:resizeMode="horizontal|vertical"
    android:widgetCategory="home_screen"
    android:widgetFeatures="reconfigurable|configuration_optional">
</appwidget-provider>
小工具大小屬性
預設主畫面會根據定義高度和寬度的儲存格格線,將小工具放置在視窗中。大多數主畫面只允許小工具採用格線儲存格的整數倍數大小,例如水平兩個儲存格,垂直三個儲存格。
小工具大小屬性可讓您指定小工具的預設大小,並提供小工具大小的下限和上限。在此情況下,小工具的預設大小是指小工具首次新增至主畫面時的大小。
下表說明與小工具大小相關的 <appwidget-provider> 屬性:
| 屬性和說明 | |
|---|---|
targetCellWidth 和
targetCellHeight (Android 12)、
minWidth 和 minHeight |
targetCellWidth 和
targetCellHeight,以及 minWidth 和
minHeight),這樣一來,如果使用者的裝置不支援 targetCellWidth 和
targetCellHeight,應用程式就能改用 minWidth 和 minHeight。如果支援,targetCellWidth 和 targetCellHeight 屬性的優先順序會高於 minWidth 和 minHeight 屬性。 |
minResizeWidth 和
minResizeHeight |
指定小工具的絕對最小尺寸。這些值指定小工具無法辨識或無法使用的尺寸。使用這些屬性,使用者就能將小工具縮小至小於預設大小。如果 minResizeWidth 屬性大於 minWidth,或未啟用水平大小調整功能,系統就會忽略該屬性。請參閱resizeMode。同樣地,如果 minResizeHeight 屬性大於 minHeight,或未啟用垂直大小調整功能,系統就會忽略該屬性。 |
maxResizeWidth 和
maxResizeHeight |
指定小工具的建議大小上限。如果值不是格線儲存格尺寸的倍數,系統會無條件進位至最接近的儲存格大小。如果 maxResizeWidth 屬性小於 minWidth,或未啟用水平大小調整功能,系統會忽略該屬性。詳情請參閱「resizeMode」。同樣地,如果 maxResizeHeight 屬性大於 minHeight,或未啟用垂直大小調整功能,系統就會忽略該屬性。Android 12 推出這項功能。 |
resizeMode |
指定小工具可調整大小的規則。你可以使用這項屬性,讓主畫面小工具可沿水平、垂直或兩個軸向調整大小。使用者按住小工具即可顯示大小調整控點,
然後拖曳水平或垂直控點,即可在版面配置格線中變更小工具大小。resizeMode 屬性的值包括 horizontal、vertical 和 none。如要將小工具宣告為可水平和垂直調整大小,請使用 horizontal|vertical。 |
範例
如要說明上表中的屬性如何影響小工具大小,請假設下列規格:
- 格線儲存格的寬度為 30 dp,高度為 50 dp。
- 以下提供屬性規格:
<appwidget-provider xmlns:android="http://schemas.android.com/apk/res/android"
    android:minWidth="80dp"
    android:minHeight="80dp"
    android:targetCellWidth="2"
    android:targetCellHeight="2"
    android:minResizeWidth="40dp"
    android:minResizeHeight="40dp"
    android:maxResizeWidth="120dp"
    android:maxResizeHeight="120dp"
    android:resizeMode="horizontal|vertical" />
Android 12 以上版本:
使用 targetCellWidth 和 targetCellHeight 屬性做為小工具的預設大小。
小工具的預設大小為 2x2。小工具可縮小至 2x1 或放大至 4x3。
Android 11 以下版本:
使用 minWidth 和 minHeight 屬性計算小工具的預設大小。
預設寬度 = Math.ceil(80 / 30) = 3
預設高度 = Math.ceil(80 / 50) = 2
小工具的預設大小為 3x2。小工具可縮小至 2x1,或放大至全螢幕。
其他小工具屬性
下表說明與小工具大小以外的品質相關的 <appwidget-provider> 屬性。
| 屬性和說明 | |
|---|---|
updatePeriodMillis |
定義小工具架構向 AppWidgetProvider 要求更新的頻率,方法是呼叫 onUpdate() 回呼方法。我們無法保證系統會準時更新,建議盡量減少更新頻率 (每小時最多更新一次),以節省電量。如需選擇適當更新週期的完整考量清單,請參閱「更新小工具內容的最佳化做法」。 |
initialLayout |
指向定義小工具版面配置的版面配置資源。 |
configure |
定義使用者新增小工具時啟動的活動,讓他們設定小工具屬性。請參閱「允許使用者設定小工具」。從 Android 12 開始,應用程式可以略過初始設定。詳情請參閱「使用小工具的預設設定」。 |
description |
指定小工具挑選器要為小工具顯示的說明。Android 12 推出這項功能。 |
previewLayout (Android 12)
和 previewImage (Android 11 以下版本) |
previewImage 和 previewLayout 屬性,這樣一來,如果使用者的裝置不支援 previewLayout,應用程式就能改用 previewImage。詳情請參閱「可擴充小工具預覽的向後相容性」。 |
autoAdvanceViewId |
指定小工具子檢視區塊的檢視區塊 ID,該子檢視區塊會由小工具主機自動前進。 |
widgetCategory |
宣告小工具是否可顯示在主畫面 (home_screen)、螢幕鎖定畫面 (keyguard) 或兩者。如果是 Android 5.0 以上版本,只有 home_screen 有效。
|
widgetFeatures |
聲明小工具支援的功能。舉例來說,如果希望使用者新增小工具時,小工具使用預設設定,請同時指定 configuration_optional 和 reconfigurable 標記。這樣一來,使用者新增小工具後,系統就不會啟動設定活動。使用者之後仍可重新設定小工具。 |
使用 AppWidgetProvider 類別處理小工具廣播
AppWidgetProvider 類別會處理小工具的廣播,並依據小工具生命週期事件更新小工具。下列各節說明如何在資訊清單中宣告 AppWidgetProvider,然後實作這項功能。
在資訊清單中宣告小工具
首先,在應用程式的 AndroidManifest.xml 檔案中宣告 AppWidgetProvider 類別,如以下範例所示:
<receiver android:name="ExampleAppWidgetProvider"
                 android:exported="false">
    <intent-filter>
        <action android:name="android.appwidget.action.APPWIDGET_UPDATE" />
    </intent-filter>
    <meta-data android:name="android.appwidget.provider"
               android:resource="@xml/example_appwidget_info" />
</receiver>
<receiver> 元素需要 android:name 屬性,用於指定小工具使用的 AppWidgetProvider。除非需要透過其他程序向 AppWidgetProvider 廣播,否則不得匯出元件,通常不需要這麼做。
<intent-filter> 元素必須包含具有 android:name 屬性的 <action> 元素。這項屬性指定 AppWidgetProvider
接受
ACTION_APPWIDGET_UPDATE
廣播。這是唯一必須明確宣告的廣播。AppWidgetManager
會視需要自動將所有其他小工具的廣播傳送至 AppWidgetProvider。
<meta-data> 元素會指定 AppWidgetProviderInfo 資源,並需要下列屬性:
android:name:指定中繼資料名稱。使用android.appwidget.provider將資料識別為AppWidgetProviderInfo描述元。android:resource:指定AppWidgetProviderInfo資源位置。
實作 AppWidgetProvider 類別
AppWidgetProvider 類別會擴充 BroadcastReceiver,做為處理小工具廣播的便利類別。小工具只會接收與自身相關的事件廣播,例如小工具更新、刪除、啟用和停用時。發生這些廣播事件時,系統會呼叫下列 AppWidgetProvider 方法:
onUpdate()- 系統會呼叫這個函式,在
AppWidgetProviderInfo中updatePeriodMillis屬性定義的時間間隔更新小工具。如要瞭解其他小工具屬性,請參閱本頁面的表格。 - 使用者新增小工具時,系統也會呼叫這個方法,因此會執行基本設定,例如定義
View物件的事件處理常式,或啟動工作來載入要在小工具中顯示的資料。不過,如果您宣告設定活動時沒有configuration_optional旗標,使用者新增小工具時不會呼叫這個方法,但後續更新時會呼叫。設定活動有責任在設定完成時執行首次更新。詳情請參閱「協助使用者設定應用程式小工具」。 - 最重要的回呼是
onUpdate()。詳情請參閱本頁的「使用onUpdate()類別處理事件」一節。 onAppWidgetOptionsChanged()系統會在首次放置小工具時呼叫這個函式,並在小工具大小調整時呼叫。您可以根據小工具的大小範圍,使用這個回呼顯示或隱藏內容。呼叫
getAppWidgetOptions()即可取得大小範圍,以及 (從 Android 12 開始) 小工具執行個體可採用的可能大小清單,這會傳回包含下列項目的Bundle:OPTION_APPWIDGET_MIN_WIDTH: 包含小工具執行個體寬度的下限 (以 dp 為單位)。OPTION_APPWIDGET_MIN_HEIGHT:包含小工具執行個體的高度下限 (以 dp 為單位)。OPTION_APPWIDGET_MAX_WIDTH: 包含小工具執行個體寬度的上限 (以 dp 為單位)。OPTION_APPWIDGET_MAX_HEIGHT: 包含小工具執行個體的高度上限,單位為 dp。OPTION_APPWIDGET_SIZES:包含小工具執行個體可採用的可能大小 (List<SizeF>) 清單,單位為 dp。Android 12 推出這項功能。
onDeleted(Context, int[])每次從小工具主機刪除小工具時,系統都會呼叫這個函式。
onEnabled(Context)首次建立小工具例項時,系統會呼叫這個方法。舉例來說,如果使用者新增兩個小工具例項,系統只會在第一次呼叫這個函式。如果您需要開啟新資料庫,或執行其他只需要針對所有小工具執行一次的設定,這是個好地方。
onDisabled(Context)當從小工具主機刪除小工具的最後一個執行個體時,系統會呼叫這個方法。您可以在這裡清除
onEnabled(Context)中完成的任何工作,例如刪除暫時資料庫。onReceive(Context, Intent)系統會在每次廣播時呼叫這個方法,且會在每個前述回呼方法之前呼叫。您通常不需要實作這個方法,因為預設的
AppWidgetProvider實作方式會篩選所有小工具廣播,並視需要呼叫上述方法。
您必須使用 AndroidManifest 中的 <receiver> 元素,將 AppWidgetProvider 類別實作宣告為廣播接收器。詳情請參閱本頁的「在資訊清單中宣告小工具」。
使用 onUpdate() 類別處理事件
最重要的 AppWidgetProvider 回呼是 onUpdate(),因為系統會在每個小工具新增至主機時呼叫這個回呼,除非您使用沒有 configuration_optional 旗標的設定活動。如果小工具接受任何使用者互動事件,請在這個回呼中註冊事件處理常式。如果小工具不會建立暫時性檔案或資料庫,也不會執行其他需要清除的工作,則 onUpdate() 可能是您唯一需要定義的回呼方法。
舉例來說,如果您想要在輕觸按鈕時啟動活動的小工具,可以使用下列 AppWidgetProvider 實作方式:
Kotlin
class ExampleAppWidgetProvider : AppWidgetProvider() {

    override fun onUpdate(
            context: Context,
            appWidgetManager: AppWidgetManager,
            appWidgetIds: IntArray
    ) {
        // Perform this loop procedure for each widget that belongs to this
        // provider.
        appWidgetIds.forEach { appWidgetId ->
            // Create an Intent to launch ExampleActivity.
            val pendingIntent: PendingIntent = PendingIntent.getActivity(
                    /* context = */ context,
                    /* requestCode = */  0,
                    /* intent = */ Intent(context, ExampleActivity::class.java),
                    /* flags = */ PendingIntent.FLAG_UPDATE_CURRENT or PendingIntent.FLAG_IMMUTABLE
            )

            // Get the layout for the widget and attach an onClick listener to
            // the button.
            val views: RemoteViews = RemoteViews(
                    context.packageName,
                    R.layout.appwidget_provider_layout
            ).apply {
                setOnClickPendingIntent(R.id.button, pendingIntent)
            }

            // Tell the AppWidgetManager to perform an update on the current
            // widget.
            appWidgetManager.updateAppWidget(appWidgetId, views)
        }
    }
}
Java
public class ExampleAppWidgetProvider extends AppWidgetProvider {

    public void onUpdate(Context context, AppWidgetManager appWidgetManager, int[] appWidgetIds) {
        // Perform this loop procedure for each widget that belongs to this
        // provider.
        for (int i=0; i < appWidgetIds.length; i++) {
            int appWidgetId = appWidgetIds[i];
            // Create an Intent to launch ExampleActivity
            Intent intent = new Intent(context, ExampleActivity.class);
            PendingIntent pendingIntent = PendingIntent.getActivity(
                /* context = */ context,
                /* requestCode = */ 0,
                /* intent = */ intent,
                /* flags = */ PendingIntent.FLAG_UPDATE_CURRENT | PendingIntent.FLAG_IMMUTABLE
            );

            // Get the layout for the widget and attach an onClick listener to
            // the button.
            RemoteViews views = new RemoteViews(context.getPackageName(), R.layout.example_appwidget_layout);
            views.setOnClickPendingIntent(R.id.button, pendingIntent);

            // Tell the AppWidgetManager to perform an update on the current app
            // widget.
            appWidgetManager.updateAppWidget(appWidgetId, views);
        }
    }
}
這個 AppWidgetProvider 只會定義 onUpdate() 方法,並使用該方法建立 PendingIntent,啟動 Activity 並使用 setOnClickPendingIntent(int,
PendingIntent) 將其附加至小工具的按鈕。其中包含一個迴圈,可疊代處理 appWidgetIds 中的每個項目。appWidgetIds 是 ID 陣列,可識別這個供應商建立的每個小工具。如果使用者建立多個小工具例項,這些例項會同時更新。不過,所有小工具執行個體只會管理一個 updatePeriodMillis 時間表。舉例來說,如果更新排程定義為每兩小時更新一次,且在第一個小工具的一小時後新增第二個小工具,則這兩個小工具都會在第一個小工具定義的期間更新,第二個更新期間則會遭到忽略。兩者每兩小時更新一次,而非每小時更新一次。
詳情請參閱 ExampleAppWidgetProvider.java 範例類別。
接收小工具廣播意圖
AppWidgetProvider 是便利類別。如要直接接收小工具的廣播,可以實作自己的 BroadcastReceiver 或覆寫 onReceive(Context,Intent) 回呼。您需要注意下列意圖:
ACTION_APPWIDGET_UPDATEACTION_APPWIDGET_DELETEDACTION_APPWIDGET_ENABLEDACTION_APPWIDGET_DISABLEDACTION_APPWIDGET_OPTIONS_CHANGED
建立小工具版面配置
您必須在 XML 中定義小工具的初始版面配置,並將其儲存在專案的 res/layout/ 目錄中。詳情請參閱設計指南。
如果您熟悉版面配置,就能輕鬆建立小工具版面配置。不過請注意,小工具版面配置是以 RemoteViews 為基礎,因此不支援所有類型的版面配置或檢視畫面小工具。您無法使用自訂檢視畫面,或 RemoteViews 支援的檢視畫面子類別。
RemoteViews 也支援 ViewStub,這是大小為零的隱藏 View,可用於在執行階段延後加載版面配置資源。
支援有狀態行為
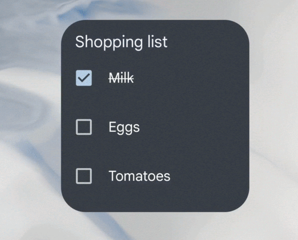
Android 12 新增支援使用下列現有元件的狀態行為:
小工具仍為無狀態,應用程式必須儲存狀態,並註冊狀態變更事件。

以下程式碼範例說明如何實作這些元件。
Kotlin
// Check the view.
remoteView.setCompoundButtonChecked(R.id.my_checkbox, true)

// Check a radio group.
remoteView.setRadioGroupChecked(R.id.my_radio_group, R.id.radio_button_2)

// Listen for check changes. The intent has an extra with the key
// EXTRA_CHECKED that specifies the current checked state of the view.
remoteView.setOnCheckedChangeResponse(
        R.id.my_checkbox,
        RemoteViews.RemoteResponse.fromPendingIntent(onCheckedChangePendingIntent)
)
Java
// Check the view.
remoteView.setCompoundButtonChecked(R.id.my_checkbox, true);

// Check a radio group.
remoteView.setRadioGroupChecked(R.id.my_radio_group, R.id.radio_button_2);

// Listen for check changes. The intent has an extra with the key
// EXTRA_CHECKED that specifies the current checked state of the view.
remoteView.setOnCheckedChangeResponse(
    R.id.my_checkbox,
    RemoteViews.RemoteResponse.fromPendingIntent(onCheckedChangePendingIntent));
提供兩個版面配置:一個指定 Android 12 以上版本的裝置 (位於 res/layout-v31 中),另一個指定 Android 11 以下版本的裝置 (位於預設 res/layout 資料夾中)。
實作圓角
Android 12 推出下列系統參數,可設定小工具圓角的半徑:
system_app_widget_background_radius:小工具背景的圓角半徑,不得大於 28 dp。內半徑,可從外半徑和邊框間距計算得出。 請參閱以下程式碼片段:
/** * Applies corner radius for views that are visually positioned [widgetPadding]dp inside of the * widget background. */ @Composable fun GlanceModifier.appWidgetInnerCornerRadius(widgetPadding: Dp): GlanceModifier { if (Build.VERSION.SDK_INT < 31) { return this } val resources = LocalContext.current.resources // get dimension in float (without rounding). val px = resources.getDimension(android.R.dimen.system_app_widget_background_radius) val widgetBackgroundRadiusDpValue = px / resources.displayMetrics.density if (widgetBackgroundRadiusDpValue < widgetPadding.value) { return this } return this.cornerRadius(Dp(widgetBackgroundRadiusDpValue - widgetPadding.value)) }
如要計算小工具內部內容的合適半徑,請使用以下公式:systemRadiusValue - widgetPadding
如果小工具將內容剪輯成非矩形,應使用 @android:id/background 做為背景檢視區塊的檢視區塊 ID,且 android:clipToOutline 應設為 true。
圓角的重要注意事項
- 第三方啟動器和裝置製造商可以覆寫
system_app_widget_background_radius參數,使其小於 28 dp。 如果小工具未使用
@android:id/background或定義背景,根據輪廓裁剪內容 (android:clipToOutline設為true),啟動器會自動識別背景,並使用圓角矩形 (系統半徑) 裁剪小工具。非矩形形狀必須包含在圓角矩形 調整大小容器中,以免遭到裁剪。
從 Android 16 開始,AOSP 系統的
system_app_widget_background_radius值為24dp。啟動器和裝置製造商可能會將小工具剪輯到system_app_widget_background_radius。小工具的內部內容必須有足夠的邊框間距,才能支援最大
28dp的system_app_widget_background_radius半徑值,避免內容遭到圓角裁剪。
如要確保小工具與舊版 Android 相容,建議您定義自訂屬性,並使用自訂主題覆寫 Android 12 的屬性,如下列 XML 範例檔案所示:
/values/attrs.xml
<resources>
  <attr name="backgroundRadius" format="dimension" />
</resources>
/values/styles.xml
<resources>
  <style name="MyWidgetTheme">
    <item name="backgroundRadius">@dimen/my_background_radius_dimen</item>
  </style>
</resources>
/values-31/styles.xml
<resources>
  <style name="MyWidgetTheme" parent="@android:style/Theme.DeviceDefault.DayNight">
    <item name="backgroundRadius">@android:dimen/system_app_widget_background_radius</item>
  </style>
</resources>
/drawable/my_widget_background.xml
<shape xmlns:android="http://schemas.android.com/apk/res/android"
  android:shape="rectangle">
  <corners android:radius="?attr/backgroundRadius" />
  ...
</shape>
/layout/my_widget_layout.xml
<LinearLayout xmlns:android="http://schemas.android.com/apk/res/android"
  ...
  android:background="@drawable/my_widget_background" />

