
テキスト フィールドはすべて、メールアドレス、電話番号、または単なるテキストなど、特定の種類のテキスト入力を想定しています。システムが適切なソフト入力方法(画面キーボードなど)を表示するように、アプリの各テキスト フィールドに入力タイプを指定する必要があります。
入力方法で使用できるボタンのタイプ以外にも、入力方法でスペルの候補を提供するかどうか、新しい文を大文字にするかどうか、改行ボタンを Done または Next などのアクション ボタンに置き換えるかどうかなどの動作を指定できます。このページでは、これらの特性を指定する方法について説明します。
キーボード タイプの指定
<EditText> 要素に android:inputType 属性を追加して、常にテキスト フィールドの入力方法を宣言する必要があります。
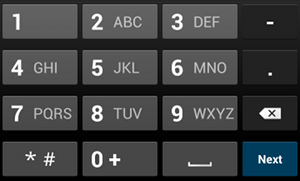
phone 入力タイプ。たとえば、電話番号の入力方法を指定する場合は、"phone" 値を使用します。
<EditText
    android:id="@+id/phone"
    android:layout_width="fill_parent"
    android:layout_height="wrap_content"
    android:hint="@string/phone_hint"
    android:inputType="phone" />
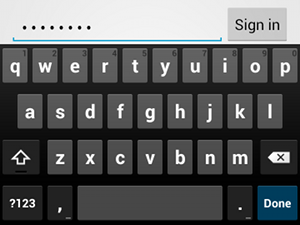
textPassword 入力タイプ。テキスト フィールドがパスワード用の場合は、"textPassword" 値を使用して、テキスト フィールドでユーザーの入力が隠されるようにします。
<EditText
    android:id="@+id/password"
    android:hint="@string/password_hint"
    android:inputType="textPassword"
    ... />
android:inputType 属性の有効な値はドキュメントに記載されており、一部の値を組み合わせて入力メソッドの外観と追加の動作を指定できます。
スペルの候補と他の動作の有効化
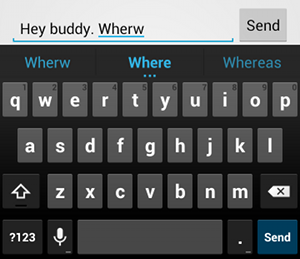
textAutoCorrect を追加すると、スペルミスの自動修正が提供されます。android:inputType 属性を使用すると、入力メソッドのさまざまな動作を指定できます。最も重要なことは、テキスト フィールドが基本的なテキスト入力(テキスト メッセージなど)を目的としている場合、"textAutoCorrect" 値を使用して自動スペル修正を有効にすることです。
android:inputType 属性で、さまざまな動作と入力方法のスタイルを組み合わせることができます。たとえば、文の最初の単語を大文字にし、スペルミスを自動修正するテキスト フィールドの作成方法は次のとおりです。
<EditText
    android:id="@+id/message"
    android:layout_width="wrap_content"
    android:layout_height="wrap_content"
    android:inputType=
        "textCapSentences|textAutoCorrect"
    ... />
入力方法のアクションの指定
ほとんどのソフト入力方法では、現在のテキスト フィールドに適したユーザー アクション ボタンが下隅にあります。デフォルトでは、テキスト フィールドで複数行テキストが(android:inputType="textMultiLine" などで)許可されている場合を除き、システムはこのボタンを Next または Done アクションに使用します。複数行テキストが許可されている場合、アクション ボタンは改行です。ただし、Send や Go など、テキスト フィールドにより適した別のアクションを指定できます。
キーボード アクション ボタンを指定するには、android:imeOptions 属性値を使用して "actionSend" または "actionSearch" などのアクション値を指定します。次に例を示します。

android:imeOptions="actionSend" を宣言すると、[送信] ボタンが表示されます。<EditText android:id="@+id/search" android:layout_width="fill_parent" android:layout_height="wrap_content" android:hint="@string/search_hint" android:inputType="text" android:imeOptions="actionSend" />
その後、EditText 要素の TextView.OnEditorActionListener を定義することで、アクション ボタンの押下をリッスンできます。次の例に示すように、リスナーで、EditorInfo クラスで定義された適切な IME アクション ID(IME_ACTION_SEND など)に応答します。
Kotlin
findViewById<EditText>(R.id.search).setOnEditorActionListener { v, actionId, event ->
    return@setOnEditorActionListener when (actionId) {
        EditorInfo.IME_ACTION_SEND -> {
            sendMessage()
            true
        }
        else -> false
    }
}
Java
EditText editText = (EditText) findViewById(R.id.search);
editText.setOnEditorActionListener(new OnEditorActionListener() {
    @Override
    public boolean onEditorAction(TextView v, int actionId, KeyEvent event) {
        boolean handled = false;
        if (actionId == EditorInfo.IME_ACTION_SEND) {
            sendMessage();
            handled = true;
        }
        return handled;
    }
});
オートコンプリート候補の提供
入力時に候補を提供する場合は、AutoCompleteTextView という EditText のサブクラスを使用できます。オートコンプリートを実装するには、テキストの候補を提供する Adapter を指定する必要があります。データの送信元(データベースやアレイなど)に応じて、いくつかのアダプタを使用できます。
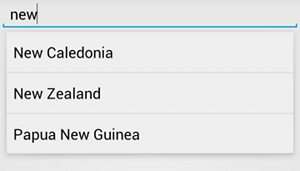
AutoCompleteTextView の例。次の手順では、ArrayAdapter を使用して、配列から候補を提供する AutoCompleteTextView を設定する方法について説明します。
AutoCompleteTextViewをレイアウトに追加します。テキスト フィールドのみのレイアウトは次のとおりです。<?xml version="1.0" encoding="utf-8"?> <AutoCompleteTextView xmlns:android="http://schemas.android.com/apk/res/android" android:id="@+id/autocomplete_country" android:layout_width="fill_parent" android:layout_height="wrap_content" />
- すべてのテキスト候補を含む配列を定義します。たとえば、国名の配列は次のとおりです。
<?xml version="1.0" encoding="utf-8"?>
<resources>
    <string-array name="countries_array">
        <item>Afghanistan</item>
        <item>Albania</item>
        <item>Algeria</item>
        <item>American Samoa</item>
        <item>Andorra</item>
        <item>Angola</item>
        <item>Anguilla</item>
        <item>Antarctica</item>
        ...
    </string-array>
</resources>
ActivityまたはFragmentで、次のコードを使用して、候補を提供するアダプターを指定します。Kotlin
// Get a reference to the AutoCompleteTextView in the layout.
val textView = findViewById(R.id.autocomplete_country) as AutoCompleteTextView
// Get the string array.
val countries: Array<out String> = resources.getStringArray(R.array.countries_array)
// Create the adapter and set it to the AutoCompleteTextView.
ArrayAdapter<String>(this, android.R.layout.simple_list_item_1, countries).also { adapter ->
    textView.setAdapter(adapter)
}
Java
// Get a reference to the AutoCompleteTextView in the layout.
AutoCompleteTextView textView = (AutoCompleteTextView) findViewById(R.id.autocomplete_country);
// Get the string array.
String[] countries = getResources().getStringArray(R.array.countries_array);
// Create the adapter and set it to the AutoCompleteTextView.
ArrayAdapter<String> adapter =
        new ArrayAdapter<String>(this, android.R.layout.simple_list_item_1, countries);
textView.setAdapter(adapter);
上記の例では、新しい
ArrayAdapterが初期化されて、countries_array文字列配列の各アイテムが、simple_list_item_1レイアウトに存在するTextViewにバインドされます。これは、リスト内のテキストに標準の外観を提供する Android 提供のレイアウトです。-
setAdapter()を呼び出して、アダプターをAutoCompleteTextViewに割り当てます。