在 Android 11 及更高版本中,“快速访问设备控制器”功能可让用户通过默认启动器在三次互动内快速查看和控制外部设备(例如灯、恒温器和相机)。设备 OEM 会选择使用哪个启动器。设备集合商家(例如 Google Home)和第三方供应商应用可以提供要在此工作区中显示的设备。本页面将向您介绍此工作区中设备控制器的布局,以及将其关联至控制应用的方式。
如需添加此支持,请创建并声明 ControlsProviderService。根据预定义的控件类型创建应用支持的控件,然后为这些控件创建发布者。
界面
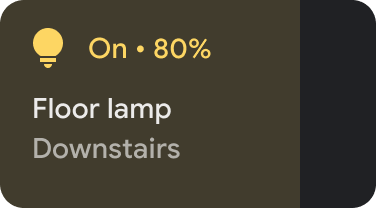
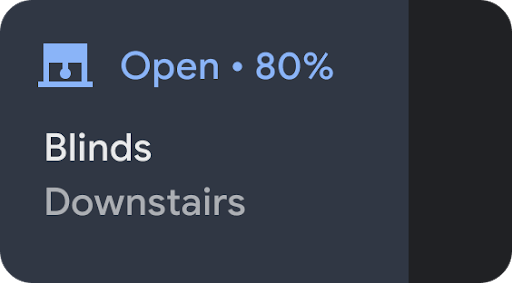
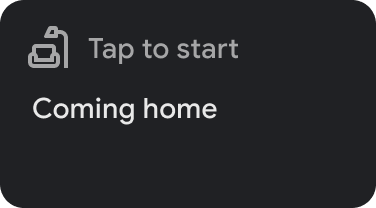
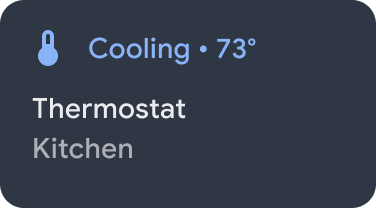
设备以模板化微件的形式显示在设备控制器下。有五个设备控制器 widget 可供使用,如下图所示:

|
|
|
|
|
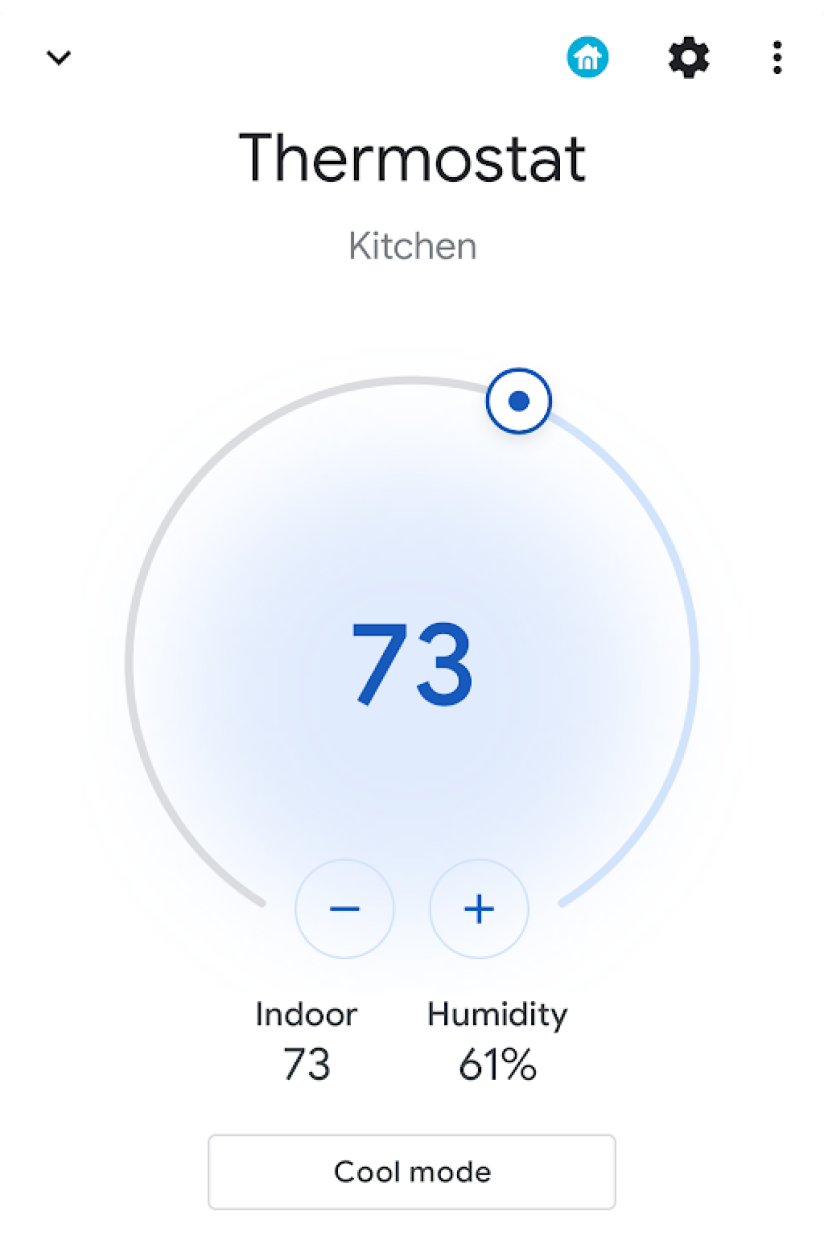
轻触并按住某个微件可以转到相应的应用,让您进行更多控制操作。您可以自定义每个 widget 的图标和颜色,但为了提供最佳用户体验,建议您使用默认的图标和颜色(如果默认设置与设备匹配)。
创建服务
本部分介绍如何创建 ControlsProviderService。此服务告知 Android 系统界面,您的应用包含的设备控制器必须显示在 Android 界面的设备控制器区域中。
ControlsProviderService API 假定您熟悉响应式流 GitHub 项目中定义的响应式流以及在 Java 9 流界面中实现的响应式流。
该 API 围绕以下概念构建而成:
- 发布者:您的应用是发布者。
- 订阅者:系统界面是订阅者,可以向发布者请求多个控件。
- 订阅:发布者可以向系统界面发送更新的时间范围。发布者或订阅者都可以关闭此窗口。
声明服务
您的应用必须在其应用清单中声明一项服务(例如 MyCustomControlService)。
服务必须包含 ControlsProviderService 的 intent 过滤器。此过滤器能够让应用控制系统界面。
您还需要一个显示在系统界面中的控件中的 label。
以下示例展示了如何声明服务:
<service
    android:name="MyCustomControlService"
    android:label="My Custom Controls"
    android:permission="android.permission.BIND_CONTROLS"
    android:exported="true"
    >
    <intent-filter>
      <action android:name="android.service.controls.ControlsProviderService" />
    </intent-filter>
</service>
接下来,创建一个名为 MyCustomControlService.kt 的新 Kotlin 文件,并使其扩展 ControlsProviderService():
Kotlin
    class MyCustomControlService : ControlsProviderService() {
        ...
    }
Java
    public class MyCustomJavaControlService extends ControlsProviderService {
        ...
    }
选择正确的控件类型
API 提供了用于创建控件的构建器方法。如需填充构建器,请确定要控制的设备以及用户与其互动的方式。执行以下步骤:
- 选择控件代表的设备类型。
DeviceTypes类是对所有受支持设备的枚举。类型用于确定设备在界面中的图标和颜色。 - 确定面向用户显示的名称、设备所在位置(例如厨房)以及与控件关联的其他界面文本元素。
- 选择最佳模板,为用户互动提供支持。系统会为控件分配一个来自应用的
ControlTemplate。此模板会直接向用户显示控件状态以及可用的输入方法(即ControlAction)。下表概述了一些可用的模板及其支持的操作:
| 模板 | 操作 | 说明 |
ControlTemplate.getNoTemplateObject()
|
None
|
应用可以使用此模板来传递有关该控件的信息,但用户无法与其进行互动。 |
ToggleTemplate
|
BooleanAction
|
表示可在启用和停用状态之间切换的控件。BooleanAction 对象包含一个字段,当用户点按控件时,该字段会更改以表示请求的新状态。
|
RangeTemplate
|
FloatAction
|
表示指定了最小值、最大值和步长值的滑块 widget。当用户与滑块互动时,系统应将新的 FloatAction 对象发送回具有更新值的应用。
|
ToggleRangeTemplate
|
BooleanAction, FloatAction
|
此模板是 ToggleTemplate 和 RangeTemplate 的组合。它支持触摸事件和滑块,例如,用于控制可调光灯。
|
TemperatureControlTemplate
|
ModeAction, BooleanAction, FloatAction
|
除了封装上述操作之外,此模板还允许用户设置模式,如制暖、制冷、适温、节能或关闭。 |
StatelessTemplate
|
CommandAction
|
用于指示提供触摸功能但无法确定其状态的控件,例如红外线电视遥控器。您可以使用此模板定义常规操作或宏,其中聚合了控件和状态更改。 |
了解这些信息后,您可以创建控件:
- 如果控件的状态未知,就使用
Control.StatelessBuilder构建器类。 - 如果控件的状态已知,就使用
Control.StatefulBuilder构建器类。
例如,如需控制智能灯泡和温控器,请将以下常量添加到 MyCustomControlService 中:
Kotlin
    private const val LIGHT_ID = 1234
    private const val LIGHT_TITLE = "My fancy light"
    private const val LIGHT_TYPE = DeviceTypes.TYPE_LIGHT
    private const val THERMOSTAT_ID = 5678
    private const val THERMOSTAT_TITLE = "My fancy thermostat"
    private const val THERMOSTAT_TYPE = DeviceTypes.TYPE_THERMOSTAT

    class MyCustomControlService : ControlsProviderService() {
      ...
    }
Java
    public class MyCustomJavaControlService extends ControlsProviderService {

    private final int LIGHT_ID = 1337;
    private final String LIGHT_TITLE = "My fancy light";
    private final int LIGHT_TYPE = DeviceTypes.TYPE_LIGHT;
    private final int THERMOSTAT_ID = 1338;
    private final String THERMOSTAT_TITLE = "My fancy thermostat";
    private final int THERMOSTAT_TYPE = DeviceTypes.TYPE_THERMOSTAT;

    ...
    }
为控件创建发布者
创建控件后,该控件需要一个发布者。发布者将告知系统界面该控件的存在。ControlsProviderService 类有两种您必须在应用代码中替换的发布者方法:
createPublisherForAllAvailable():为应用中提供的所有控件创建一个Publisher。使用Control.StatelessBuilder()为该发布者构建Control对象。createPublisherFor():为一组给定的控件创建一个Publisher,每个控件由其字符串标识符标识。使用Control.StatefulBuilder构建这些Control对象,因为发布者必须为每个控件分配一个状态。
创建发布者
当您的应用首次将控件发布到系统界面时,应用不知道每个控件的状态。获取状态可能是一项非常耗时的操作,涉及设备提供商网络中的许多跃点。使用 createPublisherForAllAvailable() 方法将可用的控件告知系统。此方法使用 Control.StatelessBuilder 构建器类,因为每个控件的状态都是未知的。
控件显示在 Android 界面中后,用户就可以选择收藏的控件了。
如需使用 Kotlin 协程创建 ControlsProviderService,请向 build.gradle 添加新依赖项:
Groovy
dependencies {
    implementation "org.jetbrains.kotlinx:kotlinx-coroutines-jdk9:1.6.4"
}
Kotlin
dependencies {
    implementation("org.jetbrains.kotlinx:kotlinx-coroutines-jdk9:1.6.4")
}
同步 Gradle 文件后,将以下代码段添加到 Service 以实现 createPublisherForAllAvailable():
Kotlin
class MyCustomControlService : ControlsProviderService() { override fun createPublisherForAllAvailable(): Flow.Publisher= flowPublish { send(createStatelessControl(LIGHT_ID, LIGHT_TITLE, LIGHT_TYPE)) send(createStatelessControl(THERMOSTAT_ID, THERMOSTAT_TITLE, THERMOSTAT_TYPE)) } private fun createStatelessControl(id: Int, title: String, type: Int): Control { val intent = Intent(this, MainActivity::class.java) .putExtra(EXTRA_MESSAGE, title) .addFlags(Intent.FLAG_ACTIVITY_NEW_TASK) val action = PendingIntent.getActivity( this, id, intent, PendingIntent.FLAG_UPDATE_CURRENT or PendingIntent.FLAG_IMMUTABLE ) return Control.StatelessBuilder(id.toString(), action) .setTitle(title) .setDeviceType(type) .build() } override fun createPublisherFor(controlIds: List ): Flow.Publisher { TODO() } override fun performControlAction( controlId: String, action: ControlAction, consumer: Consumer ) { TODO() } }
Java
    public class MyCustomJavaControlService extends ControlsProviderService {

        private final int LIGHT_ID = 1337;
        private final String LIGHT_TITLE = "My fancy light";
        private final int LIGHT_TYPE = DeviceTypes.TYPE_LIGHT;
        private final int THERMOSTAT_ID = 1338;
        private final String THERMOSTAT_TITLE = "My fancy thermostat";
        private final int THERMOSTAT_TYPE = DeviceTypes.TYPE_THERMOSTAT;

        private boolean toggleState = false;
        private float rangeState = 18f;
        private final Map<String, ReplayProcessor> controlFlows = new HashMap<>();

        @NonNull
        @Override
        public Flow.Publisher createPublisherForAllAvailable() {
            List controls = new ArrayList<>();
            controls.add(createStatelessControl(LIGHT_ID, LIGHT_TITLE, LIGHT_TYPE));
            controls.add(createStatelessControl(THERMOSTAT_ID, THERMOSTAT_TITLE, THERMOSTAT_TYPE));
            return FlowAdapters.toFlowPublisher(Flowable.fromIterable(controls));
        }

        @NonNull
        @Override
        public Flow.Publisher createPublisherFor(@NonNull List controlIds) {
            ReplayProcessor updatePublisher = ReplayProcessor.create();

            controlIds.forEach(control -> {
                controlFlows.put(control, updatePublisher);
                updatePublisher.onNext(createLight());
                updatePublisher.onNext(createThermostat());
            });

            return FlowAdapters.toFlowPublisher(updatePublisher);
        }
    }
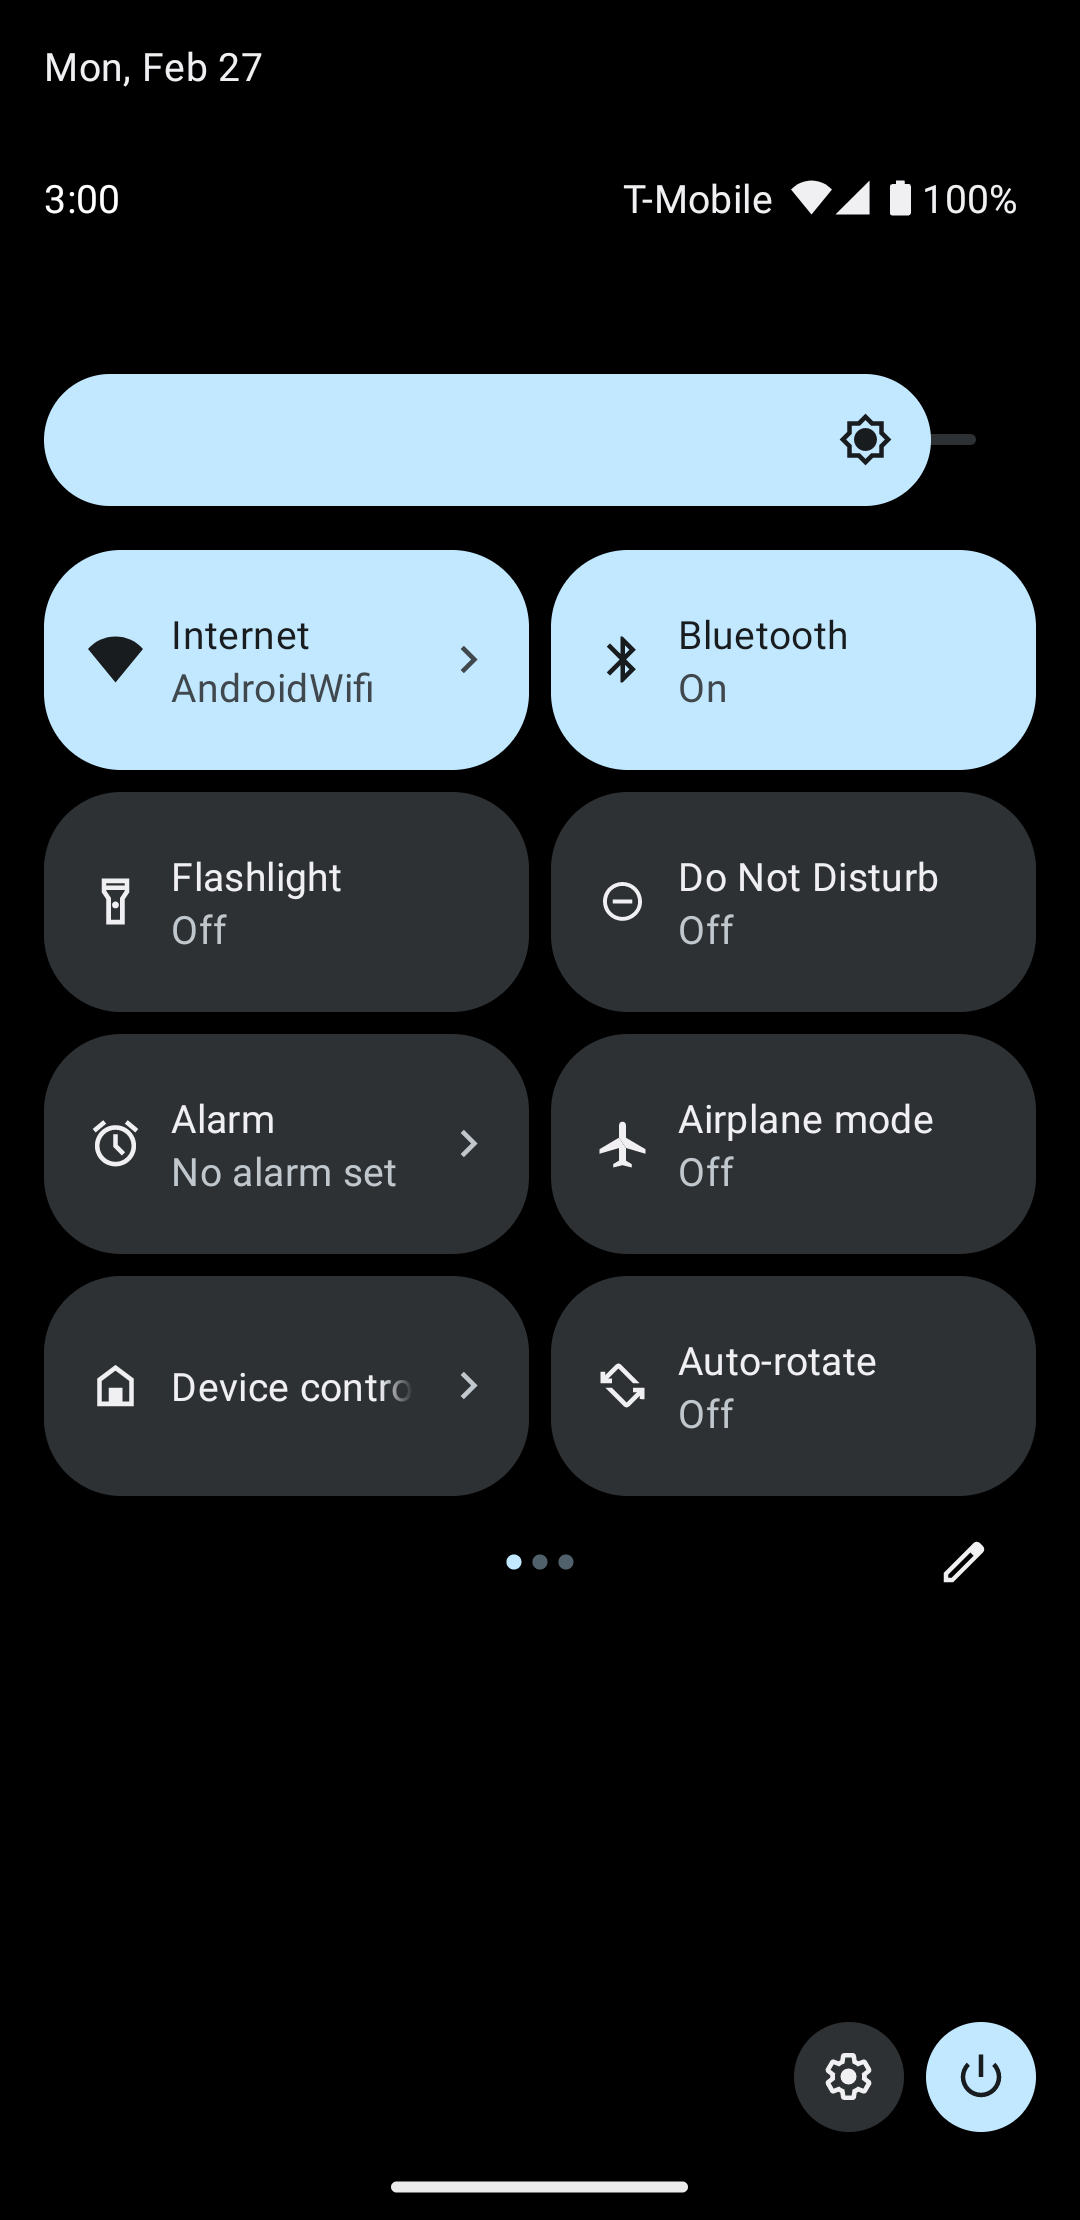
向下滑动系统菜单,找到设备控制按钮,如图 4 所示:
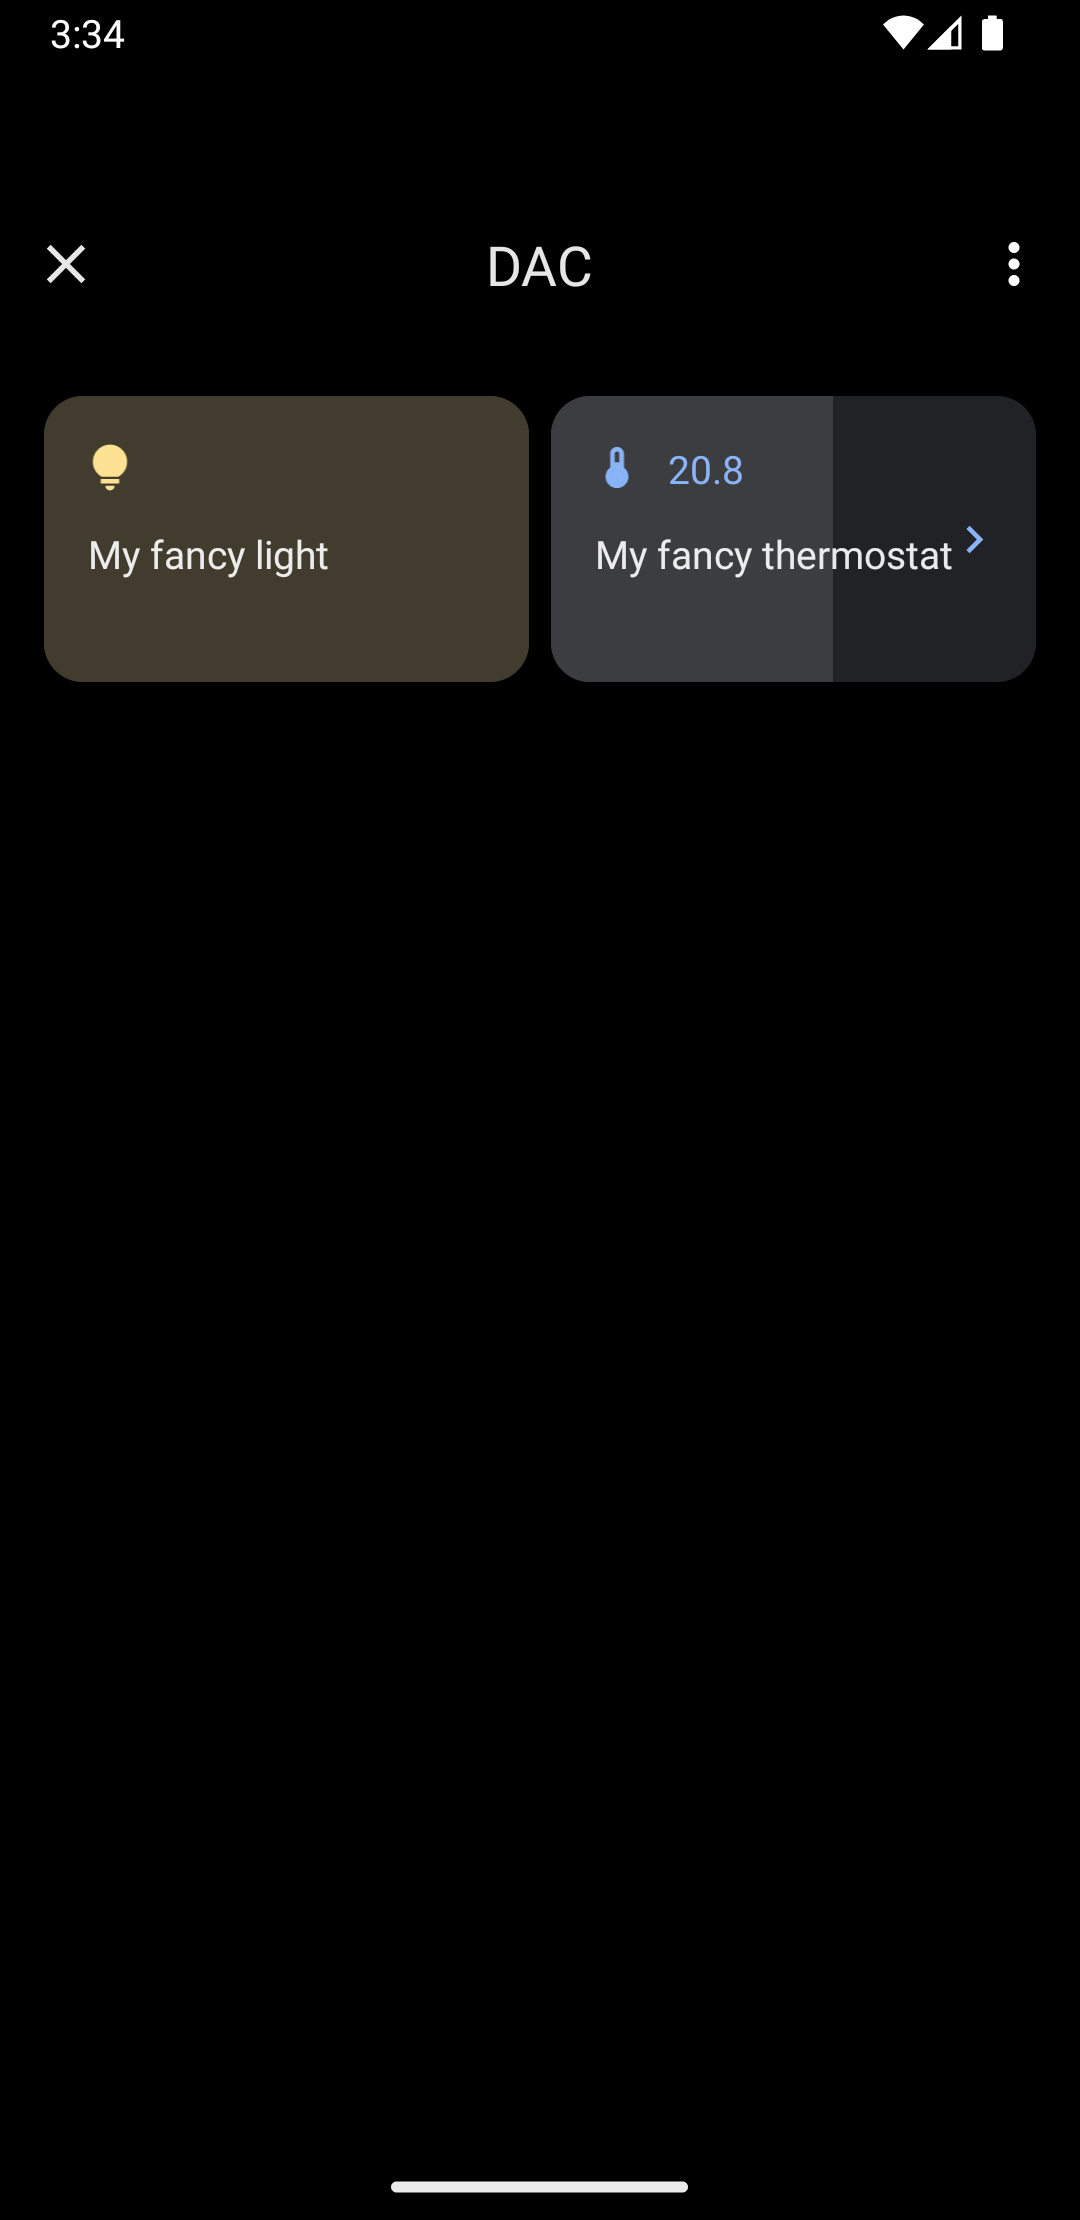
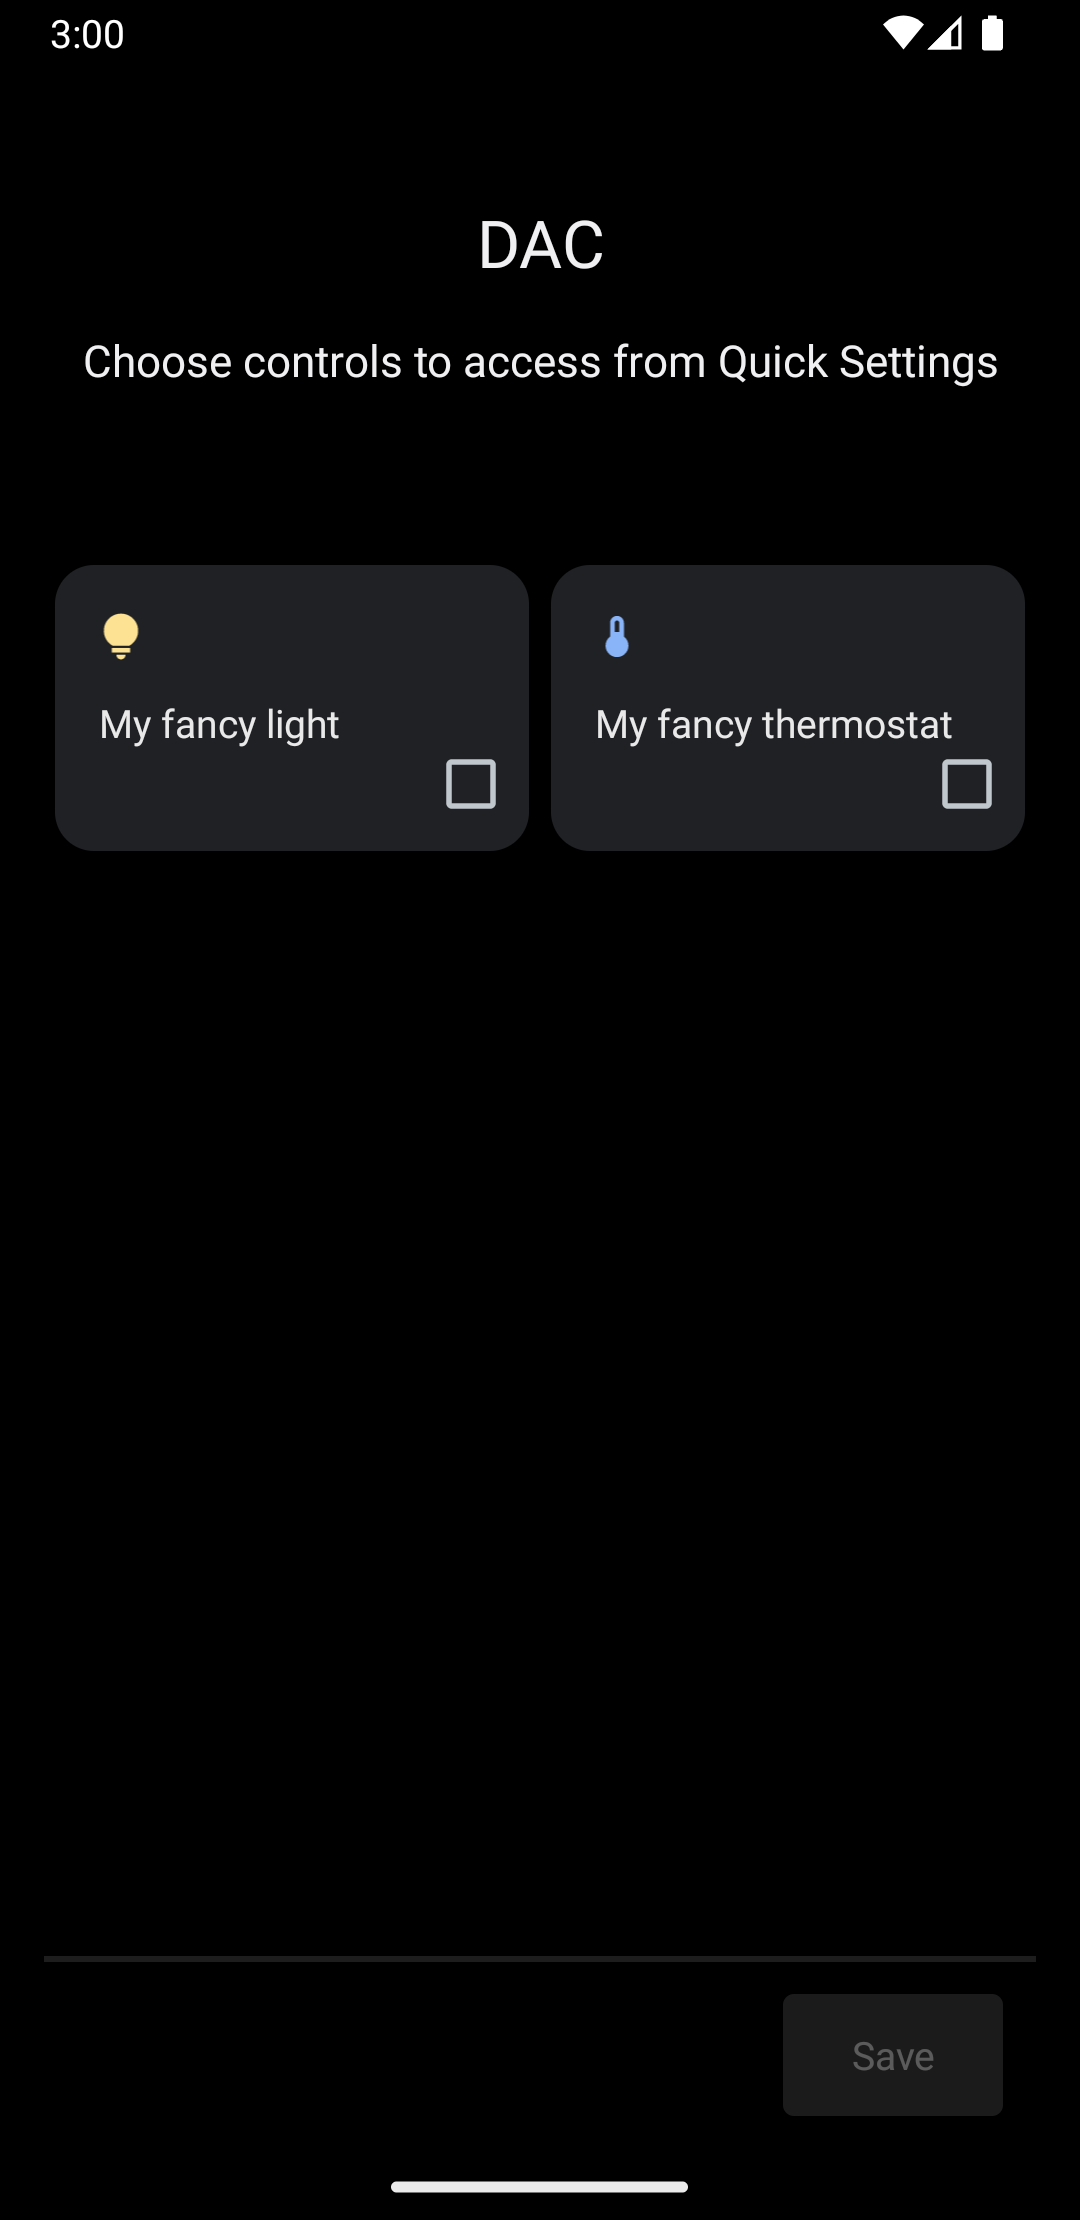
点按设备控件会进入第二个界面,您可以在其中选择自己的应用。选择应用后,您会看到前面的代码段如何创建显示新控件的自定义系统菜单,如图 5 所示:
现在,实现 createPublisherFor() 方法,并将以下内容添加到 Service:
Kotlin
private val job = SupervisorJob() private val scope = CoroutineScope(Dispatchers.IO + job) private val controlFlows = mutableMapOf<String, MutableSharedFlow>() private var toggleState = false private var rangeState = 18f override fun createPublisherFor(controlIds: List ): Flow.Publisher { val flow = MutableSharedFlow (replay = 2, extraBufferCapacity = 2) controlIds.forEach { controlFlows[it] = flow } scope.launch { delay(1000) // Retrieving the toggle state. flow.tryEmit(createLight()) delay(1000) // Retrieving the range state. flow.tryEmit(createThermostat()) } return flow.asPublisher() } private fun createLight() = createStatefulControl( LIGHT_ID, LIGHT_TITLE, LIGHT_TYPE, toggleState, ToggleTemplate( LIGHT_ID.toString(), ControlButton( toggleState, toggleState.toString().uppercase(Locale.getDefault()) ) ) ) private fun createThermostat() = createStatefulControl( THERMOSTAT_ID, THERMOSTAT_TITLE, THERMOSTAT_TYPE, rangeState, RangeTemplate( THERMOSTAT_ID.toString(), 15f, 25f, rangeState, 0.1f, "%1.1f" ) ) private fun createStatefulControl(id: Int, title: String, type: Int, state: T, template: ControlTemplate): Control { val intent = Intent(this, MainActivity::class.java) .putExtra(EXTRA_MESSAGE, "$title $state") .addFlags(Intent.FLAG_ACTIVITY_NEW_TASK) val action = PendingIntent.getActivity( this, id, intent, PendingIntent.FLAG_UPDATE_CURRENT or PendingIntent.FLAG_IMMUTABLE ) return Control.StatefulBuilder(id.toString(), action) .setTitle(title) .setDeviceType(type) .setStatus(Control.STATUS_OK) .setControlTemplate(template) .build() } override fun onDestroy() { super.onDestroy() job.cancel() }
Java
@NonNull @Override public Flow.PublishercreatePublisherFor(@NonNull List controlIds) { ReplayProcessor updatePublisher = ReplayProcessor.create(); controlIds.forEach(control -> { controlFlows.put(control, updatePublisher); updatePublisher.onNext(createLight()); updatePublisher.onNext(createThermostat()); }); return FlowAdapters.toFlowPublisher(updatePublisher); } private Control createStatelessControl(int id, String title, int type) { Intent intent = new Intent(this, MainActivity.class) .putExtra(EXTRA_MESSAGE, title) .addFlags(Intent.FLAG_ACTIVITY_NEW_TASK); PendingIntent action = PendingIntent.getActivity( this, id, intent, PendingIntent.FLAG_UPDATE_CURRENT | PendingIntent.FLAG_IMMUTABLE ); return new Control.StatelessBuilder(id + "", action) .setTitle(title) .setDeviceType(type) .build(); } private Control createLight() { return createStatefulControl( LIGHT_ID, LIGHT_TITLE, LIGHT_TYPE, toggleState, new ToggleTemplate( LIGHT_ID + "", new ControlButton( toggleState, String.valueOf(toggleState).toUpperCase(Locale.getDefault()) ) ) ); } private Control createThermostat() { return createStatefulControl( THERMOSTAT_ID, THERMOSTAT_TITLE, THERMOSTAT_TYPE, rangeState, new RangeTemplate( THERMOSTAT_ID + "", 15f, 25f, rangeState, 0.1f, "%1.1f" ) ); } private Control createStatefulControl(int id, String title, int type, T state, ControlTemplate template) { Intent intent = new Intent(this, MainActivity.class) .putExtra(EXTRA_MESSAGE, "$title $state") .addFlags(Intent.FLAG_ACTIVITY_NEW_TASK); PendingIntent action = PendingIntent.getActivity( this, id, intent, PendingIntent.FLAG_UPDATE_CURRENT | PendingIntent.FLAG_IMMUTABLE ); return new Control.StatefulBuilder(id + "", action) .setTitle(title) .setDeviceType(type) .setStatus(Control.STATUS_OK) .setControlTemplate(template) .build(); }
在此示例中,createPublisherFor() 方法包含应用必须执行的操作的虚假实现:与设备通信以检索其状态,并将该状态发送到系统。
createPublisherFor() 方法使用 Kotlin 协程和流来满足所需的 Reactive Streams API,具体做法如下:
- 创建
Flow。 - 等待 1 秒。
- 创建并发出智能灯的状态。
- 再等待一秒。
- 创建并发出温控器的状态。
处理操作
performControlAction() 方法会在用户与已发布的控件互动时发出信号。发送的 ControlAction 类型决定了操作。
对给定的控件执行适当的操作,然后在 Android 界面中更新设备的状态。
如需完成此示例,请将以下内容添加到 Service:
Kotlin
override fun performControlAction( controlId: String, action: ControlAction, consumer: Consumer) { controlFlows[controlId]?.let { flow -> when (controlId) { LIGHT_ID.toString() -> { consumer.accept(ControlAction.RESPONSE_OK) if (action is BooleanAction) toggleState = action.newState flow.tryEmit(createLight()) } THERMOSTAT_ID.toString() -> { consumer.accept(ControlAction.RESPONSE_OK) if (action is FloatAction) rangeState = action.newValue flow.tryEmit(createThermostat()) } else -> consumer.accept(ControlAction.RESPONSE_FAIL) } } ?: consumer.accept(ControlAction.RESPONSE_FAIL) }
Java
@Override public void performControlAction(@NonNull String controlId, @NonNull ControlAction action, @NonNull Consumerconsumer) { ReplayProcessor processor = controlFlows.get(controlId); if (processor == null) return; if (controlId.equals(LIGHT_ID + "")) { consumer.accept(ControlAction.RESPONSE_OK); if (action instanceof BooleanAction) toggleState = ((BooleanAction) action).getNewState(); processor.onNext(createLight()); } if (controlId.equals(THERMOSTAT_ID + "")) { consumer.accept(ControlAction.RESPONSE_OK); if (action instanceof FloatAction) rangeState = ((FloatAction) action).getNewValue() processor.onNext(createThermostat()); } }
运行该应用,访问设备控制菜单,然后查看灯具和温控器控件。