
ส่วนต่อไปนี้จะอธิบายวิธีสร้างวิดเจ็ตแอปพื้นฐานด้วย Glance
ประกาศ AppWidget ในไฟล์ Manifest
หลังจากทำตามขั้นตอนการตั้งค่าเสร็จแล้ว ให้ประกาศ AppWidget และข้อมูลเมตาของ AppWidget ในแอป
ขยายตัวรับ
AppWidgetจากGlanceAppWidgetReceiverโดยทำดังนี้class MyAppWidgetReceiver : GlanceAppWidgetReceiver() { override val glanceAppWidget: GlanceAppWidget = TODO("Create GlanceAppWidget") }
ลงทะเบียนผู้ให้บริการวิดเจ็ตแอปในไฟล์
AndroidManifest.xmlและไฟล์ข้อมูลเมตาที่เกี่ยวข้อง<receiver android:name=".glance.MyReceiver" android:exported="true"> <intent-filter> <action android:name="android.appwidget.action.APPWIDGET_UPDATE" /> </intent-filter> <meta-data android:name="android.appwidget.provider" android:resource="@xml/my_app_widget_info" /> </receiver>
เพิ่มAppWidgetProviderInfoข้อมูลเมตา
จากนั้นทำตามคำแนะนำสร้างวิดเจ็ตเพื่อสร้างและกำหนดข้อมูลวิดเจ็ตแอปในไฟล์ @xml/my_app_widget_info
ความแตกต่างเพียงอย่างเดียวสำหรับ Glance คือไม่มี initialLayout XML แต่คุณต้องกำหนด คุณใช้เลย์เอาต์การโหลดที่กำหนดไว้ล่วงหน้าซึ่งมีอยู่ใน
ไลบรารีได้
<appwidget-provider xmlns:android="http://schemas.android.com/apk/res/android"
android:initialLayout="@layout/glance_default_loading_layout">
</appwidget-provider>
ประกาศ XML ของ AppWidgetProviderInfo
ออบเจ็กต์ AppWidgetProviderInfo จะกำหนดคุณสมบัติที่สำคัญของวิดเจ็ต
กำหนด AppWidgetProviderInfo ในไฟล์ทรัพยากรข้อมูลเมตา XML
(res/xml/my_app_widget_info.xml) ภายในองค์ประกอบ <appwidget-provider> ดังนี้
<appwidget-provider xmlns:android="http://schemas.android.com/apk/res/android"
    android:minWidth="40dp"
    android:minHeight="40dp"
    android:targetCellWidth="1"
    android:targetCellHeight="1"
    android:maxResizeWidth="250dp"
    android:maxResizeHeight="120dp"
    android:updatePeriodMillis="86400000"
    android:description="@string/example_appwidget_description"
    android:previewLayout="@layout/example_appwidget_preview"
    android:initialLayout="@layout/glance_default_loading_layout"
    android:configure="com.example.android.ExampleAppWidgetConfigurationActivity"
    android:resizeMode="horizontal|vertical"
    android:widgetCategory="home_screen"
    android:widgetFeatures="reconfigurable|configuration_optional">
</appwidget-provider>
แอตทริบิวต์การปรับขนาดวิดเจ็ต
หน้าจอหลักเริ่มต้นจะวางวิดเจ็ตในหน้าต่างตามตารางกริดของเซลล์ ที่มีความสูงและความกว้างที่กำหนดไว้ หน้าจอหลักส่วนใหญ่จะอนุญาตให้วิดเจ็ตมีขนาด เป็นจำนวนเต็มของเซลล์กริด เช่น 2 เซลล์ ในแนวนอนและ 3 เซลล์ในแนวตั้ง
แอตทริบิวต์การกำหนดขนาดวิดเจ็ตช่วยให้คุณระบุขนาดเริ่มต้นสำหรับวิดเจ็ตและ ระบุขอบเขตล่างและบนของขนาดวิดเจ็ตได้ ในบริบทนี้ ขนาดเริ่มต้นของวิดเจ็ตคือขนาดที่วิดเจ็ตใช้เมื่อมีการ เพิ่มลงในหน้าจอหลักเป็นครั้งแรก
ตารางต่อไปนี้จะอธิบายแอตทริบิวต์ <appwidget-provider> ที่เกี่ยวข้อง
กับการปรับขนาดวิดเจ็ต
| แอตทริบิวต์และคำอธิบาย | |
|---|---|
targetCellWidth และ
targetCellHeight (Android 12)
minWidth และ minHeight |
targetCellWidth และ
targetCellHeight รวมถึง minWidth และ
minHeight เพื่อให้แอปสามารถกลับไปใช้
minWidth และ minHeight ได้หากอุปกรณ์ของผู้ใช้
ไม่รองรับ targetCellWidth และ
targetCellHeight หากรองรับ แอตทริบิวต์
targetCellWidth และ targetCellHeight
จะมีความสำคัญเหนือกว่าแอตทริบิวต์ minWidth และ minHeight
|
minResizeWidth และ
minResizeHeight |
ระบุขนาดขั้นต่ำสุดของวิดเจ็ต ค่าเหล่านี้จะระบุ
ขนาดที่วิดเจ็ตอ่านไม่ออกหรือใช้ไม่ได้ การใช้แอตทริบิวต์เหล่านี้ช่วยให้ผู้ใช้ปรับขนาดวิดเจ็ตให้มีขนาดเล็กกว่า
ขนาดเริ่มต้นของวิดเจ็ตได้ ระบบจะละเว้นแอตทริบิวต์ minResizeWidth หากมีค่ามากกว่า minWidth หรือหากไม่ได้เปิดใช้การปรับขนาดแนวนอน ดูresizeMode ในทำนองเดียวกัน ระบบจะละเว้นแอตทริบิวต์ minResizeHeight หากมีค่ามากกว่า minHeight หรือหากไม่ได้เปิดใช้การปรับขนาดแนวตั้ง |
maxResizeWidth และ
maxResizeHeight |
ระบุขนาดสูงสุดที่แนะนําของวิดเจ็ต หากค่าไม่ใช่
ผลคูณของขนาดเซลล์กริด ระบบจะปัดค่าขึ้นเป็นขนาดเซลล์ที่ใกล้เคียงที่สุด
ระบบจะไม่สนใจแอตทริบิวต์ maxResizeWidth หากมีขนาดเล็กกว่า minWidth หรือหากไม่ได้เปิดใช้
การปรับขนาดแนวนอน ดู resizeMode ในทํานองเดียวกัน
ระบบจะไม่สนใจแอตทริบิวต์ maxResizeHeight หากมีขนาดเล็กกว่า minHeight หรือหากไม่ได้เปิดใช้
การปรับขนาดแนวตั้ง เปิดตัวใน Android 12 |
resizeMode |
ระบุกฎเกณฑ์ที่ใช้ในการปรับขนาดวิดเจ็ต คุณสามารถใช้แอตทริบิวต์นี้เพื่อทำให้วิดเจ็ตหน้าจอหลักปรับขนาดได้ในแนวนอน แนวตั้ง หรือทั้ง 2 แกน ผู้ใช้แตะวิดเจ็ตค้างไว้เพื่อแสดงแฮนเดิลการปรับขนาด จากนั้นลากแฮนเดิลแนวนอนหรือแนวตั้งเพื่อเปลี่ยนขนาดในตารางกริดของเลย์เอาต์ ค่าสำหรับแอตทริบิวต์ resizeMode ได้แก่ horizontal, vertical และ none หากต้องการประกาศว่าวิดเจ็ตปรับขนาดได้ทั้งในแนวนอนและแนวตั้ง ให้ใช้ horizontal|vertical |
ตัวอย่าง
ลองดูข้อมูลจำเพาะต่อไปนี้เพื่อให้เห็นภาพว่าแอตทริบิวต์ในตารางก่อนหน้าส่งผลต่อการปรับขนาดวิดเจ็ตอย่างไร
- เซลล์ตารางกริดมีความกว้าง 30 dp และสูง 50 dp
- เราได้ระบุข้อกำหนดแอตทริบิวต์ต่อไปนี้
<appwidget-provider xmlns:android="http://schemas.android.com/apk/res/android"
    android:minWidth="80dp"
    android:minHeight="80dp"
    android:targetCellWidth="2"
    android:targetCellHeight="2"
    android:minResizeWidth="40dp"
    android:minResizeHeight="40dp"
    android:maxResizeWidth="120dp"
    android:maxResizeHeight="120dp"
    android:resizeMode="horizontal|vertical" />
ตั้งแต่ Android 12 เป็นต้นไป
ใช้แอตทริบิวต์ targetCellWidth และ targetCellHeight เป็นขนาดเริ่มต้นของวิดเจ็ต
โดยค่าเริ่มต้น วิดเจ็ตจะมีขนาด 2x2 คุณสามารถปรับขนาดวิดเจ็ตให้เล็กลงเป็น 2x1 หรือใหญ่ขึ้นเป็น 4x3 ได้
Android 11 และต่ำกว่า
ใช้แอตทริบิวต์ minWidth และ minHeight เพื่อคำนวณขนาดเริ่มต้นของ
วิดเจ็ต
ความกว้างเริ่มต้น = Math.ceil(80 / 30) = 3
ความสูงเริ่มต้น = Math.ceil(80 / 50) = 2
โดยค่าเริ่มต้นวิดเจ็ตจะมีขนาด 3x2 คุณปรับขนาดวิดเจ็ตให้เล็กลงได้ถึง 2x1 หรือขยายให้เต็มหน้าจอ
แอตทริบิวต์วิดเจ็ตเพิ่มเติม
ตารางต่อไปนี้อธิบายแอตทริบิวต์ <appwidget-provider> ที่เกี่ยวข้อง
กับคุณภาพอื่นๆ นอกเหนือจากการปรับขนาดวิดเจ็ต
| แอตทริบิวต์และคำอธิบาย | |
|---|---|
updatePeriodMillis |
กำหนดความถี่ที่เฟรมเวิร์กวิดเจ็ตจะขออัปเดตจาก
GlanceAppWidgetReceiver โดยการเรียกใช้เมธอด Callback onUpdate()
เราขอแนะนำให้อัปเดตให้น้อยที่สุดเท่าที่จะเป็นไปได้ ซึ่งไม่เกิน 1 ครั้งต่อชั่วโมง เพื่อประหยัดแบตเตอรี่
ดูรายละเอียดได้ที่ส่วนเวลาที่ควรอัปเดตวิดเจ็ตในการจัดการสถานะ Glance |
initialLayout |
ชี้ไปยังทรัพยากรเลย์เอาต์ที่กำหนดเลย์เอาต์การโหลดของวิดเจ็ตก่อนที่องค์ประกอบ Glance UI จะแสดงผล คุณสามารถใช้เลย์เอาต์การโหลดที่กำหนดไว้ล่วงหน้าซึ่งมีอยู่ในไลบรารี @layout/glance_default_loading_layout |
configure |
กำหนดกิจกรรมการกำหนดค่าที่จะเปิดขึ้นเมื่อผู้ใช้เพิ่มวิดเจ็ต ดูส่วนใช้กิจกรรมการกำหนดค่าวิดเจ็ตในหน้านี้ |
description |
ระบุคำอธิบายสำหรับเครื่องมือเลือกวิดเจ็ตเพื่อแสดงสำหรับวิดเจ็ตของคุณ เปิดตัวใน Android 12 |
previewLayout (Android 12)
และ previewImage (Android 11 และต่ำกว่า) |
|
autoAdvanceViewId |
ระบุรหัสมุมมองของมุมมองย่อยของวิดเจ็ตที่โฮสต์ของวิดเจ็ตเปลี่ยนหน้าโดยอัตโนมัติ |
widgetCategory |
ประกาศว่าวิดเจ็ตแสดงในหน้าจอหลัก (home_screen), หน้าจอล็อก (keyguard) หรือทั้ง 2 หน้าจอได้หรือไม่ สำหรับ Android 5.0 ขึ้นไป จะใช้ได้เฉพาะ home_screen |
widgetFeatures |
ประกาศฟีเจอร์ที่วิดเจ็ตรองรับ เช่น หากการกำหนดค่าวิดเจ็ตเป็นแบบไม่บังคับ ให้ระบุทั้ง configuration_optional และ reconfigurable |
กำหนด GlanceAppWidget
สร้างคลาสใหม่ที่ขยายจาก
GlanceAppWidgetและลบล้าง เมธอดprovideGlanceนี่คือวิธีที่คุณสามารถโหลดข้อมูลที่จำเป็นต่อการแสดงผลวิดเจ็ตclass MyAppWidget : GlanceAppWidget() { override suspend fun provideGlance(context: Context, id: GlanceId) { // In this method, load data needed to render the AppWidget. // Use `withContext` to switch to another thread for long running // operations. provideContent { // create your AppWidget here Text("Hello World") } } }
สร้างอินสแตนซ์ใน
glanceAppWidgetบนGlanceAppWidgetReceiverของคุณclass MyAppWidgetReceiver : GlanceAppWidgetReceiver() { // Let MyAppWidgetReceiver know which GlanceAppWidget to use override val glanceAppWidget: GlanceAppWidget = MyAppWidget() }
ตอนนี้คุณได้กำหนดค่า AppWidget โดยใช้ Glance แล้ว
ใช้คลาส GlanceAppWidgetReceiver เพื่อจัดการการออกอากาศวิดเจ็ต
วิดเจ็ตพิกัด GlanceAppWidgetReceiver จะออกอากาศและอัปเดตสถานะแพลตฟอร์ม
โดยการขยาย AppWidgetProvider พื้นฐาน วิดเจ็ตจะรับ
เหตุการณ์ของแพลตฟอร์มเมื่อมีการอัปเดต ลบ เปิดใช้ หรือปิดใช้
วิดเจ็ต แล้วแปลเป็นคำขอวงจร Compose
ประกาศวิดเจ็ตในไฟล์ Manifest
ประกาศคลาสย่อย GlanceAppWidgetReceiver ของคุณเป็นเครื่องรับการออกอากาศในไฟล์ AndroidManifest.xml ดังนี้
<receiver android:name="ExampleAppWidgetReceiver"
          android:exported="false">
    <intent-filter>
        <action android:name="android.appwidget.action.APPWIDGET_UPDATE" />
    </intent-filter>
    <meta-data android:name="android.appwidget.provider"
               android:resource="@xml/my_app_widget_info" />
</receiver>
องค์ประกอบ <receiver> ต้องมีแอตทริบิวต์ android:name ซึ่งระบุคลาสตัวรับ ผู้รับต้องยอมรับACTION_APPWIDGET_UPDATE
การดำเนินการออกอากาศภายใน <intent-filter>
องค์ประกอบ <meta-data> ต้องระบุชื่อเป็น
android.appwidget.provider และแอตทริบิวต์ android:resource ต้องชี้ไปยัง
แหล่งข้อมูลเมตา XML ของ AppWidgetProviderInfo (@xml/my_app_widget_info)
ใช้คลาส GlanceAppWidgetReceiver
ใน Glance คุณจะขยาย GlanceAppWidgetReceiver แทน
AppWidgetProvider โดยตรงได้โดยลิงก์ตัวรับสัญญาณกับอินสแตนซ์ GlanceAppWidget
GlanceAppWidgetReceiver ของคุณ การเรียกกลับหลักที่ใช้ได้ใน
GlanceAppWidgetReceiver จะทำงานดังนี้
onUpdate(): Glance จะลบล้างโดยอัตโนมัติเพื่อดำเนินการอัปเดตการคอมโพส หากคุณลบล้างonUpdateด้วยตนเอง คุณต้องเรียกใช้super.onUpdateเพื่อให้ Glance เปิดใช้เธรดการคอมโพส ได้สำเร็จonAppWidgetOptionsChanged(): เรียกใช้เมื่อวางหรือปรับขนาดวิดเจ็ตเป็นครั้งแรก Glance จะอ่านรายการในชุดตัวเลือกเบื้องหลังเพื่อให้เลย์เอาต์ปรับตามขนาดรันไทม์ได้อย่างราบรื่นonDeleted(Context, IntArray): เรียกใช้ทุกครั้งที่ผู้ใช้ลบวิดเจ็ต อินสแตนซ์ที่เฉพาะเจาะจงonEnabled(Context): ทริกเกอร์เมื่อสร้างอินสแตนซ์แรกของวิดเจ็ตสำเร็จ เหมาะอย่างยิ่งสำหรับการย้ายข้อมูลทั่วโลกonDisabled(Context): เรียกใช้เมื่อนำอินสแตนซ์สุดท้ายที่ใช้งานอยู่ของ ผู้ให้บริการออกonReceive(Context, Intent): สกัดกั้นการออกอากาศของทุกแพลตฟอร์มก่อน เมธอดการเรียกกลับที่เฉพาะเจาะจง คุณต้องตรวจสอบว่าตรรกะตัวรับสัญญาณที่กำหนดเอง ที่คุณเขียนเรียกใช้super.onReceive(context, intent)และห้ามเรียกใช้goAsyncด้วยตนเอง เนื่องจาก Glance จะกำหนดเส้นทางการทำงานโดยอัตโนมัติ แบบไม่พร้อมกัน
รับ Intent การออกอากาศของวิดเจ็ต
GlanceAppWidgetReceiverจะกรองและจัดการเจตนาการออกอากาศวิดเจ็ตแพลตฟอร์มพื้นฐานต่อไปนี้
ACTION_APPWIDGET_UPDATEACTION_APPWIDGET_DELETEDACTION_APPWIDGET_ENABLEDACTION_APPWIDGET_DISABLEDACTION_APPWIDGET_OPTIONS_CHANGED
สร้าง UI
ข้อมูลโค้ดต่อไปนี้แสดงวิธีสร้าง UI
/* Import Glance Composables In the event there is a name clash with the Compose classes of the same name, you may rename the imports per https://kotlinlang.org/docs/packages.html#imports using the `as` keyword. import androidx.glance.Button import androidx.glance.layout.Column import androidx.glance.layout.Row import androidx.glance.text.Text */ class MyAppWidget : GlanceAppWidget() { override suspend fun provideGlance(context: Context, id: GlanceId) { // Load data needed to render the AppWidget. // Use `withContext` to switch to another thread for long running // operations. provideContent { // create your AppWidget here MyContent() } } @Composable private fun MyContent() { Column( modifier = GlanceModifier.fillMaxSize(), verticalAlignment = Alignment.Top, horizontalAlignment = Alignment.CenterHorizontally ) { Text(text = "Where to?", modifier = GlanceModifier.padding(12.dp)) Row(horizontalAlignment = Alignment.CenterHorizontally) { Button( text = "Home", onClick = actionStartActivity<MyActivity>() ) Button( text = "Work", onClick = actionStartActivity<MyActivity>() ) } } } }
ตัวอย่างโค้ดก่อนหน้าจะทำสิ่งต่อไปนี้
- ในระดับบนสุด
Columnระบบจะวางรายการในแนวตั้งต่อกัน Columnจะขยายขนาดให้พอดีกับพื้นที่ว่าง (ผ่านGlanceModifier) และจัดเนื้อหาให้อยู่ด้านบน (verticalAlignment) และจัดกึ่งกลางในแนวนอน (horizontalAlignment)- เนื้อหาของ
Columnจะกำหนดโดยใช้ Lambda ลำดับมีความสำคัญ
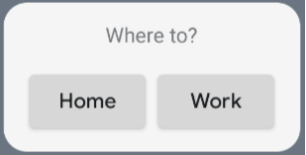
คุณสามารถเปลี่ยนค่าการจัดแนวหรือใช้ค่าตัวแก้ไขอื่น (เช่น ระยะห่างจากขอบ) เพื่อเปลี่ยนตำแหน่งและขนาดของคอมโพเนนต์ได้ ดูรายการคอมโพเนนต์ พารามิเตอร์ และตัวแก้ไขที่มี ให้สำหรับแต่ละคลาสทั้งหมดได้ในเอกสารอ้างอิง
ใช้มุมโค้งมน
Android 12 เปิดตัวพารามิเตอร์ของระบบเพื่อปรับแต่งรัศมีมุมของวิดเจ็ตแอปแบบไดนามิก ดังนี้
system_app_widget_background_radius: ระบุรัศมีมุมของคอนเทนเนอร์พื้นหลังของวิดเจ็ต (ไม่เกิน 28 dp)- รัศมีด้านใน: เพื่อป้องกันไม่ให้เนื้อหาถูกตัด ให้คำนวณรัศมีที่ได้สัดส่วน
สำหรับเนื้อหาด้านในตามโครงร่างพื้นหลังของระบบ
systemRadiusValue - widgetPadding
ใน Glance คุณสามารถใช้พร็อพเพอร์ตี้การกำหนดขนาดรัศมีมุมแบบไดนามิกใน
องค์ประกอบโดยใช้
GlanceModifier.cornerRadius(android.R.dimen.system_app_widget_background_radius)
หากต้องการความเข้ากันได้แบบย้อนหลังในอุปกรณ์ที่ใช้ Android 11 (ระดับ API 30) หรือต่ำกว่า ให้ใช้แอตทริบิวต์ที่กำหนดเองและธีมสำรองที่กำหนดเอง
/values/attrs.xml<resources> <attr name="backgroundRadius" format="dimension" /> </resources>/values/styles.xml<resources> <style name="MyWidgetTheme"> <item name="backgroundRadius">@dimen/my_background_radius_dimen</item> </style> </resources>/values-31/styles.xml<resources> <style name="MyWidgetTheme" parent="@android:style/Theme.DeviceDefault.DayNight"> <item name="backgroundRadius">@android:dimen/system_app_widget_background_radius</item> </style> </resources>/drawable/my_widget_background.xml<shape xmlns:android="http://schemas.android.com/apk/res/android" android:shape="rectangle"> <corners android:radius="?attr/backgroundRadius" /> </shape>