
ウィンドウ サイズクラスは、レスポンシブ レイアウト、アダプティブ レイアウトを設計、開発、テストするための、独自のビューポート ブレークポイントのセットです。これらのブレークポイントは、レイアウトのシンプルさと、固有のケースに合わせてアプリを最適化する柔軟性のバランスを取ります。
ウィンドウ サイズクラスは、アプリで利用可能な表示領域を コンパクト、中程度、拡大、大、または特大に分類します。利用可能な幅と高さは個別に分類されるため、どの時点でも、アプリにはウィンドウ サイズクラスが 2 つ(幅用と高さ用)あります。縦スクロールが一般的であることから、通常は利用可能な幅の方が利用可能な高さより重要です。したがって、ほとんどの場合、アプリの UI には幅のウィンドウ サイズクラスの方が適しています。

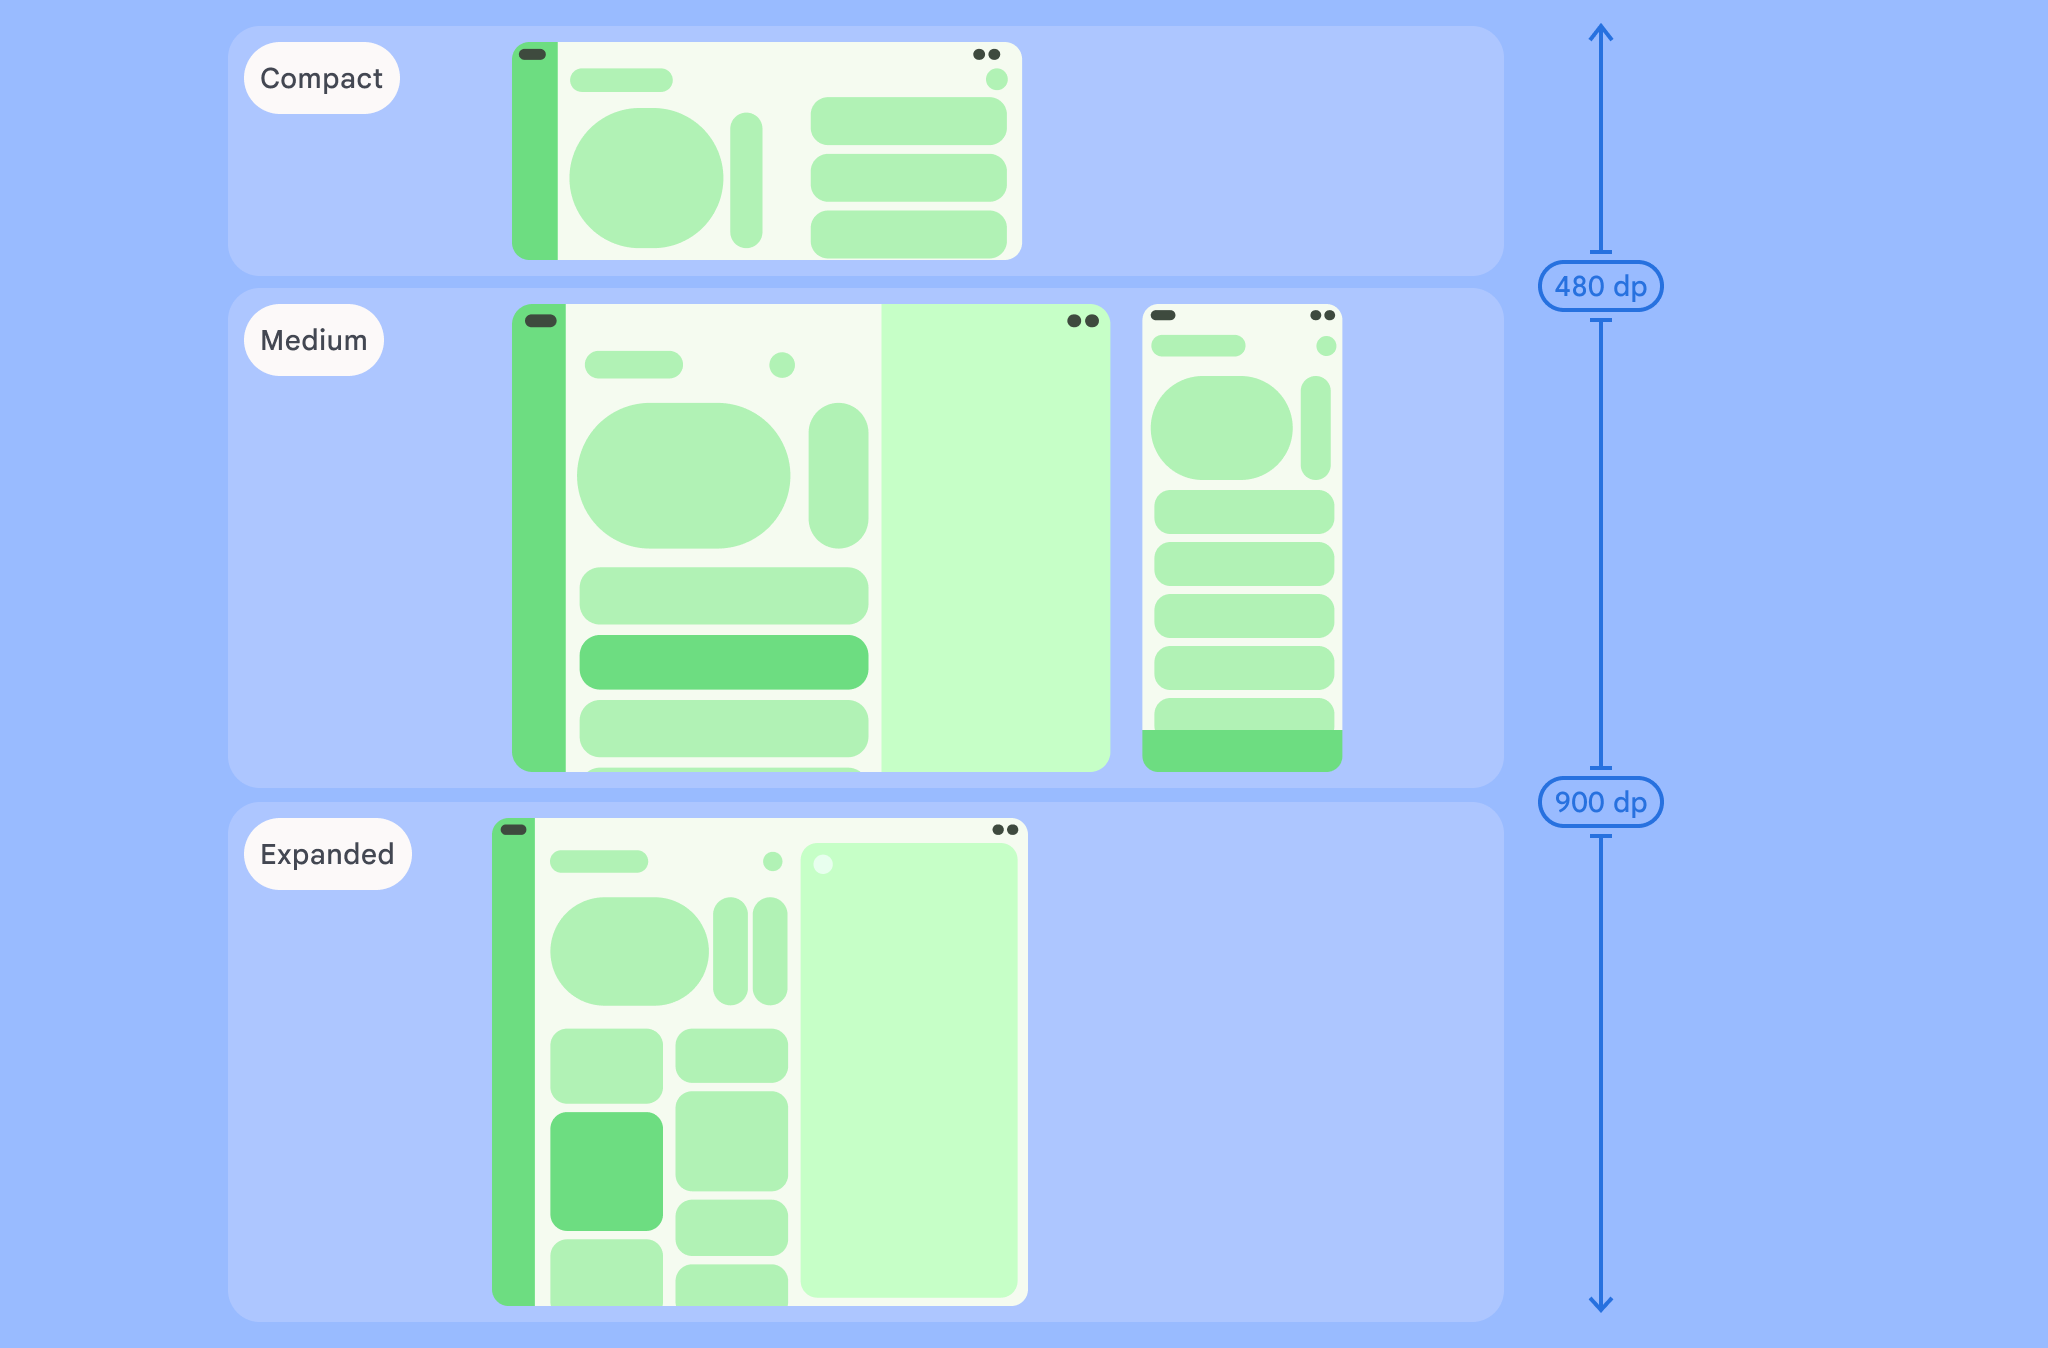
図のように、ブレークポイントを使用すると、デバイスと構成の観点からレイアウトを引き続き検討できます。各サイズクラスのブレークポイントは、典型的なデバイス シナリオの一般的なケースを表しており、ブレークポイントに基づくレイアウトの設計を検討する際の基準として有用です。
| サイズクラス | ブレークポイント | デバイスによる表現 |
|---|---|---|
| コンパクトな幅 | 幅 600 dp 未満 | 縦向きのスマートフォンの 99.96% |
| 中程度の幅 | 幅 600 dp 以上 840 dp 未満 | 縦向きのタブレットの 93.73%、
縦向きの開いた内側の大型ディスプレイのほとんど |
| 拡大幅 | 幅 840 dp 以上 1,200 dp 未満 | 横向きのタブレットの 97.22%、
横向きの開いたインナー ディスプレイのほとんどは 拡張後の幅以上 |
| 広幅 | 幅 1,200 dp 以上 1,600 dp 未満 | 大型タブレット ディスプレイ |
| 特大幅 | 幅 1,600 dp 以上 | デスクトップ ディスプレイ |
| コンパクトな高さ | 高さ 480 dp 未満 | 横向きのスマートフォンの 99.78% |
| 中程度の高さ | 高さ 480 dp 以上 900 dp 未満 | 横向きのタブレットの 96.56% 縦向きのスマートフォンの 97.59% |
| 拡大高さ | 高さ 900 dp 以上 | 縦向きのタブレットの 94.25% |
サイズクラスを実機で確認することは有用ですが、ウィンドウ サイズクラスは、デバイス画面のサイズによって明確に決定されるわけではありません。ウィンドウサイズクラスは、isTablet 型のロジックを対象としていません。むしろウィンドウ サイズクラスは、アプリを実行しているデバイスの種類に関係なく、アプリで利用可能なウィンドウ サイズによって決定されます。その結果、次の 2 点が重要となります。
物理デバイスで、特定のウィンドウ サイズクラスが保証されるわけではありません。アプリで利用可能な画面スペースは、さまざまな理由により、デバイスの画面サイズと異なります。モバイル デバイスでは、分割画面モードによって 2 つのアプリ間で画面を分割できます。ChromeOS では、任意にサイズ変更可能なデスクトップ型のウィンドウで Android アプリを表示できます。 折りたたみ式デバイスでは、デバイスを折りたたむか広げることで、2 種類の画面サイズを個別に利用できます。
ウィンドウ サイズクラスは、アプリの全期間を通じて変わる可能性があります。 アプリの実行中に、デバイスの画面の向きの変更、マルチタスク、折りたたみ、展開により、利用可能な画面スペースが変化することがあります。そのため、ウィンドウ サイズクラスは動的であり、アプリの UI はそれに適応する必要があります。
ウィンドウ サイズクラスは、 マテリアル デザインのレイアウト ガイドラインのコンパクト、中程度、拡大のブレークポイントに対応します。さらに、デスクトップと接続されたディスプレイをより適切にターゲット設定するために、大と特大のブレークポイントが追加されました。
ウィンドウ サイズクラスを使用すると、大まかなアプリ レイアウトを決定できます。たとえば、追加の画面スペースを利用するために特定の正規レイアウトを使用するかどうかを決定できます。
現在の
WindowSizeClass
使用
WindowSizeClass#compute()
の関数を Jetpack で提供
WindowManager ライブラリ:次の例をご覧ください。
ウィンドウ サイズクラスを計算し、問題が発生したときに
ウィンドウ サイズクラスの変更:
Kotlin
class MainActivity : Activity() {
    override fun onCreate(savedInstanceState: Bundle?) {
        super.onCreate(savedInstanceState)

        // ...

        // Replace with a known container that you can safely add a
        // view to where the view won't affect the layout and the view
        // won't be replaced.
        val container: ViewGroup = binding.container

        // Add a utility view to the container to hook into
        // View.onConfigurationChanged(). This is required for all
        // activities, even those that don't handle configuration
        // changes. You can't use Activity.onConfigurationChanged(),
        // since there are situations where that won't be called when
        // the configuration changes. View.onConfigurationChanged() is
        // called in those scenarios.
        container.addView(object : View(this) {
            override fun onConfigurationChanged(newConfig: Configuration?) {
                super.onConfigurationChanged(newConfig)
                computeWindowSizeClasses()
            }
        })

        computeWindowSizeClasses()
    }

    private fun computeWindowSizeClasses() {
        val metrics = WindowMetricsCalculator.getOrCreate().computeCurrentWindowMetrics(this)
        val width = metrics.bounds.width()
        val height = metrics.bounds.height()
        val density = resources.displayMetrics.density
        val windowSizeClass = WindowSizeClass.compute(width/density, height/density)
        // COMPACT, MEDIUM, or EXPANDED
        val widthWindowSizeClass = windowSizeClass.windowWidthSizeClass
        // COMPACT, MEDIUM, or EXPANDED
        val heightWindowSizeClass = windowSizeClass.windowHeightSizeClass

        // Use widthWindowSizeClass and heightWindowSizeClass.
    }
}
Java
public class MainActivity extends Activity {
    @Override
    protected void onCreate(Bundle savedInstanceState) {
        super.onCreate(savedInstanceState);

        // ...

        // Replace with a known container that you can safely add a
        // view to where the view won't affect the layout and the view
        // won't be replaced.
        ViewGroup container = binding.container;

        // Add a utility view to the container to hook into
        // View.onConfigurationChanged(). This is required for all
        // activities, even those that don't handle configuration
        // changes. You can't use Activity.onConfigurationChanged(),
        // since there are situations where that won't be called when
        // the configuration changes. View.onConfigurationChanged() is
        // called in those scenarios.
        container.addView(new View(this) {
            @Override
            protected void onConfigurationChanged(Configuration newConfig) {
                super.onConfigurationChanged(newConfig);
                computeWindowSizeClasses();
            }
        });

        computeWindowSizeClasses();
    }

    private void computeWindowSizeClasses() {
        WindowMetrics metrics = WindowMetricsCalculator.getOrCreate()
                .computeCurrentWindowMetrics(this);

        int width = metrics.getBounds().width();
        int height = metrics.getBounds().height();
        float density = getResources().getDisplayMetrics().density;
        WindowSizeClass windowSizeClass = WindowSizeClass.compute(width/density, height/density);
        // COMPACT, MEDIUM, or EXPANDED
        WindowWidthSizeClass widthWindowSizeClass = windowSizeClass.getWindowWidthSizeClass();
        // COMPACT, MEDIUM, or EXPANDED
        WindowHeightSizeClass heightWindowSizeClass = windowSizeClass.getWindowHeightSizeClass();

        // Use widthWindowSizeClass and heightWindowSizeClass.
    }
}
ウィンドウ サイズクラスをテストする
レイアウトを変更する際は、すべてのウィンドウ サイズ(特にコンパクト、中程度、拡大のブレークポイント幅)でレイアウトの動作をテストします。
コンパクト画面用の既存のレイアウトがある場合は、まず拡張後の幅のサイズクラスに合わせてレイアウトを最適化します。このサイズクラスでは、追加のコンテンツまたは UI の変更のためのスペースを最大限確保できます。その後、中程度の幅のサイズクラスに適したレイアウトを決定し、特化したレイアウトの追加を検討します。
次のステップ
ウィンドウ サイズクラスを使用してレスポンシブ レイアウト、アダプティブ レイアウトを作成する方法の詳細については、以下をご覧ください。
Compose ベースのレイアウトの場合: さまざまな表示サイズをサポートする
ビューベースのレイアウトの場合: ビューを使用したレスポンシブ/アダプティブ デザイン
すべてのデバイスと画面サイズで優れたアプリを実現する方法の詳細については、以下をご覧ください。