
Tiện ích bộ sưu tập chuyên hiển thị nhiều phần tử cùng loại, chẳng hạn như bộ sưu tập hình ảnh trong ứng dụng thư viện ảnh, bài viết trong ứng dụng tin tức hoặc tin nhắn trong ứng dụng giao tiếp. Tiện ích bộ sưu tập thường tập trung vào 2 trường hợp sử dụng: duyệt xem bộ sưu tập và mở một phần tử của bộ sưu tập ở chế độ xem chi tiết. Tiện ích bộ sưu tập có thể cuộn theo chiều dọc.
Các tiện ích này sử dụng RemoteViewsService để hiển thị các bộ sưu tập được hỗ trợ bởi dữ liệu từ xa, chẳng hạn như từ một trình cung cấp nội dung. Tiện ích này trình bày dữ liệu bằng một trong các kiểu khung hiển thị sau đây, được gọi là khung hiển thị tập hợp:
ListView- Một khung hiển thị cho thấy các mục trong danh sách cuộn theo chiều dọc.
GridView- Khung hiển thị cho thấy các mục trong một lưới cuộn hai chiều.
StackView- Chế độ xem thẻ xếp chồng – tương tự như một hộp danh thiếp – trong đó người dùng có thể hất thẻ trước lên hoặc xuống để xem thẻ trước hoặc thẻ tiếp theo.
AdapterViewFlipper- Một
ViewAnimatorđơn giản dựa trên bộ chuyển đổi, có thể tạo ảnh động giữa 2 hoặc nhiều khung hiển thị. Mỗi lần chỉ có một trẻ em xuất hiện.
Vì các khung hiển thị bộ sưu tập này hiển thị các bộ sưu tập được hỗ trợ bởi dữ liệu từ xa, nên chúng sử dụng một Adapter để liên kết giao diện người dùng với dữ liệu. Adapter liên kết các mục riêng lẻ trong một tập hợp dữ liệu với các đối tượng View riêng lẻ.
Vì các khung hiển thị bộ sưu tập này được hỗ trợ bởi các bộ điều hợp, nên khung Android phải có thêm cấu trúc để hỗ trợ việc sử dụng các khung hiển thị này trong tiện ích. Trong ngữ cảnh của một tiện ích, Adapter được thay thế bằng RemoteViewsFactory, đây là một trình bao bọc mỏng xung quanh giao diện Adapter. Khi được yêu cầu một mục cụ thể trong bộ sưu tập, RemoteViewsFactory sẽ tạo và trả về mục đó cho bộ sưu tập dưới dạng một đối tượng RemoteViews. Để đưa một khung hiển thị tập hợp vào tiện ích, hãy triển khai RemoteViewsService và RemoteViewsFactory.
RemoteViewsService là một dịch vụ cho phép bộ chuyển đổi từ xa yêu cầu các đối tượng RemoteViews. RemoteViewsFactory là một giao diện cho bộ chuyển đổi giữa một chế độ xem tập hợp (chẳng hạn như ListView, GridView và StackView) và dữ liệu cơ bản cho chế độ xem đó. Từ mẫuStackWidget, sau đây là ví dụ về mã khởi tạo để triển khai dịch vụ và giao diện này:
Kotlin
class StackWidgetService : RemoteViewsService() {

    override fun onGetViewFactory(intent: Intent): RemoteViewsFactory {
        return StackRemoteViewsFactory(this.applicationContext, intent)
    }
}

class StackRemoteViewsFactory(
        private val context: Context,
        intent: Intent
) : RemoteViewsService.RemoteViewsFactory {

// See the RemoteViewsFactory API reference for the full list of methods to
// implement.

}
Java
public class StackWidgetService extends RemoteViewsService {
    @Override
    public RemoteViewsFactory onGetViewFactory(Intent intent) {
        return new StackRemoteViewsFactory(this.getApplicationContext(), intent);
    }
}

class StackRemoteViewsFactory implements RemoteViewsService.RemoteViewsFactory {

// See the RemoteViewsFactory API reference for the full list of methods to
// implement.

}
Ứng dụng mẫu
Các đoạn mã trong phần này cũng được lấy từ StackWidgetmẫu:
StackWidget.Mẫu này bao gồm một ngăn xếp gồm 10 khung hiển thị, cho thấy các giá trị từ 0 đến 9. Tiện ích mẫu có các hành vi chính sau:
Người dùng có thể hất chế độ xem trên cùng theo chiều dọc trong tiện ích để hiển thị chế độ xem tiếp theo hoặc trước đó. Đây là hành vi
StackViewtích hợp.Nếu không có bất kỳ hoạt động tương tác nào của người dùng, tiện ích sẽ tự động chuyển qua các khung hiển thị theo trình tự, giống như một bản trình chiếu. Nguyên nhân là do chế độ cài đặt
android:autoAdvanceViewId="@id/stack_view"trong tệpres/xml/stackwidgetinfo.xml. Chế độ cài đặt này áp dụng cho mã nhận dạng khung hiển thị, trong trường hợp này là mã nhận dạng khung hiển thị của khung hiển thị ngăn xếp.Nếu người dùng chạm vào khung hiển thị trên cùng, tiện ích sẽ hiển thị thông báo
Toast"Touched view n" (Đã chạm vào khung hiển thị n), trong đó n là chỉ mục (vị trí) của khung hiển thị được chạm vào. Để biết thêm thông tin về cách triển khai các hành vi, hãy xem phần Thêm hành vi vào từng mục.
Triển khai tiện ích bằng bộ sưu tập
Để triển khai một tiện ích có bộ sưu tập, hãy làm theo quy trình triển khai mọi tiện ích, sau đó làm theo một số bước bổ sung: sửa đổi tệp kê khai, thêm một khung hiển thị bộ sưu tập vào bố cục tiện ích và sửa đổi lớp con AppWidgetProvider.
Tệp kê khai cho tiện ích có bộ sưu tập
Ngoài các yêu cầu được nêu trong phần Khai báo một tiện ích trong tệp kê khai, bạn cần cho phép các tiện ích có bộ sưu tập liên kết với RemoteViewsService. Hãy thực hiện việc này bằng cách khai báo dịch vụ trong tệp kê khai bằng quyền BIND_REMOTEVIEWS.
Điều này ngăn các ứng dụng khác truy cập tự do vào dữ liệu của tiện ích.
Ví dụ: khi tạo một tiện ích sử dụng RemoteViewsService để điền sẵn một khung hiển thị tập hợp, mục nhập tệp kê khai có thể có dạng như sau:
<service android:name="MyWidgetService"
    android:permission="android.permission.BIND_REMOTEVIEWS" />
Trong ví dụ này, android:name="MyWidgetService" đề cập đến lớp con của RemoteViewsService.
Bố cục cho tiện ích có bộ sưu tập
Yêu cầu chính đối với tệp XML bố cục tiện ích là tệp này phải có một trong các khung hiển thị tập hợp: ListView, GridView, StackView hoặc AdapterViewFlipper. Sau đây là tệp widget_layout.xml cho StackWidgetmẫu:
<FrameLayout xmlns:android="http://schemas.android.com/apk/res/android"
    android:layout_width="match_parent"
    android:layout_height="match_parent">
    <StackView
        android:id="@+id/stack_view"
        android:layout_width="match_parent"
        android:layout_height="match_parent"
        android:gravity="center"
        android:loopViews="true" />
    <TextView
        android:id="@+id/empty_view"
        android:layout_width="match_parent"
        android:layout_height="match_parent"
        android:gravity="center"
        android:background="@drawable/widget_item_background"
        android:textColor="#ffffff"
        android:textStyle="bold"
        android:text="@string/empty_view_text"
        android:textSize="20sp" />
</FrameLayout>
Xin lưu ý rằng các khung hiển thị trống phải là các khung hiển thị cùng cấp với khung hiển thị tập hợp mà khung hiển thị trống đại diện cho trạng thái trống.
Ngoài tệp bố cục cho toàn bộ tiện ích, hãy tạo một tệp bố cục khác xác định bố cục cho từng mục trong bộ sưu tập, chẳng hạn như bố cục cho từng cuốn sách trong một bộ sưu tập sách. Mẫu StackWidget chỉ có một tệp bố cục mục, widget_item.xml, vì tất cả các mục đều sử dụng cùng một bố cục.
Lớp AppWidgetProvider cho các tiện ích có bộ sưu tập
Giống như các tiện ích thông thường, phần lớn mã trong lớp con AppWidgetProvider thường nằm trong onUpdate().
Điểm khác biệt chính trong quá trình triển khai cho onUpdate() khi tạo một tiện ích bằng các bộ sưu tập là bạn phải gọi setRemoteAdapter(). Thao tác này cho biết chế độ xem bộ sưu tập nơi lấy dữ liệu.
Sau đó, RemoteViewsService có thể trả về quá trình triển khai RemoteViewsFactory và tiện ích có thể phân phát dữ liệu thích hợp. Khi bạn gọi phương thức này, hãy truyền một ý định trỏ đến quá trình triển khai RemoteViewsService và giá trị nhận dạng tiện ích chỉ định tiện ích cần cập nhật.
Ví dụ: sau đây là cách mẫu StackWidget triển khai phương thức gọi lại onUpdate() để đặt RemoteViewsService làm bộ chuyển đổi từ xa cho tập hợp các tiện ích:
Kotlin
override fun onUpdate(
        context: Context,
        appWidgetManager: AppWidgetManager,
        appWidgetIds: IntArray
) {
    // Update each of the widgets with the remote adapter.
    appWidgetIds.forEach { appWidgetId ->

        // Set up the intent that starts the StackViewService, which
        // provides the views for this collection.
        val intent = Intent(context, StackWidgetService::class.java).apply {
            // Add the widget ID to the intent extras.
            putExtra(AppWidgetManager.EXTRA_APPWIDGET_ID, appWidgetId)
            data = Uri.parse(toUri(Intent.URI_INTENT_SCHEME))
        }
        // Instantiate the RemoteViews object for the widget layout.
        val views = RemoteViews(context.packageName, R.layout.widget_layout).apply {
            // Set up the RemoteViews object to use a RemoteViews adapter.
            // This adapter connects to a RemoteViewsService through the
            // specified intent.
            // This is how you populate the data.
            setRemoteAdapter(R.id.stack_view, intent)

            // The empty view is displayed when the collection has no items.
            // It must be in the same layout used to instantiate the
            // RemoteViews object.
            setEmptyView(R.id.stack_view, R.id.empty_view)
        }

        // Do additional processing specific to this widget.

        appWidgetManager.updateAppWidget(appWidgetId, views)
    }
    super.onUpdate(context, appWidgetManager, appWidgetIds)
}
Java
public void onUpdate(Context context, AppWidgetManager appWidgetManager, int[] appWidgetIds) {
    // Update each of the widgets with the remote adapter.
    for (int i = 0; i < appWidgetIds.length; ++i) {

        // Set up the intent that starts the StackViewService, which
        // provides the views for this collection.
        Intent intent = new Intent(context, StackWidgetService.class);
        // Add the widget ID to the intent extras.
        intent.putExtra(AppWidgetManager.EXTRA_APPWIDGET_ID, appWidgetIds[i]);
        intent.setData(Uri.parse(intent.toUri(Intent.URI_INTENT_SCHEME)));
        // Instantiate the RemoteViews object for the widget layout.
        RemoteViews views = new RemoteViews(context.getPackageName(), R.layout.widget_layout);
        // Set up the RemoteViews object to use a RemoteViews adapter.
        // This adapter connects to a RemoteViewsService through the specified
        // intent.
        // This is how you populate the data.
        views.setRemoteAdapter(R.id.stack_view, intent);

        // The empty view is displayed when the collection has no items.
        // It must be in the same layout used to instantiate the RemoteViews
        // object.
        views.setEmptyView(R.id.stack_view, R.id.empty_view);

        // Do additional processing specific to this widget.

        appWidgetManager.updateAppWidget(appWidgetIds[i], views);
    }
    super.onUpdate(context, appWidgetManager, appWidgetIds);
}
Lưu trữ dữ liệu
Như mô tả trên trang này, lớp con RemoteViewsService cung cấp RemoteViewsFactory dùng để điền vào khung hiển thị tập hợp từ xa.
Cụ thể, hãy thực hiện các bước sau:
Lớp con
RemoteViewsService.RemoteViewsServicelà dịch vụ mà qua đó một bộ chuyển đổi từ xa có thể yêu cầuRemoteViews.Trong lớp con
RemoteViewsService, hãy thêm một lớp triển khai giao diệnRemoteViewsFactory.RemoteViewsFactorylà một giao diện cho trình chuyển đổi giữa một khung hiển thị tập hợp từ xa (chẳng hạn nhưListView,GridView,StackView) và dữ liệu cơ bản cho khung hiển thị đó. Quá trình triển khai của bạn chịu trách nhiệm tạo một đối tượngRemoteViewscho mỗi mục trong tập dữ liệu. Giao diện này là một trình bao bọc mỏng xung quanhAdapter.
Bạn không thể dựa vào một phiên bản duy nhất của dịch vụ hoặc bất kỳ dữ liệu nào mà phiên bản đó chứa để duy trì. Đừng lưu trữ dữ liệu trong RemoteViewsService trừ phi dữ liệu đó là tĩnh. Nếu bạn muốn dữ liệu của tiện ích duy trì, thì cách tốt nhất là sử dụng một ContentProvider có dữ liệu duy trì ngoài vòng đời của quy trình. Ví dụ: một tiện ích cửa hàng tạp hoá có thể lưu trữ trạng thái của từng mục trong danh sách tạp hoá ở một vị trí cố định, chẳng hạn như cơ sở dữ liệu SQL.
Nội dung chính của quá trình triển khai RemoteViewsService là RemoteViewsFactory, được mô tả trong phần sau.
Giao diện RemoteViewsFactory
Lớp tuỳ chỉnh của bạn triển khai giao diện RemoteViewsFactory cung cấp cho tiện ích dữ liệu cho các mục trong bộ sưu tập của tiện ích. Để làm việc này, nó kết hợp tệp bố cục XML của mục tiện ích với một nguồn dữ liệu. Nguồn dữ liệu này có thể là bất cứ thứ gì, từ cơ sở dữ liệu cho đến một mảng đơn giản. Trong mẫu StackWidget, nguồn dữ liệu là một mảng gồm WidgetItems. RemoteViewsFactory hoạt động như một trình chuyển đổi để liên kết dữ liệu với khung hiển thị tập hợp từ xa.
Hai phương thức quan trọng nhất mà bạn cần triển khai cho lớp con RemoteViewsFactory là onCreate() và getViewAt().
Hệ thống gọi onCreate() khi tạo nhà máy lần đầu tiên.
Đây là nơi bạn thiết lập mọi kết nối hoặc con trỏ đến nguồn dữ liệu. Ví dụ: mẫu StackWidget dùng onCreate() để khởi tạo một mảng các đối tượng WidgetItem. Khi tiện ích của bạn đang hoạt động, hệ thống sẽ truy cập vào các đối tượng này bằng cách sử dụng vị trí chỉ mục của chúng trong mảng và hiển thị văn bản mà chúng chứa.
Dưới đây là một đoạn trích từ quá trình triển khai RemoteViewsFactory của mẫu StackWidget. Đoạn trích này cho thấy các phần của phương thức onCreate():
Kotlin
private const val REMOTE_VIEW_COUNT: Int = 10

class StackRemoteViewsFactory(
        private val context: Context
) : RemoteViewsService.RemoteViewsFactory {

    private lateinit var widgetItems: List<WidgetItem>

    override fun onCreate() {
        // In onCreate(), set up any connections or cursors to your data
        // source. Heavy lifting, such as downloading or creating content,
        // must be deferred to onDataSetChanged() or getViewAt(). Taking
        // more than 20 seconds on this call results in an ANR.
        widgetItems = List(REMOTE_VIEW_COUNT) { index -> WidgetItem("$index!") }
        ...
    }
    ...
}
Java
class StackRemoteViewsFactory implements RemoteViewsService.RemoteViewsFactory {
    private static final int REMOTE_VIEW_COUNT = 10;
    private List<WidgetItem> widgetItems = new ArrayList<WidgetItem>();

    public void onCreate() {
        // In onCreate(), setup any connections or cursors to your data
        // source. Heavy lifting, such as downloading or creating content,
        // must be deferred to onDataSetChanged() or getViewAt(). Taking
        // more than 20 seconds on this call results in an ANR.
        for (int i = 0; i < REMOTE_VIEW_COUNT; i++) {
            widgetItems.add(new WidgetItem(i + "!"));
        }
        ...
    }
...
Phương thức RemoteViewsFactory getViewAt() trả về một đối tượng RemoteViews tương ứng với dữ liệu tại position được chỉ định trong tập dữ liệu. Dưới đây là một đoạn trích từ quá trình triển khai RemoteViewsFactory của mẫu StackWidget:
Kotlin
override fun getViewAt(position: Int): RemoteViews {
    // Construct a remote views item based on the widget item XML file
    // and set the text based on the position.
    return RemoteViews(context.packageName, R.layout.widget_item).apply {
        setTextViewText(R.id.widget_item, widgetItems[position].text)
    }
}
Java
public RemoteViews getViewAt(int position) {
    // Construct a remote views item based on the widget item XML file
    // and set the text based on the position.
    RemoteViews views = new RemoteViews(context.getPackageName(), R.layout.widget_item);
    views.setTextViewText(R.id.widget_item, widgetItems.get(position).text);
    return views;
}
Thêm hành vi cho từng mục
Các phần trước cho thấy cách liên kết dữ liệu với tập hợp các tiện ích. Nhưng điều gì sẽ xảy ra nếu bạn muốn thêm hành vi động vào từng mục trong khung hiển thị bộ sưu tập?
Như mô tả trong phần Xử lý các sự kiện bằng lớp onUpdate(), bạn thường dùng setOnClickPendingIntent() để đặt hành vi nhấp của một đối tượng, chẳng hạn như khiến một nút khởi chạy Activity. Tuy nhiên, bạn không được phép sử dụng phương pháp này cho các khung hiển thị con trong một mục riêng lẻ của bộ sưu tập.
Ví dụ: bạn có thể dùng setOnClickPendingIntent() để thiết lập một nút chung trong tiện ích Gmail nhằm khởi chạy ứng dụng, nhưng không thể thiết lập trên các mục riêng lẻ trong danh sách.
Thay vào đó, để thêm hành vi nhấp vào từng mục trong một bộ sưu tập, hãy sử dụng setOnClickFillInIntent(). Việc này bao gồm thiết lập một mẫu ý định đang chờ xử lý cho khung hiển thị bộ sưu tập, sau đó thiết lập một ý định điền sẵn trên từng mục trong bộ sưu tập thông qua RemoteViewsFactory.
Phần này sử dụng mẫu StackWidget để mô tả cách thêm hành vi vào từng mục. Trong mẫu StackWidget, nếu người dùng chạm vào khung hiển thị trên cùng, thì tiện ích sẽ hiển thị thông báo Toast "Đã chạm vào khung hiển thị n", trong đó n là chỉ mục (vị trí) của khung hiển thị được chạm vào. Dưới đây là cách hoạt động:
StackWidgetProvider(một lớp conAppWidgetProvider) sẽ tạo một ý định đang chờ xử lý bằng một thao tác tuỳ chỉnh có tên làTOAST_ACTION.Khi người dùng chạm vào một khung hiển thị, ý định sẽ kích hoạt và phát
TOAST_ACTION.Thông báo truyền tin này sẽ bị phương thức
onReceive()của lớpStackWidgetProviderchặn lại và tiện ích sẽ hiển thị thông báoToastcho khung hiển thị được chạm vào. Dữ liệu cho các mục trong bộ sưu tập doRemoteViewsFactorycung cấp thông quaRemoteViewsService.
Thiết lập mẫu ý định đang chờ xử lý
StackWidgetProvider (một lớp con AppWidgetProvider) thiết lập một ý định đang chờ xử lý. Các mục riêng lẻ của một tập hợp không thể thiết lập ý định đang chờ xử lý của riêng chúng. Thay vào đó, toàn bộ bộ sưu tập sẽ thiết lập một mẫu ý định đang chờ xử lý và các mục riêng lẻ sẽ thiết lập một ý định điền sẵn để tạo hành vi riêng biệt cho từng mục.
Lớp này cũng nhận được thông báo truyền tin được gửi khi người dùng chạm vào một khung hiển thị. Nó xử lý sự kiện này trong phương thức onReceive(). Nếu thao tác của ý định là TOAST_ACTION, thì tiện ích sẽ hiển thị thông báo Toast cho khung hiển thị hiện tại.
Kotlin
const val TOAST_ACTION = "com.example.android.stackwidget.TOAST_ACTION"
const val EXTRA_ITEM = "com.example.android.stackwidget.EXTRA_ITEM"

class StackWidgetProvider : AppWidgetProvider() {

    ...

    // Called when the BroadcastReceiver receives an Intent broadcast.
    // Checks whether the intent's action is TOAST_ACTION. If it is, the
    // widget displays a Toast message for the current item.
    override fun onReceive(context: Context, intent: Intent) {
        val mgr: AppWidgetManager = AppWidgetManager.getInstance(context)
        if (intent.action == TOAST_ACTION) {
            val appWidgetId: Int = intent.getIntExtra(
                    AppWidgetManager.EXTRA_APPWIDGET_ID,
                    AppWidgetManager.INVALID_APPWIDGET_ID
            )
            // EXTRA_ITEM represents a custom value provided by the Intent
            // passed to the setOnClickFillInIntent() method to indicate the
            // position of the clicked item. See StackRemoteViewsFactory in
            // Set the fill-in Intent for details.
            val viewIndex: Int = intent.getIntExtra(EXTRA_ITEM, 0)
            Toast.makeText(context, "Touched view $viewIndex", Toast.LENGTH_SHORT).show()
        }
        super.onReceive(context, intent)
    }

    override fun onUpdate(
            context: Context,
            appWidgetManager: AppWidgetManager,
            appWidgetIds: IntArray
    ) {
        // Update each of the widgets with the remote adapter.
        appWidgetIds.forEach { appWidgetId ->

            // Sets up the intent that points to the StackViewService that
            // provides the views for this collection.
            val intent = Intent(context, StackWidgetService::class.java).apply {
                putExtra(AppWidgetManager.EXTRA_APPWIDGET_ID, appWidgetId)
                // When intents are compared, the extras are ignored, so embed
                // the extra sinto the data so that the extras are not ignored.
                data = Uri.parse(toUri(Intent.URI_INTENT_SCHEME))
            }
            val rv = RemoteViews(context.packageName, R.layout.widget_layout).apply {
                setRemoteAdapter(R.id.stack_view, intent)

                // The empty view is displayed when the collection has no items.
                // It must be a sibling of the collection view.
                setEmptyView(R.id.stack_view, R.id.empty_view)
            }

            // This section makes it possible for items to have individualized
            // behavior. It does this by setting up a pending intent template.
            // Individuals items of a collection can't set up their own pending
            // intents. Instead, the collection as a whole sets up a pending
            // intent template, and the individual items set a fillInIntent
            // to create unique behavior on an item-by-item basis.
            val toastPendingIntent: PendingIntent = Intent(
                    context,
                    StackWidgetProvider::class.java
            ).run {
                // Set the action for the intent.
                // When the user touches a particular view, it has the effect of
                // broadcasting TOAST_ACTION.
                action = TOAST_ACTION
                putExtra(AppWidgetManager.EXTRA_APPWIDGET_ID, appWidgetId)
                data = Uri.parse(toUri(Intent.URI_INTENT_SCHEME))

                PendingIntent.getBroadcast(context, 0, this, PendingIntent.FLAG_UPDATE_CURRENT)
            }
            rv.setPendingIntentTemplate(R.id.stack_view, toastPendingIntent)

            appWidgetManager.updateAppWidget(appWidgetId, rv)
        }
        super.onUpdate(context, appWidgetManager, appWidgetIds)
    }
}
Java
public class StackWidgetProvider extends AppWidgetProvider {
    public static final String TOAST_ACTION = "com.example.android.stackwidget.TOAST_ACTION";
    public static final String EXTRA_ITEM = "com.example.android.stackwidget.EXTRA_ITEM";

    ...

    // Called when the BroadcastReceiver receives an Intent broadcast.
    // Checks whether the intent's action is TOAST_ACTION. If it is, the
    // widget displays a Toast message for the current item.
    @Override
    public void onReceive(Context context, Intent intent) {
        AppWidgetManager mgr = AppWidgetManager.getInstance(context);
        if (intent.getAction().equals(TOAST_ACTION)) {
            int appWidgetId = intent.getIntExtra(AppWidgetManager.EXTRA_APPWIDGET_ID,
                AppWidgetManager.INVALID_APPWIDGET_ID);
            // EXTRA_ITEM represents a custom value provided by the Intent
            // passed to the setOnClickFillInIntent() method to indicate the
            // position of the clicked item. See StackRemoteViewsFactory in
            // Set the fill-in Intent for details.
            int viewIndex = intent.getIntExtra(EXTRA_ITEM, 0);
            Toast.makeText(context, "Touched view " + viewIndex, Toast.LENGTH_SHORT).show();
        }
        super.onReceive(context, intent);
    }

    @Override
    public void onUpdate(Context context, AppWidgetManager appWidgetManager, int[] appWidgetIds) {
        // Update each of the widgets with the remote adapter.
        for (int i = 0; i < appWidgetIds.length; ++i) {

            // Sets up the intent that points to the StackViewService that
            // provides the views for this collection.
            Intent intent = new Intent(context, StackWidgetService.class);
            intent.putExtra(AppWidgetManager.EXTRA_APPWIDGET_ID, appWidgetIds[i]);
            // When intents are compared, the extras are ignored, so embed
            // the extras into the data so that the extras are not
            // ignored.
            intent.setData(Uri.parse(intent.toUri(Intent.URI_INTENT_SCHEME)));
            RemoteViews rv = new RemoteViews(context.getPackageName(), R.layout.widget_layout);
            rv.setRemoteAdapter(appWidgetIds[i], R.id.stack_view, intent);

            // The empty view is displayed when the collection has no items. It
            // must be a sibling of the collection view.
            rv.setEmptyView(R.id.stack_view, R.id.empty_view);

            // This section makes it possible for items to have individualized
            // behavior. It does this by setting up a pending intent template.
            // Individuals items of a collection can't set up their own pending
            // intents. Instead, the collection as a whole sets up a pending
            // intent template, and the individual items set a fillInIntent
            // to create unique behavior on an item-by-item basis.
            Intent toastIntent = new Intent(context, StackWidgetProvider.class);
            // Set the action for the intent.
            // When the user touches a particular view, it has the effect of
            // broadcasting TOAST_ACTION.
            toastIntent.setAction(StackWidgetProvider.TOAST_ACTION);
            toastIntent.putExtra(AppWidgetManager.EXTRA_APPWIDGET_ID, appWidgetIds[i]);
            intent.setData(Uri.parse(intent.toUri(Intent.URI_INTENT_SCHEME)));
            PendingIntent toastPendingIntent = PendingIntent.getBroadcast(context, 0, toastIntent,
                PendingIntent.FLAG_UPDATE_CURRENT);
            rv.setPendingIntentTemplate(R.id.stack_view, toastPendingIntent);

            appWidgetManager.updateAppWidget(appWidgetIds[i], rv);
        }
        super.onUpdate(context, appWidgetManager, appWidgetIds);
    }
}
Đặt ý định điền sẵn
RemoteViewsFactory của bạn phải đặt một ý định điền sẵn trên mỗi mục trong bộ sưu tập. Điều này giúp phân biệt hành động nhấp riêng lẻ của một mục nhất định. Sau đó, ý định điền thông tin sẽ được kết hợp với mẫu PendingIntent để xác định ý định cuối cùng được thực thi khi người dùng nhấn vào mục.
Kotlin
private const val REMOTE_VIEW_COUNT: Int = 10

class StackRemoteViewsFactory(
        private val context: Context,
        intent: Intent
) : RemoteViewsService.RemoteViewsFactory {

    private lateinit var widgetItems: List<WidgetItem>
    private val appWidgetId: Int = intent.getIntExtra(
            AppWidgetManager.EXTRA_APPWIDGET_ID,
            AppWidgetManager.INVALID_APPWIDGET_ID
    )

    override fun onCreate() {
        // In onCreate(), set up any connections or cursors to your data source.
        // Heavy lifting, such as downloading or creating content, must be
        // deferred to onDataSetChanged() or getViewAt(). Taking more than 20
        // seconds on this call results in an ANR.
        widgetItems = List(REMOTE_VIEW_COUNT) { index -> WidgetItem("$index!") }
        ...
    }
    ...

    override fun getViewAt(position: Int): RemoteViews {
        // Construct a remote views item based on the widget item XML file
        // and set the text based on the position.
        return RemoteViews(context.packageName, R.layout.widget_item).apply {
            setTextViewText(R.id.widget_item, widgetItems[position].text)

            // Set a fill-intent to fill in the pending intent template.
            // that is set on the collection view in StackWidgetProvider.
            val fillInIntent = Intent().apply {
                Bundle().also { extras ->
                    extras.putInt(EXTRA_ITEM, position)
                    putExtras(extras)
                }
            }
            // Make it possible to distinguish the individual on-click
            // action of a given item.
            setOnClickFillInIntent(R.id.widget_item, fillInIntent)
            ...
        }
    }
    ...
}
Java
public class StackWidgetService extends RemoteViewsService {
    @Override
    public RemoteViewsFactory onGetViewFactory(Intent intent) {
        return new StackRemoteViewsFactory(this.getApplicationContext(), intent);
    }
}

class StackRemoteViewsFactory implements RemoteViewsService.RemoteViewsFactory {
    private static final int count = 10;
    private List<WidgetItem> widgetItems = new ArrayList<WidgetItem>();
    private Context context;
    private int appWidgetId;

    public StackRemoteViewsFactory(Context context, Intent intent) {
        this.context = context;
        appWidgetId = intent.getIntExtra(AppWidgetManager.EXTRA_APPWIDGET_ID,
                AppWidgetManager.INVALID_APPWIDGET_ID);
    }

    // Initialize the data set.
    public void onCreate() {
        // In onCreate(), set up any connections or cursors to your data
        // source. Heavy lifting, such as downloading or creating
        // content, must be deferred to onDataSetChanged() or
        // getViewAt(). Taking more than 20 seconds on this call results
        // in an ANR.
        for (int i = 0; i < count; i++) {
            widgetItems.add(new WidgetItem(i + "!"));
        }
        ...
    }

    // Given the position (index) of a WidgetItem in the array, use the
    // item's text value in combination with the widget item XML file to
    // construct a RemoteViews object.
    public RemoteViews getViewAt(int position) {
        // Position always ranges from 0 to getCount() - 1.

        // Construct a RemoteViews item based on the widget item XML
        // file and set the text based on the position.
        RemoteViews rv = new RemoteViews(context.getPackageName(), R.layout.widget_item);
        rv.setTextViewText(R.id.widget_item, widgetItems.get(position).text);

        // Set a fill-intent to fill in the pending
        // intent template that is set on the collection view in
        // StackWidgetProvider.
        Bundle extras = new Bundle();
        extras.putInt(StackWidgetProvider.EXTRA_ITEM, position);
        Intent fillInIntent = new Intent();
        fillInIntent.putExtras(extras);
        // Make it possible to distinguish the individual on-click
        // action of a given item.
        rv.setOnClickFillInIntent(R.id.widget_item, fillInIntent);

        // Return the RemoteViews object.
        return rv;
    }
    ...
}
Luôn cập nhật dữ liệu của bộ sưu tập
Hình 2 minh hoạ quy trình cập nhật trong một tiện ích sử dụng các bộ sưu tập. Ví dụ này cho thấy cách mã tiện ích tương tác với RemoteViewsFactory và cách bạn có thể kích hoạt các bản cập nhật:
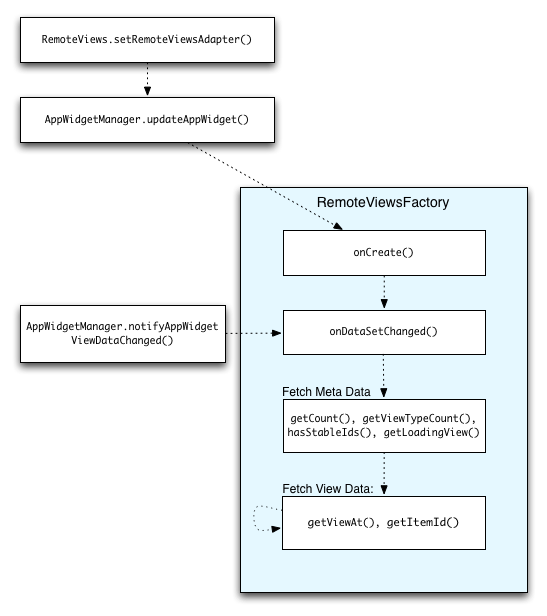
RemoteViewsFactory trong quá trình cập nhật.Những tiện ích sử dụng bộ sưu tập có thể cung cấp cho người dùng nội dung mới nhất. Ví dụ: tiện ích Gmail cung cấp cho người dùng thông tin tổng quan về hộp thư đến của họ. Để làm được điều này, hãy kích hoạt RemoteViewsFactory và chế độ xem bộ sưu tập để tìm nạp và hiển thị dữ liệu mới.
Để thực hiện việc này, hãy dùng AppWidgetManager để gọi notifyAppWidgetViewDataChanged(). Lệnh gọi này sẽ dẫn đến một lệnh gọi lại cho phương thức onDataSetChanged() của đối tượng RemoteViewsFactory, cho phép bạn tìm nạp mọi dữ liệu mới.
Bạn có thể thực hiện các thao tác chuyên sâu về xử lý một cách đồng bộ trong lệnh gọi lại onDataSetChanged(). Bạn được đảm bảo rằng lệnh gọi này sẽ hoàn tất trước khi siêu dữ liệu hoặc dữ liệu chế độ xem được tìm nạp từ RemoteViewsFactory. Bạn cũng có thể thực hiện các thao tác chuyên sâu về xử lý trong phương thức getViewAt(). Nếu lệnh gọi này mất nhiều thời gian, khung hiển thị đang tải (do phương thức getLoadingView() của đối tượng RemoteViewsFactory chỉ định) sẽ xuất hiện ở vị trí tương ứng của khung hiển thị bộ sưu tập cho đến khi lệnh gọi này trả về.
Sử dụng RemoteCollectionItems để truyền trực tiếp một bộ sưu tập
Android 12 (API cấp 31) bổ sung phương thức setRemoteAdapter(int viewId,
RemoteViews.RemoteCollectionItems
items). Phương thức này cho phép ứng dụng của bạn chuyển trực tiếp một bộ sưu tập khi điền sẵn một chế độ xem bộ sưu tập. Nếu đặt bộ chuyển đổi bằng phương thức này, bạn không cần triển khai RemoteViewsFactory và không cần gọi notifyAppWidgetViewDataChanged().
Ngoài việc giúp bạn dễ dàng điền sẵn dữ liệu cho trình chuyển đổi, phương pháp này cũng loại bỏ độ trễ khi điền sẵn dữ liệu cho các mục mới khi người dùng di chuyển xuống danh sách để hiển thị một mục mới. Bạn nên sử dụng phương pháp này để thiết lập bộ chuyển đổi miễn là tập hợp các mục trong bộ sưu tập của bạn tương đối nhỏ. Tuy nhiên, ví dụ: phương pháp này không hoạt động hiệu quả nếu bộ sưu tập của bạn chứa nhiều Bitmaps được truyền đến setImageViewBitmap.
Nếu bộ sưu tập không sử dụng một bộ bố cục cố định (tức là nếu một số mục chỉ xuất hiện đôi khi), hãy dùng setViewTypeCount để chỉ định số lượng tối đa bố cục riêng biệt mà bộ sưu tập có thể chứa. Điều này cho phép bộ chuyển đổi được dùng lại trong các bản cập nhật cho tiện ích ứng dụng.
Dưới đây là ví dụ về cách triển khai các bộ sưu tập RemoteViews đơn giản.
Kotlin
val itemLayouts = listOf(
        R.layout.item_type_1,
        R.layout.item_type_2,
        ...
)

remoteView.setRemoteAdapter(
        R.id.list_view,
        RemoteViews.RemoteCollectionItems.Builder()
            .addItem(/* id= */ ID_1, RemoteViews(context.packageName, R.layout.item_type_1))
            .addItem(/* id= */ ID_2, RemoteViews(context.packageName, R.layout.item_type_2))
            ...
            .setViewTypeCount(itemLayouts.count())
            .build()
)
Java
List<Integer> itemLayouts = Arrays.asList(
    R.layout.item_type_1,
    R.layout.item_type_2,
    ...
);

remoteView.setRemoteAdapter(
    R.id.list_view,
    new RemoteViews.RemoteCollectionItems.Builder()
        .addItem(/* id= */ ID_1, new RemoteViews(context.getPackageName(), R.layout.item_type_1))
        .addItem(/* id= */ ID_2, new RemoteViews(context.getPackageName(), R.layout.item_type_2))
        ...
        .setViewTypeCount(itemLayouts.size())
        .build()
);