


对话框是一种小窗口,用于提示用户做出决定或输入更多信息。 对话框不会占据整个屏幕,通常适用于需要用户进行操作才能继续执行的模态框事件。

Dialog
类是对话框的基类,但请勿直接实例化 Dialog
。而是应使用下列子类之一:
AlertDialog- 此对话框可显示标题、按钮(最多三个)、选项 列表或自定义布局。
DatePickerDialog或TimePickerDialog- 此对话框带有允许用户选择日期或 时间。
这些类可定义对话框的样式和结构。您还需要使用 DialogFragment 作为对话框的容器。DialogFragment 类提供
创建对话框和管理其外观所需的所有控件,
而非调用 Dialog 对象上的方法。
使用 DialogFragment 来管理对话框可确保对话框能正确处理各种生命周期事件,如用户点按“返回”按钮或旋转屏幕时。此外,DialogFragment 类还允许您以可嵌入组件的形式在较大界面中重复使用对话框界面,类似于传统的Fragment(例如当您想让对话框界面在大屏幕和小屏幕上具有不同外观时)。
本文档的以下部分介绍了如何将 DialogFragment 与 AlertDialog 对象结合使用。如果您想创建日期或时间选择器,请阅读
向应用添加选择器。
创建对话框 fragment
通过扩展 DialogFragment 并在
onCreateDialog()
回调方法中创建
AlertDialog,您可以完成各种对话框设计,包括自定义
布局以及
Material Design
Dialogs中描述的布局。
例如,以下是一个在 DialogFragment 中管理的基本 AlertDialog:
Kotlin
class StartGameDialogFragment : DialogFragment() {
    override fun onCreateDialog(savedInstanceState: Bundle?): Dialog {
        return activity?.let {
            // Use the Builder class for convenient dialog construction.
            val builder = AlertDialog.Builder(it)
            builder.setMessage("Start game")
                .setPositiveButton("Start") { dialog, id ->
                    // START THE GAME!
                }
                .setNegativeButton("Cancel") { dialog, id ->
                    // User cancelled the dialog.
                }
            // Create the AlertDialog object and return it.
            builder.create()
        } ?: throw IllegalStateException("Activity cannot be null")
    }
}

class OldXmlActivity : AppCompatActivity() {
    override fun onCreate(savedInstanceState: Bundle?) {
        super.onCreate(savedInstanceState)
        setContentView(R.layout.activity_old_xml)

        StartGameDialogFragment().show(supportFragmentManager, "GAME_DIALOG")
    }
}
Java
public class StartGameDialogFragment extends DialogFragment {
    @Override
    public Dialog onCreateDialog(Bundle savedInstanceState) {
        // Use the Builder class for convenient dialog construction.
        AlertDialog.Builder builder = new AlertDialog.Builder(getActivity());
        builder.setMessage(R.string.dialog_start_game)
               .setPositiveButton(R.string.start, new DialogInterface.OnClickListener() {
                   public void onClick(DialogInterface dialog, int id) {
                       // START THE GAME!
                   }
               })
               .setNegativeButton(R.string.cancel, new DialogInterface.OnClickListener() {
                   public void onClick(DialogInterface dialog, int id) {
                       // User cancels the dialog.
                   }
               });
        // Create the AlertDialog object and return it.
        return builder.create();
    }
}
// ...

StartGameDialogFragment().show(supportFragmentManager, "GAME_DIALOG");
当您创建此类的实例并对该对象调用 show() 时,对话框将如下图所示。
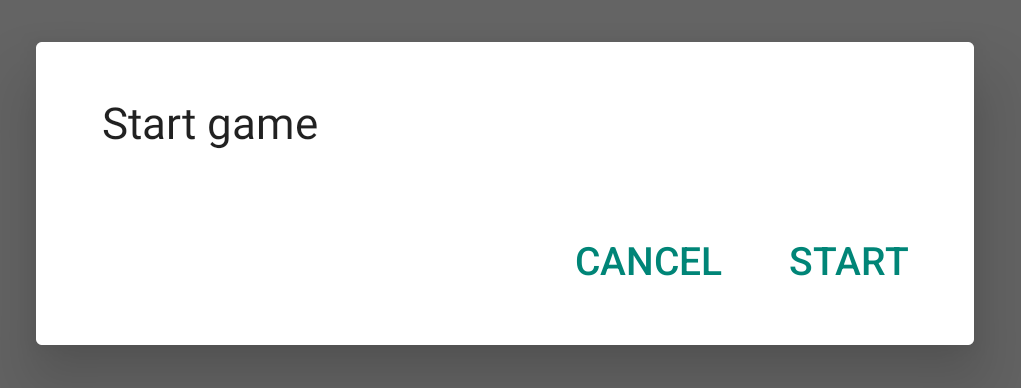
下一部分将详细介绍如何使用 AlertDialog.Builder API 来创建对话框。
根据对话框的复杂度,您可以在 DialogFragment 中实现各种其他回调方法,包括所有基本的 fragment lifecycle methods。
构建提醒对话框
您可以使用 AlertDialog 类来构建各种对话框设计。通常情况下,该类是您完成构建所需的唯一对话框类。如图所示,提醒对话框有三个区域:
- 标题:此为可选项,仅当内容区域被 详细消息、列表或自定义布局占据时才应使用标题。如果需要陈述的是一条简单消息或问题,则不需要标题。
- 内容区域:内容区域可显示消息、列表或其他自定义 布局。
- 操作按钮:对话框中最多可以有三个操作按钮。
AlertDialog.Builder 类提供了 API,可让您创建含有这几种内容(包括自定义
布局)的 AlertDialog。
如需构建 AlertDialog,请执行以下操作:
Kotlin
val builder: AlertDialog.Builder = AlertDialog.Builder(context)
builder
    .setMessage("I am the message")
    .setTitle("I am the title")

val dialog: AlertDialog = builder.create()
dialog.show()
Java
// 1. Instantiate an AlertDialog.Builder with its constructor.
AlertDialog.Builder builder = new AlertDialog.Builder(getActivity());

// 2. Chain together various setter methods to set the dialog characteristics.
builder.setMessage(R.string.dialog_message)
       .setTitle(R.string.dialog_title);

// 3. Get the AlertDialog.
AlertDialog dialog = builder.create();
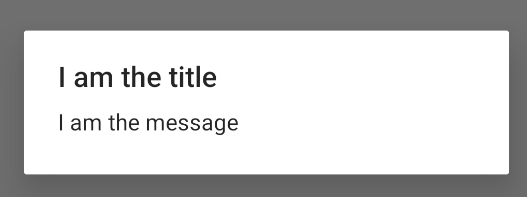
上述代码段会生成以下对话框:
添加按钮
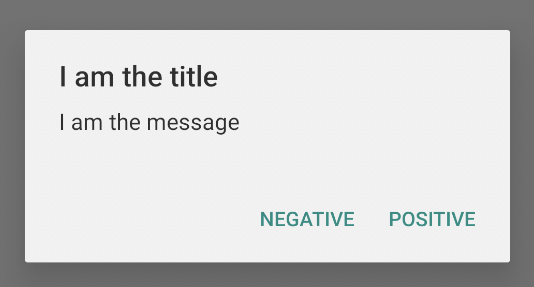
如需添加如图 2 所示的操作按钮,请调用 setPositiveButton() 和 setNegativeButton() 方法:
Kotlin
val builder: AlertDialog.Builder = AlertDialog.Builder(context)
builder
    .setMessage("I am the message")
    .setTitle("I am the title")
    .setPositiveButton("Positive") { dialog, which ->
        // Do something.
    }
    .setNegativeButton("Negative") { dialog, which ->
        // Do something else.
    }

val dialog: AlertDialog = builder.create()
dialog.show()
Java
AlertDialog.Builder builder = new AlertDialog.Builder(getActivity());
// Add the buttons.
builder.setPositiveButton(R.string.ok, new DialogInterface.OnClickListener() {
           public void onClick(DialogInterface dialog, int id) {
               // User taps OK button.
           }
       });
builder.setNegativeButton(R.string.cancel, new DialogInterface.OnClickListener() {
           public void onClick(DialogInterface dialog, int id) {
               // User cancels the dialog.
           }
       });
// Set other dialog properties.
...

// Create the AlertDialog.
AlertDialog dialog = builder.create();
The set...Button() 方法需要一个按钮标题(由
字符串资源提供)和一个
DialogInterface.OnClickListener
,后者用于定义用户点按该按钮时执行的操作。
您可以添加三种操作按钮:
- 肯定 :您应该使用此按钮来接受并继续执行操作( “确定”操作)。
- 否定 :您应该使用此按钮来取消操作。
- 中性:此按钮应用于用户可能不想继续执行 操作,但也未必想要取消操作的情况。它出现在 肯定按钮和否定按钮之间。例如,实际操作可能是“稍后提醒我 ”。
对于每种按钮类型,您只能为 AlertDialog 添加一个该类型的按钮。例如,您不能添加多个“肯定”按钮。
上述代码段会为您提供如下所示的提醒对话框:
添加列表
可通过 AlertDialog API 提供三种列表:
- 传统的单选列表。
- 永久性单选列表(单选按钮)。
- 永久性多选列表(复选框)。
如需创建如图 5 所示的单选列表,请使用 setItems() 方法:
Kotlin
val builder: AlertDialog.Builder = AlertDialog.Builder(context)
builder
    .setTitle("I am the title")
    .setPositiveButton("Positive") { dialog, which ->
        // Do something.
    }
    .setNegativeButton("Negative") { dialog, which ->
        // Do something else.
    }
    .setItems(arrayOf("Item One", "Item Two", "Item Three")) { dialog, which ->
        // Do something on item tapped.
    }

val dialog: AlertDialog = builder.create()
dialog.show()
Java
@Override
public Dialog onCreateDialog(Bundle savedInstanceState) {
    AlertDialog.Builder builder = new AlertDialog.Builder(getActivity());
    builder.setTitle(R.string.pick_color)
           .setItems(R.array.colors_array, new DialogInterface.OnClickListener() {
               public void onClick(DialogInterface dialog, int which) {
               // The 'which' argument contains the index position of the selected item.
           }
    });
    return builder.create();
}
此代码段会生成如下所示的对话框:
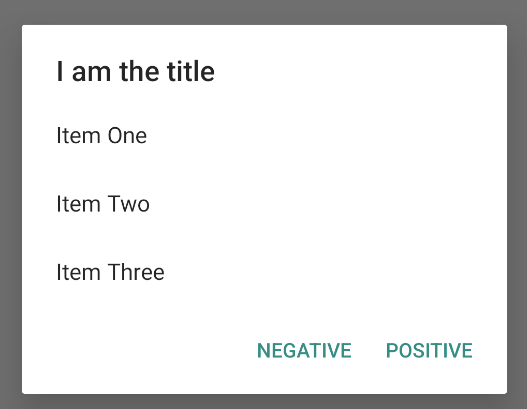
由于列表出现在对话框的内容区域,因此对话框无法同时显示消息和列表。通过 setTitle() 为对话框设置标题。
如需为列表指定项目,请调用 setItems(),并传递数组。或者,您可以使用 setAdapter() 来指定列表。
如此一来,您便可借助 ListAdapter 使用动态数据(如来自数据库的数据)来支持列表。
如果您通过 ListAdapter 来支持列表,请务必使用 Loader,这样内容便可以异步方式进行加载。使用适配器和
加载器构建布局
中对此做了进一步描述。
添加永久性多选列表或永久性单选列表
如需添加多选(复选框)或单选(单选按钮)列表,请分别使用 setMultiChoiceItems() 或 setSingleChoiceItems() 方法。
例如,以下示例展示了如何创建如图 6 所示的多选列表,该多选列表将选定项保存在 ArrayList 中:
Kotlin
val builder: AlertDialog.Builder = AlertDialog.Builder(context)
builder
    .setTitle("I am the title")
    .setPositiveButton("Positive") { dialog, which ->
        // Do something.
    }
    .setNegativeButton("Negative") { dialog, which ->
        // Do something else.
    }
    .setMultiChoiceItems(
        arrayOf("Item One", "Item Two", "Item Three"), null) { dialog, which, isChecked ->
        // Do something.
    }

val dialog: AlertDialog = builder.create()
dialog.show()
Java
@Override
public Dialog onCreateDialog(Bundle savedInstanceState) {
    selectedItems = new ArrayList();  // Where we track the selected items
    AlertDialog.Builder builder = new AlertDialog.Builder(getActivity());
    // Set the dialog title.
    builder.setTitle(R.string.pick_toppings)
    // Specify the list array, the items to be selected by default (null for
    // none), and the listener through which to receive callbacks when items
    // are selected.
           .setMultiChoiceItems(R.array.toppings, null,
                      new DialogInterface.OnMultiChoiceClickListener() {
               @Override
               public void onClick(DialogInterface dialog, int which,
                       boolean isChecked) {
                   if (isChecked) {
                       // If the user checks the item, add it to the selected
                       // items.
                       selectedItems.add(which);
                   } else if (selectedItems.contains(which)) {
                       // If the item is already in the array, remove it.
                       selectedItems.remove(which);
                   }
               }
           })
    // Set the action buttons
           .setPositiveButton(R.string.ok, new DialogInterface.OnClickListener() {
               @Override
               public void onClick(DialogInterface dialog, int id) {
                   // User taps OK, so save the selectedItems results
                   // somewhere or return them to the component that opens the
                   // dialog.
                   ...
               }
           })
           .setNegativeButton(R.string.cancel, new DialogInterface.OnClickListener() {
               @Override
               public void onClick(DialogInterface dialog, int id) {
                   ...
               }
           });

    return builder.create();
}
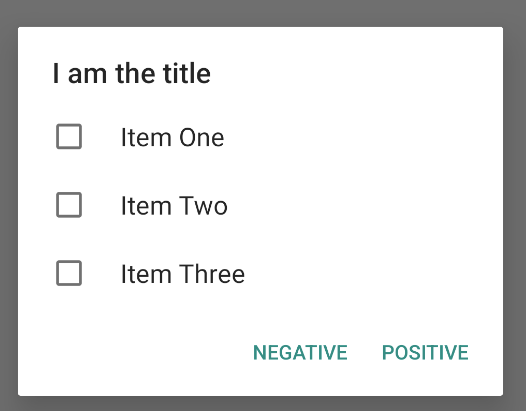
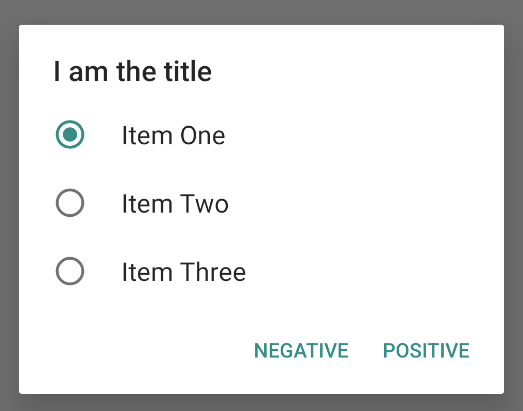
您可以按如下方式获取单选提醒对话框:
Kotlin
val builder: AlertDialog.Builder = AlertDialog.Builder(context)
builder
    .setTitle("I am the title")
    .setPositiveButton("Positive") { dialog, which ->
        // Do something.
    }
    .setNegativeButton("Negative") { dialog, which ->
        // Do something else.
    }
    .setSingleChoiceItems(
        arrayOf("Item One", "Item Two", "Item Three"), 0
    ) { dialog, which ->
        // Do something.
    }

val dialog: AlertDialog = builder.create()
dialog.show()
Java
        String[] choices = {"Item One", "Item Two", "Item Three"};

        AlertDialog.Builder builder = AlertDialog.Builder(context);
        builder
                .setTitle("I am the title")
                .setPositiveButton("Positive", (dialog, which) -> {

                })
                .setNegativeButton("Negative", (dialog, which) -> {

                })
                .setSingleChoiceItems(choices, 0, (dialog, which) -> {

                });

        AlertDialog dialog = builder.create();
        dialog.show();
结果如下例所示:
创建自定义布局
如果您想在对话框中使用自定义布局,请创建一个布局,然后通过对 AlertDialog.Builder 对象调用
setView()
,将该布局添加至 an
AlertDialog。
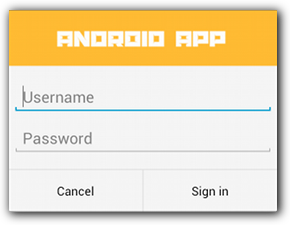
默认情况下,自定义布局会填充对话框窗口,但您仍可使用 AlertDialog.Builder 方法来添加按钮和标题。
例如,以下是上述自定义对话框布局的布局文件:
res/layout/dialog_signin.xml
<LinearLayout xmlns:android="http://schemas.android.com/apk/res/android"
    android:orientation="vertical"
    android:layout_width="wrap_content"
    android:layout_height="wrap_content">
    <ImageView
        android:src="@drawable/header_logo"
        android:layout_width="match_parent"
        android:layout_height="64dp"
        android:scaleType="center"
        android:background="#FFFFBB33"
        android:contentDescription="@string/app_name" />
    <EditText
        android:id="@+id/username"
        android:inputType="textEmailAddress"
        android:layout_width="match_parent"
        android:layout_height="wrap_content"
        android:layout_marginTop="16dp"
        android:layout_marginLeft="4dp"
        android:layout_marginRight="4dp"
        android:layout_marginBottom="4dp"
        android:hint="@string/username" />
    <EditText
        android:id="@+id/password"
        android:inputType="textPassword"
        android:layout_width="match_parent"
        android:layout_height="wrap_content"
        android:layout_marginTop="4dp"
        android:layout_marginLeft="4dp"
        android:layout_marginRight="4dp"
        android:layout_marginBottom="16dp"
        android:fontFamily="sans-serif"
        android:hint="@string/password"/>
</LinearLayout>
如需在 DialogFragment 中扩充布局,请使用
LayoutInflater
获取
getLayoutInflater()
,然后调用
inflate()。
第一个参数是布局资源 ID,第二个参数是布局的父视图。然后,您可以调用 setView(),将布局放入对话框中。详见下例。
Kotlin
override fun onCreateDialog(savedInstanceState: Bundle?): Dialog {
    return activity?.let {
        val builder = AlertDialog.Builder(it)
        // Get the layout inflater.
        val inflater = requireActivity().layoutInflater;

        // Inflate and set the layout for the dialog.
        // Pass null as the parent view because it's going in the dialog
        // layout.
        builder.setView(inflater.inflate(R.layout.dialog_signin, null))
                // Add action buttons.
                .setPositiveButton(R.string.signin,
                        DialogInterface.OnClickListener { dialog, id ->
                            // Sign in the user.
                        })
                .setNegativeButton(R.string.cancel,
                        DialogInterface.OnClickListener { dialog, id ->
                            getDialog().cancel()
                        })
        builder.create()
    } ?: throw IllegalStateException("Activity cannot be null")
}
Java
@Override
public Dialog onCreateDialog(Bundle savedInstanceState) {
    AlertDialog.Builder builder = new AlertDialog.Builder(getActivity());
    // Get the layout inflater.
    LayoutInflater inflater = requireActivity().getLayoutInflater();

    // Inflate and set the layout for the dialog.
    // Pass null as the parent view because it's going in the dialog layout.
    builder.setView(inflater.inflate(R.layout.dialog_signin, null))
    // Add action buttons
           .setPositiveButton(R.string.signin, new DialogInterface.OnClickListener() {
               @Override
               public void onClick(DialogInterface dialog, int id) {
                   // Sign in the user.
               }
           })
           .setNegativeButton(R.string.cancel, new DialogInterface.OnClickListener() {
               public void onClick(DialogInterface dialog, int id) {
                   LoginDialogFragment.this.getDialog().cancel();
               }
           });
    return builder.create();
}
如果您要自定义对话框,可以改用对话框的形式显示 Activity,而非使用 Dialog API。创建一个 activity,并
将其主题背景设置为
Theme.Holo.Dialog
在
<activity>
清单元素中:
<activity android:theme="@android:style/Theme.Holo.Dialog" >
Activity 现在会显示在一个对话框窗口中,而非全屏显示。
将事件传递回对话框的宿主
当用户点按对话框的某个操作按钮或从列表中选择某一项时,您的 DialogFragment 可能会自行执行必要操作,但通常您需要将事件传递给打开该对话框的 activity 或 fragment。为此,请定义一个接口,其中每种类型的点击事件对应一个方法。然后,在将从该对话框接收操作事件的宿主组件中实现该接口。
例如,以下 DialogFragment 定义了一个接口,通过该接口将事件传回给宿主 activity:
Kotlin
class NoticeDialogFragment : DialogFragment() {
    // Use this instance of the interface to deliver action events.
    internal lateinit var listener: NoticeDialogListener

    // The activity that creates an instance of this dialog fragment must
    // implement this interface to receive event callbacks. Each method passes
    // the DialogFragment in case the host needs to query it.
    interface NoticeDialogListener {
        fun onDialogPositiveClick(dialog: DialogFragment)
        fun onDialogNegativeClick(dialog: DialogFragment)
    }

    // Override the Fragment.onAttach() method to instantiate the
    // NoticeDialogListener.
    override fun onAttach(context: Context) {
        super.onAttach(context)
        // Verify that the host activity implements the callback interface.
        try {
            // Instantiate the NoticeDialogListener so you can send events to
            // the host.
            listener = context as NoticeDialogListener
        } catch (e: ClassCastException) {
            // The activity doesn't implement the interface. Throw exception.
            throw ClassCastException((context.toString() +
                    " must implement NoticeDialogListener"))
        }
    }
}
Java
public class NoticeDialogFragment extends DialogFragment {

    // The activity that creates an instance of this dialog fragment must
    // implement this interface to receive event callbacks. Each method passes
    // the DialogFragment in case the host needs to query it.
    public interface NoticeDialogListener {
        public void onDialogPositiveClick(DialogFragment dialog);
        public void onDialogNegativeClick(DialogFragment dialog);
    }

    // Use this instance of the interface to deliver action events.
    NoticeDialogListener listener;

    // Override the Fragment.onAttach() method to instantiate the
    // NoticeDialogListener.
    @Override
    public void onAttach(Context context) {
        super.onAttach(context);
        // Verify that the host activity implements the callback interface.
        try {
            // Instantiate the NoticeDialogListener so you can send events to
            // the host.
            listener = (NoticeDialogListener) context;
        } catch (ClassCastException e) {
            // The activity doesn't implement the interface. Throw exception.
            throw new ClassCastException(activity.toString()
                    + " must implement NoticeDialogListener");
        }
    }
    ...
}
对话框的宿主 activity 会使用对话框 fragment 的构造函数创建对话框实例,并通过 NoticeDialogListener 接口的实现接收对话框的事件:
Kotlin
class MainActivity : FragmentActivity(),
        NoticeDialogFragment.NoticeDialogListener {

    fun showNoticeDialog() {
        // Create an instance of the dialog fragment and show it.
        val dialog = NoticeDialogFragment()
        dialog.show(supportFragmentManager, "NoticeDialogFragment")
    }

    // The dialog fragment receives a reference to this Activity through the
    // Fragment.onAttach() callback, which it uses to call the following
    // methods defined by the NoticeDialogFragment.NoticeDialogListener
    // interface.
    override fun onDialogPositiveClick(dialog: DialogFragment) {
        // User taps the dialog's positive button.
    }

    override fun onDialogNegativeClick(dialog: DialogFragment) {
        // User taps the dialog's negative button.
    }
}
Java
public class MainActivity extends FragmentActivity
                          implements NoticeDialogFragment.NoticeDialogListener{
    ...
    public void showNoticeDialog() {
        // Create an instance of the dialog fragment and show it.
        DialogFragment dialog = new NoticeDialogFragment();
        dialog.show(getSupportFragmentManager(), "NoticeDialogFragment");
    }

    // The dialog fragment receives a reference to this Activity through the
    // Fragment.onAttach() callback, which it uses to call the following
    // methods defined by the NoticeDialogFragment.NoticeDialogListener
    // interface.
    @Override
    public void onDialogPositiveClick(DialogFragment dialog) {
        // User taps the dialog's positive button.
        ...
    }

    @Override
    public void onDialogNegativeClick(DialogFragment dialog) {
        // User taps the dialog's negative button.
        ...
    }
}
由于宿主 activity 会实现 NoticeDialogListener(由上例中显示的 onAttach() 回调方法强制执行),因此对话框 fragment 可使用接口回调方法向 activity 传递点击事件:
Kotlin
    override fun onCreateDialog(savedInstanceState: Bundle): Dialog {
        return activity?.let {
            // Build the dialog and set up the button click handlers.
            val builder = AlertDialog.Builder(it)

            builder.setMessage(R.string.dialog_start_game)
                    .setPositiveButton(R.string.start,
                            DialogInterface.OnClickListener { dialog, id ->
                                // Send the positive button event back to the
                                // host activity.
                                listener.onDialogPositiveClick(this)
                            })
                    .setNegativeButton(R.string.cancel,
                            DialogInterface.OnClickListener { dialog, id ->
                                // Send the negative button event back to the
                                // host activity.
                                listener.onDialogNegativeClick(this)
                            })

            builder.create()
        } ?: throw IllegalStateException("Activity cannot be null")
    }
Java
public class NoticeDialogFragment extends DialogFragment {
    ...
    @Override
    public Dialog onCreateDialog(Bundle savedInstanceState) {
        // Build the dialog and set up the button click handlers.
        AlertDialog.Builder builder = new AlertDialog.Builder(getActivity());
        builder.setMessage(R.string.dialog_start_game)
               .setPositiveButton(R.string.start, new DialogInterface.OnClickListener() {
                   public void onClick(DialogInterface dialog, int id) {
                       // Send the positive button event back to the host activity.
                       listener.onDialogPositiveClick(NoticeDialogFragment.this);
                   }
               })
               .setNegativeButton(R.string.cancel, new DialogInterface.OnClickListener() {
                   public void onClick(DialogInterface dialog, int id) {
                       // Send the negative button event back to the host activity.
                       listener.onDialogNegativeClick(NoticeDialogFragment.this);
                   }
               });
        return builder.create();
    }
}
显示对话框
如果您想显示对话框,请创建一个 DialogFragment 实例并调用 show(),以传递对话框 fragment 的 FragmentManager 和标记名称。
您可以通过从
FragmentActivity
调用
getSupportFragmentManager()
或从 Fragment 调用
getParentFragmentManager()
来获取FragmentManager。请查看以下示例:
Kotlin
fun confirmStartGame() {
    val newFragment = StartGameDialogFragment()
    newFragment.show(supportFragmentManager, "game")
}
Java
public void confirmStartGame() {
    DialogFragment newFragment = new StartGameDialogFragment();
    newFragment.show(getSupportFragmentManager(), "game");
}
第二个参数 "game" 是系统用于保存 fragment 状态并在必要时进行恢复的唯一标记名称。该标记还允许您通过调用 findFragmentByTag() 来获取 fragment 的句柄。
全屏显示对话框或将其显示为嵌入式 fragment
您可能希望界面设计的一部分在某些情况下显示为对话框,而在其他情况下显示为全屏或嵌入式 fragment。您可能还希望它根据设备的屏幕尺寸以不同的方式显示。
DialogFragment 类可提供灵活性来实现此目的,
因为其可充当可嵌入 Fragment。
但在此情况下,您不能使用 AlertDialog.Builder 或其他
Dialog 对象来构建对话框。如果您想让 DialogFragment 拥有嵌入能力,则必须在布局中定义对话框的界面,然后在 onCreateView() 回调中加载布局。
以下示例 DialogFragment 可显示为对话框或可嵌入 fragment(使用名为 purchase_items.xml 的布局):
Kotlin
class CustomDialogFragment : DialogFragment() {

    // The system calls this to get the DialogFragment's layout, regardless of
    // whether it's being displayed as a dialog or an embedded fragment.
    override fun onCreateView(
            inflater: LayoutInflater,
            container: ViewGroup?,
            savedInstanceState: Bundle?
    ): View {
        // Inflate the layout to use as a dialog or embedded fragment.
        return inflater.inflate(R.layout.purchase_items, container, false)
    }

    // The system calls this only when creating the layout in a dialog.
    override fun onCreateDialog(savedInstanceState: Bundle): Dialog {
        // The only reason you might override this method when using
        // onCreateView() is to modify the dialog characteristics. For example,
        // the dialog includes a title by default, but your custom layout might
        // not need it. Here, you can remove the dialog title, but you must
        // call the superclass to get the Dialog.
        val dialog = super.onCreateDialog(savedInstanceState)
        dialog.requestWindowFeature(Window.FEATURE_NO_TITLE)
        return dialog
    }
}
Java
public class CustomDialogFragment extends DialogFragment {
    // The system calls this to get the DialogFragment's layout, regardless of
    // whether it's being displayed as a dialog or an embedded fragment.
    @Override
    public View onCreateView(LayoutInflater inflater, ViewGroup container,
            Bundle savedInstanceState) {
        // Inflate the layout to use as a dialog or embedded fragment.
        return inflater.inflate(R.layout.purchase_items, container, false);
    }

    // The system calls this only when creating the layout in a dialog.
    @Override
    public Dialog onCreateDialog(Bundle savedInstanceState) {
        // The only reason you might override this method when using
        // onCreateView() is to modify the dialog characteristics. For example,
        // the dialog includes a title by default, but your custom layout might
        // not need it. Here, you can remove the dialog title, but you must
        // call the superclass to get the Dialog.
        Dialog dialog = super.onCreateDialog(savedInstanceState);
        dialog.requestWindowFeature(Window.FEATURE_NO_TITLE);
        return dialog;
    }
}
以下示例可根据屏幕尺寸确定将 fragment 显示为对话框或全屏界面:
Kotlin
fun showDialog() {
    val fragmentManager = supportFragmentManager
    val newFragment = CustomDialogFragment()
    if (isLargeLayout) {
        // The device is using a large layout, so show the fragment as a
        // dialog.
        newFragment.show(fragmentManager, "dialog")
    } else {
        // The device is smaller, so show the fragment fullscreen.
        val transaction = fragmentManager.beginTransaction()
        // For a polished look, specify a transition animation.
        transaction.setTransition(FragmentTransaction.TRANSIT_FRAGMENT_OPEN)
        // To make it fullscreen, use the 'content' root view as the container
        // for the fragment, which is always the root view for the activity.
        transaction
                .add(android.R.id.content, newFragment)
                .addToBackStack(null)
                .commit()
    }
}
Java
public void showDialog() {
    FragmentManager fragmentManager = getSupportFragmentManager();
    CustomDialogFragment newFragment = new CustomDialogFragment();

    if (isLargeLayout) {
        // The device is using a large layout, so show the fragment as a
        // dialog.
        newFragment.show(fragmentManager, "dialog");
    } else {
        // The device is smaller, so show the fragment fullscreen.
        FragmentTransaction transaction = fragmentManager.beginTransaction();
        // For a polished look, specify a transition animation.
        transaction.setTransition(FragmentTransaction.TRANSIT_FRAGMENT_OPEN);
        // To make it fullscreen, use the 'content' root view as the container
        // for the fragment, which is always the root view for the activity.
        transaction.add(android.R.id.content, newFragment)
                   .addToBackStack(null).commit();
    }
}
如需详细了解如何执行 fragment 事务,请参阅 fragment。
在本示例中,mIsLargeLayout 布尔值指定当前设备是否必须使用应用的大布局设计,进而将此 fragment 显示为对话框,而非全屏显示。设置这种
布尔值的最佳方式是声明一个
布尔资源
值,其中包含适用于不同屏幕尺寸的
备用
资源值。例如,以下两个版本的布尔资源适用于不同屏幕尺寸:
res/values/bools.xml
<!-- Default boolean values -->
<resources>
    <bool name="large_layout">false</bool>
</resources>
res/values-large/bools.xml
<!-- Large screen boolean values -->
<resources>
    <bool name="large_layout">true</bool>
</resources>
然后,您可以在 activity 的 onCreate() 方法的执行期间初始化 mIsLargeLayout 值,如以下示例所示:
Kotlin
override fun onCreate(savedInstanceState: Bundle?) {
    super.onCreate(savedInstanceState)
    setContentView(R.layout.activity_main)

    isLargeLayout = resources.getBoolean(R.bool.large_layout)
}
Java
boolean isLargeLayout;

@Override
public void onCreate(Bundle savedInstanceState) {
    super.onCreate(savedInstanceState);
    setContentView(R.layout.activity_main);

    isLargeLayout = getResources().getBoolean(R.bool.large_layout);
}
在大屏幕上将 activity 显示为对话框
相对于在小屏幕上将对话框显示为全屏界面,您可以在大屏幕上将 Activity 显示为对话框,从而达到相同的效果。您选择的方法取决于应用设计,但当应用已经针对小屏幕进行设计,并且您想通过将短生存期 activity 显示为对话框来改善平板电脑体验时,将 activity 显示为对话框往往会很有帮助。
如需仅在大屏幕上将 activity 显示为对话框,请将
Theme.Holo.DialogWhenLarge
主题应用于 <activity> 清单元素:
<activity android:theme="@android:style/Theme.Holo.DialogWhenLarge" >
如需详细了解如何通过主题设置 activity 的样式,请参阅 样式和主题。
关闭对话框
当用户点按使用 AlertDialog.Builder 创建的操作按钮时,系统会为您关闭对话框。
系统还会在用户点按对话框列表中的项时关闭对话框,列表使用单选按钮或复选框的情况除外。否则,您可以通过对 DialogFragment 调用 dismiss() 来手动关闭对话框。
如果需要在对话框消失时执行特定操作,您可以在 DialogFragment 中实现 onDismiss() 方法。
您还可取消对话框。 此特殊事件表示用户离开对话框,且并未完成任务。如果用户点按“返回”按钮、点按屏幕上对话框区域之外的位置,或者您对 Dialog 显式调用 cancel()(例如,为响应对话框中的“取消”按钮),就会发生这种情况。
如上例所示,您可以通过在 DialogFragment 类中实现 onCancel() 来响应取消事件。