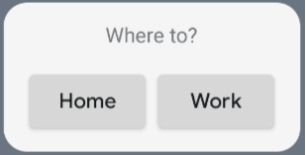
以降のセクションでは、Glance を使用してシンプルなアプリ ウィジェットを作成する方法について説明します。
マニフェストで AppWidget を宣言する
設定手順を完了したら、アプリで AppWidget とそのメタデータを宣言します。
GlanceAppWidgetReceiverからAppWidgetレシーバを拡張します。class MyAppWidgetReceiver : GlanceAppWidgetReceiver() { override val glanceAppWidget: GlanceAppWidget = TODO("Create GlanceAppWidget") }
アプリ ウィジェットのプロバイダを
AndroidManifest.xmlファイルと関連するメタデータ ファイルに登録します。<receiver android:name=".glance.MyReceiver" android:exported="true"> <intent-filter> <action android:name="android.appwidget.action.APPWIDGET_UPDATE" /> </intent-filter> <meta-data android:name="android.appwidget.provider" android:resource="@xml/my_app_widget_info" /> </receiver>
AppWidgetProviderInfo メタデータを追加する
次に、シンプルなウィジェットを作成するガイドに沿って、@xml/my_app_widget_info ファイルにアプリ ウィジェット情報を作成して定義します。
Glance との唯一の違いは、initialLayout XML がないことです。これは定義する必要があります。ライブラリで提供されている事前定義された読み込みレイアウトを使用できます。
<appwidget-provider xmlns:android="http://schemas.android.com/apk/res/android"
android:initialLayout="@layout/glance_default_loading_layout">
</appwidget-provider>
GlanceAppWidget を定義する
GlanceAppWidgetから拡張し、provideGlanceメソッドをオーバーライドする新しいクラスを作成します。このメソッドでは、ウィジェットのレンダリングに必要なデータを読み込むことができます。class MyAppWidget : GlanceAppWidget() { override suspend fun provideGlance(context: Context, id: GlanceId) { // In this method, load data needed to render the AppWidget. // Use `withContext` to switch to another thread for long running // operations. provideContent { // create your AppWidget here Text("Hello World") } } }
GlanceAppWidgetReceiverのglanceAppWidgetでインスタンス化します。class MyAppWidgetReceiver : GlanceAppWidgetReceiver() { // Let MyAppWidgetReceiver know which GlanceAppWidget to use override val glanceAppWidget: GlanceAppWidget = MyAppWidget() }
これで、Glance を使用して AppWidget が構成されました。
UI を作成する
次のスニペットは、UI を作成する方法を示しています。
/* Import Glance Composables In the event there is a name clash with the Compose classes of the same name, you may rename the imports per https://kotlinlang.org/docs/packages.html#imports using the `as` keyword. import androidx.glance.Button import androidx.glance.layout.Column import androidx.glance.layout.Row import androidx.glance.text.Text */ class MyAppWidget : GlanceAppWidget() { override suspend fun provideGlance(context: Context, id: GlanceId) { // Load data needed to render the AppWidget. // Use `withContext` to switch to another thread for long running // operations. provideContent { // create your AppWidget here MyContent() } } @Composable private fun MyContent() { Column( modifier = GlanceModifier.fillMaxSize(), verticalAlignment = Alignment.Top, horizontalAlignment = Alignment.CenterHorizontally ) { Text(text = "Where to?", modifier = GlanceModifier.padding(12.dp)) Row(horizontalAlignment = Alignment.CenterHorizontally) { Button( text = "Home", onClick = actionStartActivity<MyActivity>() ) Button( text = "Work", onClick = actionStartActivity<MyActivity>() ) } } } }
上記のコードサンプルは、次のことを行います。
- 最上位の
Columnでは、アイテムが縦方向に 1 つずつ配置されます。 Columnは、利用可能なスペースに合わせてサイズを拡大します(GlanceModifierを介して)。コンテンツは上部に配置され(verticalAlignment)、水平方向に中央に配置されます(horizontalAlignment)。Columnのコンテンツはラムダを使用して定義されます。順序は重要です。

配置とサイズを変更するには、配置値を変更するか、さまざまな修飾子値(パディングなど)を適用します。各クラスで使用可能なコンポーネント、パラメータ、修飾子の一覧については、リファレンス ドキュメントをご覧ください。
