


תיבת דו-שיח היא חלון קטן שמבקש מהמשתמש לקבל החלטה או להזין מידע נוסף. תיבת דו-שיח לא ממלאת את המסך ובדרך כלל משמשת לאירועים מודאליים שמחייבים את המשתמשים לבצע פעולה לפני שהם יכולים להמשיך.

המחלקות Dialog
הן מחלקות הבסיס לתיבות דו-שיח, אבל לא יוצרים מופע של Dialog
באופן ישיר. במקום זאת, צריך להשתמש באחת מהמחלקות המשנה הבאות:
AlertDialog- תיבת דו-שיח שיכולה להציג כותרת, עד שלושה לחצנים, רשימה של פריטים שאפשר לבחור או פריסה בהתאמה אישית.
DatePickerDialogאוTimePickerDialog- תיבת דו-שיח עם ממשק משתמש מוגדר מראש שמאפשר למשתמש לבחור תאריך או שעה.
המחלקות האלה מגדירות את הסגנון והמבנה של תיבת הדו-שיח. צריך גם DialogFragment כמאגר לתיבת הדו-שיח. המחלקות DialogFragment מספקות את כל האמצעים שצריך כדי ליצור את תיבת הדו-שיח ולנהל את המראה שלה, במקום להפעיל שיטות באובייקט Dialog.
שימוש ב-DialogFragment לניהול תיבת הדו-שיח מאפשר לטפל בצורה נכונה באירועי מחזור חיים, למשל כשהמשתמש מקיש על הכפתור "הקודם" או מסובב את המסך. בנוסף, המחלקה DialogFragment מאפשרת לכם לעשות שימוש חוזר בממשק המשתמש של תיבת הדו-שיח כרכיב שניתן להטמעה בממשק משתמש גדול יותר – בדיוק כמו Fragment מסורתי – למשל, אם אתם רוצים שממשק המשתמש של תיבת הדו-שיח ייראה שונה במסכים גדולים ובמסכים קטנים.
בקטעים הבאים במאמר הזה מוסבר איך משתמשים ב-DialogFragment בשילוב עם אובייקט AlertDialog. אם רוצים ליצור כלי לבחירת תאריך או שעה, אפשר לקרוא את המאמר בנושא הוספת כלים לבחירה לאפליקציה.
יצירת קטע של תיבת דו-שיח
אפשר ליצור מגוון רחב של עיצובים לתיבות דו-שיח – כולל פריסות מותאמות אישית ואלה שמתוארות במאמר תיבות דו-שיח של Material Design – על ידי הרחבת DialogFragment ויצירת AlertDialog בשיטת הקריאה החוזרת onCreateDialog().
לדוגמה, הנה AlertDialog בסיסי שמנוהל בתוך DialogFragment:
Kotlin
class StartGameDialogFragment : DialogFragment() {
    override fun onCreateDialog(savedInstanceState: Bundle?): Dialog {
        return activity?.let {
            // Use the Builder class for convenient dialog construction.
            val builder = AlertDialog.Builder(it)
            builder.setMessage("Start game")
                .setPositiveButton("Start") { dialog, id ->
                    // START THE GAME!
                }
                .setNegativeButton("Cancel") { dialog, id ->
                    // User cancelled the dialog.
                }
            // Create the AlertDialog object and return it.
            builder.create()
        } ?: throw IllegalStateException("Activity cannot be null")
    }
}

class OldXmlActivity : AppCompatActivity() {
    override fun onCreate(savedInstanceState: Bundle?) {
        super.onCreate(savedInstanceState)
        setContentView(R.layout.activity_old_xml)

        StartGameDialogFragment().show(supportFragmentManager, "GAME_DIALOG")
    }
}
Java
public class StartGameDialogFragment extends DialogFragment {
    @Override
    public Dialog onCreateDialog(Bundle savedInstanceState) {
        // Use the Builder class for convenient dialog construction.
        AlertDialog.Builder builder = new AlertDialog.Builder(getActivity());
        builder.setMessage(R.string.dialog_start_game)
               .setPositiveButton(R.string.start, new DialogInterface.OnClickListener() {
                   public void onClick(DialogInterface dialog, int id) {
                       // START THE GAME!
                   }
               })
               .setNegativeButton(R.string.cancel, new DialogInterface.OnClickListener() {
                   public void onClick(DialogInterface dialog, int id) {
                       // User cancels the dialog.
                   }
               });
        // Create the AlertDialog object and return it.
        return builder.create();
    }
}
// ...

StartGameDialogFragment().show(supportFragmentManager, "GAME_DIALOG");
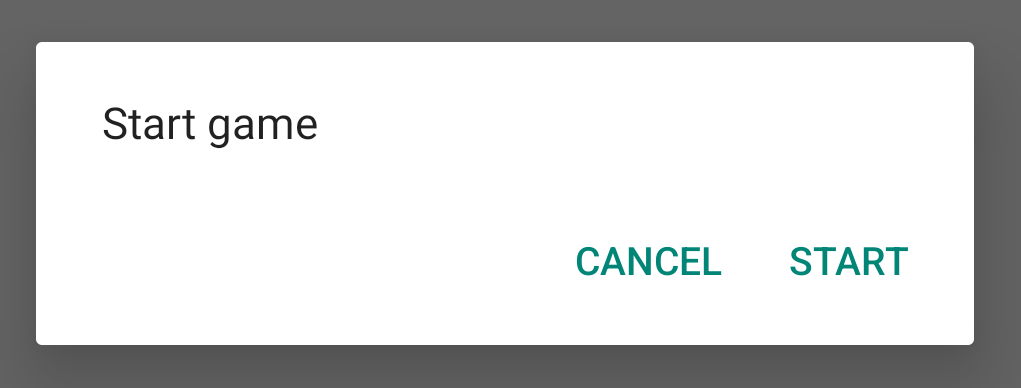
כשיוצרים מופע של המחלקה הזו ומפעילים את הפונקציה show() באובייקט הזה, תיבת הדו-שיח מופיעה כמו שמוצג באיור הבא.
בקטע הבא מפורט מידע נוסף על השימוש בממשקי ה-API כדי ליצור את תיבת הדו-שיח.AlertDialog.Builder
בהתאם למורכבות של תיבת הדו-שיח, אפשר להטמיע מגוון שיטות אחרות של קריאה חוזרת ב-DialogFragment, כולל כל השיטות הבסיסיות של מחזור החיים של המקטע.
יצירת תיבת דו-שיח של התראה
המחלקות AlertDialog מאפשרות ליצור מגוון עיצובים של תיבות דו-שיח, ולעתים קרובות הן המחלקות היחידות שנדרשות לתיבות דו-שיח. כפי שמוצג באיור הבא, יש שלושה אזורים בתיבת דו-שיח של התראה:
- כותרת: זהו שדה אופציונלי שמשמש רק כשאזור התוכן כולל הודעה מפורטת, רשימה או פריסה בהתאמה אישית. אם אתם צריכים לכתוב הודעה או שאלה פשוטה, לא צריך כותרת.
- אזור התוכן: יכול להציג הודעה, רשימה או פריסה מותאמת אישית אחרת.
- כפתורי פעולה: יכולים להיות עד שלושה כפתורי פעולה בתיבת דו-שיח.
המחלקות AlertDialog.Builder מספקות ממשקי API שמאפשרים ליצור AlertDialog עם סוגי התוכן האלה, כולל פריסה בהתאמה אישית.
כדי ליצור AlertDialog:
Kotlin
val builder: AlertDialog.Builder = AlertDialog.Builder(context)
builder
    .setMessage("I am the message")
    .setTitle("I am the title")

val dialog: AlertDialog = builder.create()
dialog.show()
Java
// 1. Instantiate an AlertDialog.Builder with its constructor.
AlertDialog.Builder builder = new AlertDialog.Builder(getActivity());

// 2. Chain together various setter methods to set the dialog characteristics.
builder.setMessage(R.string.dialog_message)
       .setTitle(R.string.dialog_title);

// 3. Get the AlertDialog.
AlertDialog dialog = builder.create();
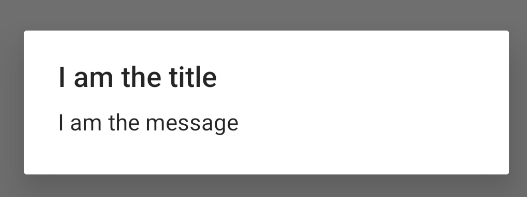
קטע הקוד הקודם יוצר את תיבת הדו-שיח הזו:
הוספת לחצנים
כדי להוסיף לחצני פעולה כמו אלה שמוצגים באיור 2, צריך להפעיל את השיטות
setPositiveButton()
ו-
setNegativeButton():
Kotlin
val builder: AlertDialog.Builder = AlertDialog.Builder(context)
builder
    .setMessage("I am the message")
    .setTitle("I am the title")
    .setPositiveButton("Positive") { dialog, which ->
        // Do something.
    }
    .setNegativeButton("Negative") { dialog, which ->
        // Do something else.
    }

val dialog: AlertDialog = builder.create()
dialog.show()
Java
AlertDialog.Builder builder = new AlertDialog.Builder(getActivity());
// Add the buttons.
builder.setPositiveButton(R.string.ok, new DialogInterface.OnClickListener() {
           public void onClick(DialogInterface dialog, int id) {
               // User taps OK button.
           }
       });
builder.setNegativeButton(R.string.cancel, new DialogInterface.OnClickListener() {
           public void onClick(DialogInterface dialog, int id) {
               // User cancels the dialog.
           }
       });
// Set other dialog properties.
...

// Create the AlertDialog.
AlertDialog dialog = builder.create();
השיטות set...Button() דורשות כותרת לכפתור – שסופקה על ידי משאב מחרוזת – וDialogInterface.OnClickListener שמגדיר את הפעולה שתתבצע כשהמשתמש יקיש על הכפתור.
אפשר להוסיף שלושה כפתורי פעולה:
- חיובי: משמש לאישור ולהמשך הפעולה (הפעולה OK).
- שלילי: משמש לביטול הפעולה.
- ניטרלי: משתמשים באפשרות הזו אם המשתמש לא רוצה להמשיך בפעולה אבל לא רוצה לבטל אותה. הוא מופיע בין הלחצנים של המשוב החיובי והשלילי. לדוגמה, הפעולה יכולה להיות "תזכיר לי מאוחר יותר".
אפשר להוסיף רק לחצן אחד מכל סוג ל-AlertDialog. לדוגמה, אי אפשר להוסיף יותר מלחצן אחד עם ערך חיובי.
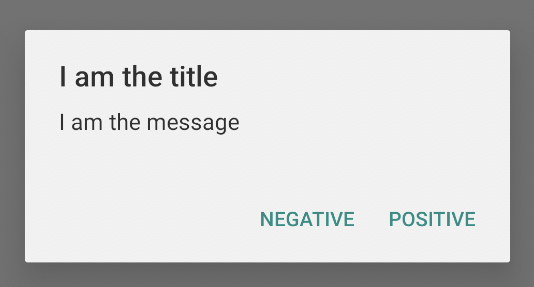
קטע הקוד הקודם מציג תיבת דו-שיח של התראה כמו זו שמוצגת כאן:
הוספת רשימה
יש שלושה סוגים של רשימות שזמינים באמצעות ממשקי ה-API של AlertDialog:
- רשימה מסורתית עם בחירת תשובה יחידה.
- רשימה קבועה עם אפשרות בחירה יחידה (כפתורי בחירה).
- רשימה קבועה של בחירות מרובות (תיבות סימון).
כדי ליצור רשימה עם אפשרות בחירה אחת כמו בדוגמה באיור 5, משתמשים בשיטה setItems():
Kotlin
val builder: AlertDialog.Builder = AlertDialog.Builder(context)
builder
    .setTitle("I am the title")
    .setPositiveButton("Positive") { dialog, which ->
        // Do something.
    }
    .setNegativeButton("Negative") { dialog, which ->
        // Do something else.
    }
    .setItems(arrayOf("Item One", "Item Two", "Item Three")) { dialog, which ->
        // Do something on item tapped.
    }

val dialog: AlertDialog = builder.create()
dialog.show()
Java
@Override
public Dialog onCreateDialog(Bundle savedInstanceState) {
    AlertDialog.Builder builder = new AlertDialog.Builder(getActivity());
    builder.setTitle(R.string.pick_color)
           .setItems(R.array.colors_array, new DialogInterface.OnClickListener() {
               public void onClick(DialogInterface dialog, int which) {
               // The 'which' argument contains the index position of the selected item.
           }
    });
    return builder.create();
}
קטע הקוד הזה יוצר תיבת דו-שיח כמו זו שמוצגת כאן:
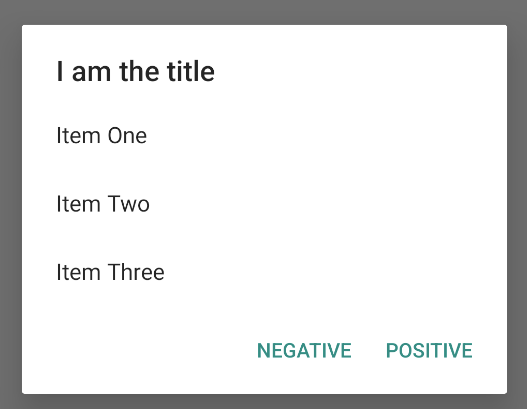
הרשימה מופיעה באזור התוכן של תיבת הדו-שיח, ולכן אי אפשר להציג בתיבת הדו-שיח גם הודעה וגם רשימה. מגדירים כותרת לתיבת הדו-שיח באמצעות setTitle().
כדי לציין את הפריטים לרשימה, קוראים ל-setItems() ומעבירים מערך. אפשר גם לציין רשימה באמצעות setAdapter().
כך אפשר להשתמש בנתונים דינמיים ברשימה – למשל מתוך מסד נתונים – באמצעות ListAdapter.
אם אתם משתמשים ב-ListAdapter כדי להוסיף לרשימה, תמיד צריך להשתמש ב-Loader כדי שהתוכן ייטען באופן אסינכרוני. מידע נוסף בנושא מופיע במאמרים יצירת פריסות באמצעות מתאם וLoaders.
הוספה של רשימה קבועה עם אפשרות לבחירה מרובה או בחירה יחידה
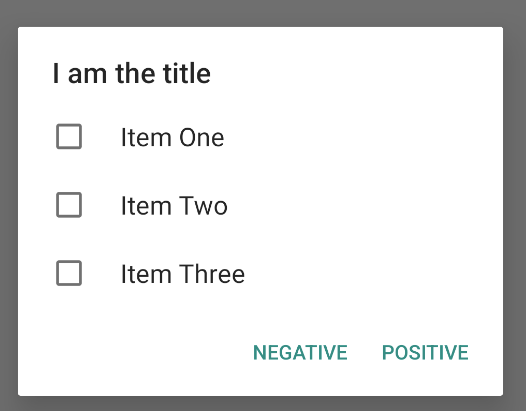
כדי להוסיף רשימה של פריטים עם אפשרויות בחירה מרובות (תיבות סימון) או פריטים עם אפשרות בחירה אחת (לחצני בחירה), משתמשים בשיטות setMultiChoiceItems() או setSingleChoiceItems() בהתאמה.
לדוגמה, כך אפשר ליצור רשימה של שאלות אמריקאיות כמו זו שמוצגת באיור 6, ששומרת את הפריטים שנבחרו ב-ArrayList:
Kotlin
val builder: AlertDialog.Builder = AlertDialog.Builder(context)
builder
    .setTitle("I am the title")
    .setPositiveButton("Positive") { dialog, which ->
        // Do something.
    }
    .setNegativeButton("Negative") { dialog, which ->
        // Do something else.
    }
    .setMultiChoiceItems(
        arrayOf("Item One", "Item Two", "Item Three"), null) { dialog, which, isChecked ->
        // Do something.
    }

val dialog: AlertDialog = builder.create()
dialog.show()
Java
@Override
public Dialog onCreateDialog(Bundle savedInstanceState) {
    selectedItems = new ArrayList();  // Where we track the selected items
    AlertDialog.Builder builder = new AlertDialog.Builder(getActivity());
    // Set the dialog title.
    builder.setTitle(R.string.pick_toppings)
    // Specify the list array, the items to be selected by default (null for
    // none), and the listener through which to receive callbacks when items
    // are selected.
           .setMultiChoiceItems(R.array.toppings, null,
                      new DialogInterface.OnMultiChoiceClickListener() {
               @Override
               public void onClick(DialogInterface dialog, int which,
                       boolean isChecked) {
                   if (isChecked) {
                       // If the user checks the item, add it to the selected
                       // items.
                       selectedItems.add(which);
                   } else if (selectedItems.contains(which)) {
                       // If the item is already in the array, remove it.
                       selectedItems.remove(which);
                   }
               }
           })
    // Set the action buttons
           .setPositiveButton(R.string.ok, new DialogInterface.OnClickListener() {
               @Override
               public void onClick(DialogInterface dialog, int id) {
                   // User taps OK, so save the selectedItems results
                   // somewhere or return them to the component that opens the
                   // dialog.
                   ...
               }
           })
           .setNegativeButton(R.string.cancel, new DialogInterface.OnClickListener() {
               @Override
               public void onClick(DialogInterface dialog, int id) {
                   ...
               }
           });

    return builder.create();
}
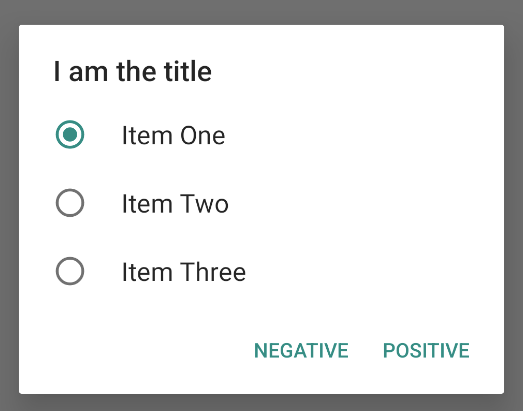
כך אפשר לקבל תיבת דו-שיח של התראה עם אפשרות בחירה אחת:
Kotlin
val builder: AlertDialog.Builder = AlertDialog.Builder(context)
builder
    .setTitle("I am the title")
    .setPositiveButton("Positive") { dialog, which ->
        // Do something.
    }
    .setNegativeButton("Negative") { dialog, which ->
        // Do something else.
    }
    .setSingleChoiceItems(
        arrayOf("Item One", "Item Two", "Item Three"), 0
    ) { dialog, which ->
        // Do something.
    }

val dialog: AlertDialog = builder.create()
dialog.show()
Java
        String[] choices = {"Item One", "Item Two", "Item Three"};

        AlertDialog.Builder builder = AlertDialog.Builder(context);
        builder
                .setTitle("I am the title")
                .setPositiveButton("Positive", (dialog, which) -> {

                })
                .setNegativeButton("Negative", (dialog, which) -> {

                })
                .setSingleChoiceItems(choices, 0, (dialog, which) -> {

                });

        AlertDialog dialog = builder.create();
        dialog.show();
התוצאה היא הדוגמה הבאה:
יצירת פריסה בהתאמה אישית
אם רוצים פריסה מותאמת אישית בתיבת דו-שיח, יוצרים פריסה ומוסיפים אותה ל-AlertDialog על ידי קריאה ל-setView() באובייקט AlertDialog.Builder.
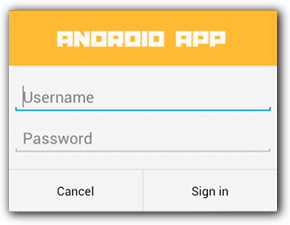
כברירת מחדל, הפריסה המותאמת אישית ממלאת את חלון הדו-שיח, אבל עדיין אפשר להשתמש בשיטות AlertDialog.Builder כדי להוסיף לחצנים וכותרת.
לדוגמה, הנה קובץ הפריסה של פריסת תיבת הדו-שיח המותאמת אישית שמופיעה למעלה:
res/layout/dialog_signin.xml
<LinearLayout xmlns:android="http://schemas.android.com/apk/res/android"
    android:orientation="vertical"
    android:layout_width="wrap_content"
    android:layout_height="wrap_content">
    <ImageView
        android:src="@drawable/header_logo"
        android:layout_width="match_parent"
        android:layout_height="64dp"
        android:scaleType="center"
        android:background="#FFFFBB33"
        android:contentDescription="@string/app_name" />
    <EditText
        android:id="@+id/username"
        android:inputType="textEmailAddress"
        android:layout_width="match_parent"
        android:layout_height="wrap_content"
        android:layout_marginTop="16dp"
        android:layout_marginLeft="4dp"
        android:layout_marginRight="4dp"
        android:layout_marginBottom="4dp"
        android:hint="@string/username" />
    <EditText
        android:id="@+id/password"
        android:inputType="textPassword"
        android:layout_width="match_parent"
        android:layout_height="wrap_content"
        android:layout_marginTop="4dp"
        android:layout_marginLeft="4dp"
        android:layout_marginRight="4dp"
        android:layout_marginBottom="16dp"
        android:fontFamily="sans-serif"
        android:hint="@string/password"/>
</LinearLayout>
כדי להגדיל את הפריסה ב-DialogFragment, צריך לקבל LayoutInflater עם getLayoutInflater() ולהתקשר אל inflate().
הפרמטר הראשון הוא מזהה משאב הפריסה, והפרמטר השני הוא תצוגת אב לפריסה. אחר כך תוכלו להתקשר אל setView() כדי להציב את הפריסה בתיבת הדו-שיח. הדוגמה הבאה ממחישה את זה.
Kotlin
override fun onCreateDialog(savedInstanceState: Bundle?): Dialog {
    return activity?.let {
        val builder = AlertDialog.Builder(it)
        // Get the layout inflater.
        val inflater = requireActivity().layoutInflater;

        // Inflate and set the layout for the dialog.
        // Pass null as the parent view because it's going in the dialog
        // layout.
        builder.setView(inflater.inflate(R.layout.dialog_signin, null))
                // Add action buttons.
                .setPositiveButton(R.string.signin,
                        DialogInterface.OnClickListener { dialog, id ->
                            // Sign in the user.
                        })
                .setNegativeButton(R.string.cancel,
                        DialogInterface.OnClickListener { dialog, id ->
                            getDialog().cancel()
                        })
        builder.create()
    } ?: throw IllegalStateException("Activity cannot be null")
}
Java
@Override
public Dialog onCreateDialog(Bundle savedInstanceState) {
    AlertDialog.Builder builder = new AlertDialog.Builder(getActivity());
    // Get the layout inflater.
    LayoutInflater inflater = requireActivity().getLayoutInflater();

    // Inflate and set the layout for the dialog.
    // Pass null as the parent view because it's going in the dialog layout.
    builder.setView(inflater.inflate(R.layout.dialog_signin, null))
    // Add action buttons
           .setPositiveButton(R.string.signin, new DialogInterface.OnClickListener() {
               @Override
               public void onClick(DialogInterface dialog, int id) {
                   // Sign in the user.
               }
           })
           .setNegativeButton(R.string.cancel, new DialogInterface.OnClickListener() {
               public void onClick(DialogInterface dialog, int id) {
                   LoginDialogFragment.this.getDialog().cancel();
               }
           });
    return builder.create();
}
אם רוצים להציג תיבת דו-שיח בהתאמה אישית, אפשר להציג Activity כתיבת דו-שיח במקום להשתמש בממשקי ה-API של Dialog. יוצרים פעילות ומגדירים את העיצוב שלה ל-Theme.Holo.Dialog ברכיב המניפסט <activity>:
<activity android:theme="@android:style/Theme.Holo.Dialog" >
הפעילות מוצגת עכשיו בחלון דו-שיח במקום במסך מלא.
העברת אירועים בחזרה למארח של תיבת הדו-שיח
כשמשתמש לוחץ על אחד מכפתורי הפעולה בתיבת הדו-שיח או בוחר פריט מהרשימה שלה, יכול להיות ש-DialogFragment יבצע את הפעולה הנדרשת בעצמו, אבל לרוב רוצים להעביר את האירוע לפעילות או לקטע שפותחים את תיבת הדו-שיח. כדי לעשות את זה, מגדירים ממשק עם שיטה לכל סוג של אירוע מסוג קליק. לאחר מכן, מטמיעים את הממשק ברכיב המארח שמקבל את אירועי הפעולה מתיבת הדו-שיח.
לדוגמה, הנה DialogFragment שמגדיר ממשק שדרכו האירועים מועברים חזרה לפעילות המארחת:
Kotlin
class NoticeDialogFragment : DialogFragment() {
    // Use this instance of the interface to deliver action events.
    internal lateinit var listener: NoticeDialogListener

    // The activity that creates an instance of this dialog fragment must
    // implement this interface to receive event callbacks. Each method passes
    // the DialogFragment in case the host needs to query it.
    interface NoticeDialogListener {
        fun onDialogPositiveClick(dialog: DialogFragment)
        fun onDialogNegativeClick(dialog: DialogFragment)
    }

    // Override the Fragment.onAttach() method to instantiate the
    // NoticeDialogListener.
    override fun onAttach(context: Context) {
        super.onAttach(context)
        // Verify that the host activity implements the callback interface.
        try {
            // Instantiate the NoticeDialogListener so you can send events to
            // the host.
            listener = context as NoticeDialogListener
        } catch (e: ClassCastException) {
            // The activity doesn't implement the interface. Throw exception.
            throw ClassCastException((context.toString() +
                    " must implement NoticeDialogListener"))
        }
    }
}
Java
public class NoticeDialogFragment extends DialogFragment {

    // The activity that creates an instance of this dialog fragment must
    // implement this interface to receive event callbacks. Each method passes
    // the DialogFragment in case the host needs to query it.
    public interface NoticeDialogListener {
        public void onDialogPositiveClick(DialogFragment dialog);
        public void onDialogNegativeClick(DialogFragment dialog);
    }

    // Use this instance of the interface to deliver action events.
    NoticeDialogListener listener;

    // Override the Fragment.onAttach() method to instantiate the
    // NoticeDialogListener.
    @Override
    public void onAttach(Context context) {
        super.onAttach(context);
        // Verify that the host activity implements the callback interface.
        try {
            // Instantiate the NoticeDialogListener so you can send events to
            // the host.
            listener = (NoticeDialogListener) context;
        } catch (ClassCastException e) {
            // The activity doesn't implement the interface. Throw exception.
            throw new ClassCastException(activity.toString()
                    + " must implement NoticeDialogListener");
        }
    }
    ...
}
הפעילות שמארחת את תיבת הדו-שיח יוצרת מופע של תיבת הדו-שיח באמצעות בנאי של קטע תיבת הדו-שיח ומקבלת את האירועים של תיבת הדו-שיח באמצעות הטמעה של הממשק NoticeDialogListener:
Kotlin
class MainActivity : FragmentActivity(),
        NoticeDialogFragment.NoticeDialogListener {

    fun showNoticeDialog() {
        // Create an instance of the dialog fragment and show it.
        val dialog = NoticeDialogFragment()
        dialog.show(supportFragmentManager, "NoticeDialogFragment")
    }

    // The dialog fragment receives a reference to this Activity through the
    // Fragment.onAttach() callback, which it uses to call the following
    // methods defined by the NoticeDialogFragment.NoticeDialogListener
    // interface.
    override fun onDialogPositiveClick(dialog: DialogFragment) {
        // User taps the dialog's positive button.
    }

    override fun onDialogNegativeClick(dialog: DialogFragment) {
        // User taps the dialog's negative button.
    }
}
Java
public class MainActivity extends FragmentActivity
                          implements NoticeDialogFragment.NoticeDialogListener{
    ...
    public void showNoticeDialog() {
        // Create an instance of the dialog fragment and show it.
        DialogFragment dialog = new NoticeDialogFragment();
        dialog.show(getSupportFragmentManager(), "NoticeDialogFragment");
    }

    // The dialog fragment receives a reference to this Activity through the
    // Fragment.onAttach() callback, which it uses to call the following
    // methods defined by the NoticeDialogFragment.NoticeDialogListener
    // interface.
    @Override
    public void onDialogPositiveClick(DialogFragment dialog) {
        // User taps the dialog's positive button.
        ...
    }

    @Override
    public void onDialogNegativeClick(DialogFragment dialog) {
        // User taps the dialog's negative button.
        ...
    }
}
מכיוון שהפעילות המארחת מטמיעה את NoticeDialogListener – שמופעלת על ידי שיטת הקריאה החוזרת onAttach() שמוצגת בדוגמה הקודמת – רכיב ה-DialogFragment יכול להשתמש בשיטות הקריאה החוזרת של הממשק כדי להעביר אירועי קליקים לפעילות:
Kotlin
    override fun onCreateDialog(savedInstanceState: Bundle): Dialog {
        return activity?.let {
            // Build the dialog and set up the button click handlers.
            val builder = AlertDialog.Builder(it)

            builder.setMessage(R.string.dialog_start_game)
                    .setPositiveButton(R.string.start,
                            DialogInterface.OnClickListener { dialog, id ->
                                // Send the positive button event back to the
                                // host activity.
                                listener.onDialogPositiveClick(this)
                            })
                    .setNegativeButton(R.string.cancel,
                            DialogInterface.OnClickListener { dialog, id ->
                                // Send the negative button event back to the
                                // host activity.
                                listener.onDialogNegativeClick(this)
                            })

            builder.create()
        } ?: throw IllegalStateException("Activity cannot be null")
    }
Java
public class NoticeDialogFragment extends DialogFragment {
    ...
    @Override
    public Dialog onCreateDialog(Bundle savedInstanceState) {
        // Build the dialog and set up the button click handlers.
        AlertDialog.Builder builder = new AlertDialog.Builder(getActivity());
        builder.setMessage(R.string.dialog_start_game)
               .setPositiveButton(R.string.start, new DialogInterface.OnClickListener() {
                   public void onClick(DialogInterface dialog, int id) {
                       // Send the positive button event back to the host activity.
                       listener.onDialogPositiveClick(NoticeDialogFragment.this);
                   }
               })
               .setNegativeButton(R.string.cancel, new DialogInterface.OnClickListener() {
                   public void onClick(DialogInterface dialog, int id) {
                       // Send the negative button event back to the host activity.
                       listener.onDialogNegativeClick(NoticeDialogFragment.this);
                   }
               });
        return builder.create();
    }
}
הצגת תיבת דו-שיח
כשרוצים להציג את תיבת הדו-שיח, יוצרים מופע של
DialogFragment וקוראים ל-show(), ומעבירים את
FragmentManager ואת שם התג של קטע תיבת הדו-שיח.
אפשר לקבל את FragmentManager על ידי התקשרות אל getSupportFragmentManager() מFragmentActivity או על ידי התקשרות אל getParentFragmentManager() מFragment. דוגמה:
Kotlin
fun confirmStartGame() {
    val newFragment = StartGameDialogFragment()
    newFragment.show(supportFragmentManager, "game")
}
Java
public void confirmStartGame() {
    DialogFragment newFragment = new StartGameDialogFragment();
    newFragment.show(getSupportFragmentManager(), "game");
}
הארגומנט השני, "game", הוא שם תג ייחודי שהמערכת משתמשת בו כדי לשמור ולשחזר את מצב הקטע כשצריך. התג מאפשר גם לקבל כינוי לקטע על ידי קריאה ל-findFragmentByTag().
הצגת תיבת דו-שיח במסך מלא או כקטע מוטמע
יכול להיות שתרצו שחלק מעיצוב ממשק המשתמש יופיע כתיבת דו-שיח במצבים מסוימים, וכקטע מוטמע או במסך מלא במצבים אחרים. יכול להיות שתרצו שהמודעה תופיע בצורה שונה בהתאם לגודל המסך של המכשיר. המחלקה DialogFragment מאפשרת גמישות בביצוע הפעולה הזו, כי היא יכולה להתנהג כ-Fragment שניתן להטמעה.
עם זאת, במקרה הזה אי אפשר להשתמש באובייקטים AlertDialog.Builder או באובייקטים אחרים של Dialog כדי ליצור את תיבת הדו-שיח. אם רוצים שאפשר יהיה להטמיע את DialogFragment, צריך להגדיר את ממשק המשתמש של תיבת הדו-שיח בפריסה, ואז לטעון את הפריסה בקריאה החוזרת onCreateView().
דוגמה DialogFragment שיכולה להופיע כתיבת דו-שיח או כקטע שניתן להטמעה, באמצעות פריסה בשם purchase_items.xml:
Kotlin
class CustomDialogFragment : DialogFragment() {

    // The system calls this to get the DialogFragment's layout, regardless of
    // whether it's being displayed as a dialog or an embedded fragment.
    override fun onCreateView(
            inflater: LayoutInflater,
            container: ViewGroup?,
            savedInstanceState: Bundle?
    ): View {
        // Inflate the layout to use as a dialog or embedded fragment.
        return inflater.inflate(R.layout.purchase_items, container, false)
    }

    // The system calls this only when creating the layout in a dialog.
    override fun onCreateDialog(savedInstanceState: Bundle): Dialog {
        // The only reason you might override this method when using
        // onCreateView() is to modify the dialog characteristics. For example,
        // the dialog includes a title by default, but your custom layout might
        // not need it. Here, you can remove the dialog title, but you must
        // call the superclass to get the Dialog.
        val dialog = super.onCreateDialog(savedInstanceState)
        dialog.requestWindowFeature(Window.FEATURE_NO_TITLE)
        return dialog
    }
}
Java
public class CustomDialogFragment extends DialogFragment {
    // The system calls this to get the DialogFragment's layout, regardless of
    // whether it's being displayed as a dialog or an embedded fragment.
    @Override
    public View onCreateView(LayoutInflater inflater, ViewGroup container,
            Bundle savedInstanceState) {
        // Inflate the layout to use as a dialog or embedded fragment.
        return inflater.inflate(R.layout.purchase_items, container, false);
    }

    // The system calls this only when creating the layout in a dialog.
    @Override
    public Dialog onCreateDialog(Bundle savedInstanceState) {
        // The only reason you might override this method when using
        // onCreateView() is to modify the dialog characteristics. For example,
        // the dialog includes a title by default, but your custom layout might
        // not need it. Here, you can remove the dialog title, but you must
        // call the superclass to get the Dialog.
        Dialog dialog = super.onCreateDialog(savedInstanceState);
        dialog.requestWindowFeature(Window.FEATURE_NO_TITLE);
        return dialog;
    }
}
בדוגמה הבאה נקבע אם להציג את הקטע כתיבת דו-שיח או כממשק משתמש במסך מלא, על סמך גודל המסך:
Kotlin
fun showDialog() {
    val fragmentManager = supportFragmentManager
    val newFragment = CustomDialogFragment()
    if (isLargeLayout) {
        // The device is using a large layout, so show the fragment as a
        // dialog.
        newFragment.show(fragmentManager, "dialog")
    } else {
        // The device is smaller, so show the fragment fullscreen.
        val transaction = fragmentManager.beginTransaction()
        // For a polished look, specify a transition animation.
        transaction.setTransition(FragmentTransaction.TRANSIT_FRAGMENT_OPEN)
        // To make it fullscreen, use the 'content' root view as the container
        // for the fragment, which is always the root view for the activity.
        transaction
                .add(android.R.id.content, newFragment)
                .addToBackStack(null)
                .commit()
    }
}
Java
public void showDialog() {
    FragmentManager fragmentManager = getSupportFragmentManager();
    CustomDialogFragment newFragment = new CustomDialogFragment();

    if (isLargeLayout) {
        // The device is using a large layout, so show the fragment as a
        // dialog.
        newFragment.show(fragmentManager, "dialog");
    } else {
        // The device is smaller, so show the fragment fullscreen.
        FragmentTransaction transaction = fragmentManager.beginTransaction();
        // For a polished look, specify a transition animation.
        transaction.setTransition(FragmentTransaction.TRANSIT_FRAGMENT_OPEN);
        // To make it fullscreen, use the 'content' root view as the container
        // for the fragment, which is always the root view for the activity.
        transaction.add(android.R.id.content, newFragment)
                   .addToBackStack(null).commit();
    }
}
מידע נוסף על ביצוע טרנזקציות של פרגמנטים זמין במאמר בנושא פרגמנטים.
בדוגמה הזו, הערך הבוליאני mIsLargeLayout מציין אם המכשיר הנוכחי צריך להשתמש בפריסת הפריטים הגדולה של האפליקציה, ולכן להציג את הקטע הזה כתיבת דו-שיח ולא במסך מלא. הדרך הכי טובה להגדיר ערך בוליאני כזה היא להצהיר על ערך של משאב בוליאני עם ערך של משאב חלופי לגדלים שונים של מסכים. לדוגמה, הנה שתי גרסאות של משאב בוליאני לגדלים שונים של מסכים:
res/values/bools.xml
<!-- Default boolean values -->
<resources>
    <bool name="large_layout">false</bool>
</resources>
res/values-large/bools.xml
<!-- Large screen boolean values -->
<resources>
    <bool name="large_layout">true</bool>
</resources>
אחר כך אפשר לאתחל את הערך mIsLargeLayout במהלך ה-method onCreate() של הפעילות, כמו בדוגמה הבאה:
Kotlin
override fun onCreate(savedInstanceState: Bundle?) {
    super.onCreate(savedInstanceState)
    setContentView(R.layout.activity_main)

    isLargeLayout = resources.getBoolean(R.bool.large_layout)
}
Java
boolean isLargeLayout;

@Override
public void onCreate(Bundle savedInstanceState) {
    super.onCreate(savedInstanceState);
    setContentView(R.layout.activity_main);

    isLargeLayout = getResources().getBoolean(R.bool.large_layout);
}
הצגת פעילות כתיבת דו-שיח במסכים גדולים
במקום להציג תיבת דו-שיח כממשק משתמש במסך מלא במסכים קטנים, אפשר להציג Activity כתיבת דו-שיח במסכים גדולים כדי לקבל את אותה התוצאה. הגישה שתבחרו תלויה בעיצוב האפליקציה, אבל הצגת פעילות כתיבת דו-שיח שימושית בדרך כלל כשהאפליקציה מיועדת למסכים קטנים ורוצים לשפר את חוויית השימוש בטאבלטים על ידי הצגת פעילות קצרת טווח כתיבת דו-שיח.
כדי להציג פעילות כתיבת דו-שיח רק במסכים גדולים, צריך להחיל את
Theme.Holo.DialogWhenLarge
העיצוב על רכיב המניפסט <activity>:
<activity android:theme="@android:style/Theme.Holo.DialogWhenLarge" >
מידע נוסף על עיצוב הפעילויות באמצעות עיצובים זמין במאמר בנושא סגנונות ועיצובים.
סגירת תיבת דו-שיח
כשמשתמש לוחץ על כפתור פעולה שנוצר באמצעות AlertDialog.Builder, המערכת סוגרת את תיבת הדו-שיח בשבילכם.
המערכת גם מבטלת את תיבת הדו-שיח כשהמשתמש מקיש על פריט ברשימה של תיבת דו-שיח, אלא אם הרשימה משתמשת בלחצני בחירה או בתיבות סימון. אחרת, אפשר לסגור את תיבת הדו-שיח באופן ידני על ידי הקשה על dismiss() ב-DialogFragment.
אם אתם צריכים לבצע פעולות מסוימות כשהתיבה נעלמת, אתם יכולים להטמיע את השיטה onDismiss() ב-DialogFragment.
אפשר גם לבטל את הדיאלוג. זהו אירוע מיוחד שמציין שהמשתמש יוצא מתיבת הדו-שיח בלי להשלים את המשימה. המצב הזה קורה אם המשתמש מקיש על הכפתור 'הקודם' או מקיש על המסך מחוץ לאזור של תיבת הדו-שיח, או אם קוראים באופן מפורש ל-cancel() ב-Dialog, למשל בתגובה ללחיצה על הכפתור 'ביטול' בתיבת הדו-שיח.
כפי שמוצג בדוגמה הקודמת, אפשר להגיב לאירוע הביטול על ידי הטמעה של onCancel() בכיתה DialogFragment.