


Okno to małe okno, które prosi użytkownika o podjęcie decyzji lub wprowadzenie dodatkowych informacji. Okno nie zajmuje całego ekranu i jest zwykle używane w przypadku zdarzeń modalnych, które wymagają od użytkowników podjęcia działania, zanim będą mogli kontynuować.

Klasa Dialog
jest klasą bazową dla okien, ale nie twórz bezpośrednio instancji klasy Dialog. Zamiast tego użyj jednej z tych podklas:
AlertDialog- Okno, które może wyświetlać tytuł, maksymalnie 3 przyciski, listę elementów do wyboru lub układ niestandardowy.
DatePickerDialoglubTimePickerDialog- Okno z predefiniowanym interfejsem, które umożliwia użytkownikowi wybranie daty lub godziny.
Te klasy określają styl i strukturę okna. Potrzebujesz też elementu DialogFragment jako kontenera okna. Klasa DialogFragment udostępnia
wszystkie elementy sterujące potrzebne do utworzenia okna i zarządzania jego wyglądem.
Nie musisz wywoływać metod w obiekcie Dialog.
Używanie elementu DialogFragment do zarządzania oknem sprawia, że prawidłowo obsługuje on zdarzenia cyklu życia, takie jak naciśnięcie przez użytkownika przycisku Wstecz lub obrócenie ekranu. Klasa DialogFragment umożliwia też ponowne użycie interfejsu okna jako komponentu, który można umieścić w większym interfejsie – tak jak tradycyjny
Fragment Możesz na przykład chcieć, aby interfejs okna wyglądał inaczej na dużych i małych
ekranach.
W kolejnych sekcjach tego dokumentu opisujemy, jak używać elementu DialogFragment w połączeniu z obiektem AlertDialog. Jeśli chcesz utworzyć selektor daty lub godziny, przeczytaj
artykuł Dodawanie selektorów do
aplikacji.
Tworzenie fragmentu okna
Możesz tworzyć różne projekty okien, w tym układy niestandardowe i te opisane wwytycznych Material Designdotyczących okien, rozszerzając DialogFragment i tworząc elementAlertDialog w metodzie wywołania zwrotnegoonCreateDialog().
Oto na przykład podstawowy element AlertDialog, którym zarządza element DialogFragment:
Kotlin
class StartGameDialogFragment : DialogFragment() {
    override fun onCreateDialog(savedInstanceState: Bundle?): Dialog {
        return activity?.let {
            // Use the Builder class for convenient dialog construction.
            val builder = AlertDialog.Builder(it)
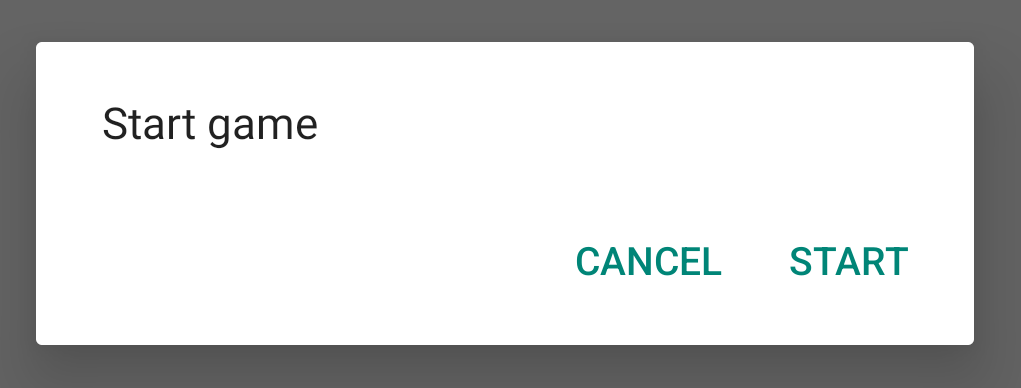
            builder.setMessage("Start game")
                .setPositiveButton("Start") { dialog, id ->
                    // START THE GAME!
                }
                .setNegativeButton("Cancel") { dialog, id ->
                    // User cancelled the dialog.
                }
            // Create the AlertDialog object and return it.
            builder.create()
        } ?: throw IllegalStateException("Activity cannot be null")
    }
}

class OldXmlActivity : AppCompatActivity() {
    override fun onCreate(savedInstanceState: Bundle?) {
        super.onCreate(savedInstanceState)
        setContentView(R.layout.activity_old_xml)

        StartGameDialogFragment().show(supportFragmentManager, "GAME_DIALOG")
    }
}
Java
public class StartGameDialogFragment extends DialogFragment {
    @Override
    public Dialog onCreateDialog(Bundle savedInstanceState) {
        // Use the Builder class for convenient dialog construction.
        AlertDialog.Builder builder = new AlertDialog.Builder(getActivity());
        builder.setMessage(R.string.dialog_start_game)
               .setPositiveButton(R.string.start, new DialogInterface.OnClickListener() {
                   public void onClick(DialogInterface dialog, int id) {
                       // START THE GAME!
                   }
               })
               .setNegativeButton(R.string.cancel, new DialogInterface.OnClickListener() {
                   public void onClick(DialogInterface dialog, int id) {
                       // User cancels the dialog.
                   }
               });
        // Create the AlertDialog object and return it.
        return builder.create();
    }
}
// ...

StartGameDialogFragment().show(supportFragmentManager, "GAME_DIALOG");
Gdy utworzysz instancję tej klasy i wywołasz metodę show() w tym obiekcie, okno pojawi się tak jak na ilustracji poniżej.
W następnej sekcji znajdziesz więcej informacji o tworzeniu okna za pomocą interfejsów API AlertDialog.Builder.
W zależności od złożoności okna możesz zaimplementować w elemencie DialogFragment różne inne metody wywołania zwrotnego, w tym wszystkie
podstawowe metody cyklu życia fragmentu.
Tworzenie okna alertu
Klasa AlertDialog umożliwia tworzenie różnych projektów okien i często jest jedyną klasą okien, której potrzebujesz. Jak pokazano na ilustracji poniżej, okno alertu ma 3 obszary:
- Tytuł: jest opcjonalny i używany tylko wtedy, gdy obszar treści jest zajęty przez szczegółową wiadomość, listę lub układ niestandardowy. Jeśli chcesz wyświetlić prosty komunikat lub pytanie, nie musisz używać tytułu.
- Obszar treści: może wyświetlać komunikat, listę lub inny układ niestandardowy.
- Przyciski działań: w oknie mogą znajdować się maksymalnie 3 przyciski działań.
Klasa AlertDialog.Builder udostępnia interfejsy API, które umożliwiają utworzenie
elementu AlertDialog z tymi rodzajami treści, w tym z układem niestandardowym.
Aby utworzyć element AlertDialog:
Kotlin
val builder: AlertDialog.Builder = AlertDialog.Builder(context)
builder
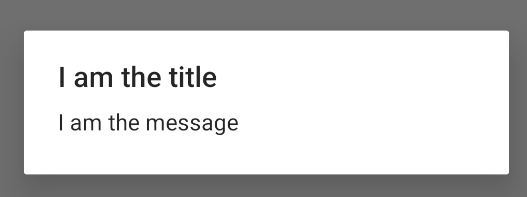
    .setMessage("I am the message")
    .setTitle("I am the title")

val dialog: AlertDialog = builder.create()
dialog.show()
Java
// 1. Instantiate an AlertDialog.Builder with its constructor.
AlertDialog.Builder builder = new AlertDialog.Builder(getActivity());

// 2. Chain together various setter methods to set the dialog characteristics.
builder.setMessage(R.string.dialog_message)
       .setTitle(R.string.dialog_title);

// 3. Get the AlertDialog.
AlertDialog dialog = builder.create();
Poprzedni fragment kodu generuje to okno:
Dodawanie przycisków
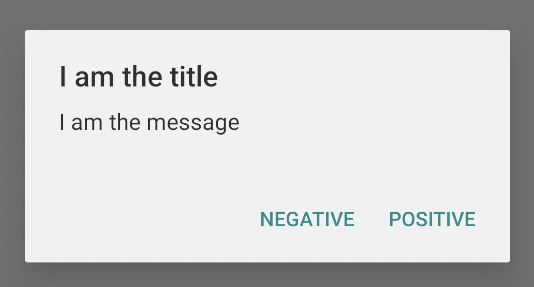
Aby dodać przyciski działań, takie jak te na rysunku 2, wywołaj metody setPositiveButton() i setNegativeButton():
Kotlin
val builder: AlertDialog.Builder = AlertDialog.Builder(context)
builder
    .setMessage("I am the message")
    .setTitle("I am the title")
    .setPositiveButton("Positive") { dialog, which ->
        // Do something.
    }
    .setNegativeButton("Negative") { dialog, which ->
        // Do something else.
    }

val dialog: AlertDialog = builder.create()
dialog.show()
Java
AlertDialog.Builder builder = new AlertDialog.Builder(getActivity());
// Add the buttons.
builder.setPositiveButton(R.string.ok, new DialogInterface.OnClickListener() {
           public void onClick(DialogInterface dialog, int id) {
               // User taps OK button.
           }
       });
builder.setNegativeButton(R.string.cancel, new DialogInterface.OnClickListener() {
           public void onClick(DialogInterface dialog, int id) {
               // User cancels the dialog.
           }
       });
// Set other dialog properties.
...

// Create the AlertDialog.
AlertDialog dialog = builder.create();
Metody set...Button() wymagają tytułu dla
przycisku (podanego przez
zasób tekstowy) i
interfejsu
DialogInterface.OnClickListener
, który określa działanie, jakie ma zostać wykonane, gdy użytkownik naciśnie przycisk.
Możesz dodać 3 przyciski działań:
- Pozytywny: użyj go, aby zaakceptować działanie i kontynuować (działanie „OK”).
- Negatywny: użyj go, aby anulować działanie.
- Neutralny: użyj go, gdy użytkownik może nie chcieć kontynuować działania, ale niekoniecznie chce je anulować. Pojawia się między przyciskami pozytywnym i negatywnym. Działanie może na przykład brzmieć „Przypomnij mi później”.
Do elementu AlertDialog możesz dodać tylko 1 przycisk każdego typu. Nie możesz na przykład mieć więcej niż 1 przycisku „pozytywnego”.
Poprzedni fragment kodu tworzy okno alertu podobne do tego:
Dodawanie listy
Interfejsy API AlertDialog udostępniają 3 rodzaje list:
- Tradycyjna lista z jedną odpowiedzią.
- Trwała lista z jedną odpowiedzią (przyciski opcji).
- Trwała lista z wieloma odpowiedziami (pola wyboru).
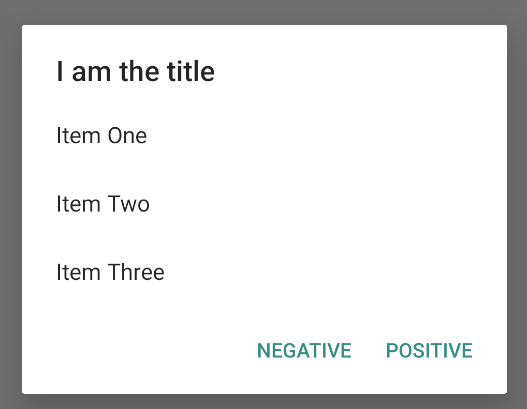
Aby utworzyć listę z jedną odpowiedzią, taką jak na rysunku 5, użyj metody setItems():
Kotlin
val builder: AlertDialog.Builder = AlertDialog.Builder(context)
builder
    .setTitle("I am the title")
    .setPositiveButton("Positive") { dialog, which ->
        // Do something.
    }
    .setNegativeButton("Negative") { dialog, which ->
        // Do something else.
    }
    .setItems(arrayOf("Item One", "Item Two", "Item Three")) { dialog, which ->
        // Do something on item tapped.
    }

val dialog: AlertDialog = builder.create()
dialog.show()
Java
@Override
public Dialog onCreateDialog(Bundle savedInstanceState) {
    AlertDialog.Builder builder = new AlertDialog.Builder(getActivity());
    builder.setTitle(R.string.pick_color)
           .setItems(R.array.colors_array, new DialogInterface.OnClickListener() {
               public void onClick(DialogInterface dialog, int which) {
               // The 'which' argument contains the index position of the selected item.
           }
    });
    return builder.create();
}
Ten fragment kodu generuje okno podobne do tego:
Ponieważ lista pojawia się w obszarze treści okna, okno nie może wyświetlać jednocześnie komunikatu i listy. Ustaw tytuł okna za pomocą metody setTitle().
Aby określić elementy listy, wywołaj metodę setItems(), przekazując tablicę. Możesz też określić listę za pomocą metody setAdapter().
Umożliwia to tworzenie listy z danymi dynamicznymi, np. z bazy danych, za pomocą interfejsu ListAdapter.
Jeśli tworzysz listę za pomocą interfejsu ListAdapter, zawsze używaj interfejsu Loader, aby treści wczytywały się asynchronicznie. Więcej informacji znajdziesz w artykułach
Tworzenie układów
za pomocą adaptera i
Ładowarki.
Dodawanie trwałej listy z wieloma lub jedną odpowiedzią
Aby dodać listę elementów z wieloma odpowiedziami (pola wyboru) lub jedną odpowiedzią (przyciski opcji), użyj odpowiednio metod setMultiChoiceItems() lub setSingleChoiceItems().
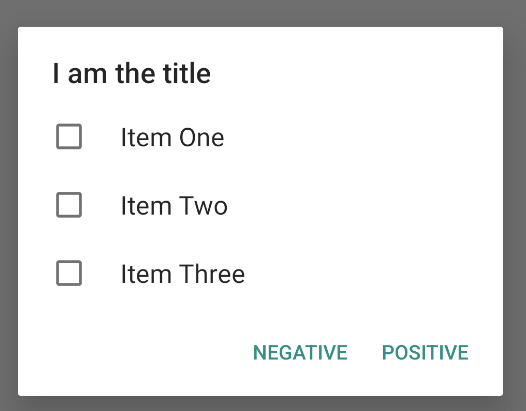
Oto na przykład, jak utworzyć listę z wieloma odpowiedziami, taką jak na rysunku 6, która zapisuje wybrane elementy w elemencie ArrayList:
Kotlin
val builder: AlertDialog.Builder = AlertDialog.Builder(context)
builder
    .setTitle("I am the title")
    .setPositiveButton("Positive") { dialog, which ->
        // Do something.
    }
    .setNegativeButton("Negative") { dialog, which ->
        // Do something else.
    }
    .setMultiChoiceItems(
        arrayOf("Item One", "Item Two", "Item Three"), null) { dialog, which, isChecked ->
        // Do something.
    }

val dialog: AlertDialog = builder.create()
dialog.show()
Java
@Override
public Dialog onCreateDialog(Bundle savedInstanceState) {
    selectedItems = new ArrayList();  // Where we track the selected items
    AlertDialog.Builder builder = new AlertDialog.Builder(getActivity());
    // Set the dialog title.
    builder.setTitle(R.string.pick_toppings)
    // Specify the list array, the items to be selected by default (null for
    // none), and the listener through which to receive callbacks when items
    // are selected.
           .setMultiChoiceItems(R.array.toppings, null,
                      new DialogInterface.OnMultiChoiceClickListener() {
               @Override
               public void onClick(DialogInterface dialog, int which,
                       boolean isChecked) {
                   if (isChecked) {
                       // If the user checks the item, add it to the selected
                       // items.
                       selectedItems.add(which);
                   } else if (selectedItems.contains(which)) {
                       // If the item is already in the array, remove it.
                       selectedItems.remove(which);
                   }
               }
           })
    // Set the action buttons
           .setPositiveButton(R.string.ok, new DialogInterface.OnClickListener() {
               @Override
               public void onClick(DialogInterface dialog, int id) {
                   // User taps OK, so save the selectedItems results
                   // somewhere or return them to the component that opens the
                   // dialog.
                   ...
               }
           })
           .setNegativeButton(R.string.cancel, new DialogInterface.OnClickListener() {
               @Override
               public void onClick(DialogInterface dialog, int id) {
                   ...
               }
           });

    return builder.create();
}
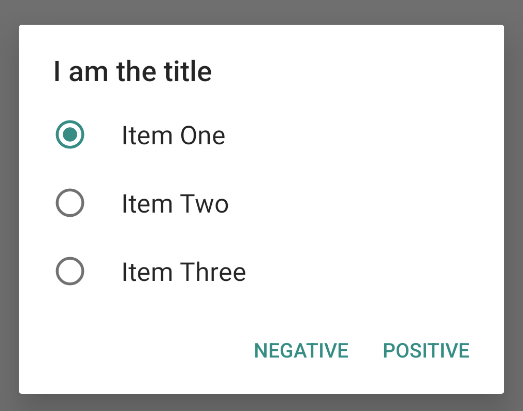
Okno alertu z jedną odpowiedzią możesz uzyskać w ten sposób:
Kotlin
val builder: AlertDialog.Builder = AlertDialog.Builder(context)
builder
    .setTitle("I am the title")
    .setPositiveButton("Positive") { dialog, which ->
        // Do something.
    }
    .setNegativeButton("Negative") { dialog, which ->
        // Do something else.
    }
    .setSingleChoiceItems(
        arrayOf("Item One", "Item Two", "Item Three"), 0
    ) { dialog, which ->
        // Do something.
    }

val dialog: AlertDialog = builder.create()
dialog.show()
Java
        String[] choices = {"Item One", "Item Two", "Item Three"};

        AlertDialog.Builder builder = AlertDialog.Builder(context);
        builder
                .setTitle("I am the title")
                .setPositiveButton("Positive", (dialog, which) -> {

                })
                .setNegativeButton("Negative", (dialog, which) -> {

                })
                .setSingleChoiceItems(choices, 0, (dialog, which) -> {

                });

        AlertDialog dialog = builder.create();
        dialog.show();
Oto przykład:
Tworzenie układu niestandardowego
Jeśli chcesz mieć w oknie układ niestandardowy, utwórz układ i dodaj go do elementu
AlertDialog wywołując metodę
setView()
w obiekcie AlertDialog.Builder.
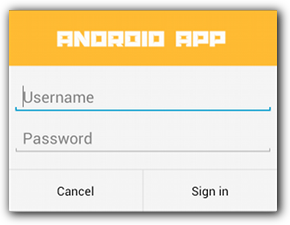
Domyślnie układ niestandardowy wypełnia okno, ale nadal możesz używać metod AlertDialog.Builder, aby dodać przyciski i tytuł.
Oto na przykład plik układu dla poprzedniego układu okna niestandardowego:
res/layout/dialog_signin.xml
<LinearLayout xmlns:android="http://schemas.android.com/apk/res/android"
    android:orientation="vertical"
    android:layout_width="wrap_content"
    android:layout_height="wrap_content">
    <ImageView
        android:src="@drawable/header_logo"
        android:layout_width="match_parent"
        android:layout_height="64dp"
        android:scaleType="center"
        android:background="#FFFFBB33"
        android:contentDescription="@string/app_name" />
    <EditText
        android:id="@+id/username"
        android:inputType="textEmailAddress"
        android:layout_width="match_parent"
        android:layout_height="wrap_content"
        android:layout_marginTop="16dp"
        android:layout_marginLeft="4dp"
        android:layout_marginRight="4dp"
        android:layout_marginBottom="4dp"
        android:hint="@string/username" />
    <EditText
        android:id="@+id/password"
        android:inputType="textPassword"
        android:layout_width="match_parent"
        android:layout_height="wrap_content"
        android:layout_marginTop="4dp"
        android:layout_marginLeft="4dp"
        android:layout_marginRight="4dp"
        android:layout_marginBottom="16dp"
        android:fontFamily="sans-serif"
        android:hint="@string/password"/>
</LinearLayout>
Aby rozwinąć układ w elemencie DialogFragment, pobierz element
LayoutInflater
za pomocą metody
getLayoutInflater()
i wywołaj metodę
inflate().
Pierwszy parametr to identyfikator zasobu układu, a drugi to widok nadrzędny układu. Następnie możesz wywołać metodę setView(), aby umieścić układ w oknie. Pokazuje to ten przykład.
Kotlin
override fun onCreateDialog(savedInstanceState: Bundle?): Dialog {
    return activity?.let {
        val builder = AlertDialog.Builder(it)
        // Get the layout inflater.
        val inflater = requireActivity().layoutInflater;

        // Inflate and set the layout for the dialog.
        // Pass null as the parent view because it's going in the dialog
        // layout.
        builder.setView(inflater.inflate(R.layout.dialog_signin, null))
                // Add action buttons.
                .setPositiveButton(R.string.signin,
                        DialogInterface.OnClickListener { dialog, id ->
                            // Sign in the user.
                        })
                .setNegativeButton(R.string.cancel,
                        DialogInterface.OnClickListener { dialog, id ->
                            getDialog().cancel()
                        })
        builder.create()
    } ?: throw IllegalStateException("Activity cannot be null")
}
Java
@Override
public Dialog onCreateDialog(Bundle savedInstanceState) {
    AlertDialog.Builder builder = new AlertDialog.Builder(getActivity());
    // Get the layout inflater.
    LayoutInflater inflater = requireActivity().getLayoutInflater();

    // Inflate and set the layout for the dialog.
    // Pass null as the parent view because it's going in the dialog layout.
    builder.setView(inflater.inflate(R.layout.dialog_signin, null))
    // Add action buttons
           .setPositiveButton(R.string.signin, new DialogInterface.OnClickListener() {
               @Override
               public void onClick(DialogInterface dialog, int id) {
                   // Sign in the user.
               }
           })
           .setNegativeButton(R.string.cancel, new DialogInterface.OnClickListener() {
               public void onClick(DialogInterface dialog, int id) {
                   LoginDialogFragment.this.getDialog().cancel();
               }
           });
    return builder.create();
}
Jeśli chcesz mieć okno niestandardowe, możesz zamiast interfejsów API Dialog wyświetlić element Activity jako okno. Utwórz aktywność i
ustaw jej motyw na
Theme.Holo.Dialog
w elemencie
<activity>
manifestu:
<activity android:theme="@android:style/Theme.Holo.Dialog" >
Aktywność wyświetla się teraz w oknie zamiast na pełnym ekranie.
Przekazywanie zdarzeń z powrotem do hosta okna
Gdy użytkownik naciśnie jeden z przycisków działań okna lub wybierze element z jego listy, element DialogFragment może samodzielnie wykonać niezbędne działanie, ale często chcesz przekazać zdarzenie do aktywności lub fragmentu, który otwiera okno. Aby to zrobić, zdefiniuj interfejs z metodą dla każdego typu zdarzenia kliknięcia. Następnie zaimplementuj ten interfejs w komponencie hosta, który odbiera zdarzenia działań z okna.
Oto na przykład element DialogFragment, który definiuje interfejs, za pomocą którego przekazuje zdarzenia z powrotem do aktywności hosta:
Kotlin
class NoticeDialogFragment : DialogFragment() {
    // Use this instance of the interface to deliver action events.
    internal lateinit var listener: NoticeDialogListener

    // The activity that creates an instance of this dialog fragment must
    // implement this interface to receive event callbacks. Each method passes
    // the DialogFragment in case the host needs to query it.
    interface NoticeDialogListener {
        fun onDialogPositiveClick(dialog: DialogFragment)
        fun onDialogNegativeClick(dialog: DialogFragment)
    }

    // Override the Fragment.onAttach() method to instantiate the
    // NoticeDialogListener.
    override fun onAttach(context: Context) {
        super.onAttach(context)
        // Verify that the host activity implements the callback interface.
        try {
            // Instantiate the NoticeDialogListener so you can send events to
            // the host.
            listener = context as NoticeDialogListener
        } catch (e: ClassCastException) {
            // The activity doesn't implement the interface. Throw exception.
            throw ClassCastException((context.toString() +
                    " must implement NoticeDialogListener"))
        }
    }
}
Java
public class NoticeDialogFragment extends DialogFragment {

    // The activity that creates an instance of this dialog fragment must
    // implement this interface to receive event callbacks. Each method passes
    // the DialogFragment in case the host needs to query it.
    public interface NoticeDialogListener {
        public void onDialogPositiveClick(DialogFragment dialog);
        public void onDialogNegativeClick(DialogFragment dialog);
    }

    // Use this instance of the interface to deliver action events.
    NoticeDialogListener listener;

    // Override the Fragment.onAttach() method to instantiate the
    // NoticeDialogListener.
    @Override
    public void onAttach(Context context) {
        super.onAttach(context);
        // Verify that the host activity implements the callback interface.
        try {
            // Instantiate the NoticeDialogListener so you can send events to
            // the host.
            listener = (NoticeDialogListener) context;
        } catch (ClassCastException e) {
            // The activity doesn't implement the interface. Throw exception.
            throw new ClassCastException(activity.toString()
                    + " must implement NoticeDialogListener");
        }
    }
    ...
}
Aktywność hostująca okno tworzy instancję okna za pomocą konstruktora fragmentu okna i odbiera zdarzenia okna za pomocą implementacji interfejsu NoticeDialogListener:
Kotlin
class MainActivity : FragmentActivity(),
        NoticeDialogFragment.NoticeDialogListener {

    fun showNoticeDialog() {
        // Create an instance of the dialog fragment and show it.
        val dialog = NoticeDialogFragment()
        dialog.show(supportFragmentManager, "NoticeDialogFragment")
    }

    // The dialog fragment receives a reference to this Activity through the
    // Fragment.onAttach() callback, which it uses to call the following
    // methods defined by the NoticeDialogFragment.NoticeDialogListener
    // interface.
    override fun onDialogPositiveClick(dialog: DialogFragment) {
        // User taps the dialog's positive button.
    }

    override fun onDialogNegativeClick(dialog: DialogFragment) {
        // User taps the dialog's negative button.
    }
}
Java
public class MainActivity extends FragmentActivity
                          implements NoticeDialogFragment.NoticeDialogListener{
    ...
    public void showNoticeDialog() {
        // Create an instance of the dialog fragment and show it.
        DialogFragment dialog = new NoticeDialogFragment();
        dialog.show(getSupportFragmentManager(), "NoticeDialogFragment");
    }

    // The dialog fragment receives a reference to this Activity through the
    // Fragment.onAttach() callback, which it uses to call the following
    // methods defined by the NoticeDialogFragment.NoticeDialogListener
    // interface.
    @Override
    public void onDialogPositiveClick(DialogFragment dialog) {
        // User taps the dialog's positive button.
        ...
    }

    @Override
    public void onDialogNegativeClick(DialogFragment dialog) {
        // User taps the dialog's negative button.
        ...
    }
}
Ponieważ aktywność hosta implementuje interfejs NoticeDialogListener (co jest wymuszane przez metodę wywołania zwrotnego onAttach() pokazaną w poprzednim przykładzie), fragment okna może używać metod wywołania zwrotnego interfejsu do przekazywania zdarzeń kliknięcia do aktywności:
Kotlin
    override fun onCreateDialog(savedInstanceState: Bundle): Dialog {
        return activity?.let {
            // Build the dialog and set up the button click handlers.
            val builder = AlertDialog.Builder(it)

            builder.setMessage(R.string.dialog_start_game)
                    .setPositiveButton(R.string.start,
                            DialogInterface.OnClickListener { dialog, id ->
                                // Send the positive button event back to the
                                // host activity.
                                listener.onDialogPositiveClick(this)
                            })
                    .setNegativeButton(R.string.cancel,
                            DialogInterface.OnClickListener { dialog, id ->
                                // Send the negative button event back to the
                                // host activity.
                                listener.onDialogNegativeClick(this)
                            })

            builder.create()
        } ?: throw IllegalStateException("Activity cannot be null")
    }
Java
public class NoticeDialogFragment extends DialogFragment {
    ...
    @Override
    public Dialog onCreateDialog(Bundle savedInstanceState) {
        // Build the dialog and set up the button click handlers.
        AlertDialog.Builder builder = new AlertDialog.Builder(getActivity());
        builder.setMessage(R.string.dialog_start_game)
               .setPositiveButton(R.string.start, new DialogInterface.OnClickListener() {
                   public void onClick(DialogInterface dialog, int id) {
                       // Send the positive button event back to the host activity.
                       listener.onDialogPositiveClick(NoticeDialogFragment.this);
                   }
               })
               .setNegativeButton(R.string.cancel, new DialogInterface.OnClickListener() {
                   public void onClick(DialogInterface dialog, int id) {
                       // Send the negative button event back to the host activity.
                       listener.onDialogNegativeClick(NoticeDialogFragment.this);
                   }
               });
        return builder.create();
    }
}
Wyświetlanie okna
Gdy chcesz wyświetlić okno, utwórz instancję elementu DialogFragment i wywołaj metodę show(), przekazując element FragmentManager i nazwę tagu fragmentu okna.
Element FragmentManager możesz uzyskać, wywołując metodę
getSupportFragmentManager()
z elementu
FragmentActivity
lub metodę
getParentFragmentManager()
z elementu Fragment. Oto przykład:
Kotlin
fun confirmStartGame() {
    val newFragment = StartGameDialogFragment()
    newFragment.show(supportFragmentManager, "game")
}
Java
public void confirmStartGame() {
    DialogFragment newFragment = new StartGameDialogFragment();
    newFragment.show(getSupportFragmentManager(), "game");
}
Drugi argument, "game", to unikalna nazwa tagu, której system używa do zapisywania i przywracania stanu fragmentu w razie potrzeby. Tag umożliwia też uzyskanie uchwytu do fragmentu przez wywołanie metody findFragmentByTag().
Wyświetlanie okna na pełnym ekranie lub jako fragment umieszczony
W niektórych sytuacjach możesz chcieć, aby część projektu interfejsu wyświetlała się jako okno, a w innych – jako fragment na pełnym ekranie lub fragment umieszczony. Możesz też chcieć, aby wyglądała inaczej w zależności od rozmiaru ekranu urządzenia. Klasa
DialogFragment zapewnia elastyczność, ponieważ może działać jako fragment, który można umieścićFragment.
W tym przypadku nie możesz jednak użyć elementu AlertDialog.Builder ani innych
Dialog obiektów do utworzenia okna. Jeśli chcesz, aby element DialogFragment można było umieścić, zdefiniuj interfejs okna w układzie, a następnie wczytaj układ w wywołaniu zwrotnym onCreateView().
Oto przykład elementu DialogFragment, który może wyświetlać się jako okno lub fragment umieszczony, używając układu o nazwie purchase_items.xml:
Kotlin
class CustomDialogFragment : DialogFragment() {

    // The system calls this to get the DialogFragment's layout, regardless of
    // whether it's being displayed as a dialog or an embedded fragment.
    override fun onCreateView(
            inflater: LayoutInflater,
            container: ViewGroup?,
            savedInstanceState: Bundle?
    ): View {
        // Inflate the layout to use as a dialog or embedded fragment.
        return inflater.inflate(R.layout.purchase_items, container, false)
    }

    // The system calls this only when creating the layout in a dialog.
    override fun onCreateDialog(savedInstanceState: Bundle): Dialog {
        // The only reason you might override this method when using
        // onCreateView() is to modify the dialog characteristics. For example,
        // the dialog includes a title by default, but your custom layout might
        // not need it. Here, you can remove the dialog title, but you must
        // call the superclass to get the Dialog.
        val dialog = super.onCreateDialog(savedInstanceState)
        dialog.requestWindowFeature(Window.FEATURE_NO_TITLE)
        return dialog
    }
}
Java
public class CustomDialogFragment extends DialogFragment {
    // The system calls this to get the DialogFragment's layout, regardless of
    // whether it's being displayed as a dialog or an embedded fragment.
    @Override
    public View onCreateView(LayoutInflater inflater, ViewGroup container,
            Bundle savedInstanceState) {
        // Inflate the layout to use as a dialog or embedded fragment.
        return inflater.inflate(R.layout.purchase_items, container, false);
    }

    // The system calls this only when creating the layout in a dialog.
    @Override
    public Dialog onCreateDialog(Bundle savedInstanceState) {
        // The only reason you might override this method when using
        // onCreateView() is to modify the dialog characteristics. For example,
        // the dialog includes a title by default, but your custom layout might
        // not need it. Here, you can remove the dialog title, but you must
        // call the superclass to get the Dialog.
        Dialog dialog = super.onCreateDialog(savedInstanceState);
        dialog.requestWindowFeature(Window.FEATURE_NO_TITLE);
        return dialog;
    }
}
Ten przykład określa, czy fragment ma być wyświetlany jako okno, czy jako interfejs na pełnym ekranie, na podstawie rozmiaru ekranu:
Kotlin
fun showDialog() {
    val fragmentManager = supportFragmentManager
    val newFragment = CustomDialogFragment()
    if (isLargeLayout) {
        // The device is using a large layout, so show the fragment as a
        // dialog.
        newFragment.show(fragmentManager, "dialog")
    } else {
        // The device is smaller, so show the fragment fullscreen.
        val transaction = fragmentManager.beginTransaction()
        // For a polished look, specify a transition animation.
        transaction.setTransition(FragmentTransaction.TRANSIT_FRAGMENT_OPEN)
        // To make it fullscreen, use the 'content' root view as the container
        // for the fragment, which is always the root view for the activity.
        transaction
                .add(android.R.id.content, newFragment)
                .addToBackStack(null)
                .commit()
    }
}
Java
public void showDialog() {
    FragmentManager fragmentManager = getSupportFragmentManager();
    CustomDialogFragment newFragment = new CustomDialogFragment();

    if (isLargeLayout) {
        // The device is using a large layout, so show the fragment as a
        // dialog.
        newFragment.show(fragmentManager, "dialog");
    } else {
        // The device is smaller, so show the fragment fullscreen.
        FragmentTransaction transaction = fragmentManager.beginTransaction();
        // For a polished look, specify a transition animation.
        transaction.setTransition(FragmentTransaction.TRANSIT_FRAGMENT_OPEN);
        // To make it fullscreen, use the 'content' root view as the container
        // for the fragment, which is always the root view for the activity.
        transaction.add(android.R.id.content, newFragment)
                   .addToBackStack(null).commit();
    }
}
Więcej informacji o wykonywaniu transakcji fragmentów znajdziesz w artykule Fragmenty.
W tym przykładzie wartość logiczna mIsLargeLayout określa, czy bieżące urządzenie musi używać dużego układu aplikacji, a tym samym wyświetlać ten fragment jako okno, a nie na pełnym ekranie. Najlepszym sposobem na ustawienie tego rodzaju
wartości logicznej jest zadeklarowanie
wartości zasobu
logicznego z
alternatywną
wartością zasobu dla różnych rozmiarów ekranu. Oto na przykład 2 wersje zasobu logicznego dla różnych rozmiarów ekranu:
res/values/bools.xml
<!-- Default boolean values -->
<resources>
    <bool name="large_layout">false</bool>
</resources>
res/values-large/bools.xml
<!-- Large screen boolean values -->
<resources>
    <bool name="large_layout">true</bool>
</resources>
Następnie możesz zainicjować wartość mIsLargeLayout w metodzie onCreate() aktywności, jak pokazano w tym przykładzie:
Kotlin
override fun onCreate(savedInstanceState: Bundle?) {
    super.onCreate(savedInstanceState)
    setContentView(R.layout.activity_main)

    isLargeLayout = resources.getBoolean(R.bool.large_layout)
}
Java
boolean isLargeLayout;

@Override
public void onCreate(Bundle savedInstanceState) {
    super.onCreate(savedInstanceState);
    setContentView(R.layout.activity_main);

    isLargeLayout = getResources().getBoolean(R.bool.large_layout);
}
Wyświetlanie aktywności jako okna na dużych ekranach
Zamiast wyświetlać okno jako interfejs na pełnym ekranie na małych ekranach, możesz uzyskać
ten sam efekt, wyświetlając Activity jako okno na dużych
ekranach. Wybrana metoda zależy od projektu aplikacji, ale wyświetlanie aktywności jako okna jest często przydatne, gdy aplikacja jest przeznaczona na małe ekrany i chcesz poprawić wrażenia na tabletach, wyświetlając krótkotrwałą aktywność jako okno.
Aby wyświetlać aktywność jako okno tylko na dużych ekranach, zastosuj motyw
Theme.Holo.DialogWhenLarge
do elementu <activity> manifestu:
<activity android:theme="@android:style/Theme.Holo.DialogWhenLarge" >
Więcej informacji o stylizowaniu aktywności za pomocą motywów znajdziesz w artykule Style i motywy.
Zamykanie okna
Gdy użytkownik naciśnie przycisk polecenia utworzony za pomocą elementu AlertDialog.Builder, system zamknie okno.
System zamyka też okno, gdy użytkownik naciśnie element na liście okna, z wyjątkiem sytuacji, gdy lista używa przycisków opcji lub pól wyboru. W przeciwnym razie możesz ręcznie zamknąć okno, wywołując metodę dismiss() w elemencie DialogFragment.
Jeśli musisz wykonać określone działania po zamknięciu okna, możesz zaimplementować metodę onDismiss() w elemencie DialogFragment.
Możesz też anulować okno. Jest to specjalne zdarzenie, które wskazuje, że użytkownik opuszcza okno bez wykonywania zadania. Dzieje się tak, gdy użytkownik naciśnie przycisk Wstecz lub naciśnie ekran poza obszarem okna albo gdy jawnie wywołasz metodę cancel() w elemencie Dialog, np. w odpowiedzi na naciśnięcie przycisku „Anuluj” w oknie.
Jak pokazano w poprzednim przykładzie, możesz reagować na zdarzenie anulowania, implementując metodę onCancel() w klasie DialogFragment.