


İletişim kutusu, kullanıcıdan karar vermesini veya ek bilgi girmesini isteyen küçük bir penceredir. İletişim kutusu ekranı doldurmaz ve genellikle kullanıcıların devam edebilmek için işlem yapmasını gerektiren modal etkinlikler için kullanılır.

Dialog
sınıfı, iletişim kutularının temel sınıfıdır ancak Dialog
doğrudan örneklenmez. Bunun yerine aşağıdaki alt sınıflardan birini kullanın:
AlertDialog- Başlık, en fazla üç düğme, seçilebilir öğeler listesi veya özel düzen gösterebilen bir iletişim kutusu.
DatePickerDialogveyaTimePickerDialog- Kullanıcının tarih veya saat seçmesine olanak tanıyan, önceden tanımlanmış bir kullanıcı arayüzüne sahip iletişim kutusu.
Bu sınıflar, iletişim kutunuzun stilini ve yapısını tanımlar. Ayrıca iletişim kutunuz için kapsayıcı olarak DialogFragment kullanmanız gerekir. DialogFragment sınıfı, Dialog nesnesinde yöntem çağırmak yerine iletişim kutunuzu oluşturmak ve görünümünü yönetmek için ihtiyacınız olan tüm kontrolleri sağlar.
İletişim kutusunu yönetmek için DialogFragment kullanmak, kullanıcının Geri düğmesine dokunması veya ekranı döndürmesi gibi yaşam döngüsü etkinliklerinin doğru şekilde işlenmesini sağlar. DialogFragment sınıfı, geleneksel bir Fragment gibi, iletişim kutusunun kullanıcı arayüzünü daha büyük bir kullanıcı arayüzünde yerleştirilebilir bir bileşen olarak yeniden kullanmanıza da olanak tanır. Örneğin, iletişim kutusu kullanıcı arayüzünün büyük ve küçük ekranlarda farklı görünmesini istediğinizde bu sınıfı kullanabilirsiniz.
Bu belgedeki aşağıdaki bölümlerde, DialogFragment nesnesiyle birlikte AlertDialog nesnesinin nasıl kullanılacağı açıklanmaktadır. Tarih veya saat seçici oluşturmak istiyorsanız Uygulamanıza seçici ekleme başlıklı makaleyi inceleyin.
İletişim kutusu parçası oluşturma
DialogFragment öğesini genişleterek ve onCreateDialog() geri çağırma yönteminde AlertDialog oluşturarak özel düzenler ve Materyal Tasarım İletişim Kutuları'nda açıklananlar da dahil olmak üzere çok çeşitli iletişim kutusu tasarımları oluşturabilirsiniz.
Örneğin, DialogFragment içinde yönetilen temel bir AlertDialog aşağıda verilmiştir:
Kotlin
class StartGameDialogFragment : DialogFragment() {
    override fun onCreateDialog(savedInstanceState: Bundle?): Dialog {
        return activity?.let {
            // Use the Builder class for convenient dialog construction.
            val builder = AlertDialog.Builder(it)
            builder.setMessage("Start game")
                .setPositiveButton("Start") { dialog, id ->
                    // START THE GAME!
                }
                .setNegativeButton("Cancel") { dialog, id ->
                    // User cancelled the dialog.
                }
            // Create the AlertDialog object and return it.
            builder.create()
        } ?: throw IllegalStateException("Activity cannot be null")
    }
}

class OldXmlActivity : AppCompatActivity() {
    override fun onCreate(savedInstanceState: Bundle?) {
        super.onCreate(savedInstanceState)
        setContentView(R.layout.activity_old_xml)

        StartGameDialogFragment().show(supportFragmentManager, "GAME_DIALOG")
    }
}
Java
public class StartGameDialogFragment extends DialogFragment {
    @Override
    public Dialog onCreateDialog(Bundle savedInstanceState) {
        // Use the Builder class for convenient dialog construction.
        AlertDialog.Builder builder = new AlertDialog.Builder(getActivity());
        builder.setMessage(R.string.dialog_start_game)
               .setPositiveButton(R.string.start, new DialogInterface.OnClickListener() {
                   public void onClick(DialogInterface dialog, int id) {
                       // START THE GAME!
                   }
               })
               .setNegativeButton(R.string.cancel, new DialogInterface.OnClickListener() {
                   public void onClick(DialogInterface dialog, int id) {
                       // User cancels the dialog.
                   }
               });
        // Create the AlertDialog object and return it.
        return builder.create();
    }
}
// ...

StartGameDialogFragment().show(supportFragmentManager, "GAME_DIALOG");
Bu sınıfın bir örneğini oluşturup
show() nesnesini çağırdığınızda iletişim kutusu aşağıdaki şekilde gösterilir.
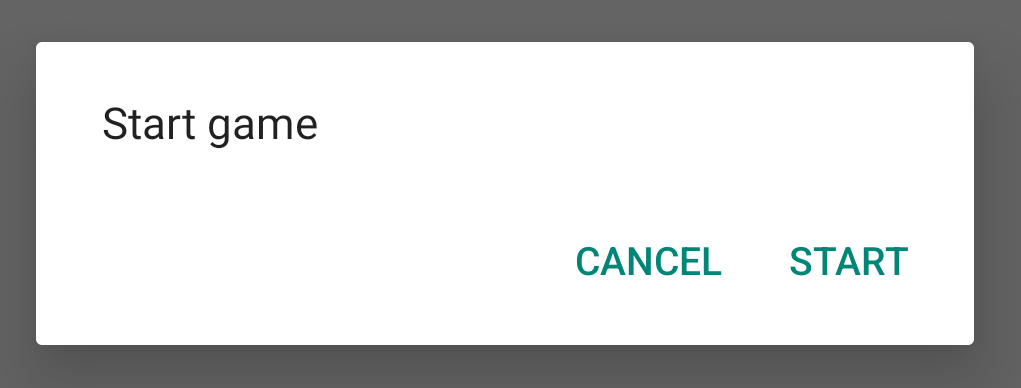
Sonraki bölümde, iletişim kutusunu oluşturmak için
AlertDialog.Builder
API'leri kullanma hakkında daha ayrıntılı bilgi verilmektedir.
İletişim kutunuzun karmaşıklığına bağlı olarak, DialogFragment içinde parça yaşam döngüsü yöntemleri de dahil olmak üzere çeşitli geri çağırma yöntemleri uygulayabilirsiniz.
Uyarı iletişim kutusu oluşturma
AlertDialog sınıfı, çeşitli iletişim kutusu tasarımları oluşturmanıza olanak tanır ve genellikle ihtiyacınız olan tek iletişim kutusu sınıfıdır. Aşağıdaki şekilde gösterildiği gibi, uyarı iletişim kutusunun üç bölgesi vardır:
- Başlık: Bu özellik isteğe bağlıdır ve yalnızca içerik alanı ayrıntılı bir mesaj, liste veya özel düzenle doldurulduğunda kullanılır. Basit bir mesaj veya soru belirtmeniz gerekiyorsa başlığa ihtiyacınız yoktur.
- İçerik alanı: Bu alanda mesaj, liste veya başka bir özel düzen gösterilebilir.
- İşlem düğmeleri: Bir iletişim kutusunda en fazla üç işlem düğmesi olabilir.
AlertDialog.Builder sınıfı, özel düzen de dahil olmak üzere bu tür içeriklerle AlertDialog oluşturmanıza olanak tanıyan API'ler sağlar.
AlertDialog oluşturmak için aşağıdakileri yapın:
Kotlin
val builder: AlertDialog.Builder = AlertDialog.Builder(context)
builder
    .setMessage("I am the message")
    .setTitle("I am the title")

val dialog: AlertDialog = builder.create()
dialog.show()
Java
// 1. Instantiate an AlertDialog.Builder with its constructor.
AlertDialog.Builder builder = new AlertDialog.Builder(getActivity());

// 2. Chain together various setter methods to set the dialog characteristics.
builder.setMessage(R.string.dialog_message)
       .setTitle(R.string.dialog_title);

// 3. Get the AlertDialog.
AlertDialog dialog = builder.create();
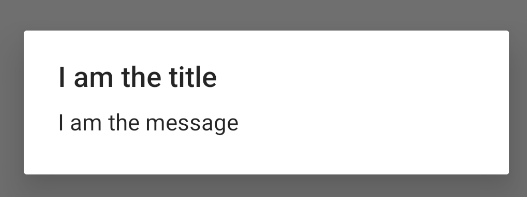
Önceki kod snippet'i şu iletişim kutusunu oluşturur:
Düğme ekleme
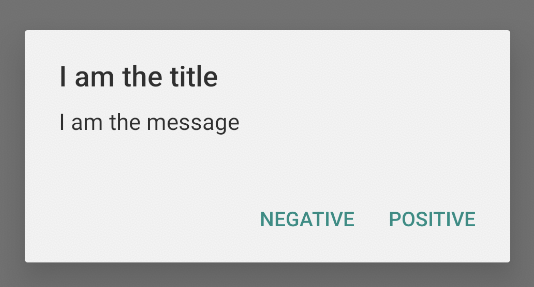
Şekil 2'deki gibi işlem düğmeleri eklemek için setPositiveButton() ve setNegativeButton() yöntemlerini çağırın:
Kotlin
val builder: AlertDialog.Builder = AlertDialog.Builder(context)
builder
    .setMessage("I am the message")
    .setTitle("I am the title")
    .setPositiveButton("Positive") { dialog, which ->
        // Do something.
    }
    .setNegativeButton("Negative") { dialog, which ->
        // Do something else.
    }

val dialog: AlertDialog = builder.create()
dialog.show()
Java
AlertDialog.Builder builder = new AlertDialog.Builder(getActivity());
// Add the buttons.
builder.setPositiveButton(R.string.ok, new DialogInterface.OnClickListener() {
           public void onClick(DialogInterface dialog, int id) {
               // User taps OK button.
           }
       });
builder.setNegativeButton(R.string.cancel, new DialogInterface.OnClickListener() {
           public void onClick(DialogInterface dialog, int id) {
               // User cancels the dialog.
           }
       });
// Set other dialog properties.
...

// Create the AlertDialog.
AlertDialog dialog = builder.create();
set...Button() yöntemleri, düğme için bir başlık (dize kaynağı tarafından sağlanır) ve kullanıcının düğmeye dokunduğunda gerçekleştirilecek işlemi tanımlayan bir DialogInterface.OnClickListener gerektirir.
Ekleyebileceğiniz üç işlem düğmesi vardır:
- Olumlu: İşlemi kabul etmek ve devam etmek için kullanılır ("Tamam" işlemi).
- Olumsuz: İşlemi iptal etmek için bu düğmeyi kullanın.
- Nötr: Kullanıcı işlemin devam etmesini istemeyebilir ancak iptal etmek de istemeyebilir. Bu durumda bu seçeneği kullanın. Bu düğme, olumlu ve olumsuz düğmelerinin arasında görünür. Örneğin, işlem "Daha sonra hatırlat" olabilir.
Bir AlertDialog'ya her düğme türünden yalnızca bir tane ekleyebilirsiniz. Örneğin, birden fazla "olumlu" düğmesi olamaz.
Önceki kod snippet'i size aşağıdaki gibi bir uyarı iletişim kutusu gösterir:
Liste ekleme
AlertDialog
API'lerinde üç tür liste bulunur:
- Geleneksel tek seçimli liste.
- Kalıcı bir tek seçimli liste (radyo düğmeleri).
- Kalıcı bir çoktan seçmeli liste (onay kutuları).
Şekil 5'teki gibi tek seçimlik bir liste oluşturmak için aşağıdaki yöntemi kullanın:
setItems()
Kotlin
val builder: AlertDialog.Builder = AlertDialog.Builder(context)
builder
    .setTitle("I am the title")
    .setPositiveButton("Positive") { dialog, which ->
        // Do something.
    }
    .setNegativeButton("Negative") { dialog, which ->
        // Do something else.
    }
    .setItems(arrayOf("Item One", "Item Two", "Item Three")) { dialog, which ->
        // Do something on item tapped.
    }

val dialog: AlertDialog = builder.create()
dialog.show()
Java
@Override
public Dialog onCreateDialog(Bundle savedInstanceState) {
    AlertDialog.Builder builder = new AlertDialog.Builder(getActivity());
    builder.setTitle(R.string.pick_color)
           .setItems(R.array.colors_array, new DialogInterface.OnClickListener() {
               public void onClick(DialogInterface dialog, int which) {
               // The 'which' argument contains the index position of the selected item.
           }
    });
    return builder.create();
}
Bu kod snippet'i, aşağıdaki gibi bir iletişim kutusu oluşturur:
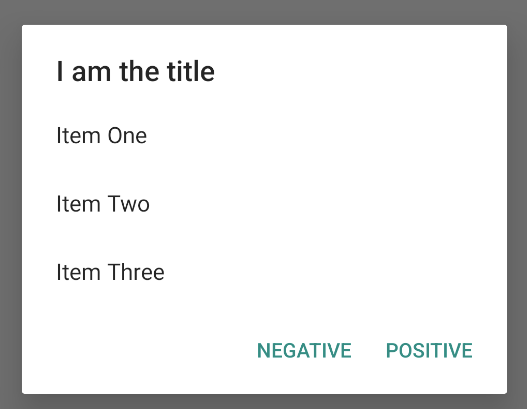
Liste, iletişim kutusunun içerik alanında göründüğünden iletişim kutusunda hem ileti hem de liste gösterilemez. setTitle() ile iletişim kutusu için başlık ayarlayın.
Listeye eklenecek öğeleri belirtmek için setItems() işlevini çağırarak bir dizi iletin. Alternatif olarak, setAdapter() kullanarak bir liste belirtebilirsiniz.
Bu sayede, ListAdapter kullanarak listeyi dinamik verilerle (ör. veritabanından alınan veriler) destekleyebilirsiniz.
Listenizi ListAdapter ile destekliyorsanız içeriğin eşzamansız olarak yüklenmesi için her zaman Loader kullanın. Bu konu, Adaptörle düzen oluşturma ve Yükleyiciler başlıklı makalelerde daha ayrıntılı olarak açıklanmaktadır.
Kalıcı bir çoktan seçmeli veya tek seçimli liste ekleme
Çoktan seçmeli öğeler (onay kutuları) veya tek seçimlik öğeler (radyo düğmeleri) listesi eklemek için sırasıyla setMultiChoiceItems() veya setSingleChoiceItems() yöntemlerini kullanın.
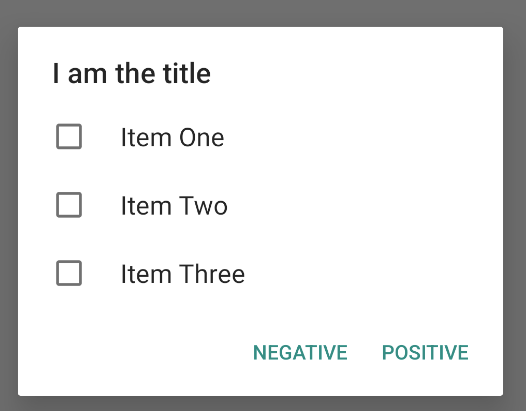
Örneğin, Şekil 6'da gösterilene benzer bir çoktan seçmeli liste oluşturarak seçilen öğeleri ArrayList içine nasıl kaydedebileceğinizi aşağıda bulabilirsiniz:
Kotlin
val builder: AlertDialog.Builder = AlertDialog.Builder(context)
builder
    .setTitle("I am the title")
    .setPositiveButton("Positive") { dialog, which ->
        // Do something.
    }
    .setNegativeButton("Negative") { dialog, which ->
        // Do something else.
    }
    .setMultiChoiceItems(
        arrayOf("Item One", "Item Two", "Item Three"), null) { dialog, which, isChecked ->
        // Do something.
    }

val dialog: AlertDialog = builder.create()
dialog.show()
Java
@Override
public Dialog onCreateDialog(Bundle savedInstanceState) {
    selectedItems = new ArrayList();  // Where we track the selected items
    AlertDialog.Builder builder = new AlertDialog.Builder(getActivity());
    // Set the dialog title.
    builder.setTitle(R.string.pick_toppings)
    // Specify the list array, the items to be selected by default (null for
    // none), and the listener through which to receive callbacks when items
    // are selected.
           .setMultiChoiceItems(R.array.toppings, null,
                      new DialogInterface.OnMultiChoiceClickListener() {
               @Override
               public void onClick(DialogInterface dialog, int which,
                       boolean isChecked) {
                   if (isChecked) {
                       // If the user checks the item, add it to the selected
                       // items.
                       selectedItems.add(which);
                   } else if (selectedItems.contains(which)) {
                       // If the item is already in the array, remove it.
                       selectedItems.remove(which);
                   }
               }
           })
    // Set the action buttons
           .setPositiveButton(R.string.ok, new DialogInterface.OnClickListener() {
               @Override
               public void onClick(DialogInterface dialog, int id) {
                   // User taps OK, so save the selectedItems results
                   // somewhere or return them to the component that opens the
                   // dialog.
                   ...
               }
           })
           .setNegativeButton(R.string.cancel, new DialogInterface.OnClickListener() {
               @Override
               public void onClick(DialogInterface dialog, int id) {
                   ...
               }
           });

    return builder.create();
}
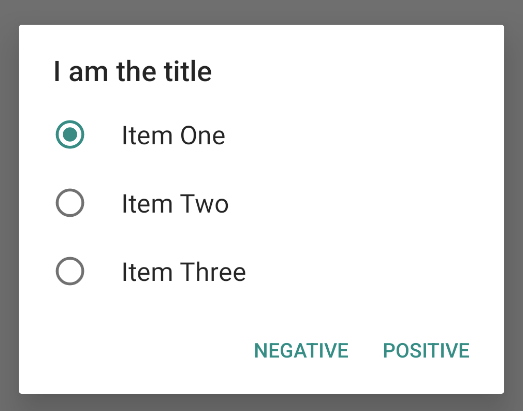
Tek seçimlik uyarı iletişim kutusu şu şekilde elde edilebilir:
Kotlin
val builder: AlertDialog.Builder = AlertDialog.Builder(context)
builder
    .setTitle("I am the title")
    .setPositiveButton("Positive") { dialog, which ->
        // Do something.
    }
    .setNegativeButton("Negative") { dialog, which ->
        // Do something else.
    }
    .setSingleChoiceItems(
        arrayOf("Item One", "Item Two", "Item Three"), 0
    ) { dialog, which ->
        // Do something.
    }

val dialog: AlertDialog = builder.create()
dialog.show()
Java
        String[] choices = {"Item One", "Item Two", "Item Three"};

        AlertDialog.Builder builder = AlertDialog.Builder(context);
        builder
                .setTitle("I am the title")
                .setPositiveButton("Positive", (dialog, which) -> {

                })
                .setNegativeButton("Negative", (dialog, which) -> {

                })
                .setSingleChoiceItems(choices, 0, (dialog, which) -> {

                });

        AlertDialog dialog = builder.create();
        dialog.show();
Bu durumda aşağıdaki örnek elde edilir:
Özel düzen oluşturma
Bir iletişim kutusunda özel düzen istiyorsanız düzen oluşturun ve AlertDialog nesnenizde setView() çağırarak bu düzeni AlertDialog.Builder nesnesine ekleyin.
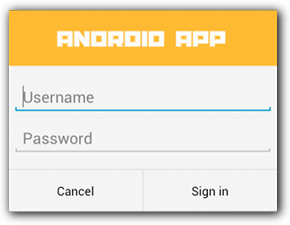
Özel düzen varsayılan olarak iletişim kutusunu doldurur ancak düğme ve başlık eklemek için AlertDialog.Builder yöntemlerini kullanmaya devam edebilirsiniz.
Örneğin, yukarıdaki özel iletişim kutusunun düzen dosyası şu şekildedir: layout:
res/layout/dialog_signin.xml
<LinearLayout xmlns:android="http://schemas.android.com/apk/res/android"
    android:orientation="vertical"
    android:layout_width="wrap_content"
    android:layout_height="wrap_content">
    <ImageView
        android:src="@drawable/header_logo"
        android:layout_width="match_parent"
        android:layout_height="64dp"
        android:scaleType="center"
        android:background="#FFFFBB33"
        android:contentDescription="@string/app_name" />
    <EditText
        android:id="@+id/username"
        android:inputType="textEmailAddress"
        android:layout_width="match_parent"
        android:layout_height="wrap_content"
        android:layout_marginTop="16dp"
        android:layout_marginLeft="4dp"
        android:layout_marginRight="4dp"
        android:layout_marginBottom="4dp"
        android:hint="@string/username" />
    <EditText
        android:id="@+id/password"
        android:inputType="textPassword"
        android:layout_width="match_parent"
        android:layout_height="wrap_content"
        android:layout_marginTop="4dp"
        android:layout_marginLeft="4dp"
        android:layout_marginRight="4dp"
        android:layout_marginBottom="16dp"
        android:fontFamily="sans-serif"
        android:hint="@string/password"/>
</LinearLayout>
DialogFragment düzenini genişletmek için LayoutInflater ile getLayoutInflater() alın ve inflate() işlevini çağırın.
İlk parametre, düzen kaynağı kimliği, ikinci parametre ise düzenin ebeveyn görünümüdür. Ardından, düzeni iletişim kutusuna yerleştirmek için setView() tuşuna basabilirsiniz. Bu durum aşağıdaki örnekte gösterilmektedir.
Kotlin
override fun onCreateDialog(savedInstanceState: Bundle?): Dialog {
    return activity?.let {
        val builder = AlertDialog.Builder(it)
        // Get the layout inflater.
        val inflater = requireActivity().layoutInflater;

        // Inflate and set the layout for the dialog.
        // Pass null as the parent view because it's going in the dialog
        // layout.
        builder.setView(inflater.inflate(R.layout.dialog_signin, null))
                // Add action buttons.
                .setPositiveButton(R.string.signin,
                        DialogInterface.OnClickListener { dialog, id ->
                            // Sign in the user.
                        })
                .setNegativeButton(R.string.cancel,
                        DialogInterface.OnClickListener { dialog, id ->
                            getDialog().cancel()
                        })
        builder.create()
    } ?: throw IllegalStateException("Activity cannot be null")
}
Java
@Override
public Dialog onCreateDialog(Bundle savedInstanceState) {
    AlertDialog.Builder builder = new AlertDialog.Builder(getActivity());
    // Get the layout inflater.
    LayoutInflater inflater = requireActivity().getLayoutInflater();

    // Inflate and set the layout for the dialog.
    // Pass null as the parent view because it's going in the dialog layout.
    builder.setView(inflater.inflate(R.layout.dialog_signin, null))
    // Add action buttons
           .setPositiveButton(R.string.signin, new DialogInterface.OnClickListener() {
               @Override
               public void onClick(DialogInterface dialog, int id) {
                   // Sign in the user.
               }
           })
           .setNegativeButton(R.string.cancel, new DialogInterface.OnClickListener() {
               public void onClick(DialogInterface dialog, int id) {
                   LoginDialogFragment.this.getDialog().cancel();
               }
           });
    return builder.create();
}
Özel bir iletişim kutusu istiyorsanız Dialog API'lerini kullanmak yerine Activity öğesini iletişim kutusu olarak gösterebilirsiniz. Bir etkinlik oluşturun ve <activity> manifest öğesinde temasını Theme.Holo.Dialog olarak ayarlayın:
<activity android:theme="@android:style/Theme.Holo.Dialog" >
Etkinlik artık tam ekran yerine bir iletişim kutusu penceresinde gösteriliyor.
Etkinlikleri iletişim kutusunun ana makinesine geri iletme
Kullanıcı, iletişim kutusunun işlem düğmelerinden birine dokunduğunda veya listeden bir öğe seçtiğinde DialogFragment gerekli işlemi kendisi gerçekleştirebilir ancak genellikle etkinliği, iletişim kutusunu açan etkinliğe veya parçaya iletmek istersiniz. Bunu yapmak için her tıklama etkinliği türü için bir yöntem içeren bir arayüz tanımlayın. Ardından, bu arayüzü, iletişim kutusundan işlem etkinliklerini alan ana bileşende uygulayın.
Örneğin, etkinlikleri ana makine etkinliğine geri ilettiği bir arayüzü tanımlayan DialogFragment aşağıda verilmiştir:
Kotlin
class NoticeDialogFragment : DialogFragment() {
    // Use this instance of the interface to deliver action events.
    internal lateinit var listener: NoticeDialogListener

    // The activity that creates an instance of this dialog fragment must
    // implement this interface to receive event callbacks. Each method passes
    // the DialogFragment in case the host needs to query it.
    interface NoticeDialogListener {
        fun onDialogPositiveClick(dialog: DialogFragment)
        fun onDialogNegativeClick(dialog: DialogFragment)
    }

    // Override the Fragment.onAttach() method to instantiate the
    // NoticeDialogListener.
    override fun onAttach(context: Context) {
        super.onAttach(context)
        // Verify that the host activity implements the callback interface.
        try {
            // Instantiate the NoticeDialogListener so you can send events to
            // the host.
            listener = context as NoticeDialogListener
        } catch (e: ClassCastException) {
            // The activity doesn't implement the interface. Throw exception.
            throw ClassCastException((context.toString() +
                    " must implement NoticeDialogListener"))
        }
    }
}
Java
public class NoticeDialogFragment extends DialogFragment {

    // The activity that creates an instance of this dialog fragment must
    // implement this interface to receive event callbacks. Each method passes
    // the DialogFragment in case the host needs to query it.
    public interface NoticeDialogListener {
        public void onDialogPositiveClick(DialogFragment dialog);
        public void onDialogNegativeClick(DialogFragment dialog);
    }

    // Use this instance of the interface to deliver action events.
    NoticeDialogListener listener;

    // Override the Fragment.onAttach() method to instantiate the
    // NoticeDialogListener.
    @Override
    public void onAttach(Context context) {
        super.onAttach(context);
        // Verify that the host activity implements the callback interface.
        try {
            // Instantiate the NoticeDialogListener so you can send events to
            // the host.
            listener = (NoticeDialogListener) context;
        } catch (ClassCastException e) {
            // The activity doesn't implement the interface. Throw exception.
            throw new ClassCastException(activity.toString()
                    + " must implement NoticeDialogListener");
        }
    }
    ...
}
İletişim kutusunu barındıran etkinlik, iletişim kutusunun bir örneğini "dialog fragment" oluşturucusuyla oluşturur ve iletişim kutusunun etkinliklerini NoticeDialogListener arayüzünün bir uygulaması aracılığıyla alır:
Kotlin
class MainActivity : FragmentActivity(),
        NoticeDialogFragment.NoticeDialogListener {

    fun showNoticeDialog() {
        // Create an instance of the dialog fragment and show it.
        val dialog = NoticeDialogFragment()
        dialog.show(supportFragmentManager, "NoticeDialogFragment")
    }

    // The dialog fragment receives a reference to this Activity through the
    // Fragment.onAttach() callback, which it uses to call the following
    // methods defined by the NoticeDialogFragment.NoticeDialogListener
    // interface.
    override fun onDialogPositiveClick(dialog: DialogFragment) {
        // User taps the dialog's positive button.
    }

    override fun onDialogNegativeClick(dialog: DialogFragment) {
        // User taps the dialog's negative button.
    }
}
Java
public class MainActivity extends FragmentActivity
                          implements NoticeDialogFragment.NoticeDialogListener{
    ...
    public void showNoticeDialog() {
        // Create an instance of the dialog fragment and show it.
        DialogFragment dialog = new NoticeDialogFragment();
        dialog.show(getSupportFragmentManager(), "NoticeDialogFragment");
    }

    // The dialog fragment receives a reference to this Activity through the
    // Fragment.onAttach() callback, which it uses to call the following
    // methods defined by the NoticeDialogFragment.NoticeDialogListener
    // interface.
    @Override
    public void onDialogPositiveClick(DialogFragment dialog) {
        // User taps the dialog's positive button.
        ...
    }

    @Override
    public void onDialogNegativeClick(DialogFragment dialog) {
        // User taps the dialog's negative button.
        ...
    }
}
Ana makine etkinliği, önceki örnekte gösterilen onAttach() geri arama yöntemiyle zorunlu kılınan NoticeDialogListener öğesini uyguladığından iletişim kutusu parçası, tıklama etkinliklerini etkinliğe iletmek için arayüz geri arama yöntemlerini kullanabilir:
Kotlin
    override fun onCreateDialog(savedInstanceState: Bundle): Dialog {
        return activity?.let {
            // Build the dialog and set up the button click handlers.
            val builder = AlertDialog.Builder(it)

            builder.setMessage(R.string.dialog_start_game)
                    .setPositiveButton(R.string.start,
                            DialogInterface.OnClickListener { dialog, id ->
                                // Send the positive button event back to the
                                // host activity.
                                listener.onDialogPositiveClick(this)
                            })
                    .setNegativeButton(R.string.cancel,
                            DialogInterface.OnClickListener { dialog, id ->
                                // Send the negative button event back to the
                                // host activity.
                                listener.onDialogNegativeClick(this)
                            })

            builder.create()
        } ?: throw IllegalStateException("Activity cannot be null")
    }
Java
public class NoticeDialogFragment extends DialogFragment {
    ...
    @Override
    public Dialog onCreateDialog(Bundle savedInstanceState) {
        // Build the dialog and set up the button click handlers.
        AlertDialog.Builder builder = new AlertDialog.Builder(getActivity());
        builder.setMessage(R.string.dialog_start_game)
               .setPositiveButton(R.string.start, new DialogInterface.OnClickListener() {
                   public void onClick(DialogInterface dialog, int id) {
                       // Send the positive button event back to the host activity.
                       listener.onDialogPositiveClick(NoticeDialogFragment.this);
                   }
               })
               .setNegativeButton(R.string.cancel, new DialogInterface.OnClickListener() {
                   public void onClick(DialogInterface dialog, int id) {
                       // Send the negative button event back to the host activity.
                       listener.onDialogNegativeClick(NoticeDialogFragment.this);
                   }
               });
        return builder.create();
    }
}
İletişim kutusu gösterme
İletişim kutunuzu göstermek istediğinizde DialogFragment öğenizin bir örneğini oluşturun ve show() işlevini çağırarak FragmentManager ve iletişim kutusu parçası için bir etiket adı iletin.
FragmentManager kodunu getSupportFragmentManager() numaralı telefonu FragmentActivity cihazdan arayarak veya getParentFragmentManager() numaralı telefonu Fragment cihazdan arayarak alabilirsiniz. Örnek için aşağıdakilere bakın:
Kotlin
fun confirmStartGame() {
    val newFragment = StartGameDialogFragment()
    newFragment.show(supportFragmentManager, "game")
}
Java
public void confirmStartGame() {
    DialogFragment newFragment = new StartGameDialogFragment();
    newFragment.show(getSupportFragmentManager(), "game");
}
İkinci bağımsız değişken olan "game", sistemin gerektiğinde parça durumunu kaydetmek ve geri yüklemek için kullandığı benzersiz bir etiket adıdır. Etiket, findFragmentByTag() çağırarak parçanın tutamacını almanıza da olanak tanır.
İletişim kutusunu tam ekran veya yerleştirilmiş bir parça olarak gösterme
Kullanıcı arayüzü tasarımınızın bir bölümünün bazı durumlarda iletişim kutusu, bazılarında ise tam ekran veya yerleştirilmiş parça olarak görünmesini isteyebilirsiniz. Ayrıca, cihazın ekran boyutuna bağlı olarak farklı görünmesini de isteyebilirsiniz. DialogFragment sınıfı, yerleştirilebilir bir Fragment gibi davranabildiği için bu işlemi gerçekleştirmek üzere esneklik sunar.
Ancak bu durumda iletişim kutusunu oluşturmak için AlertDialog.Builder veya diğer Dialog nesnelerini kullanamazsınız. DialogFragment öğesinin yerleştirilebilir olmasını istiyorsanız iletişim kutusunun kullanıcı arayüzünü bir düzende tanımlayın, ardından düzeni onCreateView() geri çağırma işlevinde yükleyin.
Aşağıda, purchase_items.xml adlı bir düzen kullanılarak iletişim kutusu veya yerleştirilebilir parça olarak görünebilen bir örnek DialogFragment verilmiştir:
Kotlin
class CustomDialogFragment : DialogFragment() {

    // The system calls this to get the DialogFragment's layout, regardless of
    // whether it's being displayed as a dialog or an embedded fragment.
    override fun onCreateView(
            inflater: LayoutInflater,
            container: ViewGroup?,
            savedInstanceState: Bundle?
    ): View {
        // Inflate the layout to use as a dialog or embedded fragment.
        return inflater.inflate(R.layout.purchase_items, container, false)
    }

    // The system calls this only when creating the layout in a dialog.
    override fun onCreateDialog(savedInstanceState: Bundle): Dialog {
        // The only reason you might override this method when using
        // onCreateView() is to modify the dialog characteristics. For example,
        // the dialog includes a title by default, but your custom layout might
        // not need it. Here, you can remove the dialog title, but you must
        // call the superclass to get the Dialog.
        val dialog = super.onCreateDialog(savedInstanceState)
        dialog.requestWindowFeature(Window.FEATURE_NO_TITLE)
        return dialog
    }
}
Java
public class CustomDialogFragment extends DialogFragment {
    // The system calls this to get the DialogFragment's layout, regardless of
    // whether it's being displayed as a dialog or an embedded fragment.
    @Override
    public View onCreateView(LayoutInflater inflater, ViewGroup container,
            Bundle savedInstanceState) {
        // Inflate the layout to use as a dialog or embedded fragment.
        return inflater.inflate(R.layout.purchase_items, container, false);
    }

    // The system calls this only when creating the layout in a dialog.
    @Override
    public Dialog onCreateDialog(Bundle savedInstanceState) {
        // The only reason you might override this method when using
        // onCreateView() is to modify the dialog characteristics. For example,
        // the dialog includes a title by default, but your custom layout might
        // not need it. Here, you can remove the dialog title, but you must
        // call the superclass to get the Dialog.
        Dialog dialog = super.onCreateDialog(savedInstanceState);
        dialog.requestWindowFeature(Window.FEATURE_NO_TITLE);
        return dialog;
    }
}
Aşağıdaki örnekte, ekran boyutuna göre parçanın iletişim kutusu veya tam ekran kullanıcı arayüzü olarak gösterilip gösterilmeyeceği belirlenir:
Kotlin
fun showDialog() {
    val fragmentManager = supportFragmentManager
    val newFragment = CustomDialogFragment()
    if (isLargeLayout) {
        // The device is using a large layout, so show the fragment as a
        // dialog.
        newFragment.show(fragmentManager, "dialog")
    } else {
        // The device is smaller, so show the fragment fullscreen.
        val transaction = fragmentManager.beginTransaction()
        // For a polished look, specify a transition animation.
        transaction.setTransition(FragmentTransaction.TRANSIT_FRAGMENT_OPEN)
        // To make it fullscreen, use the 'content' root view as the container
        // for the fragment, which is always the root view for the activity.
        transaction
                .add(android.R.id.content, newFragment)
                .addToBackStack(null)
                .commit()
    }
}
Java
public void showDialog() {
    FragmentManager fragmentManager = getSupportFragmentManager();
    CustomDialogFragment newFragment = new CustomDialogFragment();

    if (isLargeLayout) {
        // The device is using a large layout, so show the fragment as a
        // dialog.
        newFragment.show(fragmentManager, "dialog");
    } else {
        // The device is smaller, so show the fragment fullscreen.
        FragmentTransaction transaction = fragmentManager.beginTransaction();
        // For a polished look, specify a transition animation.
        transaction.setTransition(FragmentTransaction.TRANSIT_FRAGMENT_OPEN);
        // To make it fullscreen, use the 'content' root view as the container
        // for the fragment, which is always the root view for the activity.
        transaction.add(android.R.id.content, newFragment)
                   .addToBackStack(null).commit();
    }
}
Parça işlemleri gerçekleştirme hakkında daha fazla bilgi için Parçalar başlıklı makaleyi inceleyin.
Bu örnekte, mIsLargeLayout boole değeri, mevcut cihazın uygulamanın büyük düzen tasarımını kullanıp kullanmaması gerektiğini ve dolayısıyla bu parçayı tam ekran yerine iletişim kutusu olarak gösterip göstermemesi gerektiğini belirtir. Bu tür bir boole değerini ayarlamanın en iyi yolu, farklı ekran boyutları için alternatif kaynak değeriyle bir bool kaynak değeri bildirmektir. Örneğin, farklı ekran boyutları için iki bool kaynağı sürümü aşağıda verilmiştir:
res/values/bools.xml
<!-- Default boolean values -->
<resources>
    <bool name="large_layout">false</bool>
</resources>
res/values-large/bools.xml
<!-- Large screen boolean values -->
<resources>
    <bool name="large_layout">true</bool>
</resources>
Ardından, aşağıdaki örnekte gösterildiği gibi mIsLargeLayout değerini etkinlik onCreate() yönteminde başlatabilirsiniz:
Kotlin
override fun onCreate(savedInstanceState: Bundle?) {
    super.onCreate(savedInstanceState)
    setContentView(R.layout.activity_main)

    isLargeLayout = resources.getBoolean(R.bool.large_layout)
}
Java
boolean isLargeLayout;

@Override
public void onCreate(Bundle savedInstanceState) {
    super.onCreate(savedInstanceState);
    setContentView(R.layout.activity_main);

    isLargeLayout = getResources().getBoolean(R.bool.large_layout);
}
Büyük ekranlarda etkinliği iletişim kutusu olarak gösterme
Küçük ekranlarda iletişim kutusunu tam ekran kullanıcı arayüzü olarak göstermek yerine büyük ekranlarda Activity öğesini iletişim kutusu olarak göstererek aynı sonucu elde edebilirsiniz. Seçeceğiniz yaklaşım uygulama tasarımınıza bağlıdır. Ancak uygulamanız küçük ekranlar için tasarlanmışsa ve kısa süreli bir etkinliği iletişim kutusu olarak göstererek tabletlerdeki deneyimi iyileştirmek istiyorsanız etkinliği iletişim kutusu olarak göstermek genellikle yararlıdır.
Bir etkinliği yalnızca büyük ekranlarda iletişim kutusu olarak göstermek için Theme.Holo.DialogWhenLarge
<activity> manifest öğesine temayı uygulayın:
<activity android:theme="@android:style/Theme.Holo.DialogWhenLarge" >
Etkinliklerinizi temalarla stilize etme hakkında daha fazla bilgi için Stiller ve temalar başlıklı makaleyi inceleyin.
İletişim kutusunu kapatma
Kullanıcı, AlertDialog.Builder ile oluşturulan bir işlem düğmesine dokunduğunda sistem iletişim kutusunu sizin için kapatır.
Liste radyo düğmeleri veya onay kutuları kullanmadığı sürece, kullanıcı bir iletişim kutusu listesindeki bir öğeye dokunduğunda sistem de iletişim kutusunu kapatır. Aksi takdirde, dismiss() tuşuna basarak iletişim kutunuzu manuel olarak kapatabilirsiniz.DialogFragment
İletişim kutusu kapatıldığında belirli işlemler yapmanız gerekiyorsa onDismiss() yöntemini DialogFragment içinde uygulayabilirsiniz.
Ayrıca bir iletişim kutusunu iptal edebilirsiniz. Bu, kullanıcının görevi tamamlamadan iletişim kutusundan çıktığını gösteren özel bir etkinliktir. Bu durum, kullanıcı Geri düğmesine dokunduğunda veya ekranın iletişim kutusu alanı dışına dokunduğunda ya da cancel() işlevini Dialog üzerinde açıkça çağırdığınızda (ör. iletişim kutusundaki "İptal" düğmesine yanıt olarak) meydana gelir.
Önceki örnekte gösterildiği gibi, onCancel() sınıfınızda DialogFragment uygulayarak iptal etkinliğine yanıt verebilirsiniz.