Activity embedding optimizes apps on large screen devices by splitting an application's task window between two activities or two instances of the same activity.
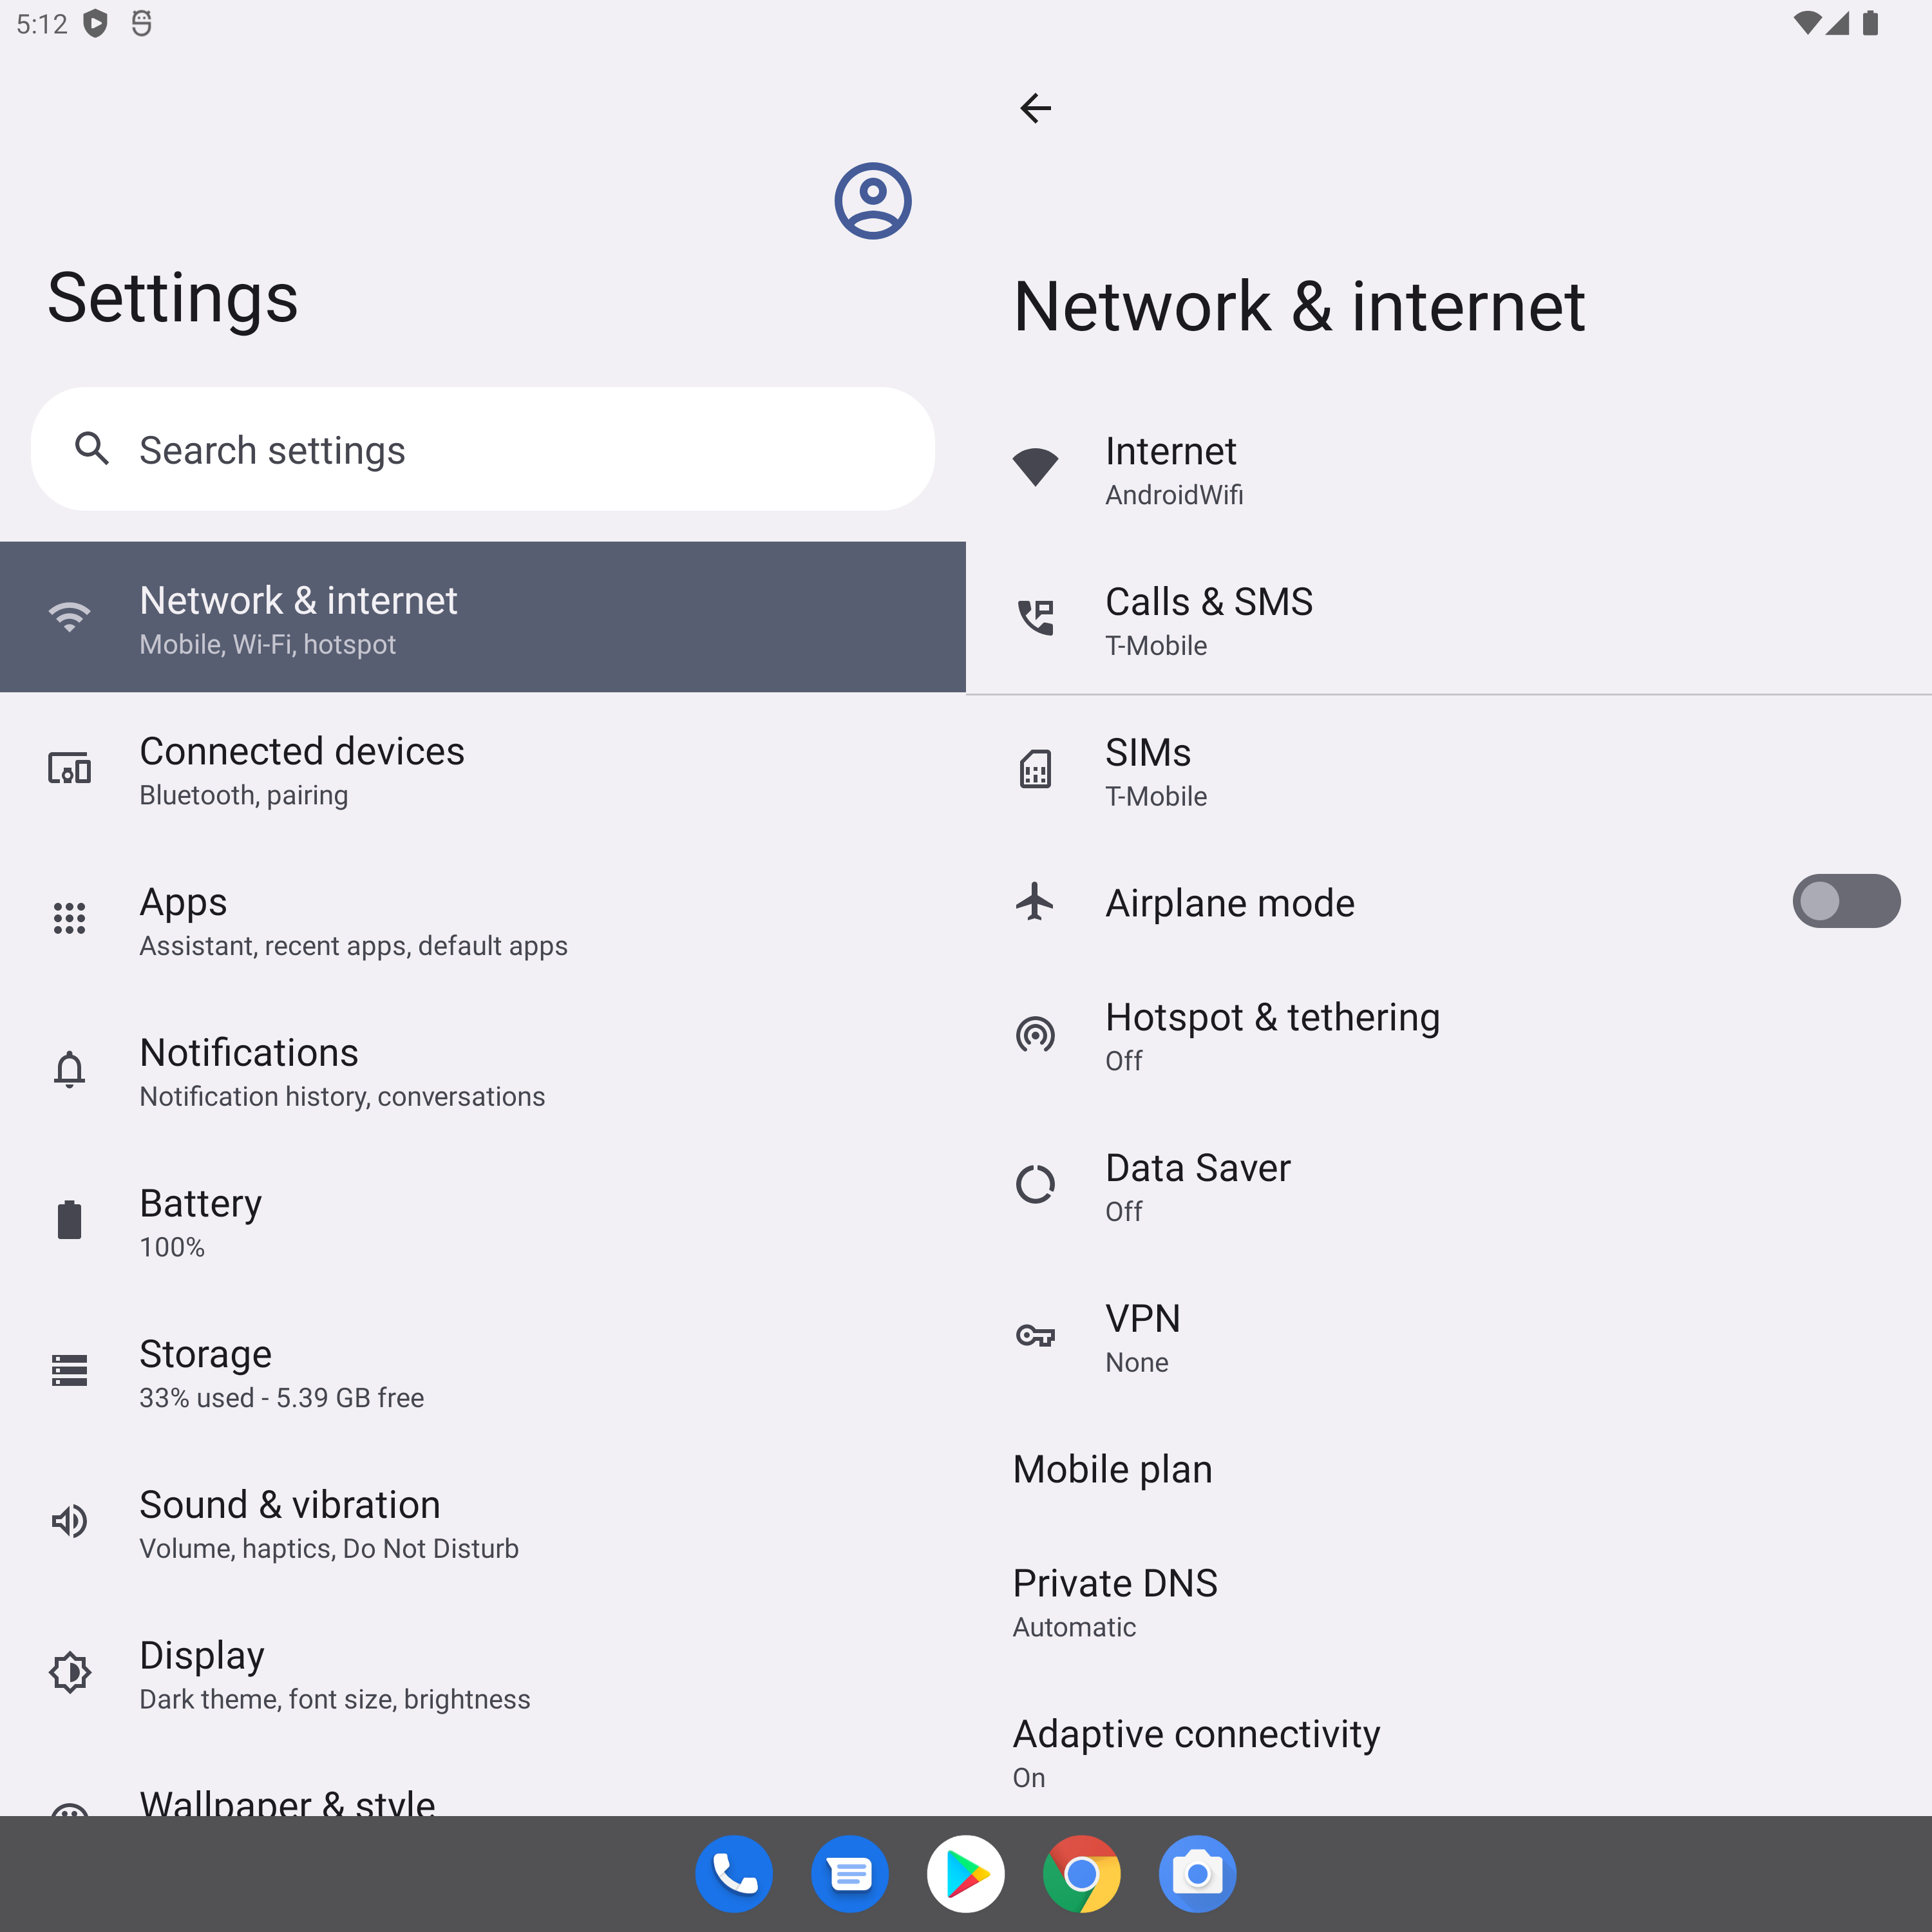
If your app consists of multiple activities, activity embedding enables you to provide an enhanced user experience on tablets, foldables, and ChromeOS devices.
Activity embedding requires no code refactoring. You determine how your app displays its activities—side by side or stacked—by creating an XML configuration file or by making Jetpack WindowManager API calls.
Support for small screens is maintained automatically. When your app is on a device with a small screen, activities are stacked one on top of the other. On large screens, activities are displayed side by side. The system determines the presentation based on the configuration you've created—no branching logic required.
Activity embedding accommodates device orientation changes and works seamlessly on foldable devices, stacking and unstacking activities as the device folds and unfolds.
Activity embedding is supported on most large screen devices running Android 12L (API level 32) and higher.
Split task window
Activity embedding splits the app task window into two containers: primary and secondary. The containers hold activities launched from the main activity or from other activities already in the containers.
Activities are stacked in the secondary container as they're launched, and the secondary container is stacked on top of the primary container on small screens, so activity stacking and back navigation are consistent with the ordering of activities already built into your app.
Activity embedding enables you to display activities in a variety of ways. Your app can split the task window by launching two activities simultaneously side by side or one above the other:
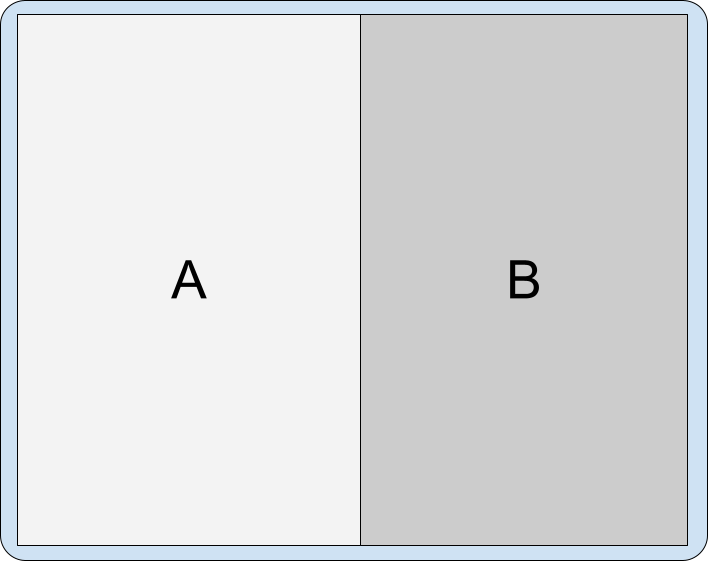
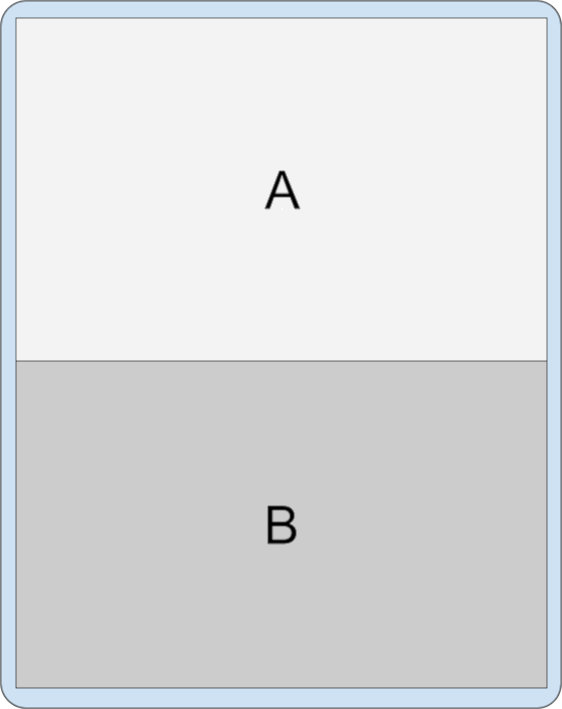
An activity that's occupying the entire task window can create a split by launching a new activity alongside:

Activities that are already in a split and sharing a task window can launch other activities in the following ways:
To the side on top of another activity:

Figure 4. Activity A starts activity C to the side over activity B. To the side, and shift the split sideways, concealing the previous primary activity:

Figure 5. Activity B starts activity C to the side and shifts the split sideways. Launch an activity in place on top; that is, in the same activity stack:

Figure 6. Activity B starts activity C with no extra intent flags. Launch an activity full window in the same task:

Figure 7. Activity A or activity B starts activity C which fills the task window.
Back navigation
Different types of applications can have different back navigation rules in a split task window state depending on the dependencies between activities or how users trigger the back event, for example:
- Going together: If activities are related, and one shouldn't be shown without the other, back navigation can be configured to finish both.
- Going it alone: If activities are fully independent, back navigation on an activity does not affect the state of another activity in the task window.
The back event is sent to the last focused activity when using button navigation.
For gesture-based navigation:
Android 14 (API level 34) and lower — The back event is sent to the activity where the gesture occurred. When users swipe from the left side of the screen, the back event is sent to the activity in the left‑hand pane of the split window. When users swipe from the right side of the screen, the back event is sent to the activity in the right‑hand pane.
Android 15 (API level 35) and higher
When dealing with multiple activities from the same app, the gesture finishes the top activity regardless of the swipe direction, providing a more unified experience.
In scenarios involving two activities from different apps (overlay), the back event is directed to the last activity in focus, aligning with the behavior of button navigation.
Multi-pane layout
Jetpack WindowManager enables you to build an activity embedding multi-pane
layout on large screen devices with Android 12L (API level 32) or higher and on
some devices with earlier platform versions. Existing apps that are based on
multiple activities rather than fragments or view-based layouts such as
SlidingPaneLayout can provide an improved large screen user experience
without refactoring source code.
One common example is a list-detail split. To ensure a high-quality presentation, the system starts the list activity, and then the application immediately starts the detail activity. The transition system waits until both activities are drawn, then displays them together. To the user, the two activities launch as one.

Split attributes
You can specify how the task window is proportioned between the split containers and how the containers are layed out relative to one another.
For rules defined in an XML configuration file, set the following attributes:
splitRatio: Sets the container proportions. The value is a floating point number in the open interval (0.0, 1.0).splitLayoutDirection: Specifies how the split containers are layed out relative to one another. Values include:ltr: Left to rightrtl: Right to leftlocale: Eitherltrorrtlis determined from the locale setting
See the XML configuration section for examples.
For rules created using the WindowManager APIs, create a SplitAttributes
object with SplitAttributes.Builder and call the following builder
methods:
setSplitType(): Sets the proportions of the split containers. SeeSplitAttributes.SplitTypefor valid arguments, including theSplitAttributes.SplitType.ratio()method.setLayoutDirection(): Sets the layout of the containers. SeeSplitAttributes.LayoutDirectionfor possible values.
See the WindowManager API section for examples.

Split orientation
The dimensions and aspect ratio of the display determine the positioning of activities in activity embedding splits. On large landscape displays, activities are displayed side by side; on tall portrait displays or tabletop posture on foldables, one above the other.
You can specify the split orientation with the SplitController
SplitAttributes calculator. The calculator computes SplitAttributes for
the active SplitRule.
Use the calculator to split the parent container in different directions for different device states, for example:
Kotlin
if (WindowSdkExtensions.getInstance().extensionVersion >= 2) { SplitController.getInstance(this).setSplitAttributesCalculator { params -> val parentConfiguration = params.parentConfiguration val builder = SplitAttributes.Builder() return@setSplitAttributesCalculator if (parentConfiguration.screenWidthDp >= 840) { // Side-by-side dual-pane layout for wide displays. builder .setLayoutDirection(SplitAttributes.LayoutDirection.LOCALE) .build() } else if (parentConfiguration.screenHeightDp >= 600) { // Horizontal split for tall displays. builder .setLayoutDirection(SplitAttributes.LayoutDirection.BOTTOM_TO_TOP) .build() } else { // Fallback to expand the secondary container. builder .setSplitType(SPLIT_TYPE_EXPAND) .build() } } }
Java
if (WindowSdkExtensions.getInstance().getExtensionVersion() >= 2) { SplitController.getInstance(this).setSplitAttributesCalculator(params -> { Configuration parentConfiguration = params.getParentConfiguration(); SplitAttributes.Builder builder = new SplitAttributes.Builder(); if (parentConfiguration.screenWidthDp >= 840) { // Side-by-side dual-pane layout for wide displays. return builder .setLayoutDirection(SplitAttributes.LayoutDirection.LOCALE) .build(); } else if (parentConfiguration.screenHeightDp >= 600) { // Horizontal split for tall displays. return builder .setLayoutDirection(SplitAttributes.LayoutDirection.BOTTOM_TO_TOP) .build(); } else { // Fallback to expand the secondary container. return builder .setSplitType(SplitType.SPLIT_TYPE_EXPAND) .build(); } }); }
On foldable devices, you can split the screen vertically if the device is landscape, display a single activity if the device is portrait, and split the screen horizontally if the device is in tabletop posture:
Kotlin
if (WindowSdkExtensions.getInstance().extensionVersion >= 2) { SplitController.getInstance(this).setSplitAttributesCalculator { params -> val tag = params.splitRuleTag val parentWindowMetrics = params.parentWindowMetrics val parentConfiguration = params.parentConfiguration val foldingFeatures = params.parentWindowLayoutInfo.displayFeatures.filterIsInstance<FoldingFeature>() val feature = if (foldingFeatures.size == 1) foldingFeatures[0] else null val builder = SplitAttributes.Builder() builder.setSplitType(SPLIT_TYPE_HINGE) return@setSplitAttributesCalculator if (feature?.isSeparating == true) { // Horizontal split for tabletop posture. builder .setSplitType(SPLIT_TYPE_HINGE) .setLayoutDirection( if (feature.orientation == FoldingFeature.Orientation.HORIZONTAL) { SplitAttributes.LayoutDirection.BOTTOM_TO_TOP } else { SplitAttributes.LayoutDirection.LOCALE } ) .build() } else if (parentConfiguration.screenWidthDp >= 840) { // Side-by-side dual-pane layout for wide displays. builder .setLayoutDirection(SplitAttributes.LayoutDirection.LOCALE) .build() } else { // No split for tall displays. builder .setSplitType(SPLIT_TYPE_EXPAND) .build() } } }
Java
if (WindowSdkExtensions.getInstance().getExtensionVersion() >= 2) { SplitController.getInstance(this).setSplitAttributesCalculator(params -> { String tag = params.getSplitRuleTag(); WindowMetrics parentWindowMetrics = params.getParentWindowMetrics(); Configuration parentConfiguration = params.getParentConfiguration(); List<FoldingFeature> foldingFeatures = params.getParentWindowLayoutInfo().getDisplayFeatures().stream().filter( item -> item instanceof FoldingFeature) .map(item -> (FoldingFeature) item) .collect(Collectors.toList()); FoldingFeature feature = foldingFeatures.size() == 1 ? foldingFeatures.get(0) : null; SplitAttributes.Builder builder = new SplitAttributes.Builder(); builder.setSplitType(SplitType.SPLIT_TYPE_HINGE); if (feature != null && feature.isSeparating()) { // Horizontal slit for tabletop posture. return builder .setSplitType(SplitType.SPLIT_TYPE_HINGE) .setLayoutDirection( feature.getOrientation() == FoldingFeature.Orientation.HORIZONTAL ? SplitAttributes.LayoutDirection.BOTTOM_TO_TOP : SplitAttributes.LayoutDirection.LOCALE) .build(); } else if (parentConfiguration.screenWidthDp >= 840) { // Side-by-side dual-pane layout for wide displays. return builder .setLayoutDirection(SplitAttributes.LayoutDirection.LOCALE) .build(); } else { // No split for tall displays. return builder .setSplitType(SplitType.SPLIT_TYPE_EXPAND) .build(); } }); }
Placeholders
Placeholder activities are empty secondary activities that occupy an area of an activity split. They are ultimately meant to be replaced with another activity that contains content. For example, a placeholder activity could occupy the secondary side of an activity split in a list-detail layout until an item from the list is selected, at which point an activity containing the detail information for the selected list item replaces the placeholder.
By default, the system displays placeholders only when there is enough space for an activity split. Placeholders automatically finish when the display size changes to a width or height too small to display a split. When space permits, the system relaunches the placeholder with a reinitialized state.

However, the stickyPlaceholder attribute of a SplitPlaceholderRule or
setSticky() method of SplitPlaceholder.Builder can override the
default behavior. When the attribute or method specifies a value of true, the
system displays the placeholder as the topmost activity in the task window when
the display is resized down to a single-pane display from a two-pane display
(see Split configuration for an example).

Window size changes
When device configuration changes reduce the task window width so that it is not large enough for a multi-pane layout (for example, when a large screen foldable device folds from tablet size to phone size or the app window is resized in multi-window mode), the non-placeholder activities in the secondary pane of the task window are stacked on top of the activities in the primary pane.
Placeholder activities are shown only when there is enough display width for a split. On smaller screens, the placeholder is automatically dismissed. When the display area becomes large enough again, the placeholder is recreated. (See the Placeholders section.)
Activity stacking is possible because WindowManager z-orders the activities in the secondary pane above activities in the primary pane.
Multiple activities in secondary pane
Activity B starts activity C in place with no extra intent flags:

resulting in the following z-order of activities in the same task:
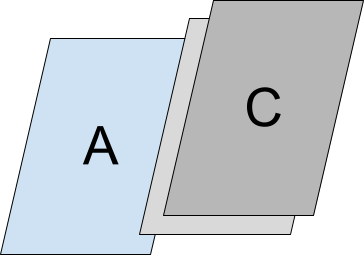
So, in a smaller task window, the application shrinks to a single activity with C at the top of the stack:
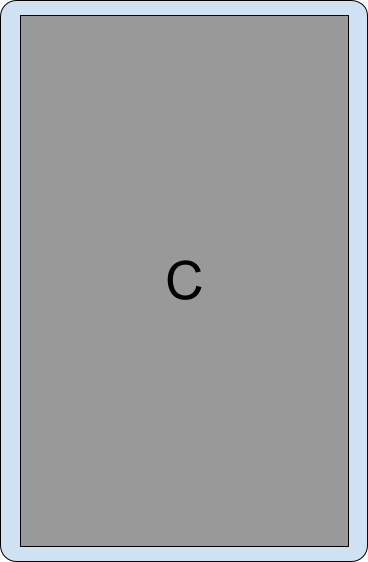
Navigating back in the smaller window navigates through the activities stacked on top of each other.
If the task window configuration is restored to a larger size that can accommodate multiple panes, the activities are displayed side by side again.
Stacked splits
Activity B starts activity C to the side and shifts the split sideways:

The result is the following z-order of activities in the same task:
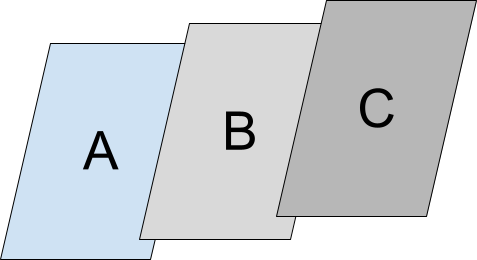
In a smaller task window, the application shrinks to a single activity with C on top:

Fixed-portrait orientation
The android:screenOrientation manifest setting enables apps to constrain activities to portrait or landscape orientation. To improve the user experience on large screen devices such as tablets and foldables, device manufacturers (OEMs) can ignore screen orientation requests and letterbox the app in portrait orientation on landscape displays or landscape orientation on portrait displays.
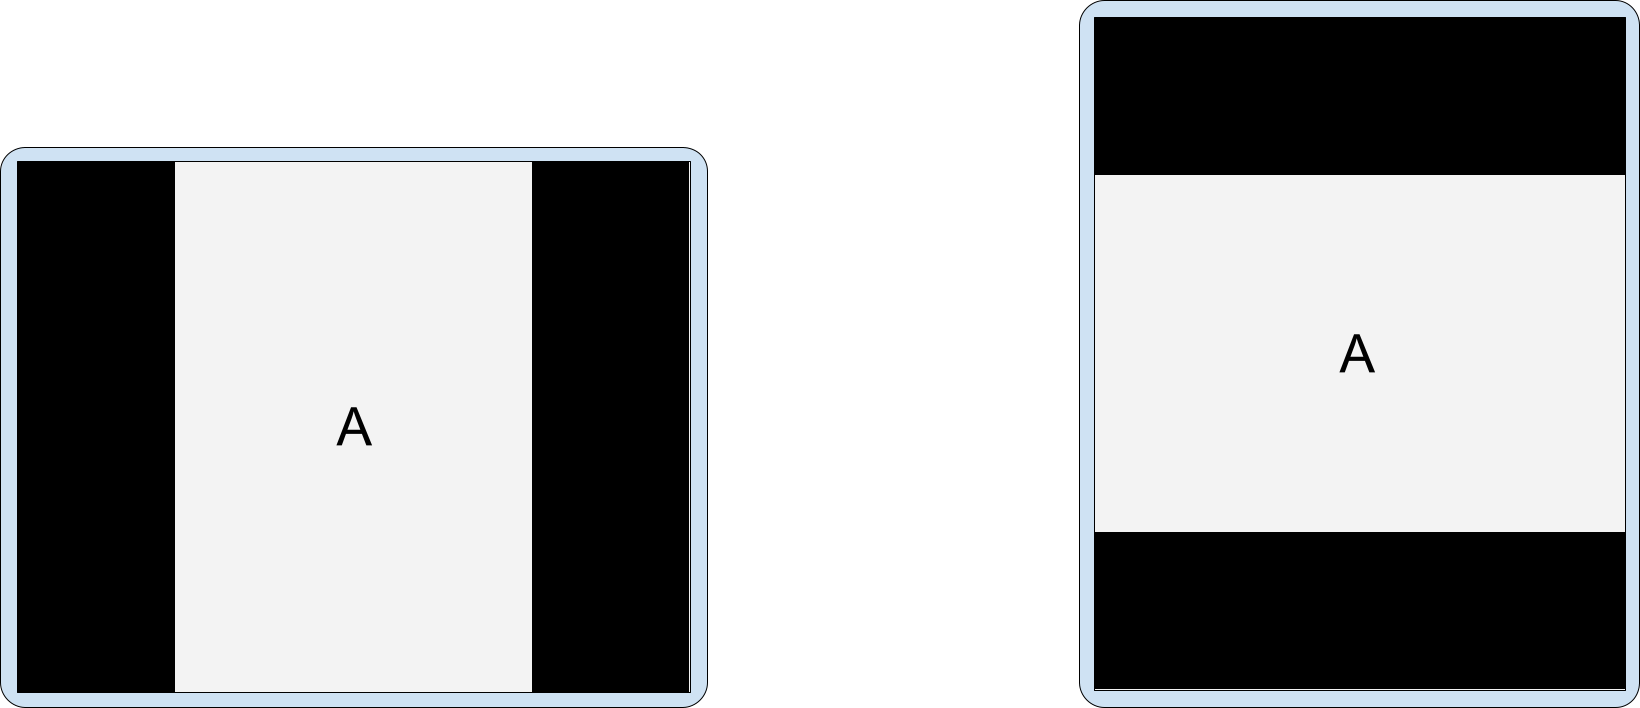
Similarly, when activity embedding is enabled, OEMs can customize devices to letterbox fixed-portrait activities in landscape orientation on large screens (width ≥ 600dp). When a fixed-portrait activity launches a second activity, the device can display the two activities side by side in a two-pane display.

Always add the android.window.PROPERTY_ACTIVITY_EMBEDDING_SPLITS_ENABLED
property to your app manifest file to inform devices that your app supports
activity embedding (see the Split configuration
section). OEM-customized devices can then determine whether to letterbox
fixed-portrait activities.
Split configuration
Split rules configure activity splits. You define split rules in an XML configuration file or by making Jetpack WindowManager API calls.
In either case, your app must access the WindowManager library and must inform the system that the app has implemented activity embedding.
Do the following:
Add the latest WindowManager library dependency to your app's module-level
build.gradlefile, for example:implementation 'androidx.window:window:1.1.0-beta02'The WindowManager library provides all the components required for activity embedding.
Inform the system that your app has implemented activity embedding.
Add the
android.window.PROPERTY_ACTIVITY_EMBEDDING_SPLITS_ENABLEDproperty to the <application> element of the app manifest file, and set the value to true, for example:<manifest xmlns:android="http://schemas.android.com/apk/res/android"> <application> <property android:name="android.window.PROPERTY_ACTIVITY_EMBEDDING_SPLITS_ENABLED" android:value="true" /> </application> </manifest>On WindowManager release 1.1.0-alpha06 and later, activity embedding splits are disabled unless the property is added to the manifest and set to true.
Also, device manufacturers use the setting to enable custom capabilities for apps that support activity embedding. For example, devices can letterbox a portrait-only activity on landscape displays to orient the activity for the transition to a two-pane layout when a second activity starts (see Fixed-portrait orientation).
XML configuration
To create an XML-based implementation of activity embedding, complete the following steps:
Create an XML resource file that does the following:
- Defines activities that share a split
- Configures the split options
- Creates a placeholder for the secondary container of the split when content is not available
- Specifies activities that should never be part of a split
For example:
<!-- main_split_config.xml -->

<resources
    xmlns:window="http://schemas.android.com/apk/res-auto">

    <!-- Define a split for the named activities. -->
    <SplitPairRule
        window:splitRatio="0.33"
        window:splitLayoutDirection="locale"
        window:splitMinWidthDp="840"
        window:splitMaxAspectRatioInPortrait="alwaysAllow"
        window:finishPrimaryWithSecondary="never"
        window:finishSecondaryWithPrimary="always"
        window:clearTop="false">
        <SplitPairFilter
            window:primaryActivityName=".ListActivity"
            window:secondaryActivityName=".DetailActivity"/>
    </SplitPairRule>

    <!-- Specify a placeholder for the secondary container when content is
         not available. -->
    <SplitPlaceholderRule
        window:placeholderActivityName=".PlaceholderActivity"
        window:splitRatio="0.33"
        window:splitLayoutDirection="locale"
        window:splitMinWidthDp="840"
        window:splitMaxAspectRatioInPortrait="alwaysAllow"
        window:stickyPlaceholder="false">
        <ActivityFilter
            window:activityName=".ListActivity"/>
    </SplitPlaceholderRule>

    <!-- Define activities that should never be part of a split. Note: Takes
         precedence over other split rules for the activity named in the
         rule. -->
    <ActivityRule
        window:alwaysExpand="true">
        <ActivityFilter
            window:activityName=".ExpandedActivity"/>
    </ActivityRule>

</resources>
Create an initializer.
The WindowManager
RuleControllercomponent parses the XML configuration file and makes the rules available to the system. A Jetpack Startup libraryInitializermakes the XML file available toRuleControllerat app startup so that the rules are in effect when any activities start.To create an initializer, do the following:
Add the latest Jetpack Startup library dependency to your module-level
build.gradlefile, for example:implementation 'androidx.startup:startup-runtime:1.1.1'Create a class that implements the
Initializerinterface.The initializer makes the split rules available to
RuleControllerby passing the ID of the XML configuration file (main_split_config.xml) to theRuleController.parseRules()method.Kotlin
class SplitInitializer : Initializer<RuleController> { override fun create(context: Context): RuleController { return RuleController.getInstance(context).apply { setRules(RuleController.parseRules(context, R.xml.main_split_config)) } } override fun dependencies(): List<Class<out Initializer<*>>> { return emptyList() } }
Java
public class SplitInitializer implements Initializer<RuleController> { @NonNull @Override public RuleController create(@NonNull Context context) { RuleController ruleController = RuleController.getInstance(context); ruleController.setRules( RuleController.parseRules(context, R.xml.main_split_config) ); return ruleController; } @NonNull @Override public List<Class<? extends Initializer<?>>> dependencies() { return Collections.emptyList(); } }
Create a content provider for the rule definitions.
Add
androidx.startup.InitializationProviderto your app manifest file as a<provider>. Include a reference to the implementation of yourRuleControllerinitializer,SplitInitializer:<!-- AndroidManifest.xml --> <provider android:name="androidx.startup.InitializationProvider" android:authorities="${applicationId}.androidx-startup" android:exported="false" tools:node="merge"> <!-- Make SplitInitializer discoverable by InitializationProvider. --> <meta-data android:name="${applicationId}.SplitInitializer" android:value="androidx.startup" /> </provider>InitializationProviderdiscovers and initializesSplitInitializerbefore the app'sonCreate()method is called. As a result, the split rules are in effect when the app's main activity starts.
WindowManager API
You can implement activity embedding programmatically with a handful of API
calls. Make the calls in the onCreate() method of a subclass of
Application to ensure the rules are in effect before any activities
launch.
To programmatically create an activity split, do the following:
Create a split rule:
Create a
SplitPairFilterthat identifies the activities that share the split:Kotlin
val splitPairFilter = SplitPairFilter( ComponentName(this, ListActivity::class.java), ComponentName(this, DetailActivity::class.java), null )
Java
SplitPairFilter splitPairFilter = new SplitPairFilter( new ComponentName(this, ListActivity.class), new ComponentName(this, DetailActivity.class), null );
Add the filter to a filter set:
```Kotlin
val filterSet = setOf(splitPairFilter)
Java
Set<SplitPairFilter> filterSet = new HashSet<>(); filterSet.add(splitPairFilter);
Create layout attributes for the split:
Kotlin
val splitAttributes: SplitAttributes = SplitAttributes.Builder() .setSplitType(SplitAttributes.SplitType.ratio(0.33f)) .setLayoutDirection(SplitAttributes.LayoutDirection.LEFT_TO_RIGHT) .build()
Java
SplitAttributes splitAttributes = new SplitAttributes.Builder() .setSplitType(SplitAttributes.SplitType.ratio(0.33f)) .setLayoutDirection(SplitAttributes.LayoutDirection.LEFT_TO_RIGHT) .build();
SplitAttributes.Buildercreates an object containing layout attributes:setSplitType(): Defines how the available display area is allocated to each activity container. The ratio split type specifies the proportion of the available display area allocated to the primary container; the secondary container occupies the remainder of the available display area.setLayoutDirection(): Specifies how the activity containers are laid out relative to one another, primary container first.
Build a
SplitPairRule:Kotlin
val splitPairRule = SplitPairRule.Builder(filterSet) .setDefaultSplitAttributes(splitAttributes) .setMinWidthDp(840) .setMinSmallestWidthDp(600) .setMaxAspectRatioInPortrait(EmbeddingAspectRatio.ratio(1.5f)) .setFinishPrimaryWithSecondary(SplitRule.FinishBehavior.NEVER) .setFinishSecondaryWithPrimary(SplitRule.FinishBehavior.ALWAYS) .setClearTop(false) .build()
Java
SplitPairRule splitPairRule = new SplitPairRule.Builder(filterSet) .setDefaultSplitAttributes(splitAttributes) .setMinWidthDp(840) .setMinSmallestWidthDp(600) .setMaxAspectRatioInPortrait(EmbeddingAspectRatio.ratio(1.5f)) .setFinishPrimaryWithSecondary(SplitRule.FinishBehavior.NEVER) .setFinishSecondaryWithPrimary(SplitRule.FinishBehavior.ALWAYS) .setClearTop(false) .build();
SplitPairRule.Buildercreates and configures the rule:filterSet: Contains split pair filters that determine when to apply the rule by identifying activities that share a split.setDefaultSplitAttributes(): Applies layout attributes to the rule.setMinWidthDp(): Sets the minimum display width (in density‑independent pixels, dp) that enables a split.setMinSmallestWidthDp(): Sets the minimum value (in dp) that the smaller of the two display dimensions must have to enable a split regardless of the device orientation.setMaxAspectRatioInPortrait(): Sets the maximum display aspect ratio (height:width) in portrait orientation for which activity splits are displayed. If the aspect ratio of a portrait display exceeds the maximum aspect ratio, splits are disabled regardless of the width of the display. Note: The default value is 1.4, which results in activities occupying the entire task window in portrait orientation on most tablets. See alsoSPLIT_MAX_ASPECT_RATIO_PORTRAIT_DEFAULTandsetMaxAspectRatioInLandscape(). The default value for landscape isALWAYS_ALLOW.setFinishPrimaryWithSecondary(): Sets how finishing all activities in the secondary container affects the activities in the primary container.NEVERindicates the system shouldn't finish the primary activities when all activities in the secondary container finish (see Finish activities).setFinishSecondaryWithPrimary(): Sets how finishing all activities in the primary container affects the activities in the secondary container.ALWAYSindicates the system should always finish the activities in the secondary container when all activities in the primary container finish (see Finish activities).setClearTop(): Specifies whether all activities in the secondary container are finished when a new activity is launched in the container. Afalsevalue specifies that new activities are stacked on top of activities already in the secondary container.
Get the singleton instance of the WindowManager
RuleController, and add the rule:Kotlin
val ruleController = RuleController.getInstance(this) ruleController.addRule(splitPairRule)
Java
RuleController ruleController = RuleController.getInstance(this); ruleController.addRule(splitPairRule);
Create a placeholder for the secondary container when content is not available:
Create an
ActivityFilterthat identifies the activity with which the placeholder shares a task window split:Kotlin
val placeholderActivityFilter = ActivityFilter( ComponentName(this, ListActivity::class.java), null )
Java
ActivityFilter placeholderActivityFilter = new ActivityFilter( new ComponentName(this, ListActivity.class), null );
Add the filter to a filter set:
Kotlin
val placeholderActivityFilterSet = setOf(placeholderActivityFilter)
Java
Set<ActivityFilter> placeholderActivityFilterSet = new HashSet<>(); placeholderActivityFilterSet.add(placeholderActivityFilter);
Create a
SplitPlaceholderRule:Kotlin
val splitPlaceholderRule = SplitPlaceholderRule.Builder( placeholderActivityFilterSet, Intent(context, PlaceholderActivity::class.java) ).setDefaultSplitAttributes(splitAttributes) .setMinWidthDp(840) .setMinSmallestWidthDp(600) .setMaxAspectRatioInPortrait(EmbeddingAspectRatio.ratio(1.5f)) .setFinishPrimaryWithPlaceholder(SplitRule.FinishBehavior.ALWAYS) .setSticky(false) .build()
Java
SplitPlaceholderRule splitPlaceholderRule = new SplitPlaceholderRule.Builder( placeholderActivityFilterSet, new Intent(this, PlaceholderActivity.class) ).setDefaultSplitAttributes(splitAttributes) .setMinWidthDp(840) .setMinSmallestWidthDp(600) .setMaxAspectRatioInPortrait(EmbeddingAspectRatio.ratio(1.5f)) .setFinishPrimaryWithPlaceholder(SplitRule.FinishBehavior.ALWAYS) .setSticky(false) .build();
SplitPlaceholderRule.Buildercreates and configures the rule:placeholderActivityFilterSet: Contains activity filters that determine when to apply the rule by identifying activities with which the placeholder activity is associated.Intent: Specifies the launch of the placeholder activity.setDefaultSplitAttributes(): Applies layout attributes to the rule.setMinWidthDp(): Sets the minimum display width (in density-independent pixels, dp) that allows a split.setMinSmallestWidthDp(): Sets the minimum value (in dp) that the smaller of the two display dimensions must have to allow a split regardless of the device orientation.setMaxAspectRatioInPortrait(): Sets the maximum display aspect ratio (height:width) in portrait orientation for which activity splits are displayed. Note: The default value is 1.4, which results in activities filling the task window in portrait orientation on most tablets. See alsoSPLIT_MAX_ASPECT_RATIO_PORTRAIT_DEFAULTandsetMaxAspectRatioInLandscape(). The default value for landscape isALWAYS_ALLOW.setFinishPrimaryWithPlaceholder(): Sets how finishing the placeholder activity affects the activities in the primary container. ALWAYS indicates the system should always finish the activities in the primary container when the placeholder finishes (see Finish activities).setSticky(): Determines whether the placeholder activity appears on top of the activity stack on small displays once the placeholder has first appeared in a split with sufficient minimum width.
Add the rule to the WindowManager
RuleController:Kotlin
ruleController.addRule(splitPlaceholderRule)
Java
ruleController.addRule(splitPlaceholderRule);
Specify activities that should never be part of a split:
Create an
ActivityFilterthat identifies an activity that should always occupy the entire task display area:Kotlin
val expandedActivityFilter = ActivityFilter( ComponentName(this, ExpandedActivity::class.java), null )
Java
ActivityFilter expandedActivityFilter = new ActivityFilter( new ComponentName(this, ExpandedActivity.class), null );
Add the filter to a filter set:
Kotlin
val expandedActivityFilterSet = setOf(expandedActivityFilter)
Java
Set<ActivityFilter> expandedActivityFilterSet = new HashSet<>(); expandedActivityFilterSet.add(expandedActivityFilter);
Create an
ActivityRule:Kotlin
val activityRule = ActivityRule.Builder(expandedActivityFilterSet) .setAlwaysExpand(true) .build()
Java
ActivityRule activityRule = new ActivityRule.Builder( expandedActivityFilterSet ).setAlwaysExpand(true) .build();
ActivityRule.Buildercreates and configures the rule:expandedActivityFilterSet: Contains activity filters that determine when to apply the rule by identifying activities that you want to exclude from splits.setAlwaysExpand(): Specifies whether the activity should fill the entire task window.
Add the rule to the WindowManager
RuleController:Kotlin
ruleController.addRule(activityRule)
Java
ruleController.addRule(activityRule);
Cross-application embedding
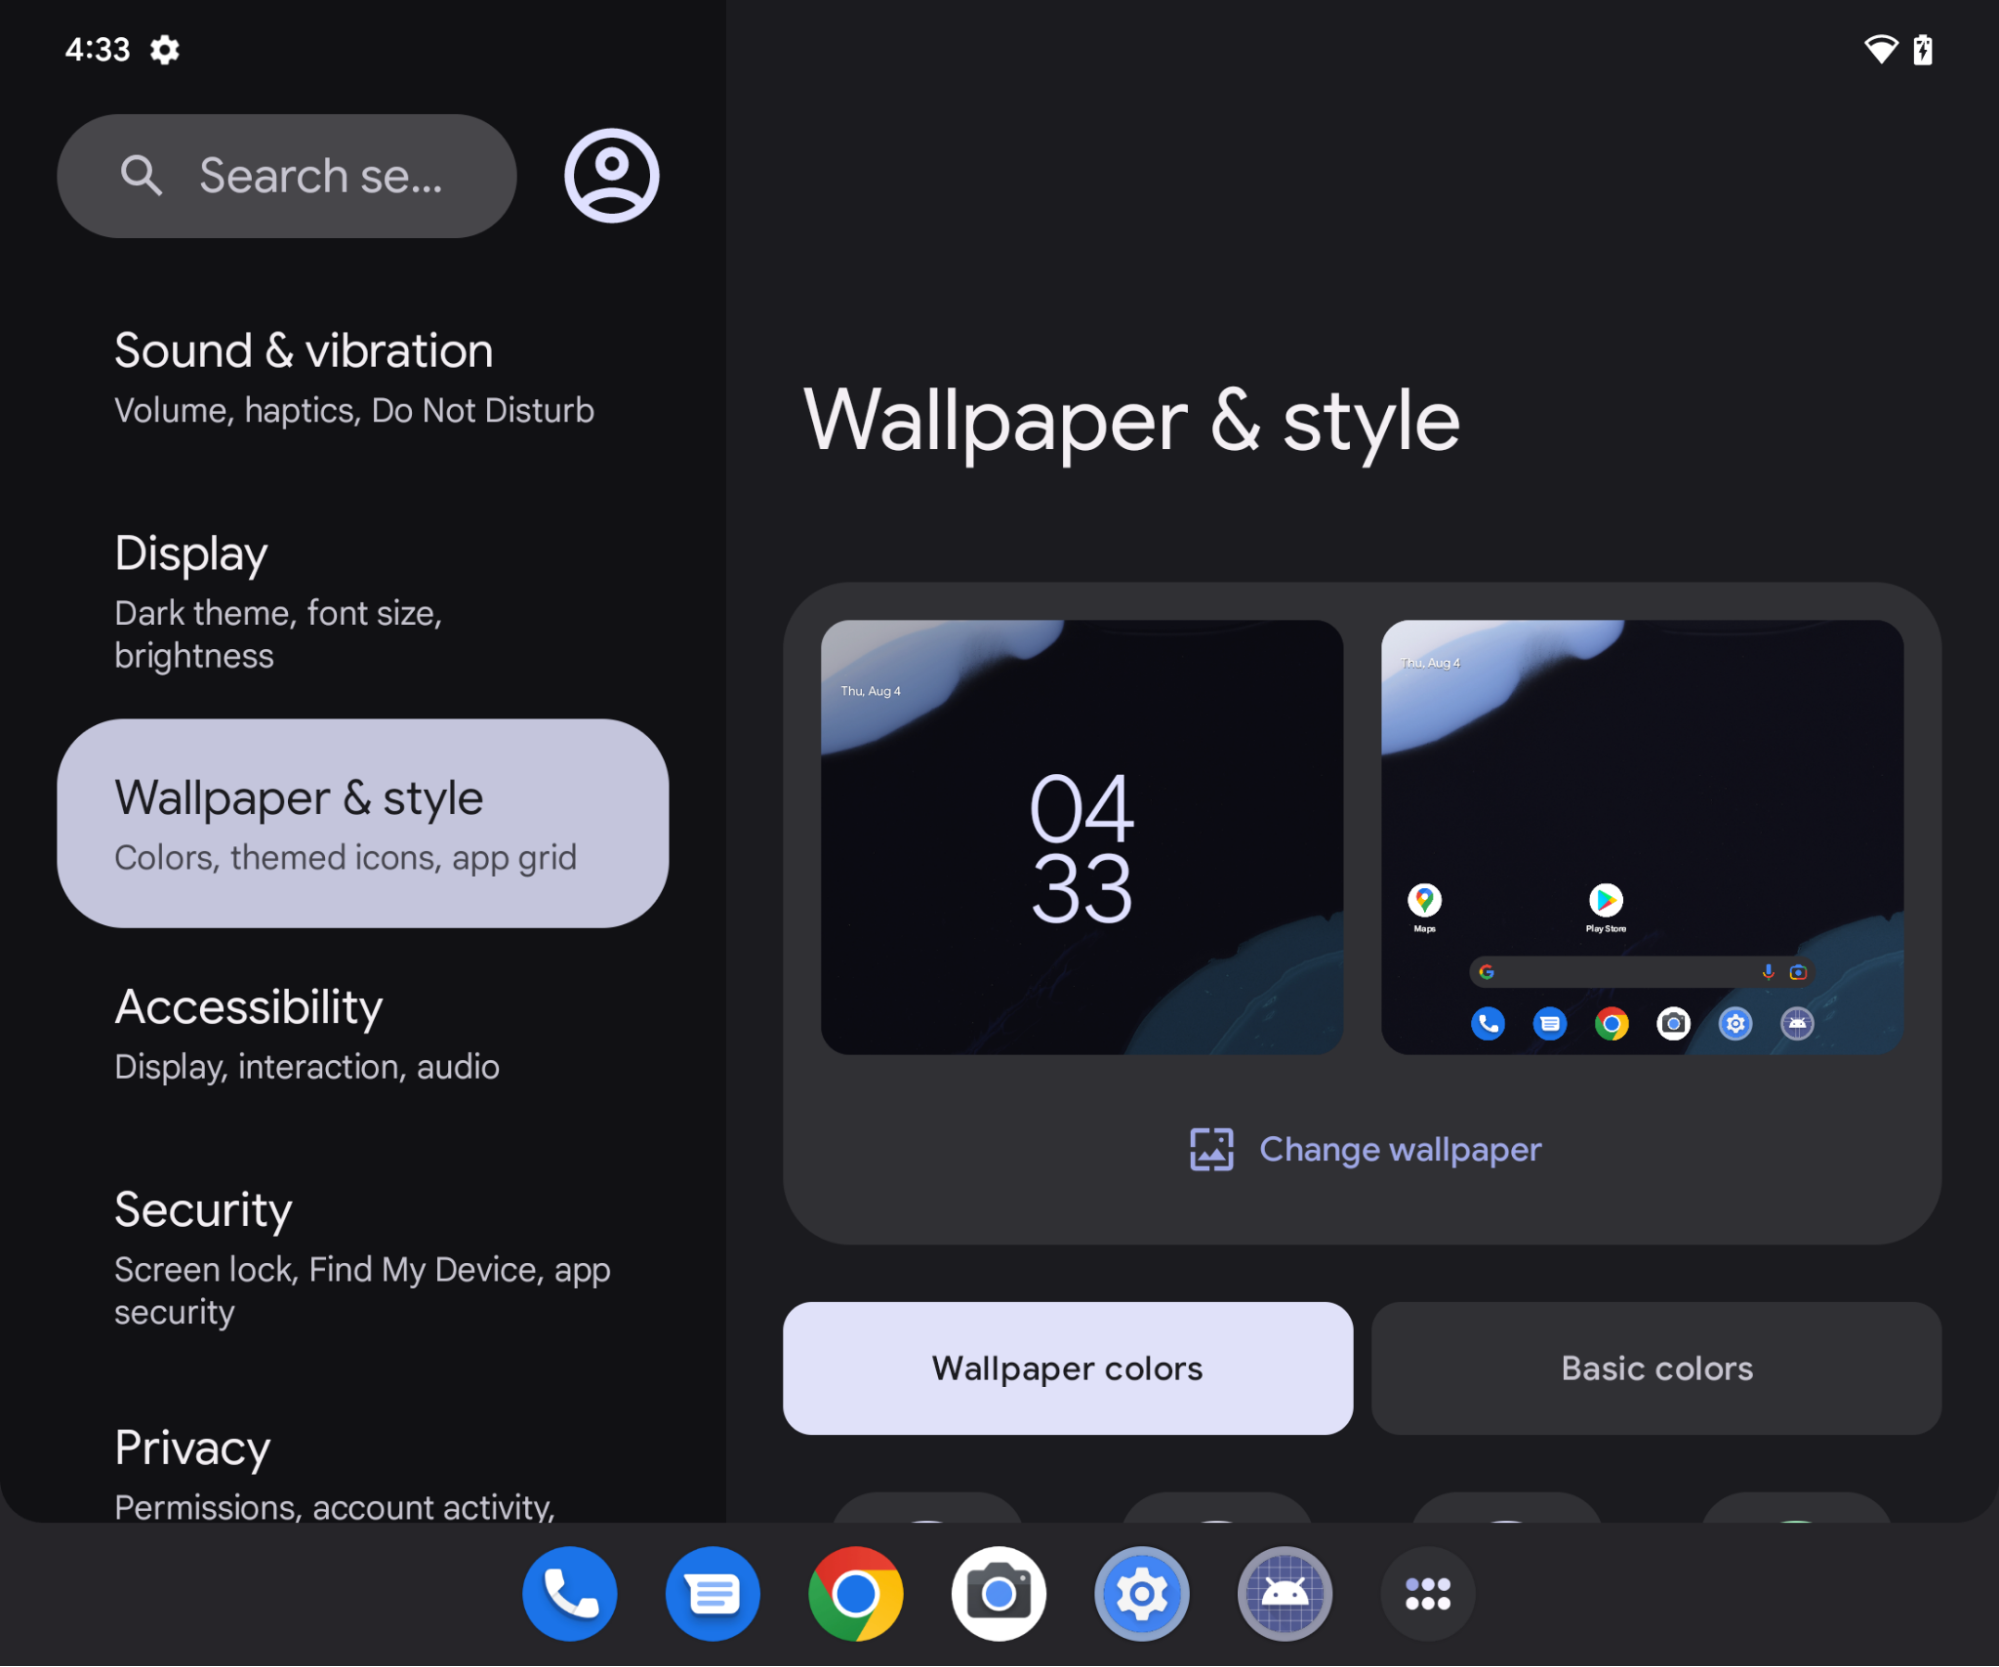
On Android 13 (API level 33) and higher, apps can embed activities from other apps. Cross‑application, or cross‑UID, activity embedding enables visual integration of activities from multiple Android applications. The system displays an activity of the host app and an embedded activity from another app on screen side by side or top and bottom just as in single-app activity embedding.
For example, the Settings app could embed the wallpaper selector activity from the WallpaperPicker app:
Trust model
Host processes that embed activities from other apps are able to redefine the presentation of the embedded activities, including size, position, cropping, and transparency. Malicious hosts can use this capability to mislead users and create clickjacking or other UI-redressing attacks.
To prevent misuse of cross-app activity embedding, Android requires apps to opt in to allow embedding of their activities. Apps can designate hosts as trusted or untrusted.
Trusted hosts
To allow other applications to embed and fully control the presentation of
activities from your app, specify the SHA-256 certificate of the host
application in the android:knownActivityEmbeddingCerts attribute of the
<activity> or <application> elements of your app's manifest file.
Set the value of android:knownActivityEmbeddingCerts either as a string:
<activity
    android:name=".MyEmbeddableActivity"
    android:knownActivityEmbeddingCerts="@string/known_host_certificate_digest"
    ... />
or, to specify multiple certificates, an array of strings:
<activity
    android:name=".MyEmbeddableActivity"
    android:knownActivityEmbeddingCerts="@array/known_host_certificate_digests"
    ... />
which references a resource like the following:
<resources>
    <string-array name="known_host_certificate_digests">
      <item>cert1</item>
      <item>cert2</item>
      ...
    </string-array>
</resources>
App owners can get a SHA certificate digest by running the Gradle
signingReport task. The certificate digest is the SHA-256 fingerprint without
the separating colons. For more information, see Run a signing report and
Authenticating Your Client.
Untrusted hosts
To allow any app to embed your app's activities and control their presentation,
specify the android:allowUntrustedActivityEmbedding attribute in the
<activity> or <application> elements in the app manifest, for example:
<activity
    android:name=".MyEmbeddableActivity"
    android:allowUntrustedActivityEmbedding="true"
    ... />
The default value of the attribute is false, which prevents cross-app activity embedding.
Custom authentication
To mitigate the risks of untrusted activity embedding, create a custom
authentication mechanism that verifies the host identity. If you know the host
certificates, use the androidx.security.app.authenticator library to
authenticate. If the host authenticates after embedding your activity, you can
display the actual content. If not, you can inform the user that the action was
not allowed and block the content.
Use the ActivityEmbeddingController#isActivityEmbedded() method from the
Jetpack WindowManager library to check whether a host is embedding your
activity, for example:
Kotlin
fun isActivityEmbedded(activity: Activity): Boolean { return ActivityEmbeddingController.getInstance(this).isActivityEmbedded(activity) }
Java
boolean isActivityEmbedded(Activity activity) { return ActivityEmbeddingController.getInstance(context).isActivityEmbedded(activity); }
Minimum size restriction
The Android system applies the minimum height and width specified in the app
manifest <layout> element to embedded activities. If an application does
not specify minimum height and width, the system default values apply
(sw220dp).
If the host attempts to resize the embedded container to a size smaller than the minimum, the embedded container expands to occupy the entire task bounds.
<activity-alias>
For trusted or untrusted activity embedding to work with the
<activity-alias> element, android:knownActivityEmbeddingCerts or
android:allowUntrustedActivityEmbedding must be applied to the target activity
rather than the alias. The policy that verifies security on the system server is
based on the flags set on the target, not the alias.
Host application
Host applications implement cross-app activity embedding the same way they
implement single-app activity embedding. SplitPairRule and
SplitPairFilter or ActivityRule and ActivityFilter objects
specify embedded activities and task window splits. Split rules are defined
statically in XML or at runtime using Jetpack
WindowManager API calls.
If a host application attempts to embed an activity that has not opted in to cross-app embedding, the activity occupies the entire task bounds. As a result, host applications need to know whether target activities allow cross-app embedding.
If an embedded activity starts a new activity in the same task and the new activity has not opted in to cross-app embedding, the activity occupies the entire task bounds instead of overlaying the activity in the embedded container.
A host application can embed its own activities without restriction as long as the activities launch in the same task.
Split examples
Split from full window

No refactoring required. You can define the configuration for the split
statically or at runtime and then call Context#startActivity() without any
additional parameters.
<SplitPairRule>
    <SplitPairFilter
        window:primaryActivityName=".A"
        window:secondaryActivityName=".B"/>
</SplitPairRule>
Split by default
When the landing page of an application is designed to be split into two containers on large screens, the user experience is best when both activities are created and presented simultaneously. However, content might not be available for the secondary container of the split until the user interacts with the activity in the primary container (for example, the user selects an item from a navigation menu). A placeholder activity can fill the void until content can be displayed in the secondary container of the split (see the Placeholders section).

To create a split with a placeholder, create a placeholder and associate it with the primary activity:
<SplitPlaceholderRule
    window:placeholderActivityName=".PlaceholderActivity">
    <ActivityFilter
        window:activityName=".MainActivity"/>
</SplitPlaceholderRule>
Deep link split
When an app receives an intent, the target activity can be shown as the secondary part of an activity split; for example, a request to show a detail screen with information about an item from a list. On small displays, the detail is shown in the full task window; on larger devices, beside the list.
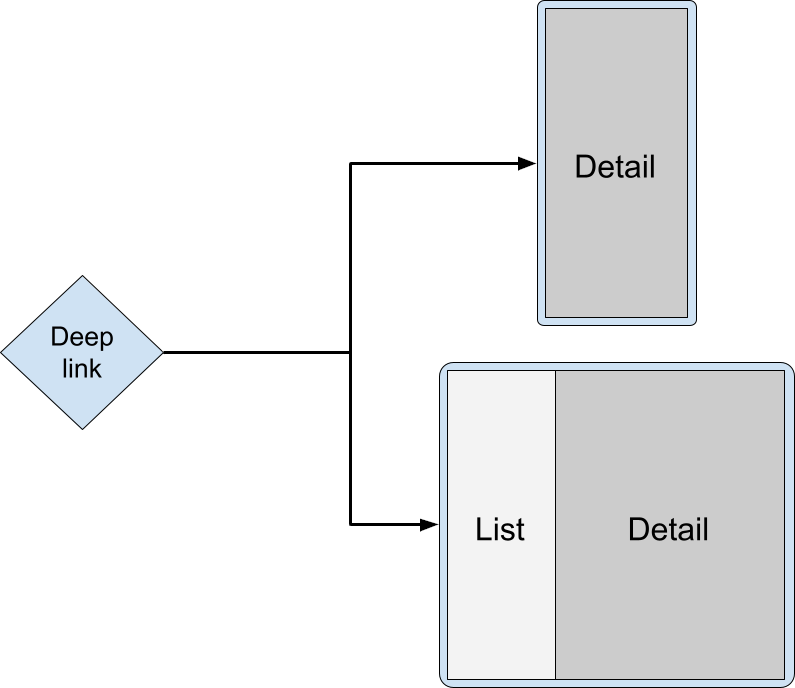
The launch request should be routed to the main activity, and the target detail activity should be launched in a split. The system automatically chooses the correct presentation—stacked or side by side—based on the available display width.
Kotlin
override fun onCreate(savedInstanceState: Bundle?) { super.onCreate(savedInstanceState) RuleController.getInstance(this) .addRule(SplitPairRule.Builder(filterSet).build()) startActivity(Intent(this, DetailActivity::class.java)) }
Java
@Override protected void onCreate(@Nullable Bundle savedInstanceState) { super.onCreate(savedInstanceState); RuleController.getInstance(this) .addRule(new SplitPairRule.Builder(filterSet).build()); startActivity(new Intent(this, DetailActivity.class)); }
The deep link destination might be the only activity that should be available to the user in the back navigation stack, and you might want to avoid dismissing the detail activity and leaving only the main activity:

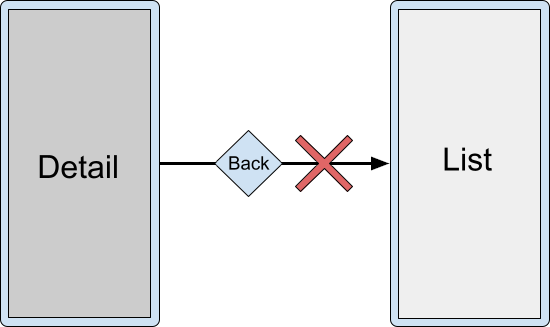
Instead, you can finish both activities at the same time by using the
finishPrimaryWithSecondary attribute:
<SplitPairRule
    window:finishPrimaryWithSecondary="always">
    <SplitPairFilter
        window:primaryActivityName=".ListActivity"
        window:secondaryActivityName=".DetailActivity"/>
</SplitPairRule>
See the Configuration attributes section.
Multiple activities in split containers
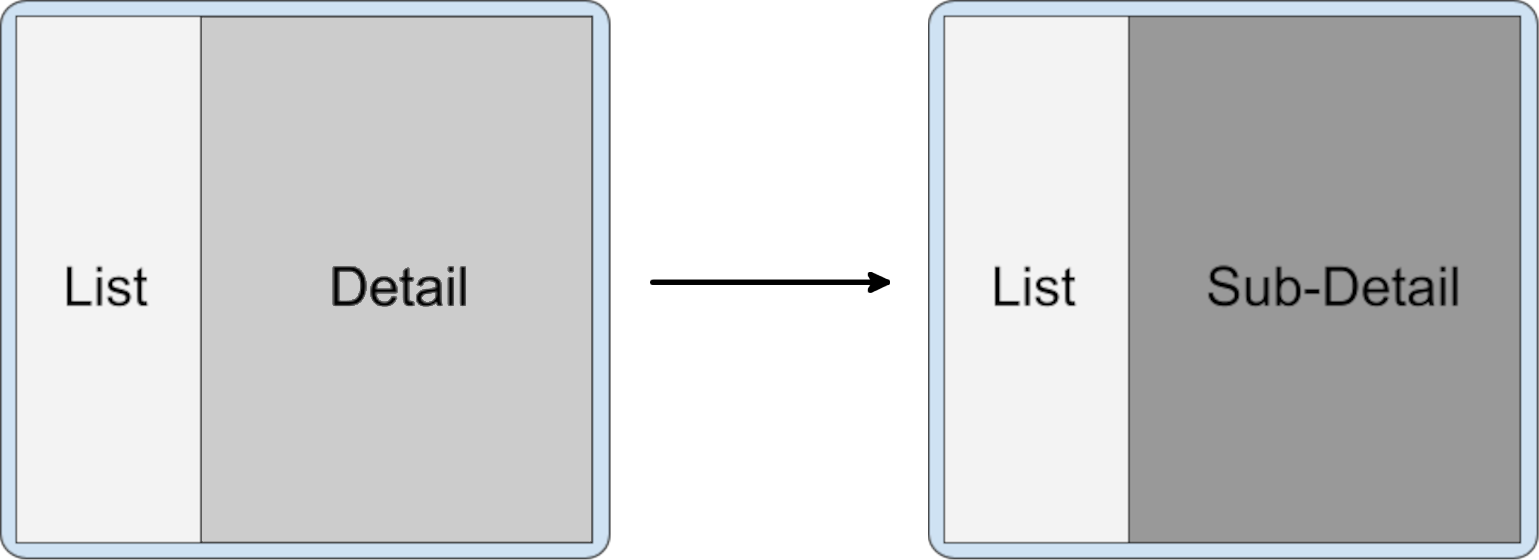
Stacking multiple activities in a split container enables users to access deep content. For example, with a list-detail split, the user might need to go into a sub-detail section but keep the primary activity in place:
Kotlin
class DetailActivity : AppCompatActivity() { fun onOpenSubdetail() { startActivity(Intent(this, SubdetailActivity::class.java)) } }
Java
public class DetailActivity extends AppCompatActivity { void onOpenSubdetail() { startActivity(new Intent(this, SubdetailActivity.class)); } }
The sub-detail activity is placed on top of the detail activity, concealing it:

The user can then go back to the previous detail level by navigating back through the stack:
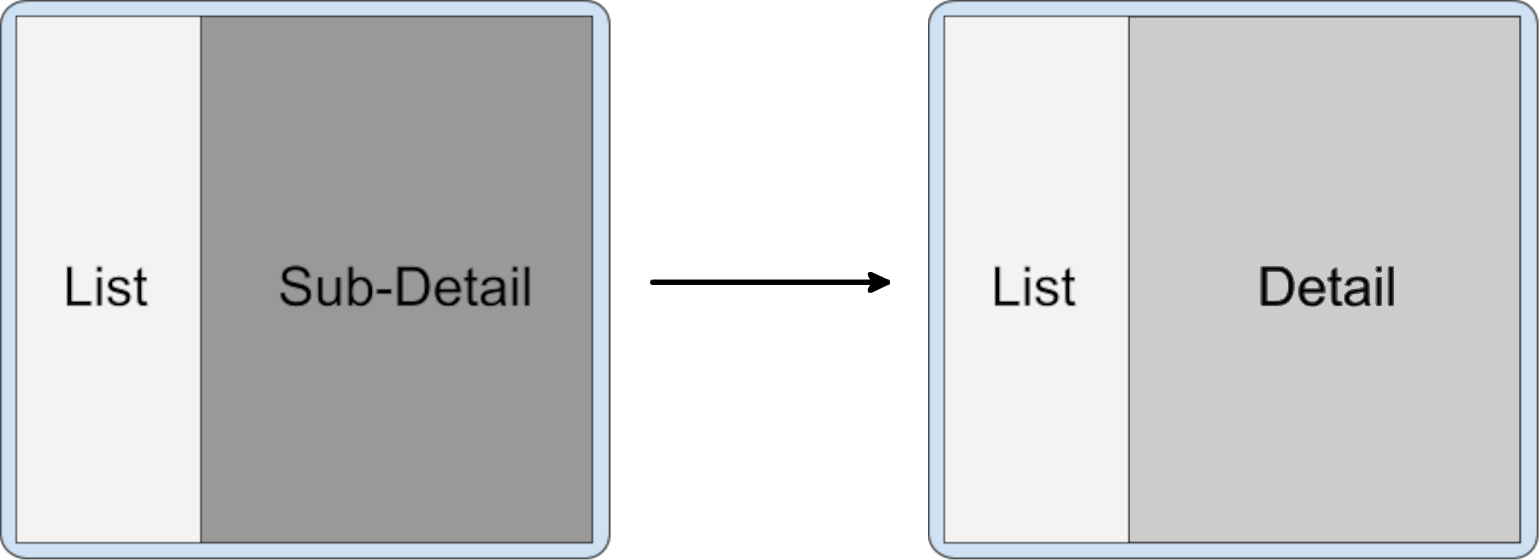
Stacking activities on top of each other is the default behavior when activities are launched from an activity in the same secondary container. Activities launched from the primary container within an active split also end up in the secondary container on the top of the activity stack.
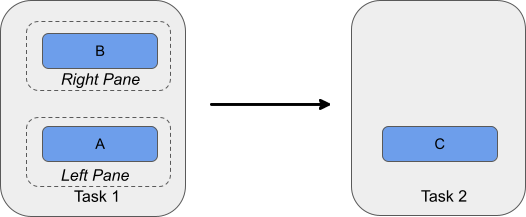
Activities in a new task
When activities in a split task window start activities in a new task, the new task is separate from the task that includes the split and is displayed full window. The Recents screen shows two tasks: the task in the split and the new task.
Activity replacement
Activities can be replaced in the secondary container stack; for example, when the primary activity is used for top-level navigation and the secondary activity is a selected destination. Each selection from the top-level navigation should start a new activity in the secondary container and remove the activity or activities that were previously there.
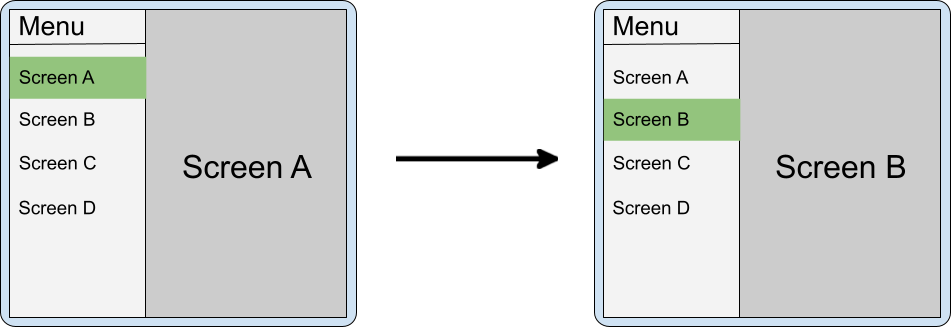
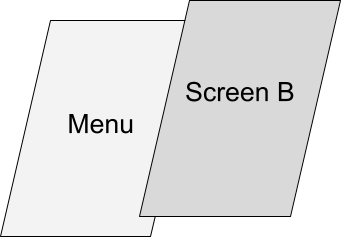
If the app doesn't finish the activity in the secondary container when the navigation selection changes, back navigation might be confusing when the split is collapsed (when the device is folded). For example, if you have a menu in the primary pane and screens A and B stacked in the secondary pane, when the user folds the phone, B is on top of A, and A is on top of the menu. When the user navigates back from B, A appears instead of the menu.
Screen A must be removed from the back stack in such cases.
The default behavior when launching to the side in a new container over an
existing split is to put the new secondary containers on top and retain the old
ones in the back stack. You can configure the splits to clear the previous
secondary containers with clearTop and launch new activities normally.
<SplitPairRule
    window:clearTop="true">
    <SplitPairFilter
        window:primaryActivityName=".Menu"
        window:secondaryActivityName=".ScreenA"/>
    <SplitPairFilter
        window:primaryActivityName=".Menu"
        window:secondaryActivityName=".ScreenB"/>
</SplitPairRule>
Kotlin
inner class MenuActivity : AppCompatActivity() { fun onMenuItemSelected(selectedMenuItem: Int) { startActivity(Intent(this, classForItem(selectedMenuItem))) } }
Java
public class MenuActivity extends AppCompatActivity{ void onMenuItemSelected(int selectedMenuItem) { startActivity(new Intent(this, classForItem(selectedMenuItem))); } }
Alternatively, use the same secondary activity, and from the primary (menu) activity send new intents that resolve to the same instance but trigger a state or UI update in the secondary container.
Multiple splits
Apps can provide multi-level deep navigation by launching additional activities to the side.
When an activity in a secondary container launches a new activity to the side, a new split is created over top of the existing split.

The back stack contains all activities that were previously opened, so users can navigate to the A/B split after finishing C.

To create a new split, launch the new activity to the side from the existing secondary container. Declare the configurations for both the A/B and B/C splits and launch activity C normally from B:
<SplitPairRule>
    <SplitPairFilter
        window:primaryActivityName=".A"
        window:secondaryActivityName=".B"/>
    <SplitPairFilter
        window:primaryActivityName=".B"
        window:secondaryActivityName=".C"/>
</SplitPairRule>
Kotlin
class B : AppCompatActivity() { fun onOpenC() { startActivity(Intent(this, C::class.java)) } }
Java
public class B extends AppCompatActivity{ void onOpenC() { startActivity(new Intent(this, C.class)); } }
React to split state changes
Different activities in an app can have UI elements that perform the same function; for example, a control that opens a window containing account settings.
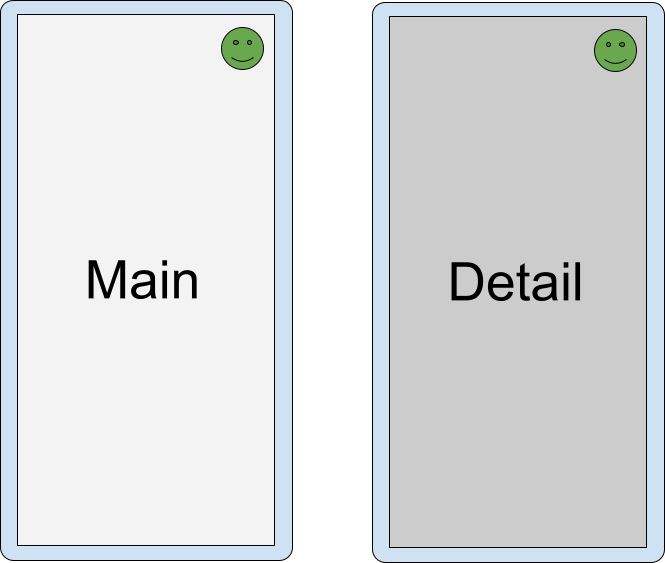
If two activities that have a UI element in common are in a split, it’s redundant and perhaps confusing to show the element in both activities.
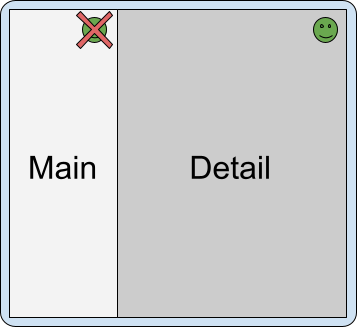
To know when activities are in a split, check the
SplitController.splitInfoList flow or register a listener with
SplitControllerCallbackAdapter for changes in the split state. Then,
adjust the UI accordingly:
Kotlin
val layout = layoutInflater.inflate(R.layout.activity_main, null) val view = layout.findViewById<View>(R.id.infoButton) lifecycleScope.launch { repeatOnLifecycle(Lifecycle.State.STARTED) { splitController.splitInfoList(this@SplitDeviceActivity) // The activity instance. .collect { list -> view.visibility = if (list.isEmpty()) View.VISIBLE else View.GONE } } }
Java
@Override protected void onCreate(@Nullable Bundle savedInstanceState) { super.onCreate(savedInstanceState); new SplitControllerCallbackAdapter(SplitController.getInstance(this)) .addSplitListener( this, Runnable::run, splitInfoList -> { View layout = getLayoutInflater().inflate(R.layout.activity_main, null); layout.findViewById(R.id.infoButton).setVisibility( splitInfoList.isEmpty() ? View.VISIBLE : View.GONE); }); }
Coroutines can be launched in any lifecycle state, but are typically launched in
the STARTED state to conserve resources (see Use Kotlin coroutines with
lifecycle-aware components for more information).
Callbacks can be made in any lifecycle state, including when an activity is
stopped. Listeners should usually be registered in onStart() and unregistered
in onStop().
Full-window modal
Some activities block users from interacting with the application until a specified action is performed; for example, a login screen activity, policy acknowledgement screen, or error message. Modal activities should be prevented from appearing in a split.
An activity can be forced to always fill the task window by using the expand configuration:
<ActivityRule
    window:alwaysExpand="true">
    <ActivityFilter
        window:activityName=".FullWidthActivity"/>
</ActivityRule>
Finish activities
Users can finish activities on either side of the split by swiping from the edge of the display:
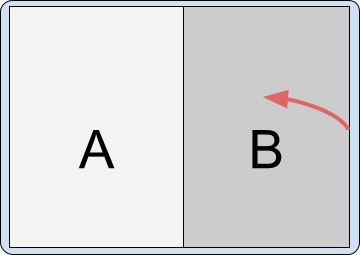
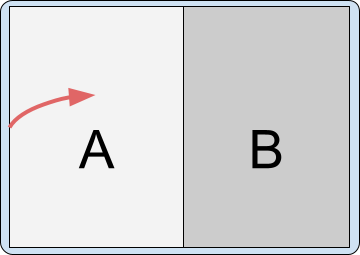
If the device is set up to use the back button instead of gesture navigation, the input is sent to the focused activity—the activity that was touched or launched last.
The effect that finishing all activities in a container has on the opposing container depends on the split configuration.
Configuration attributes
You can specify split pair rule attributes to configure how finishing all activities on one side of the split affects the activities on the other side of the split. The attributes are:
window:finishPrimaryWithSecondary— How finishing all activities in the secondary container affects the activities in the primary containerwindow:finishSecondaryWithPrimary— How finishing all activities in the primary container affects the activities in the secondary container
Possible values of the attributes include:
always— Always finish the activities in the associated containernever— Never finish the activities in the associated containeradjacent— Finish the activities in the associated container when the two containers are displayed adjacent to each other, but not when the two containers are stacked
For example:
<SplitPairRule
    <!-- Do not finish primary container activities when all secondary container activities finish. -->
    window:finishPrimaryWithSecondary="never"
    <!-- Finish secondary container activities when all primary container activities finish. -->
    window:finishSecondaryWithPrimary="always">
    <SplitPairFilter
        window:primaryActivityName=".A"
        window:secondaryActivityName=".B"/>
</SplitPairRule>
Default configuration
When all activities in one container of a split finish, the remaining container occupies the entire window:
<SplitPairRule>
    <SplitPairFilter
        window:primaryActivityName=".A"
        window:secondaryActivityName=".B"/>
</SplitPairRule>


Finish activities together
Finish the activities in the primary container automatically when all activities in the secondary container finish:
<SplitPairRule
    window:finishPrimaryWithSecondary="always">
    <SplitPairFilter
        window:primaryActivityName=".A"
        window:secondaryActivityName=".B"/>
</SplitPairRule>


Finish the activities in the secondary container automatically when all activities in the primary container finish:
<SplitPairRule
    window:finishSecondaryWithPrimary="always">
    <SplitPairFilter
        window:primaryActivityName=".A"
        window:secondaryActivityName=".B"/>
</SplitPairRule>


Finish activities together when all activities in either the primary or secondary container finish:
<SplitPairRule
    window:finishPrimaryWithSecondary="always"
    window:finishSecondaryWithPrimary="always">
    <SplitPairFilter
        window:primaryActivityName=".A"
        window:secondaryActivityName=".B"/>
</SplitPairRule>


Finish multiple activities in containers
If multiple activities are stacked in a split container, finishing an activity on the bottom of the stack does not automatically finish activities on top.
For example, if two activities are in the secondary container, C on top of B:

and the configuration of the split is defined by the configuration of activities A and B:
<SplitPairRule>
    <SplitPairFilter
        window:primaryActivityName=".A"
        window:secondaryActivityName=".B"/>
</SplitPairRule>
finishing the top activity retains the split.

Finishing the bottom (root) activity of the secondary container does not remove the activities on top of it; and so, also retains the split.

Any additional rules for finishing activities together, such as finishing the secondary activity with the primary, are also executed:
<SplitPairRule
    window:finishSecondaryWithPrimary="always">
    <SplitPairFilter
        window:primaryActivityName=".A"
        window:secondaryActivityName=".B"/>
</SplitPairRule>

And when the split is configured to finish primary and secondary together:
<SplitPairRule
    window:finishPrimaryWithSecondary="always"
    window:finishSecondaryWithPrimary="always">
    <SplitPairFilter
        window:primaryActivityName=".A"
        window:secondaryActivityName=".B"/>
</SplitPairRule>


Change split properties at runtime
The properties of an active and visible split cannot be changed. Changing the split rules affects additional activity launches and new containers, but not existing and active splits.
To change the properties of active splits, finish the side activity or activities in the split and launch to the side again with a new configuration.
Dynamic split properties
Android 15 (API level 35) and higher supported by Jetpack WindowManager 1.4 and higher offer dynamic features that enable configurability of activity embedding splits, including:
- Pane expansion: An interactive, draggable divider enables users to resize the panes in a split presentation.
- Activity stack pinning: Users can pin the content in one container and isolate navigation in the container from navigation in the other container.
- Dialog full-screen dim: When displaying a dialog, apps can specify whether to dim the entire task window or just the container that opened the dialog.
Pane expansion
Pane expansion enables users to adjust the amount of screen space allocated to the two activities in a dual‑pane layout.
To customize the appearance of the window divider and set the divider's draggable range, do the following:
Create an instance of
DividerAttributesCustomize the divider attributes:
color: The color of the draggable pane separator.widthDp: The width of the draggable pane separator. Set toWIDTH_SYSTEM_DEFAULTto let the system determine the divider width.Drag range: The minimum percentage of the screen either pane can occupy. Can range from 0.33 to 0.66. Set to
DRAG_RANGE_SYSTEM_DEFAULTto let the system determine the drag range.
Kotlin
val splitAttributesBuilder: SplitAttributes.Builder = SplitAttributes.Builder() .setSplitType(SplitAttributes.SplitType.ratio(0.33f)) .setLayoutDirection(SplitAttributes.LayoutDirection.LEFT_TO_RIGHT) if (WindowSdkExtensions.getInstance().extensionVersion >= 6) { splitAttributesBuilder.setDividerAttributes( DividerAttributes.DraggableDividerAttributes.Builder() .setColor(getColor(R.color.divider_color)) .setWidthDp(4) .setDragRange(DividerAttributes.DragRange.DRAG_RANGE_SYSTEM_DEFAULT) .build() ) } val splitAttributes: SplitAttributes = splitAttributesBuilder.build()
Java
SplitAttributes.Builder splitAttributesBuilder = new SplitAttributes.Builder() .setSplitType(SplitAttributes.SplitType.ratio(0.33f)) .setLayoutDirection(SplitAttributes.LayoutDirection.LEFT_TO_RIGHT); if (WindowSdkExtensions.getInstance().getExtensionVersion() >= 6) { splitAttributesBuilder.setDividerAttributes( new DividerAttributes.DraggableDividerAttributes.Builder() .setColor(ContextCompat.getColor(this, R.color.divider_color)) .setWidthDp(4) .setDragRange(DividerAttributes.DragRange.DRAG_RANGE_SYSTEM_DEFAULT) .build() ); } SplitAttributes _splitAttributes = splitAttributesBuilder.build();
Activity stack pinning
Activity stack pinning enables users to pin one of the split windows so the activity stays as is while users navigate within the other window. Activity stack pinning provides an enhanced multitasking experience.
To enable activity stack pinning in your app, do the following:
Add a button to the layout file of the activity you want to pin, for example, the detail activity of an list‑detail layout:
<androidx.constraintlayout.widget.ConstraintLayout
 xmlns:android="http://schemas.android.com/apk/res/android"
 xmlns:app="http://schemas.android.com/apk/res-auto"
 xmlns:tools="http://schemas.android.com/tools"
 android:id="@+id/detailActivity"
 android:layout_width="match_parent"
 android:layout_height="match_parent"
 android:background="@color/white"
 tools:context=".DetailActivity">

<TextView
   android:id="@+id/textViewItemDetail"
   android:layout_width="wrap_content"
   android:layout_height="wrap_content"
   android:textSize="36sp"
   android:textColor="@color/obsidian"
   app:layout_constraintBottom_toTopOf="@id/pinButton"
   app:layout_constraintEnd_toEndOf="parent"
   app:layout_constraintStart_toStartOf="parent"
   app:layout_constraintTop_toTopOf="parent" />

<androidx.appcompat.widget.AppCompatButton
   android:id="@+id/pinButton"
   android:layout_width="wrap_content"
   android:layout_height="wrap_content"
   android:text="@string/pin_this_activity"
   app:layout_constraintBottom_toBottomOf="parent"
   app:layout_constraintEnd_toEndOf="parent"
   app:layout_constraintStart_toStartOf="parent"
   app:layout_constraintTop_toBottomOf="@id/textViewItemDetail"/>

</androidx.constraintlayout.widget.ConstraintLayout>
In the
onCreate()method of the activity, set an onclick listener on the button:Kotlin
val pinButton: Button = findViewById(R.id.pinButton) pinButton.setOnClickListener { val splitAttributes: SplitAttributes = SplitAttributes.Builder() .setSplitType(SplitAttributes.SplitType.ratio(0.66f)) .setLayoutDirection(SplitAttributes.LayoutDirection.LEFT_TO_RIGHT) .build() val pinSplitRule = SplitPinRule.Builder() .setSticky(true) .setDefaultSplitAttributes(splitAttributes) .build() SplitController.getInstance(applicationContext) .pinTopActivityStack(taskId, pinSplitRule) }
Java
Button pinButton = findViewById(R.id.pinButton); pinButton.setOnClickListener( (view) -> { SplitAttributes splitAttributes = new SplitAttributes.Builder() .setSplitType(SplitAttributes.SplitType.ratio(0.66f)) .setLayoutDirection(SplitAttributes.LayoutDirection.LEFT_TO_RIGHT) .build(); SplitPinRule pinSplitRule = new SplitPinRule.Builder() .setSticky(true) .setDefaultSplitAttributes(splitAttributes) .build(); SplitController.getInstance(getApplicationContext()) .pinTopActivityStack(getTaskId(), pinSplitRule); });
Dialog full-screen dim
Activities typically dim their displays to draw attention to a dialog. In activity embedding, both panes of the dual‑pane display should dim, not just the pane containing the activity that opened the dialog, for a unified UI experience.
With WindowManager 1.4 and higher, the entire app window dims by default when a
dialog opens (see EmbeddingConfiguration.DimAreaBehavior.ON_TASK).
To dim only the container of the activity that opened the dialog, use
EmbeddingConfiguration.DimAreaBehavior.ON_ACTIVITY_STACK.
Extract an activity from a split to full window
Create a new configuration that displays the side activity full window, and then relaunch the activity with an intent that resolves to the same instance.
Check for split support at runtime
Activity embedding is supported on Android 12L (API level 32) and higher, but is
also available on some devices running earlier platform versions. To check at
runtime for the availability of the feature, use the
SplitController.splitSupportStatus property or
SplitController.getSplitSupportStatus() method:
Kotlin
if (SplitController.getInstance(this).splitSupportStatus == SplitController.SplitSupportStatus.SPLIT_AVAILABLE ) { // Device supports split activity features. }
Java
if (SplitController.getInstance(this).getSplitSupportStatus() == SplitController.SplitSupportStatus.SPLIT_AVAILABLE) { // Device supports split activity features. }
If splits are not supported, activities are launched on top of the activity stack (following the non-activity embedding model).
Prevent system override
The manufacturers of Android devices (original equipment manufacturers, or OEMs), can implement activity embedding as a function of the device system. The system specifies split rules for multi-activity apps, overriding the windowing behavior of the apps. The system override forces multi-activity apps into a system-defined activity embedding mode.
System activity embedding can enhance app presentation through multi-pane layouts, such as list-detail, without any changes to the app. However, the system's activity embedding might also cause incorrect app layouts, bugs, or conflicts with activity embedding implemented by the app.
Your app can prevent or permit system activity embedding by setting
PROPERTY_ACTIVITY_EMBEDDING_ALLOW_SYSTEM_OVERRIDE in the app manifest
file, for example:
<manifest xmlns:android="http://schemas.android.com/apk/res/android">
    <application>
        <property
            android:name="android.window.PROPERTY_ACTIVITY_EMBEDDING_ALLOW_SYSTEM_OVERRIDE"
            android:value="true|false" />
    </application>
</manifest>
The property name is defined in the Jetpack WindowManager WindowProperties
object. Set the value to false if your app implements activity embedding, or
if you want to otherwise prevent the system from applying its activity embedding
rules to your app. Set the value to true to permit the system to apply
system-defined activity embedding to your app.
Limitations, restrictions, and caveats
- Only the host app of the task, which is identified as the owner of the root activity in the task, can organize and embed other activities in the task. If activities that support embedding and splits run in a task that belongs to a different application, then embedding and splits will not work for those activities.
- Activities can only be organized within a single task. Launching an activity in a new task always puts it in a new expanded window outside of any existing splits.
- Only activities in the same process can be organized and put in a split. The
SplitInfocallback only reports activities that belong to the same process, since there is no way of knowing about activities in different processes. - Each pair or singular activity rule applies only to activity launches that happen after the rule has been registered. There is currently no way to update existing splits or their visual properties.
- The split pair filter configuration must match the intents used when launching activities completely. The matching occurs at the point when a new activity is started from the application process, so it might not know about component names that are resolved later in the system process when using implicit intents. If a component name is not known at the time of launch, a wildcard can be used instead ("*/*") and filtering can be performed based on intent action.
- There is currently no way to move activities between containers or in and out of splits after they were created. Splits are only created by the WindowManager library when new activities with matching rules are launched, and splits are destroyed when the last activity in a split container is finished.
- Activities can be relaunched when the configuration changes, so when a split is created or removed and activity bounds change, the activity can go through complete destruction of the previous instance and creation of the new one. As a result, app developers should be careful with things like launching new activities from lifecycle callbacks.
- Devices must include the window extensions interface to support activity embedding. Nearly all large screen devices running Android 12L (API level 32) or higher include the interface. However, some large screen devices that are not capable of running multiple activities don't include the window extensions interface. If a large screen device doesn't support multi-window mode, it might not support activity embedding.
Additional resources
- Codelabs:
- Learning pathway — Activity embedding
- Sample app — activity-embedding
