配置项目
使用集合让一切井井有条
根据您的偏好保存内容并对其进行分类。
将项目配置为使用 Android Game Development Extension。
Android Game Development Extension 会调用 MSBuild 以将 C/C++ 源代码构建到共享库 (.so
) 和静态库 (.a
) 中。在构建流程中,一项自定义 MSBuild 任务会调用 Gradle 来编译 Java 和 Kotlin 源代码、打包资源,并生成用于部署的 APK 文件。在配置项目时,您必须确保 MSBuild 具有针对 Android 平台进行构建所需的信息。
使用 MSBuild 构建 C/C++
典型的 Android 项目使用 Gradle 构建而成,其中项目内的原生代码由运行 CMake 或 ndk-build 的 Gradle 通道构建。有了适用于 Visual Studio 的 Android Game Development Extension,构建流程颠倒过来。现在,MSBuild 是构建流程的起点。MSBuild 首先为作为扩展程序的一部分在系统上安装的新 Android 平台(例如“Android-x86_64”)构建所有 C/C++ 源代码。MSBuild 随后调用 Gradle 以将包含 C/C++ 逻辑的共享库文件打包到 APK 中。
您应首先在 MSBuild 中复制 CMake 或 ndk-build 中的项目现有构建逻辑。将目标平台设置为以下各项:
- Android-x86
- Android-x86_64
- Android-armeabi-v7a
- Android-arm64-v8a
这些平台全部由 Android Game Development Extension 提供。
设置编译和链接选项
AGDE 在构建应用的 C/C++ 部分时,会使用您选择的 NDK 来确定默认的编译和链接选项。
如果您需要自定义这些编译或链接选项,可以使用“Project Properties”(项目属性)进行设置。您可以在“C/C++”(用于编译)、“Librarian”(用于静态库归档)和“Linker”(用于动态库关联)组中找到最常见的选项。如果您需要传递任何其他自定义选项,可以将其添加到“命令行”部分。例如,如果您使用的是低于 r28 的 NDK,则可能需要设置链接器标志,以使应用支持 16 KB 页面大小。
虽然 Teapot 示例项目包含 Android 平台,但您必须手动将一个 Android 平台添加到现有项目。如要添加一个新平台,请在 Visual Studio 中执行以下操作:
- 依次选择生成 > 配置管理器。
- 在 Active solution platform 下,选择 <New>。
为新平台输入以下某一项:
- Android-armeabi-v7a
- Android-arm64-v8a
- Android-x86
- Android-x86_64
在从此处复制设置框中,选择其他现有 Android 平台,如果尚无任何 Android 平台,请选择 <Empty>。确保您已启用创建新的项目平台。
添加 Android APK 项
依次选择 Add > New Item > Visual C++ > Android > Android APK,然后点击 Add。在接下来显示的对话框中配置 Android 应用。
- Application Name:简单易懂的 Android 应用名称。
- Application ID:Android 应用的唯一标识符。
- Solution Explorer Location:包含添加的 Android 打包支持文件的虚拟文件夹的位置。默认情况下,这些文件也位于项目中的一个同名文件夹中。您可以通过选中 Put support files in a custom location 复选框并指定自定义位置来自定义位置。虚拟文件夹仍位于 Solution Explorer 中的当前项目下。
让 MSBuild 调用 Gradle 以构建 APK
除非 MSBuild 知道 Gradle 项目的位置,否则它无法调用 Gradle。您可以使用 Gradle Build Directory 属性设置此位置,如图 1 所示。

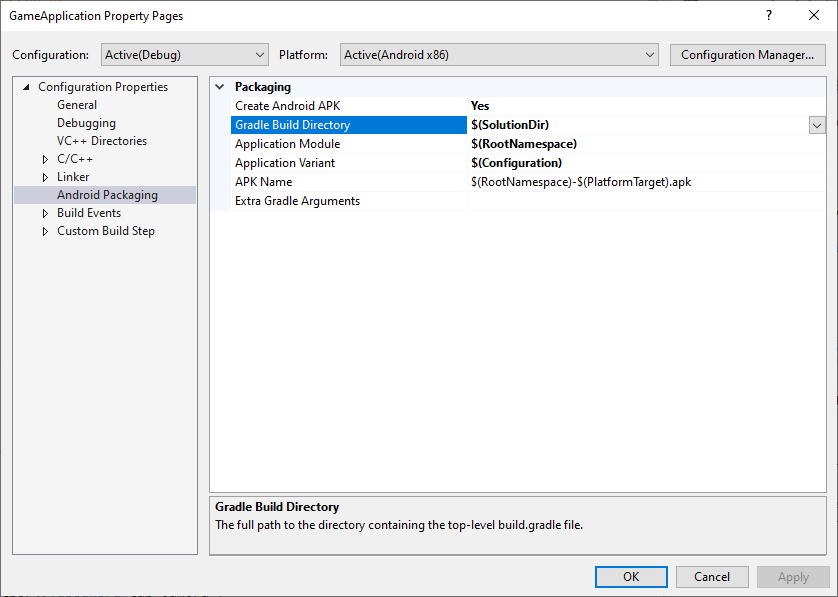
图 1. Gradle Build Directory 属性
此外,还应设置 Application Module、Application Variant 和 APK Name 属性(如上图所示),以使 MSBuild 知道要构建的内容。
- Application Module:Gradle 子项目的名称。这是
settings.gradle
文件中设置的主项目。对于直接使用 Android Studio 创建的项目,它通常称为 app
。
- Application Variant:要构建的 Android 变体。此值应根据 MSBuild 配置进行设置。例如,对于调试 build,应将此值设置为调试变体。如果项目的 MSBuild 配置名称与 Gradle 变体名称相符,则只需使用默认值
$(Configuration)
。
- APK Name:生成的 APK 文件的名称,该文件用于在开发计算机上进行调试和性能剖析。此名称会传递给 Gradle,Gradle 构建脚本应遵循此属性(请参阅下一部分中的
MSBUILD_ANDROID_OUTPUT_APK_NAME
属性)。
修改 Gradle 构建脚本
在构建期间,MSBuild 会将以下信息作为项目属性传递给 Gradle 脚本。请更改项目的现有构建脚本(通常名为 build.gradle
)以读取这些属性。
MSBUILD_MIN_SDK_VERSION
:构建 APK 的最低 SDK 版本(作为字符串)。在项目属性页面上的 Minimum Android SDK Version 框中设置此值,如图 2 所示。
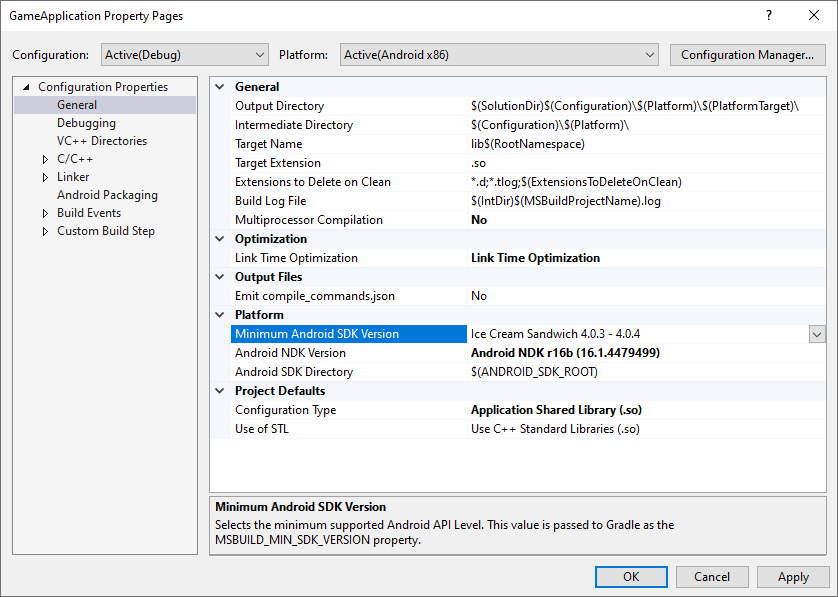
图 2. Minimum Android SDK Version 属性
Gradle 构建脚本应将 minSdkVersion
或 minSdk
设置为此字符串值,并在必要时进行 toInteger()
类型转换。
Groovy
android {
// ...
defaultConfig {
applicationId "com.yourcompany.yourapp"
minSdkVersion MSBUILD_MIN_SDK_VERSION
// Or: minSdk MSBUILD_MIN_SDK_VERSION.toInteger()
// ...
}
// ...
}
Kotlin
android {
// ...
defaultConfig {
applicationId = "com.yourcompany.yourapp"
minSdkVersion(MSBUILD_MIN_SDK_VERSION)
// Or: minSdk = MSBUILD_MIN_SDK_VERSION.toInteger()
// ...
}
// ...
}
MSBUILD_ANDROID_OUTPUT_APK_NAME
:Gradle 构建的 APK 的预期名称。Android Game Development Extension 将查找与此名称相符的 APK,然后将其部署到连接的设备(用于调试和性能剖析)。在项目属性页面上的 APK Name 框中设置此值,如图 3 所示。
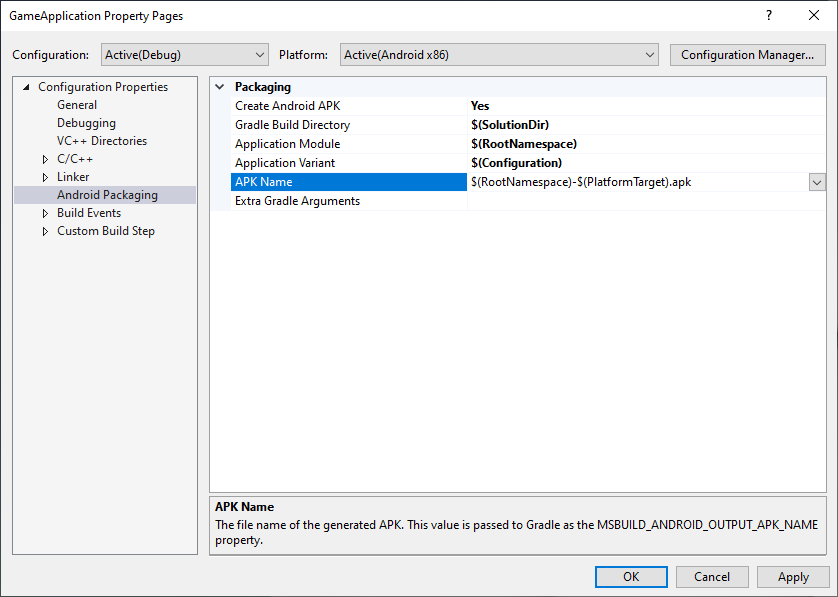
图 3. APK Name 属性
Gradle 构建脚本必须遵循此属性。例如,以下示例将所有变体的输出 APK 名称设置为 MSBuild 选择的名称。
Groovy
android {
// ...
applicationVariants.all { variant ->
variant.outputs.all {
outputFileName = MSBUILD_ANDROID_OUTPUT_APK_NAME
}
}
// ...
}
Kotlin
android {
// ...
applicationVariants.all { variant ->
variant.outputs.all {
outputFileName = MSBUILD_ANDROID_OUTPUT_APK_NAME
}
}
// ...
}
MSBUILD_JNI_LIBS_SRC_DIR
:包含 MSBuild 构建的共享库(.so
文件)的目录。在项目属性页面上的 Output Directory 框中设置此值,如下所示。默认情况下,此值是 Visual Studio 项目的输出目录属性,如图 4 所示。
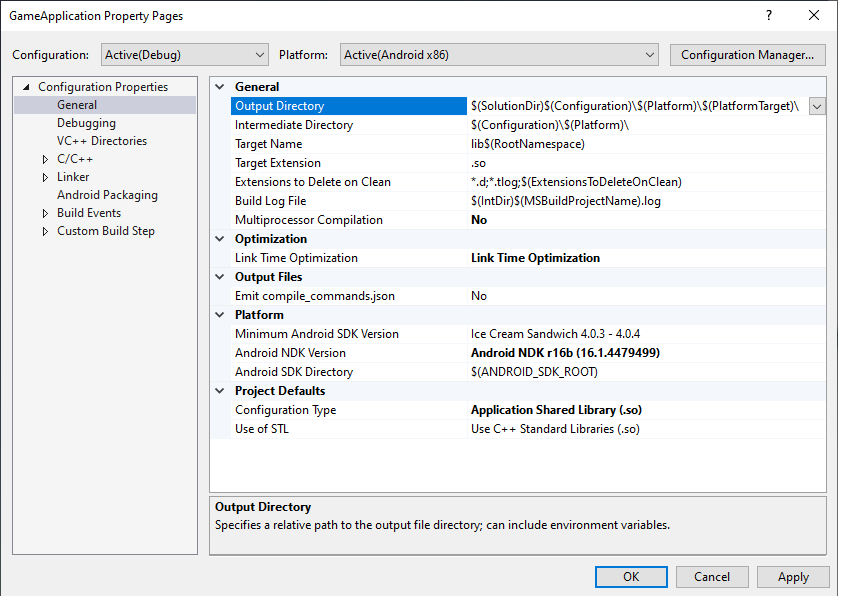
图 4. Output Directory 属性
Gradle 应将此文件夹中的共享库文件打包到 APK 内,以便 Android 应用在运行时加载它们。
Groovy
android {
// ...
sourceSets {
main {
jniLibs.srcDirs += [MSBUILD_JNI_LIBS_SRC_DIR]
}
}
// ...
}
Kotlin
android {
// ...
sourceSets.getByName("main") {
jniLibs.srcDir(MSBUILD_JNI_LIBS_SRC_DIR)
}
// ...
}
此外,由于所有 C/C++ 代码现在都由 MSBuild 构建,因此请移除 Gradle 构建脚本中的 externalNativeBuild
部分。这些部分过去用于调用 CMake 或 ndk-build 以编译 C/C++ 代码,但不再需要。
MSBUILD_NDK_VERSION
:要用于构建项目的 NDK 的版本。在项目属性页面上的 Android NDK Version 框中设置此值,如图 5 所示。
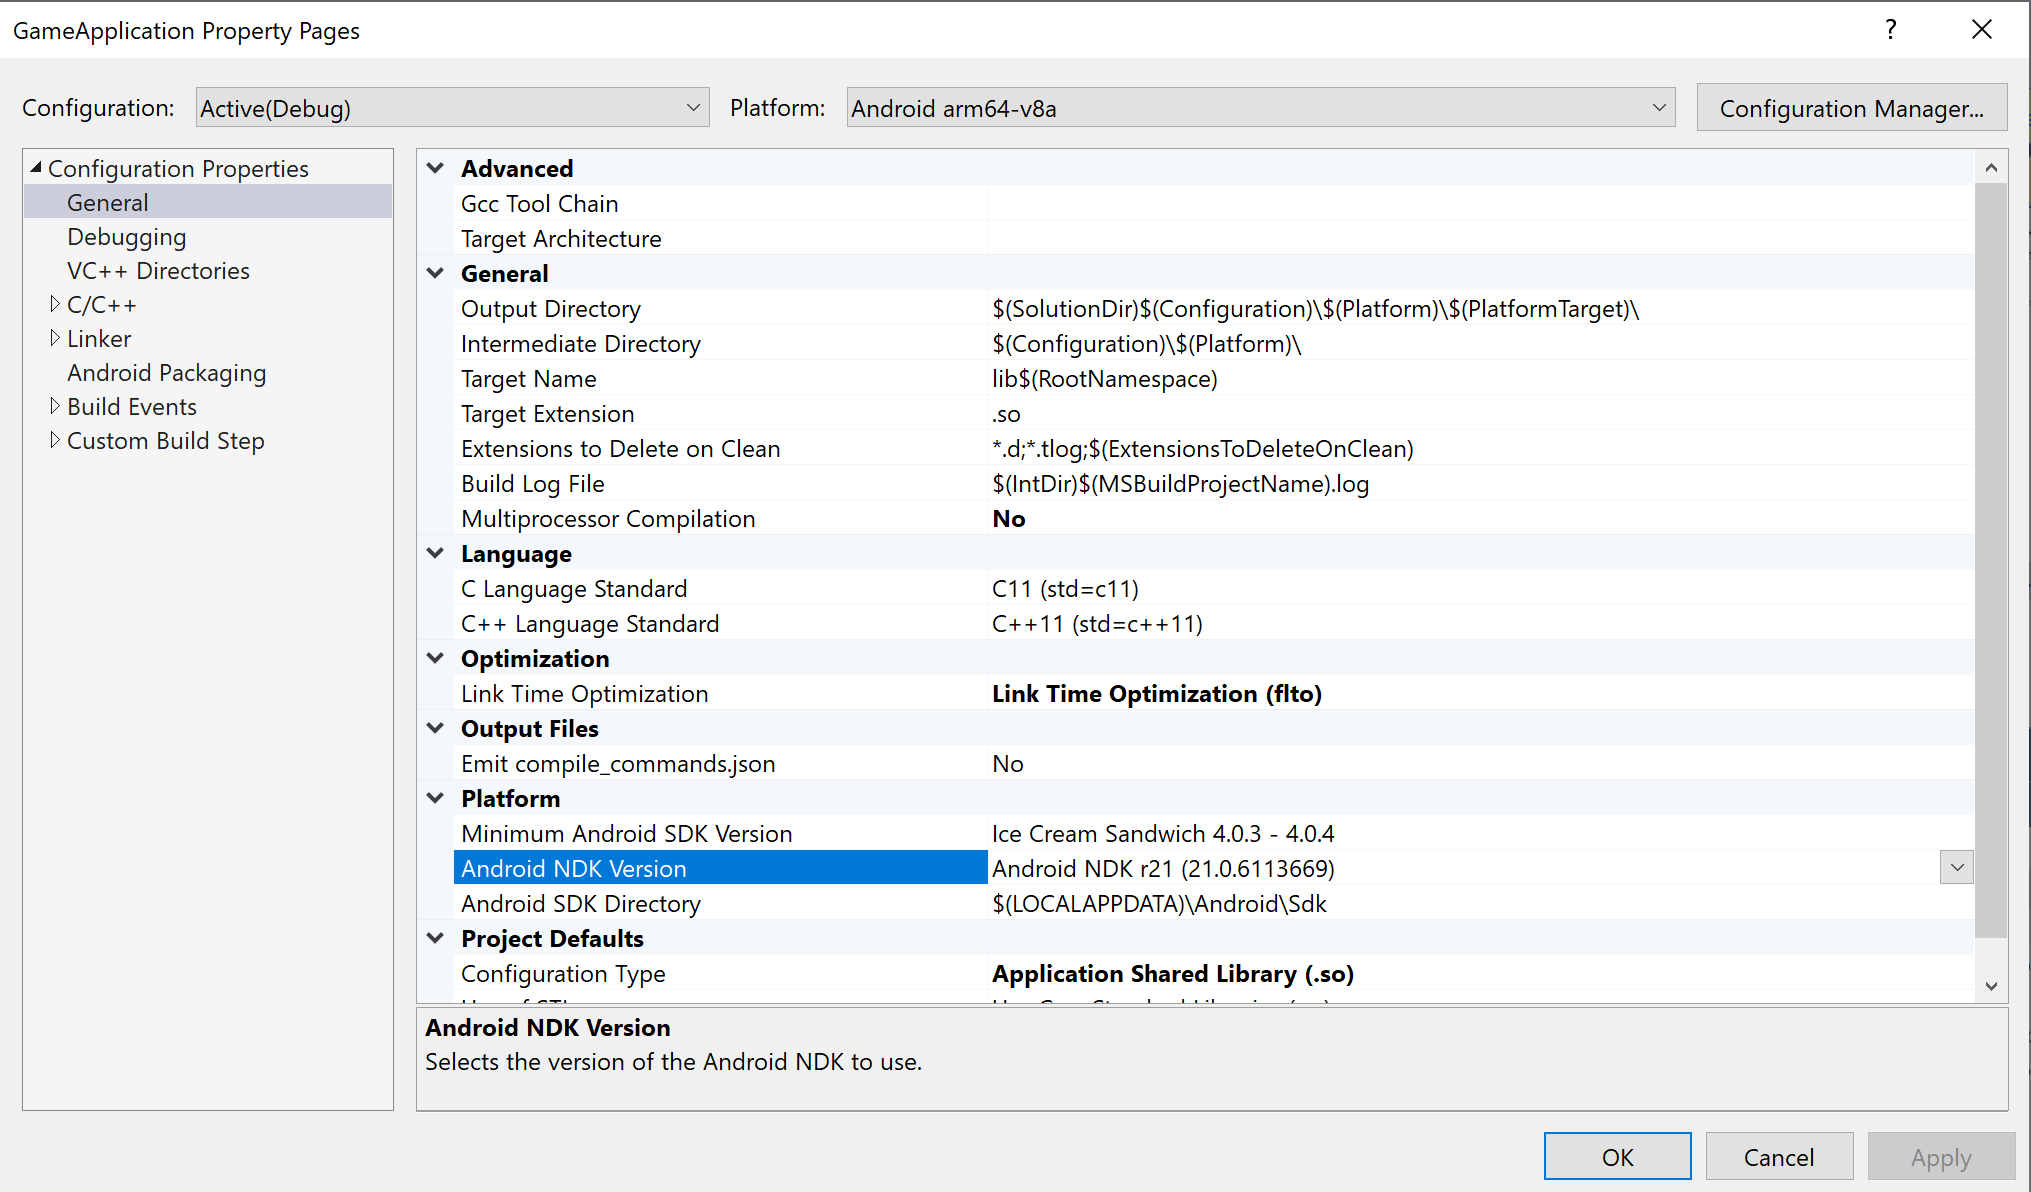
图 5. Android NDK Version 属性
Gradle 构建脚本应将 ndkVersion
设置为此值,如下所示。
Groovy
android {
// ...
ndkVersion MSBUILD_NDK_VERSION
// ...
}
Kotlin
android {
// ...
ndkVersion = MSBUILD_NDK_VERSION
// ...
}
如需了解详情,请参阅 Android Studio 主题:安装及配置 NDK 和 CMake。
本页面上的内容和代码示例受内容许可部分所述许可的限制。Java 和 OpenJDK 是 Oracle 和/或其关联公司的注册商标。
最后更新时间 (UTC):2025-07-27。
[null,null,["最后更新时间 (UTC):2025-07-27。"],[],[],null,["# Configure a project to use the Android Game Development Extension.\n\nThe Android Game Development Extension invokes MSBuild to build C/C++ source code into shared\nlibraries (`.so`) and static libraries (`.a`). As part of the build process, a\ncustom MSBuild task invokes Gradle to compile Java and Kotlin source code,\npackage assets, and generate an APK file for deployment. When you configure your\nproject, you must ensure that MSBuild has the information it needs to build for\nthe Android platform.\n\nBuild C/C++ with MSBuild\n------------------------\n\nA typical Android project is built with Gradle, where the native code inside the\nproject is built by a Gradle pass that runs either [CMake](/ndk/guides/cmake) or\n[ndk-build](/ndk/guides/ndk-build). With the Android Game Development Extension for Visual\nStudio, the build process is inverted. Now MSBuild is the starting point of the\nbuild process. All C/C++ source code is built first by MSBuild for the new\nAndroid platforms installed on your system as part of the extension (for\nexample, \"Android-x86_64\"). MSBuild then invokes Gradle to package the shared\nlibrary files that contain your C/C++ logic into an APK.\n\nYou should first replicate your project's existing build logic in CMake or\nndk-build in MSBuild. Set the target platforms to the following:\n\n- Android-x86\n- Android-x86_64\n- Android-armeabi-v7a\n- Android-arm64-v8a\n\nThese platforms are all provided by the Android Game Development Extension.\n\n### Set your compile and link options\n\nAGDE uses the NDK you select to determine the default compile and link options\nwhen building the C/C++ part of your app.\n\nIf you need to customize these compile or link options, you can set them using\nProject Properties. You can find the most common options in the C/C++\n(for compilation), Librarian (for static library archiving) and Linker (for\ndynamic library linking) groups. If you need to pass any other custom\noptions, you can add them to the Command Line section. For example,\nif you are using an NDK older than r28, you might want to set the linker flag\nto make your app [support 16 KB page sizes](/guide/practices/page-sizes#compile-16-kb-alignment).\n\n### Add an Android Platform\n\nWhile the teapot sample project includes Android platforms, you must manually\nadd an Android platform to an existing project. To add a new platform, do the\nfollowing in Visual Studio:\n\n1. Select **Build \\\u003e Configuration Manager**.\n2. Under **Active solution platform** , select **\\\u003cNew\\\u003e**.\n3. Type one of the following for the new platform:\n\n - **Android-armeabi-v7a**\n - **Android-arm64-v8a**\n - **Android-x86**\n - **Android-x86_64**\n4. In the **Copy settings from** box, select another existing Android\n platform, or **\\\u003cEmpty\\\u003e** if you do not have any Android platforms yet.\n Make sure you enabled **Create new project platforms**.\n\n### Add an Android APK item\n\nSelect **Add \\\u003e New Item \\\u003e Visual C++ \\\u003e Android \\\u003e Android APK** and click\n**Add**. Configure the Android application on the following dialog.\n\n- **Application Name**: The human-readable name of your Android application.\n- **Application ID** : The [unique identifier](/studio/build/configure-app-module#set_the_application_id) for your Android application.\n- **Solution Explorer Location** : Location of the virtual folder that contains the added Android packaging support files. By default, these files are also located in the project in a folder with the same name. You can customize the location by selecting the **Put support files in a custom location** checkbox and specifying a custom location. The virtual folder will still be under the current project in the Solution Explorer.\n\nMake MSBuild invoke Gradle to build an APK\n------------------------------------------\n\nMSBuild cannot invoke Gradle unless it knows the location of the Gradle project.\nSet this location using the **Gradle Build Directory** property, as\nshown in figure 1.\n\n\u003cbr /\u003e\n\n\n**Figure 1** . **Gradle Build Directory** property\n\nIn addition, set the **Application Module** , **Application Variant** , and **APK\nName** properties (as shown in the previous image) in order for MSBuild to know\nwhat to build.\n\n- **Application Module** : The name of the Gradle subproject. This is the main project set in the `settings.gradle` file. It is usually called `app` for projects directly created using Android Studio.\n- **Application Variant** : The Android variant to build. This value should be set according to the MSBuild configurations. For example, a debug build should have a value set to the debug variant. If your project's MSBuild configuration name matches the Gradle variant names, then just use the default value of `$(Configuration)`.\n- **APK Name** : The name of the generated APK file used for debugging and profiling on your development computer. This name is passed to Gradle and your Gradle build script should respect this (see the property `MSBUILD_ANDROID_OUTPUT_APK_NAME` in the following section).\n\n### Modify your Gradle build scripts\n\nDuring the build, MSBuild passes the following information as project properties\nto the Gradle script. Change your project's existing build scripts (typically\nnamed `build.gradle`) to read these properties.\n\n- `MSBUILD_MIN_SDK_VERSION`: The minimum SDK version for building the APK, as a\n string. Set this value in the **Minimum Android SDK Version** box on the\n project property page shown in figure 2.\n\n \u003cbr /\u003e\n\n\n **Figure 2** . **Minimum Android SDK Version** property\n\n The Gradle build script should set `minSdkVersion` or `minSdk` to this\n string value, with a `toInteger()` type conversion when necessary. \n\n ### Groovy\n\n ```groovy\n android {\n // ...\n\n defaultConfig {\n applicationId \"com.yourcompany.yourapp\"\n minSdkVersion MSBUILD_MIN_SDK_VERSION\n // Or: minSdk MSBUILD_MIN_SDK_VERSION.toInteger()\n // ...\n }\n\n // ...\n }\n ```\n\n ### Kotlin\n\n ```kotlin\n android {\n // ...\n\n defaultConfig {\n applicationId = \"com.yourcompany.yourapp\"\n minSdkVersion(MSBUILD_MIN_SDK_VERSION)\n // Or: minSdk = MSBUILD_MIN_SDK_VERSION.toInteger()\n // ...\n }\n\n // ...\n }\n ```\n- `MSBUILD_ANDROID_OUTPUT_APK_NAME`: The expected name of the APK that Gradle\n builds. The Android Game Development Extension will look for an APK matching this name and\n then deploy it to connected devices (for debugging and profiling). Set this\n value in the **APK Name** box on the project property page shown in figure 3.\n\n \u003cbr /\u003e\n\n\n **Figure 3** . **APK Name** property\n\n The Gradle build script must respect this property. For example, the\n following example sets the output APK name for all variants to the name\n chosen by MSBuild. \n\n ### Groovy\n\n ```groovy\n android {\n // ...\n\n applicationVariants.all { variant -\u003e\n variant.outputs.all {\n outputFileName = MSBUILD_ANDROID_OUTPUT_APK_NAME\n }\n }\n\n // ...\n }\n ```\n\n ### Kotlin\n\n ```kotlin\n android {\n // ...\n\n applicationVariants.all { variant -\u003e\n variant.outputs.all {\n outputFileName = MSBUILD_ANDROID_OUTPUT_APK_NAME\n }\n }\n\n // ...\n }\n ```\n- `MSBUILD_JNI_LIBS_SRC_DIR`: The directory containing the shared libraries\n (`.so` files) built by MSBuild. Set this value in the **Output Directory**\n box on the project property page shown below. By default, this value is the\n output directory property for the Visual Studio project, as shown in figure 4.\n\n \u003cbr /\u003e\n\n\n **Figure 4** . **Output Directory** property\n\n Gradle should package the shared library files in this folder inside the APK\n in order for the Android application to load them at runtime. \n\n ### Groovy\n\n ```groovy\n android {\n // ...\n\n sourceSets {\n main {\n jniLibs.srcDirs += [MSBUILD_JNI_LIBS_SRC_DIR]\n }\n }\n\n // ...\n }\n ```\n\n ### Kotlin\n\n ```kotlin\n android {\n // ...\n\n sourceSets.getByName(\"main\") {\n jniLibs.srcDir(MSBUILD_JNI_LIBS_SRC_DIR)\n }\n\n // ...\n }\n ```\n\n In addition, since any C/C++ code is now built by MSBuild, remove the\n `externalNativeBuild` sections in your Gradle build scripts. These sections\n were used to invoke CMake or ndk-build to compile your C/C++ code, but are\n no longer needed.\n- `MSBUILD_NDK_VERSION`: The version of the NDK to use to build your\n project. Set this value in the **Android NDK Version** box on the\n project property page shown in figure 5.\n\n \u003cbr /\u003e\n\n\n **Figure 5** . **Android NDK Version** property\n\n The Gradle build script should set `ndkVersion` to this value, as shown: \n\n ### Groovy\n\n ```groovy\n android {\n // ...\n\n ndkVersion MSBUILD_NDK_VERSION\n\n // ...\n }\n ```\n\n ### Kotlin\n\n ```kotlin\n android {\n // ...\n\n ndkVersion = MSBUILD_NDK_VERSION\n\n // ...\n }\n ```\n\n For more information, see the Android Studio topic\n [Install and configure the NDK and CMake](/studio/projects/install-ndk)."]]