برای استفاده از فایلهای گسترش APK، Unity 2018.2 مورد نیاز است
برای بهبود سرعت فریم و اندازهگیریهای GPU، نسخه Unity 2019.3.14 یا جدیدتر مورد نیاز است.
برای پشتیبانی از صحنه های Addressables، Unity 2019.3 یا بالاتر و بسته Addressables 1.19.4 یا بالاتر مورد نیاز است.
افزونه را دانلود کنید
افزونه را از مخزن GitHub دانلود کنید. دانلود فایل .unitypackage را انتخاب کنید.
افزونه را وارد کنید
قبل از وارد کردن افزونه، مطمئن شوید که پروژه شما از دات نت نسخه 4.6 استفاده می کند. این مورد برای نسخه یونیتی 2018.4 و قبل از آن اعمال می شود (نسخه های بعدی یونیتی فقط دارای نسخه 4.6 دات نت هستند).
File > Build Settings را انتخاب کنید. مطمئن شوید که اندروید به عنوان پلتفرم فعلی انتخاب شده است.
روی دکمه Player Settings کلیک کنید.
در قسمت تنظیمات دیگر ، Scripting Runtime Version را بیابید و NET 4.6 را انتخاب کنید.
این افزونه به صورت Unity Package ارائه شده است که می توانید آن را در پروژه خود وارد کنید. Assets > Import Package > Custom Package را انتخاب کنید و فایل .unitypackage را که دانلود کرده اید انتخاب کنید.
Android Performance Tuner نسخه 1.5.1 یا بالاتر با Unity 2017
استفاده از Android Performance Tuner نسخه 1.5.1 یا بالاتر با Unity 2017 به مراحل اضافی زیر هنگام وارد کردن افزونه نیاز دارد:
به پوشه Assets/AndroidPerformanceTuner/Editor بروید.
روی فایل Google.Android.PerformanceTuner.Editor کلیک کنید تا در Inspector باز شود.
روی مرجع گمشده اسمبلی کلیک کنید و سپس - برای حذف آن کلیک کنید.
روی دکمه Apply کلیک کنید.
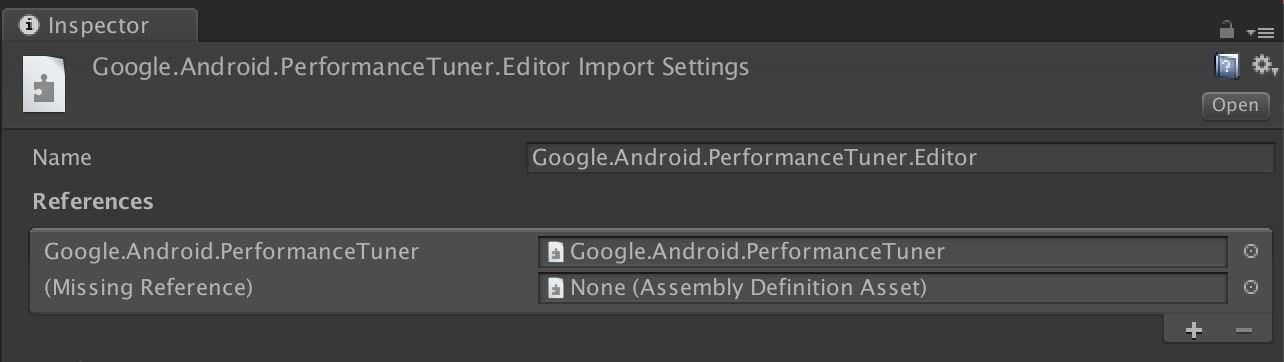
شکل 1. مرجع اسمبلی موجود نیست.
به پوشه Assets/AndroidPerformanceTuner/Runtime بروید.
روی فایل Google.Android.PerformanceTuner کلیک کنید تا در Inspector باز شود.
مرحله 3 را برای حذف دو مرجع اسمبلی مفقود تکرار کنید.
یونیتی را مجددا راه اندازی کنید.
به Window > AndroidPerformanceTuner > Setup بروید و بررسی کنید که هیچ خطایی نمایش داده نشود.
وارد کردن مجدد افزونه پس از حذف
اگر بعد از حذف افزونه از پروژه، دوباره آن را وارد میکنید، ابتدا ANDROID_PERFORMANCE_TUNER_UTILITIES از تنظیمات Player > Scripting Define Symbols حذف کنید.
افزونه را پیکربندی کنید
برای پیکربندی افزونه موارد زیر را انجام دهید:
برای نسخه یونیتی 2019.3.14 یا جدیدتر:
کتابخانه Android Frame Pacing را فعال کنید. Android Performance Tuner از این کتابخانه برای اندازهگیری عملکرد بازی شما، از جمله اقدامات عمیقتر از آنچه Unity به تنهایی گزارش میکند، استفاده میکند.
File > Build Settings را انتخاب کرده و روی دکمه Player Settings کلیک کنید. در بخش Resolution and Presentation ، کادر بهینهسازی فریم Pacing را انتخاب کنید.
رندر فریم را با جاهای خالی عمودی همگام کنید.
از قسمت Player Settings، تب Quality را انتخاب کرده و منوی VSync Count را پیدا کنید. از هر انتخابی استفاده کنید (به جز Don't Sync ). انتخابهایی غیر از همگامسازی نشود، اندازهگیریهای دقیقتری را در ارتباط با کتابخانه Android Frame Pacing فعال میکنند.
(برای نسخه های Unity قبل از 2019) سیستم ساخت را روی Gradle تنظیم کنید. File > Build Settings را انتخاب کنید. Build System را پیدا کرده و Gradle را انتخاب کنید.
مجوز دسترسی به اینترنت را اضافه کنید. در قسمت تنظیمات دیگر ، دسترسی به اینترنت را پیدا کرده و Require را انتخاب کنید.
کلید API خود را وارد کنید. پس از نصب افزونه، می توانید از منوی Window > Android Performance Tuner > Setup وارد آن شوید. در این گفتگو، تب تنظیمات را انتخاب کنید و کلید API را از پروژه Google Cloud خود در قسمت کلید API وارد کنید.
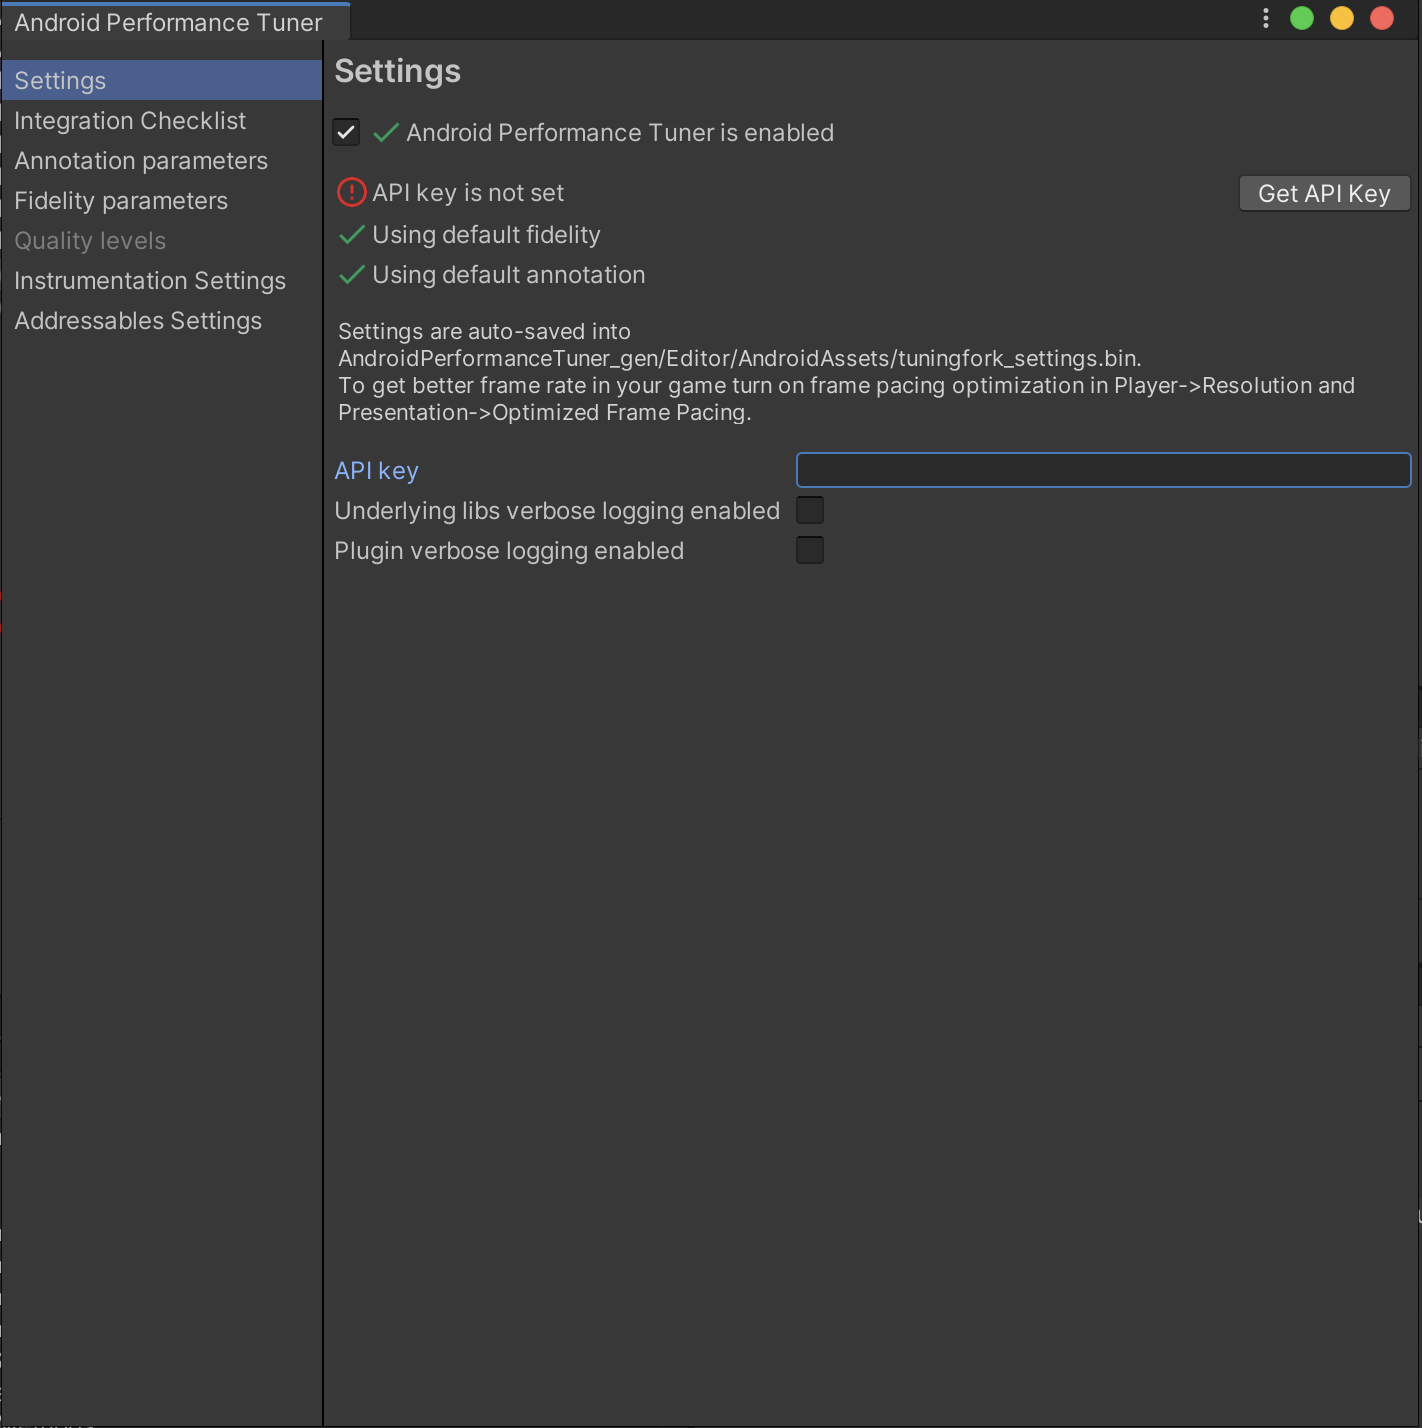
محتوا و نمونه کدها در این صفحه مشمول پروانههای توصیفشده در پروانه محتوا هستند. جاوا و OpenJDK علامتهای تجاری یا علامتهای تجاری ثبتشده Oracle و/یا وابستههای آن هستند.
تاریخ آخرین بهروزرسانی 2025-08-26 بهوقت ساعت هماهنگ جهانی.
[null,null,["تاریخ آخرین بهروزرسانی 2025-08-26 بهوقت ساعت هماهنگ جهانی."],[],[],null,["This page describes how to download, import, and configure the Unity plugin for\nAndroid Performance Tuner.\n\nRequirements\n\nTo use the plugin in your game, use a supported version of Unity:\n\n- Unity version 2017.4 or later and [.NET version 4.6](https://dotnet.microsoft.com/download/dotnet-framework/net46)\n- To use APK Expansion files, Unity 2018.2 is required\n- For improved frame pacing and GPU measurements, Unity version 2019.3.14 or later is required\n- For Addressables scenes support, Unity 2019.3 or later and [Addressables package 1.19.4](https://docs.unity3d.com/Packages/com.unity.addressables@0.8/manual/index.html) or later are required.\n\nDownload the plugin\n\nDownload the plugin from the\n[GitHub repository](https://github.com/android/tuningfork/releases). Select the\n`.unitypackage` file download.\n\nImport the plugin\n\nBefore importing the plugin, make sure your project is using .NET version 4.6.\nThis applies to Unity version 2018.4 and earlier (later versions of Unity\ncontain .NET version 4.6 only).\n\n1. Select **File \\\u003e Build Settings**. Make sure Android is selected as the current platform.\n2. Click the **Player Settings** button.\n3. Under **Other Settings** , find **Scripting Runtime Version** and select **.NET 4.6**.\n\nThe plugin is provided as a Unity Package that you can import in your project.\nSelect **Assets \\\u003e Import Package \\\u003e Custom Package** and select the\n`.unitypackage` file you downloaded.\n\nAndroid Performance Tuner version **1.5.1 or higher** with **Unity 2017**\n\nUsing Android Performance Tuner version **1.5.1 or higher** with **Unity 2017**\nrequires the following additional steps when importing the plugin:\n\n1. Go to the **Assets/AndroidPerformanceTuner/Editor** folder.\n2. Click the **Google.Android.PerformanceTuner.Editor** file to open it in the **Inspector**.\n3. Click the missing assembly reference and then click **-** to remove it.\n4. Click the **Apply** button.\n\n\n **Figure 1.** Missing assembly reference.\n5. Go to the **Assets/AndroidPerformanceTuner/Runtime** folder.\n\n6. Click the **Google.Android.PerformanceTuner** file to open it in the\n Inspector.\n\n7. Repeat **step 3** to remove the two missing assembly references.\n\n8. Restart Unity.\n\n9. Go to **Window \\\u003e AndroidPerformanceTuner \\\u003e Setup** and verify that no errors\n are displayed.\n\nRe-importing the plugin after deletion\n\nIf you're re-importing the plugin after removing it from the project, remove\n`ANDROID_PERFORMANCE_TUNER_UTILITIES` from\n**Player Settings \\\u003e Scripting Define Symbols** first.\n\nConfigure the plugin\n\nTo configure the plugin, do the following:\n\n1. For Unity version 2019.3.14 or later:\n\n - Enable the Android Frame Pacing library. Android Performance Tuner will use\n this library to measure the performance of your game, including more\n in-depth measures than what Unity alone reports.\n\n Select **File \\\u003e Build Settings** and click the **Player Settings** button.\n Under **Resolution and Presentation** , select the **Optimized Frame Pacing**\n checkbox.\n - Synchronize the frame rendering with vertical blanks.\n\n From the Player Settings, select the **Quality** tab and find the\n **VSync Count** menu. Use any selection (except **Don't Sync** ).\n Selections other than **Don't Sync** enable more precise measurements in\n conjunction with the Android Frame Pacing library.\n2. (For versions of Unity prior to 2019) Set the build system to Gradle. Select\n **File \\\u003e Build Settings** . Find **Build System** and select **Gradle**.\n\n3. Add the internet access permission. Under **Other Settings** , find\n **Internet Access** and select **Require**.\n\n4. Enter your API key. Once the plugin is installed, you can enter it from the\n **Window \\\u003e Android Performance Tuner \\\u003e Setup** menu. On this dialog, select the\n **Settings** tab and enter the\n [API key from your Google Cloud project](/games/sdk/performance-tuner/unity/enable-api)\n into the **API key** field.\n\n | **Note:** If you don't enter your API key, Android Performance Tuner won't send your game performance data to the Google Play Console. Android Performance Tuner logs this error, and you can see the error using `adb logcat`. (You will run `adb logcat` in the next section to confirm the proper operation of Android Performance Tuner.)\n\n\n **Figure 2.** Settings tab in the plugin"]]