JDK 17 را برای AGDE 23.1.82 یا جدیدتر یا JDK 11 را تا AGDE 22.2.71 دانلود و نصب کنید و متغیر محیطی JAVA_HOME خود را تنظیم کنید.
افزونه را نصب کنید
برای دانلود و نصب افزونه توسعه بازی اندروید مراحل این بخش را دنبال کنید:
تمام نمونه های ویژوال استودیو را ببندید.
آخرین نصب کننده برنامه افزودنی و نمونه ها را از صفحه دانلودها دانلود کنید.
از محل دانلود خود، روی نصب کننده دوبار کلیک کنید. نصب کننده چند دقیقه طول می کشد تا کامل شود.
اگر بیش از یک نسخه از ویژوال استودیو نصب شده است، نسخه هایی را که می خواهید افزونه برای آنها نصب شود انتخاب کنید.
برای تکمیل نصب روی Finish کلیک کنید.
Android SDK و NDK را نصب کنید
میتوانید Android SDK و Android Native Development Kit (NDK) را با Android Studio یا افزونه توسعه بازی اندروید نصب کنید. برای نصب SDK و NDK از برنامه افزودنی، از SDK Manager استفاده کنید که در نوار ابزار افزونه ویژوال استودیو قرار دارد.
هنگام نصب NDK، مطمئن شوید که از چک باکس NDK (Side by side) استفاده کنید تا برنامه افزودنی بتواند آن را پیدا کند. شما باید یک نسخه NDK را نصب کنید که توسط افزونه پشتیبانی می شود (به تاریخچه ویرایش NDK مراجعه کنید).
برای نصب SDK در مکانی متفاوت از پیش فرض، متغیر محیطی ANDROID_SDK_ROOT را در رایانه خود تنظیم کنید:
اطمینان حاصل کنید که ویژوال استودیو بسته است.
در جستجوی ویندوز، Environment Variables را جستجو کنید.
ویرایش متغیرهای محیط سیستم را انتخاب کنید.
روی Environment Variables کلیک کنید.
در قسمت User Variables ، روی New کلیک کنید.
در کادر نام متغیر ، ANDROID_SDK_ROOT را تایپ کنید.
در کادر Variable Value ، مسیر Android SDK را وارد کنید.
کامپیوتر خود را مجددا راه اندازی کنید.
مکان SDK را نمی توان با استفاده از پنجره مدیر SDK تغییر داد زیرا این متغیر محیطی تنها منبع حقیقت برای مکان SDK است.
نمونه را اجرا کنید
مراحل این بخش را دنبال کنید تا نمونه ارائه شده را روی یک شبیه ساز و سپس روی یک دستگاه اندروید فیزیکی اجرا کنید.
پلتفرم را پیکربندی کنید
فایل فشرده نمونه ها را در یک پوشه انتخابی خود از حالت فشرده خارج کنید. نمونه های زیر گنجانده شده است:
تونل بی پایان
سلام JNI
قوری
اگر ویژوال استودیو از قبل در حال اجرا نیست، آن را راه اندازی کنید.
دایرکتوری نمونه ها را باز کنید. File > Open > Project/Solution را انتخاب کنید و به فایل .sln بروید.
پلتفرم اندروید را انتخاب کنید:
Build > Configuration Manager را انتخاب کنید.
در پلتفرم Active solution ، Android-x86_64 را انتخاب کنید.
مطمئن شوید که پروژه نمونه دارای ویژگی های Android SDK و NDK پیکربندی شده است:
شکل 1. ویژگی های پلت فرم اندروید
در Solution Explorer ، روی پروژه کلیک راست کرده و Properties را انتخاب کنید.
تب General properties را انتخاب کنید و ویژگی های Platform for Android را پیدا کنید.
تب ویژگی های بسته بندی اندروید را انتخاب کنید.
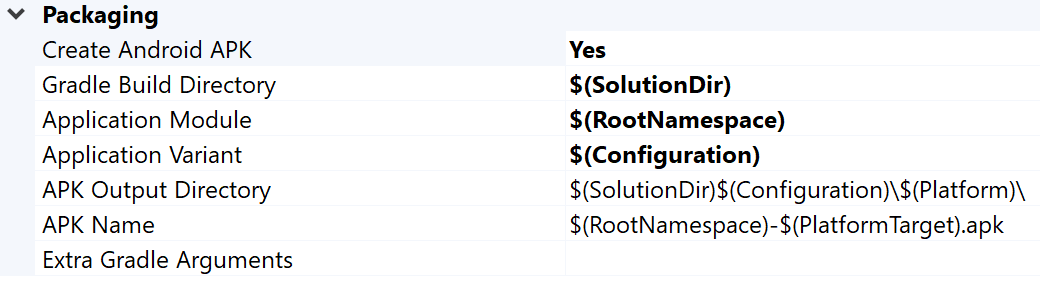
شکل 2. ویژگی های بسته بندی اندروید
میتوانید نام و فهرست APK خروجی را از این برگه تغییر دهید. توجه داشته باشید که برخی از ویژگی های پیکربندی اندروید در صفحات ویژگی تعریف شده و به Gradle ارسال می شود. برای مثال، ویژگی نام APK MSBUILD_ANDROID_OUTPUT_APK_NAME این نام را به فایل build.gradle برنامه منتقل میکند.
شبیه ساز را راه اندازی کنید
AVD Manager را از نوار ابزار افزونه در ویژوال استودیو راه اندازی کنید. یک دستگاه مجازی را پیکربندی کنید و سپس آن را در شبیه ساز اندروید اجرا کنید .
در مدیریت دستگاه مجازی اندروید، روی ایجاد دستگاه مجازی کلیک کنید.
تعریف دستگاه (مثلاً Pixel 2) را انتخاب کنید.
یک تصویر سیستم را انتخاب کنید. شما باید x86_64 ABI را انتخاب کنید زیرا این معماری در شبیه ساز سریعتر عمل می کند.
پیکربندی را تأیید کنید و روی Finish کلیک کنید.
با کلیک روی Run دستگاه مجازی را راه اندازی کنید دکمه در مدیریت دستگاه مجازی اندروید.
در ویژوال استودیو، دستگاه مجازی باید در کنار دکمه Start Debugging نوار ابزار ظاهر شود. روی Start Debugging کلیک کنید تا نمونه برنامه روی دستگاه اجرا شود. ممکن است چند لحظه طول بکشد تا اشکالزدا به برنامه متصل شود. اگر نمونه چای را اجرا می کنید، می توانید قوری را با کشیدن نشانگر ماوس روی آن بچرخانید.
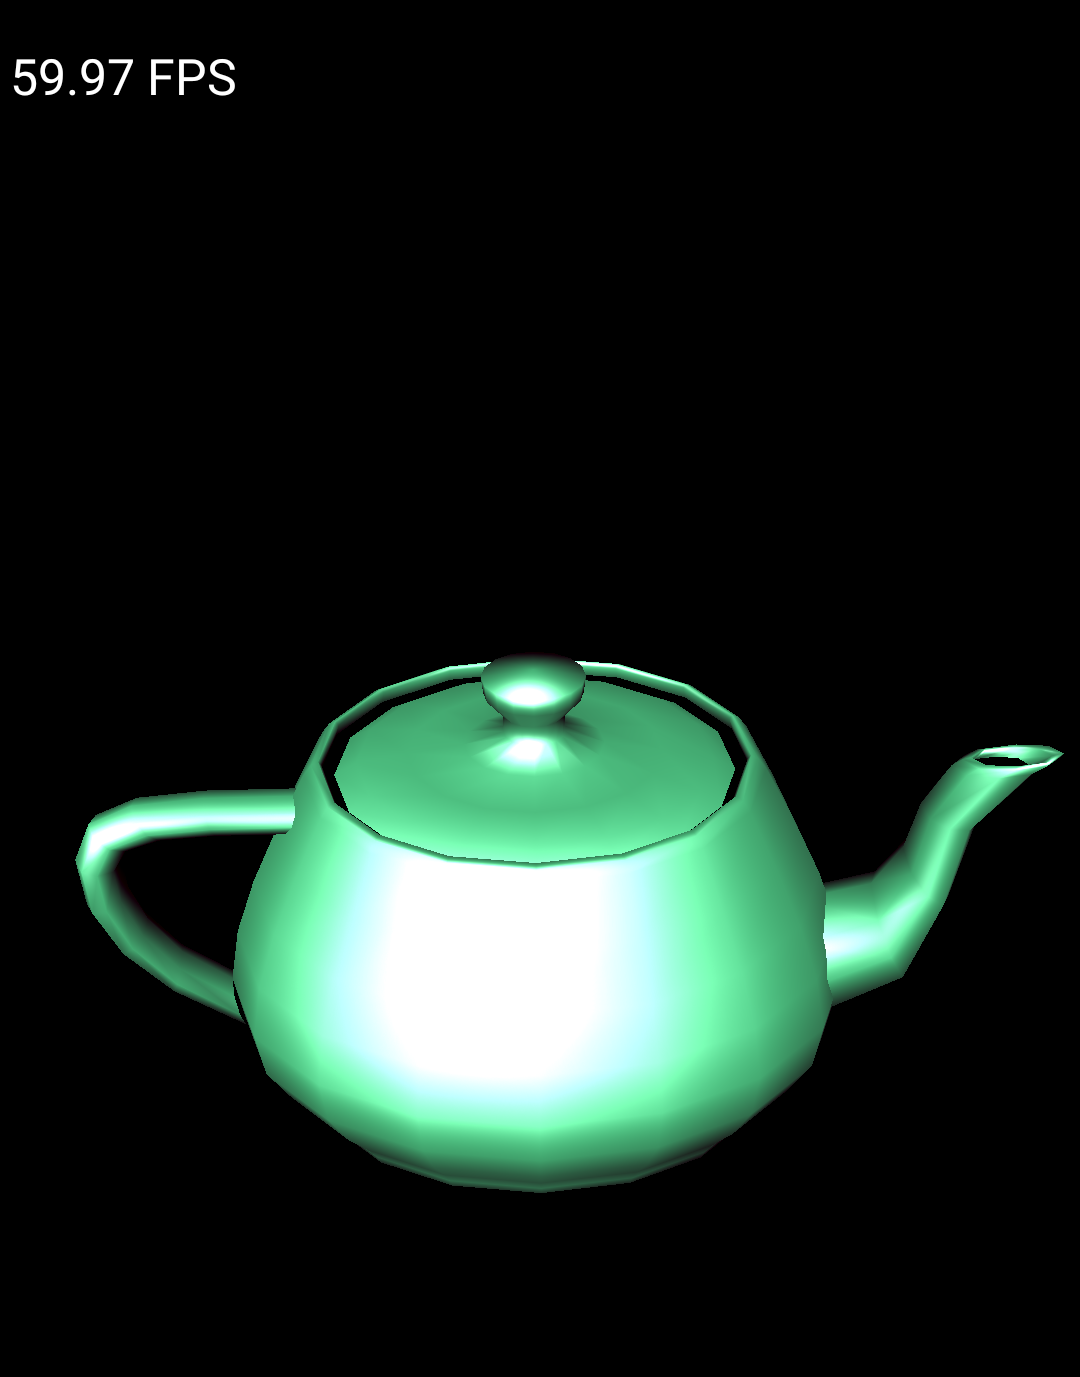
شکل 3 . نمونه قوری در حال اجرا بر روی شبیه ساز اندروید
دستگاه را راه اندازی کنید
برای اجرای نمونه بر روی یک دستگاه اندروید فیزیکی، ممکن است لازم باشد یک پلتفرم اندروید جدید در پروژه ایجاد کنید. این پلتفرم باید با معماری دستگاه مطابقت داشته باشد. برای ایجاد یک پلتفرم جدید، موارد زیر را در ویژوال استودیو انجام دهید:
Build > Configuration Manager را انتخاب کنید.
در زیر پلت فرم راه حل فعال ، <جدید> را انتخاب کنید.
یکی از موارد زیر را برای پلتفرم جدید تایپ کنید:
Android-armeabi-v7a
Android-arm64-v8a
Android-x86
Android-x86_64
در کادر تنظیمات کپی از ، پلتفرم اندروید موجود دیگری را انتخاب کنید (یا اگر هنوز پلتفرم اندروید ندارید، هیچ کدام ). مطمئن شوید که ایجاد پلتفرم های پروژه جدید را فعال کرده اید.
یک دستگاه Android را با استفاده از کابل USB به رایانه خود وصل کنید. نوع دستگاه باید در کنار دکمه Start Debugging نوار ابزار نشان داده شود.
شکل 4 . دستگاه Android متصل در کنار دکمه Start Debugging نوار ابزار نشان داده شده است
اگر دستگاه نشان داده نشد، موارد زیر را بررسی کنید:
کابل USB از اتصال داده (و نه فقط برق) پشتیبانی می کند.
روی دکمه Start Debugging نوار ابزار کلیک کنید تا برنامه نمونه روی دستگاه اجرا شود. ممکن است چند لحظه طول بکشد تا اشکالزدا به برنامه متصل شود. پس از پیوست شدن، می توانید با برنامه موجود در دستگاه خود تعامل داشته باشید.
سوالات متداول
در زیر برخی از سوالات متداول درباره برنامه افزودنی توسعه بازی اندروید وجود دارد.
گزارشهای مربوط به افزونه در کجا قرار دارند؟
میتوانید با استفاده از نماد Open Logs در نوار ابزار برنامهنویسی بازی اندروید، فایل گزارش را برای افزونه باز کنید.
افزونه از چه متغیرهای محیطی استفاده می کند؟
این افزونه از متغیرهای محیطی زیر استفاده می کند:
ANDROID_SDK_ROOT
ANDROID_SDK_HOME
TEMP
GOOGLE_ANDROID_LOG_DIR
بعدش چی
برای استفاده از پروژه خود با افزونه، باید آن را مطابق راهنمای پیکربندی پروژه پیکربندی کنید.
محتوا و نمونه کدها در این صفحه مشمول پروانههای توصیفشده در پروانه محتوا هستند. جاوا و OpenJDK علامتهای تجاری یا علامتهای تجاری ثبتشده Oracle و/یا وابستههای آن هستند.
تاریخ آخرین بهروزرسانی 2025-07-29 بهوقت ساعت هماهنگ جهانی.
[null,null,["تاریخ آخرین بهروزرسانی 2025-07-29 بهوقت ساعت هماهنگ جهانی."],[],[],null,["# Quickstart\n\nSet up the Android Game Development Extension on a Windows computer and run a sample Visual\nStudio C++ project on an Android device or emulator.\n\nPrerequisites\n-------------\n\nFollow the steps in this section to prepare your Windows computer for\ninstallation of the extension:\n\n1. Download and install one of the supported versions of Visual Studio:\n\n - [Visual Studio 2017 Version 15.4.0 (October 9th, 2017) or higher](https://docs.microsoft.com/en-us/visualstudio/install/update-visual-studio?view=vs-2017).\n - [Visual Studio 2019 Version 16.0.0 or higher](https://docs.microsoft.com/en-us/visualstudio/install/update-visual-studio?view=vs-2019).\n - [Visual Studio 2022 Version 17.0.0 or higher](https://docs.microsoft.com/en-us/visualstudio/install/update-visual-studio?view=vs-2022).\n2. [Download and install .NET Core SDK 2.2](https://dotnet.microsoft.com/download/thank-you/dotnet-sdk-2.2.107-windows-x64-installer).\n\n3. [Android Studio 3.5 or higher](/studio) is optional, but can be used\n instead of the Android Game Development Extension to install the\n [Android SDK and NDK](#install-sdk-ndk).\n\n4. Download and install [JDK 17](https://jdk.java.net/archive/) for AGDE\n 23.1.82 or newer, or [JDK 11](https://jdk.java.net/archive/) for up to AGDE\n 22.2.71, and set your `JAVA_HOME` environment variable.\n\nInstall the extension\n---------------------\n\nFollow the steps in this section to download and install the\nAndroid Game Development Extension:\n\n1. Close all instances of Visual Studio.\n\n2. Download the latest extension installer and samples from the\n [Downloads](/games/agde#downloads) page.\n\n3. From your download location, double-click the installer. The installer takes\n several minutes to complete.\n\n4. If you have more than one version of Visual Studio installed, select the\n versions that you would like the extension to be installed for.\n\n5. Click **Finish** to complete the installation.\n\nInstall the Android SDK and NDK\n-------------------------------\n\nYou can install the Android SDK and the Android\n[Native Development Kit (NDK)](/studio/projects/install-ndk#specific-version)\nwith Android Studio or the Android Game Development Extension. To install the SDK and NDK from\nthe extension, use the **SDK Manager**, which is located in the\nextension toolbar of Visual Studio.\n\nWhen installing the NDK, make sure to use the **NDK (Side by side)** checkbox so\nthat the extension can locate it. You must install an NDK version\nthat is supported by the extension\n(see [NDK revision history](/ndk/downloads/revision_history)).\n\nTo install the SDK to a different location than the default, set the\n`ANDROID_SDK_ROOT` environment variable on your computer:\n\n1. Ensure that Visual Studio is closed.\n2. In Windows Search, search for `Environment Variables`.\n3. Select **Edit the system environment variables**.\n4. Click **Environment Variables**.\n5. Under **User Variables** , click **New**.\n6. In the **Variable Name** box, type `ANDROID_SDK_ROOT`.\n7. In the **Variable Value** box, enter the path to the Android SDK.\n8. Reboot your computer.\n\nThe location of the SDK cannot be modified using the SDK Manager window as this\nenvironment variable is the only source-of-truth for the SDK location.\n\nRun the sample\n--------------\n\nFollow the steps in this section to run a provided sample on an\nemulator and then on a physical Android device.\n\n### Configure the platform\n\n1. Unzip the samples zip file into a directory of your choice. The following\n samples are included:\n\n - endless-tunnel\n - HelloJNI\n - Teapot\n2. Start Visual Studio if it is not already running.\n\n3. Open the samples directory. Select **File \\\u003e Open \\\u003e Project/Solution** and\n navigate to the `.sln` file.\n\n4. Select an Android platform:\n\n 1. Select **Build \\\u003e Configuration Manager**.\n 2. Under **Active solution platform** , select **Android-x86_64**.\n\n Android platforms are already configured in the samples (see [add\n more Android platforms](#add-platform) for adding platforms).\n | **Note:** Typical emulator images use x86 or x86_64 ABIs.\n5. Make sure the sample project has the Android SDK and NDK properties\n configured:\n\n **Figure\n 1.** Android platform properties\n - In the **Solution Explorer** , right-click the project and select\n **Properties**.\n\n - Select the **General** properties tab and find the **Platform**\n properties for Android.\n\n | **Note:** Make sure you select an NDK that is installed.\n6. Select the **Android Packaging** properties tab.\n\n **Figure\n 2.** Android packaging properties\n\n You can change the output APK name and directory from this tab. Note that\n some of the Android configuration properties are defined in the property\n pages and are passed to Gradle. For example, the APK name property\n `MSBUILD_ANDROID_OUTPUT_APK_NAME` passes this name to the app `build.gradle`\n file.\n\n### Set up the emulator\n\n1. Start AVD Manager from the extension toolbar in Visual Studio.\n Configure a virtual device and then\n [run it in the Android emulator](/studio/run/emulator).\n\n 1. In the Android Virtual Device Manager, click **Create Virtual Device**.\n 2. Choose a device definition (for example, Pixel 2).\n 3. Select a system image. You should select an x86_64 ABI because this architecture performs faster in the emulator.\n 4. Verify the configuration and click **Finish**.\n2. Start the virtual device by clicking the **Run**\n button in the Android\n Virtual Device Manager.\n\n3. In Visual Studio, the virtual device should appear next to the\n **Start Debugging** toolbar button. Click **Start Debugging** to launch the\n sample app on the device. It may take a few moments for the debugger\n to attach to the app. If you are running the Teapot sample, you can rotate\n the teapot by dragging your mouse cursor across it.\n\n \u003cbr /\u003e\n\n\n **Figure\n 3**. Teapot sample running on an Android emulator\n\n### Set up the device\n\n1. To run the sample on a physical Android device, you may need to create a\n new Android platform in the project. This platform must match the architecture\n of the device. To create a new platform, do the following in Visual Studio:\n\n 1. Select **Build \\\u003e Configuration Manager**.\n 2. Under **Active solution platform** , select **\\\u003cNew\\\u003e**.\n 3. Type one of the following for the new platform:\n\n - **Android-armeabi-v7a**\n - **Android-arm64-v8a**\n - **Android-x86**\n - **Android-x86_64**\n 4. In the **Copy settings from** box, select another existing Android\n platform (or **None** if you do not have any Android platforms yet).\n Make sure you enabled **Create new project platforms**.\n\n2. Connect an Android device to your computer using a USB cable. The device\n type should be shown next to the **Start Debugging** toolbar button.\n\n \u003cbr /\u003e\n\n\n **Figure\n 4** . Connected Android device shown next to the **Start Debugging** toolbar button\n\n If the device is not shown, check the following:\n - The platform selection matches the ABI of your device.\n - [Developer options and USB debugging](/studio/debug/dev-options) are enabled on the device.\n - The USB cable is connected from the device to the computer.\n - The USB cable supports a data connection (and not just power).\n3. Click the **Start Debugging** toolbar button to launch the sample app on the\n device. It may take a few moments for the debugger to attach to the app.\n Once it is attached, you can interact with the app on your device.\n\nFAQ\n---\n\nThe following are some frequently asked questions about the Android Game Development Extension.\n\n### Where are the logs for the plugin located?\n\nYou can open the log file for the plugin using the **Open Logs** icon in the\n**Android Game Development Extension** toolbar.\n\n### What environment variables does the plugin use?\n\nThe plugin uses the following environment variables:\n\n- `ANDROID_SDK_ROOT`\n- `ANDROID_SDK_HOME`\n- `TEMP`\n- `GOOGLE_ANDROID_LOG_DIR`\n\nWhat's next\n-----------\n\nTo use your own project with the extension, you must configure it according to\nthe [project configuration](/games/agde/adapt-existing-project) guide."]]