다운로드 위치에서 설치 프로그램을 더블클릭합니다. 설치 프로그램이 완료되는 데 몇 분 정도 걸립니다.
Visual Studio의 버전이 두 개 이상 설치되어 있는 경우 확장 프로그램을 설치할 버전을 선택합니다.
Finish를 클릭하여 설치를 완료합니다.
Android SDK 및 NDK 설치
Android 스튜디오 또는 Android 게임 개발 확장 프로그램을 사용하여 Android SDK와 Android 네이티브 개발 키트(NDK)를 설치할 수 있습니다. 확장 프로그램에서 SDK 및 NDK를 설치하려면 Visual Studio의 확장 프로그램 툴바에 있는 SDK Manager를 사용합니다.
NDK를 설치할 때 확장 프로그램에서 찾을 수 있도록 NDK (Side by side) 체크박스를 선택해야 합니다. 확장 프로그램에서 지원하는 NDK 버전을 설치해야 합니다(NDK 업데이트 기록 참고).
기본 위치가 아닌 다른 위치에 SDK를 설치하려면 컴퓨터에서 ANDROID_SDK_ROOT 환경 변수를 설정합니다.
Visual Studio가 닫혀 있어야 합니다.
Windows 검색에서 Environment Variables를 검색합니다.
Edit the system environment variables를 선택합니다.
Environment Variables를 클릭합니다.
User Variables에서 New를 클릭합니다.
Variable Name 상자에 ANDROID_SDK_ROOT를 입력합니다.
Variable Value 상자에 Android SDK 경로를 입력합니다.
컴퓨터를 재부팅합니다.
이 환경 변수는 SDK 위치의 유일한 소스이므로 SDK Manager 창을 사용하여 SDK 위치를 수정할 수 없습니다.
샘플 실행
이 섹션의 단계를 따라 제공된 샘플을 에뮬레이터와 실제 Android 기기에서 차례대로 실행합니다.
샘플에는 Android 플랫폼이 이미 구성되어 있습니다 (플랫폼 추가는 Android 플랫폼 추가 참고).
샘플 프로젝트에 Android SDK 및 NDK 속성이 구성되어 있는지 확인합니다.
그림
1. Android 플랫폼 속성
솔루션 탐색기에서 프로젝트를 마우스 오른쪽 버튼으로 클릭하고 속성을 선택합니다.
General 속성 탭을 선택하고 Android의 Platform 속성을 찾습니다.
Android Packaging 속성 탭을 선택합니다.
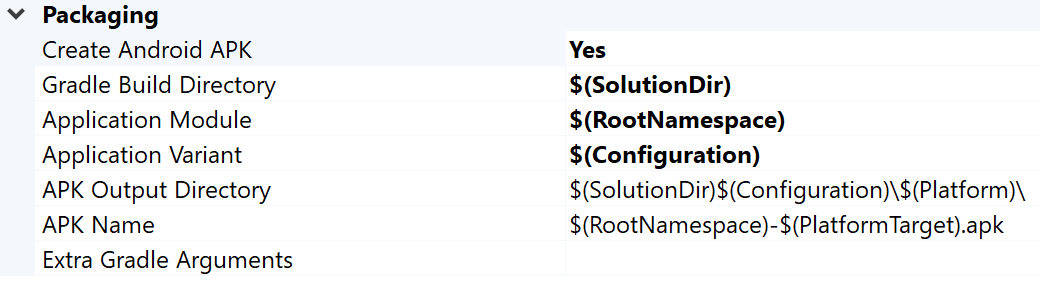
그림
2. Android 패키징 속성
이 탭에서 출력 APK 이름과 디렉터리를 변경할 수 있습니다. 참고로, 일부 Android 구성 속성은 속성 페이지에서 정의되고 Gradle로 전달됩니다. 예를 들어 APK 이름 속성 MSBUILD_ANDROID_OUTPUT_APK_NAME이 이 이름을 앱 build.gradle 파일에 전달합니다.
에뮬레이터 설정
Visual Studio의 확장 프로그램 툴바에서 AVD Manager를 시작합니다.
가상 기기를 구성한 다음 Android 에뮬레이터에서 실행합니다.
시스템 이미지를 선택합니다. x86_64 ABI를 선택해야 합니다. 에뮬레이터에서 이 아키텍처의 속도가 더 빠르기 때문입니다.
구성을 확인하고 Finish를 클릭합니다.
Android Virtual Device Manager에서 Run 버튼을 클릭하여 가상 기기를 시작합니다.
Visual Studio에서 가상 기기는 Start Debugging 툴바 버튼 옆에 표시됩니다. Start Debugging을 클릭하여 기기에서 샘플 앱을 실행합니다. 디버거가 앱에 연결되는 데 몇 분 정도 걸릴 수 있습니다. Teapot 샘플을 실행하는 경우 마우스 커서를 드래그하여 teapot을 회전할 수 있습니다.
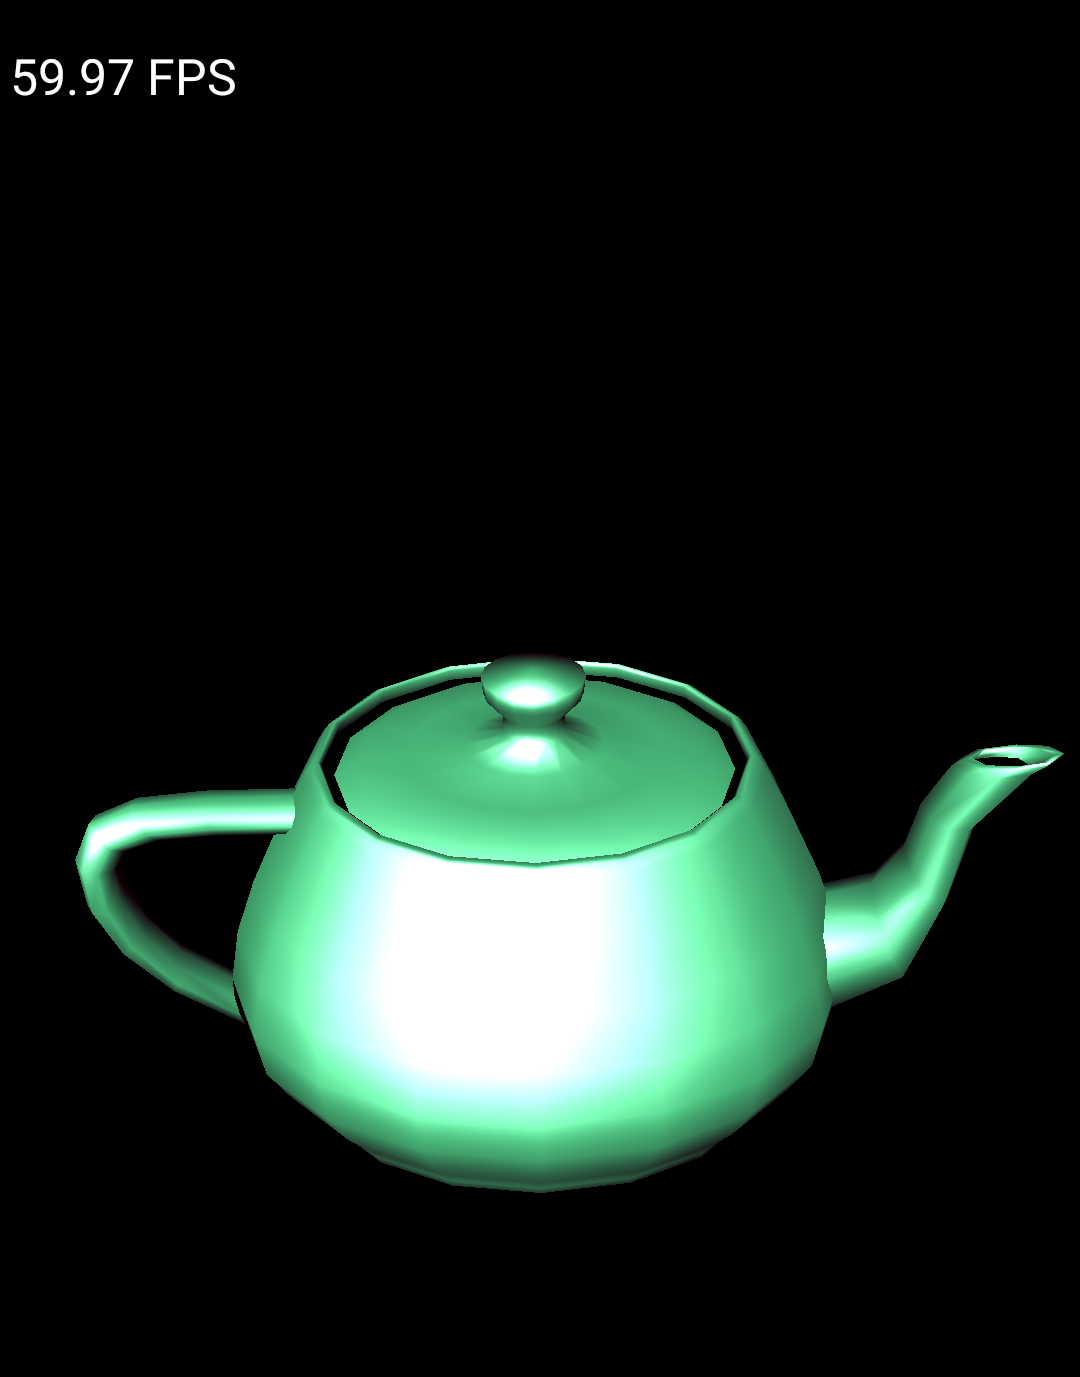
그림 3. Android Emulator에서 실행되는 Teapot 샘플
기기 설정
실제 Android 기기에서 샘플을 실행하려면 프로젝트에서 새 Android 플랫폼을 만들어야 할 수 있습니다. 이 플랫폼은 기기의 아키텍처와 일치해야 합니다. 새 플랫폼을 만들려면 Visual Studio에서 다음 작업을 수행하세요.
Build > Configuration Manager를 선택합니다.
Active solution platform에서 <New>를 선택합니다.
새 플랫폼과 관련해 다음 중 하나를 입력합니다.
Android-armeabi-v7a
Android-arm64-v8a
Android-x86
Android-x86_64
Copy settings from 상자에서 기존 Android 플랫폼을 선택합니다 (아직 Android 플랫폼이 없는 경우 None 선택).
Create new project platforms를 사용 설정했는지 확인합니다.
USB 케이블을 사용하여 Android 기기를 컴퓨터에 연결합니다. 기기 유형이 Start Debugging 툴바 버튼 옆에 표시됩니다.
그림 4. 연결된 Android 기기가 Start Debugging 툴바 버튼 옆에 표시된 모습
Start Debugging 툴바 버튼을 클릭하여 기기에서 샘플 앱을 실행합니다. 디버거가 앱에 연결되는 데 몇 분 정도 걸릴 수 있습니다. 연결되면 기기에서 앱과 상호작용할 수 있습니다.
FAQ
다음은 Android 게임 개발 확장 프로그램에 관해 자주 묻는 질문(FAQ)입니다.
플러그인의 로그는 어디에 있나요?
Android 게임 개발 확장 프로그램 툴바의 Open Logs 아이콘을 사용하여 플러그인의 로그 파일을 열 수 있습니다.
플러그인은 어떤 환경 변수를 사용하나요?
플러그인은 다음 환경 변수를 사용합니다.
ANDROID_SDK_ROOT
ANDROID_SDK_HOME
TEMP
GOOGLE_ANDROID_LOG_DIR
다음 단계
확장 프로그램과 함께 자체 프로젝트를 사용하려면 프로젝트 구성 가이드에 따라 확장 프로그램을 구성해야 합니다.
이 페이지에 나와 있는 콘텐츠와 코드 샘플에는 콘텐츠 라이선스에서 설명하는 라이선스가 적용됩니다. 자바 및 OpenJDK는 Oracle 및 Oracle 계열사의 상표 또는 등록 상표입니다.
최종 업데이트: 2025-07-27(UTC)
[null,null,["최종 업데이트: 2025-07-27(UTC)"],[],[],null,["# Quickstart\n\nSet up the Android Game Development Extension on a Windows computer and run a sample Visual\nStudio C++ project on an Android device or emulator.\n\nPrerequisites\n-------------\n\nFollow the steps in this section to prepare your Windows computer for\ninstallation of the extension:\n\n1. Download and install one of the supported versions of Visual Studio:\n\n - [Visual Studio 2017 Version 15.4.0 (October 9th, 2017) or higher](https://docs.microsoft.com/en-us/visualstudio/install/update-visual-studio?view=vs-2017).\n - [Visual Studio 2019 Version 16.0.0 or higher](https://docs.microsoft.com/en-us/visualstudio/install/update-visual-studio?view=vs-2019).\n - [Visual Studio 2022 Version 17.0.0 or higher](https://docs.microsoft.com/en-us/visualstudio/install/update-visual-studio?view=vs-2022).\n2. [Download and install .NET Core SDK 2.2](https://dotnet.microsoft.com/download/thank-you/dotnet-sdk-2.2.107-windows-x64-installer).\n\n3. [Android Studio 3.5 or higher](/studio) is optional, but can be used\n instead of the Android Game Development Extension to install the\n [Android SDK and NDK](#install-sdk-ndk).\n\n4. Download and install [JDK 17](https://jdk.java.net/archive/) for AGDE\n 23.1.82 or newer, or [JDK 11](https://jdk.java.net/archive/) for up to AGDE\n 22.2.71, and set your `JAVA_HOME` environment variable.\n\nInstall the extension\n---------------------\n\nFollow the steps in this section to download and install the\nAndroid Game Development Extension:\n\n1. Close all instances of Visual Studio.\n\n2. Download the latest extension installer and samples from the\n [Downloads](/games/agde#downloads) page.\n\n3. From your download location, double-click the installer. The installer takes\n several minutes to complete.\n\n4. If you have more than one version of Visual Studio installed, select the\n versions that you would like the extension to be installed for.\n\n5. Click **Finish** to complete the installation.\n\nInstall the Android SDK and NDK\n-------------------------------\n\nYou can install the Android SDK and the Android\n[Native Development Kit (NDK)](/studio/projects/install-ndk#specific-version)\nwith Android Studio or the Android Game Development Extension. To install the SDK and NDK from\nthe extension, use the **SDK Manager**, which is located in the\nextension toolbar of Visual Studio.\n\nWhen installing the NDK, make sure to use the **NDK (Side by side)** checkbox so\nthat the extension can locate it. You must install an NDK version\nthat is supported by the extension\n(see [NDK revision history](/ndk/downloads/revision_history)).\n\nTo install the SDK to a different location than the default, set the\n`ANDROID_SDK_ROOT` environment variable on your computer:\n\n1. Ensure that Visual Studio is closed.\n2. In Windows Search, search for `Environment Variables`.\n3. Select **Edit the system environment variables**.\n4. Click **Environment Variables**.\n5. Under **User Variables** , click **New**.\n6. In the **Variable Name** box, type `ANDROID_SDK_ROOT`.\n7. In the **Variable Value** box, enter the path to the Android SDK.\n8. Reboot your computer.\n\nThe location of the SDK cannot be modified using the SDK Manager window as this\nenvironment variable is the only source-of-truth for the SDK location.\n\nRun the sample\n--------------\n\nFollow the steps in this section to run a provided sample on an\nemulator and then on a physical Android device.\n\n### Configure the platform\n\n1. Unzip the samples zip file into a directory of your choice. The following\n samples are included:\n\n - endless-tunnel\n - HelloJNI\n - Teapot\n2. Start Visual Studio if it is not already running.\n\n3. Open the samples directory. Select **File \\\u003e Open \\\u003e Project/Solution** and\n navigate to the `.sln` file.\n\n4. Select an Android platform:\n\n 1. Select **Build \\\u003e Configuration Manager**.\n 2. Under **Active solution platform** , select **Android-x86_64**.\n\n Android platforms are already configured in the samples (see [add\n more Android platforms](#add-platform) for adding platforms).\n | **Note:** Typical emulator images use x86 or x86_64 ABIs.\n5. Make sure the sample project has the Android SDK and NDK properties\n configured:\n\n **Figure\n 1.** Android platform properties\n - In the **Solution Explorer** , right-click the project and select\n **Properties**.\n\n - Select the **General** properties tab and find the **Platform**\n properties for Android.\n\n | **Note:** Make sure you select an NDK that is installed.\n6. Select the **Android Packaging** properties tab.\n\n **Figure\n 2.** Android packaging properties\n\n You can change the output APK name and directory from this tab. Note that\n some of the Android configuration properties are defined in the property\n pages and are passed to Gradle. For example, the APK name property\n `MSBUILD_ANDROID_OUTPUT_APK_NAME` passes this name to the app `build.gradle`\n file.\n\n### Set up the emulator\n\n1. Start AVD Manager from the extension toolbar in Visual Studio.\n Configure a virtual device and then\n [run it in the Android emulator](/studio/run/emulator).\n\n 1. In the Android Virtual Device Manager, click **Create Virtual Device**.\n 2. Choose a device definition (for example, Pixel 2).\n 3. Select a system image. You should select an x86_64 ABI because this architecture performs faster in the emulator.\n 4. Verify the configuration and click **Finish**.\n2. Start the virtual device by clicking the **Run**\n button in the Android\n Virtual Device Manager.\n\n3. In Visual Studio, the virtual device should appear next to the\n **Start Debugging** toolbar button. Click **Start Debugging** to launch the\n sample app on the device. It may take a few moments for the debugger\n to attach to the app. If you are running the Teapot sample, you can rotate\n the teapot by dragging your mouse cursor across it.\n\n \u003cbr /\u003e\n\n\n **Figure\n 3**. Teapot sample running on an Android emulator\n\n### Set up the device\n\n1. To run the sample on a physical Android device, you may need to create a\n new Android platform in the project. This platform must match the architecture\n of the device. To create a new platform, do the following in Visual Studio:\n\n 1. Select **Build \\\u003e Configuration Manager**.\n 2. Under **Active solution platform** , select **\\\u003cNew\\\u003e**.\n 3. Type one of the following for the new platform:\n\n - **Android-armeabi-v7a**\n - **Android-arm64-v8a**\n - **Android-x86**\n - **Android-x86_64**\n 4. In the **Copy settings from** box, select another existing Android\n platform (or **None** if you do not have any Android platforms yet).\n Make sure you enabled **Create new project platforms**.\n\n2. Connect an Android device to your computer using a USB cable. The device\n type should be shown next to the **Start Debugging** toolbar button.\n\n \u003cbr /\u003e\n\n\n **Figure\n 4** . Connected Android device shown next to the **Start Debugging** toolbar button\n\n If the device is not shown, check the following:\n - The platform selection matches the ABI of your device.\n - [Developer options and USB debugging](/studio/debug/dev-options) are enabled on the device.\n - The USB cable is connected from the device to the computer.\n - The USB cable supports a data connection (and not just power).\n3. Click the **Start Debugging** toolbar button to launch the sample app on the\n device. It may take a few moments for the debugger to attach to the app.\n Once it is attached, you can interact with the app on your device.\n\nFAQ\n---\n\nThe following are some frequently asked questions about the Android Game Development Extension.\n\n### Where are the logs for the plugin located?\n\nYou can open the log file for the plugin using the **Open Logs** icon in the\n**Android Game Development Extension** toolbar.\n\n### What environment variables does the plugin use?\n\nThe plugin uses the following environment variables:\n\n- `ANDROID_SDK_ROOT`\n- `ANDROID_SDK_HOME`\n- `TEMP`\n- `GOOGLE_ANDROID_LOG_DIR`\n\nWhat's next\n-----------\n\nTo use your own project with the extension, you must configure it according to\nthe [project configuration](/games/agde/adapt-existing-project) guide."]]