
หัวข้อนี้ครอบคลุมวิธีใช้การป้อนข้อมูลด้วยเมาส์สำหรับ Google Play Games บน PC สำหรับเกมที่โหมดการแปลอินพุตไม่ได้มอบประสบการณ์การเล่นที่เหมาะสม
ผู้เล่นบน PC มักใช้แป้นพิมพ์และเมาส์แทนหน้าจอสัมผัส ดังนั้นคุณจึงควรพิจารณาว่าเกมของคุณรองรับการป้อนข้อมูลด้วยเมาส์หรือไม่ โดยค่าเริ่มต้น Google Play Games บน PC จะแปลงเหตุการณ์เมาส์ที่คลิกซ้ายเป็นเหตุการณ์แตะเสมือนรายการเดียว ซึ่งเรียกว่า "โหมดการแปลอินพุต"
แม้ว่าโหมดนี้จะทำให้เกมของคุณทำงานได้โดยมีการเปลี่ยนแปลงเพียงเล็กน้อย แต่ก็ไม่ได้ มอบประสบการณ์การใช้งานที่ให้ความรู้สึกเหมือนเป็นเกมที่สร้างขึ้นสำหรับ PC โดยเฉพาะแก่ผู้เล่นบน PC เราจึงขอแนะนำให้คุณใช้สิ่งต่อไปนี้
- สถานะการวางเมาส์เหนือเมนูตามบริบทแทนการกดค้าง
- คลิกขวาเพื่อดูการดำเนินการอื่นที่จะเกิดขึ้นเมื่อกดค้างหรือในเมนูตามบริบท
- การมองด้วยเมาส์สำหรับเกมแอ็กชันมุมมองบุคคลที่หนึ่งหรือสามแทนที่จะเป็นเหตุการณ์กดและลาก
หากต้องการรองรับรูปแบบ UI ที่ใช้กันทั่วไปใน PC คุณต้องปิดใช้โหมดการแปลอินพุต
การจัดการอินพุตสำหรับ Google Play Games บน PC จะเหมือนกับของ ChromeOS การเปลี่ยนแปลงที่รองรับ PC ยังช่วย ปรับปรุงเกมสำหรับผู้เล่น Android ทุกคนด้วย
ปิดใช้โหมดการแปลอินพุต
ในไฟล์ AndroidManifest.xml ให้ประกาศandroid.hardware.type.pc ฟีเจอร์
ซึ่งเป็นการบ่งชี้ว่าเกมของคุณใช้ฮาร์ดแวร์ PC และปิดใช้โหมดการแปลอินพุต
นอกจากนี้ การเพิ่ม required="false" ยังช่วยให้มั่นใจได้ว่าเกมจะยังติดตั้งในโทรศัพท์และแท็บเล็ตที่ไม่มีเมาส์ได้
เช่น
<manifest ...>
  <uses-feature
      android:name="android.hardware.type.pc"
      android:required="false" />
  ...
</manifest>
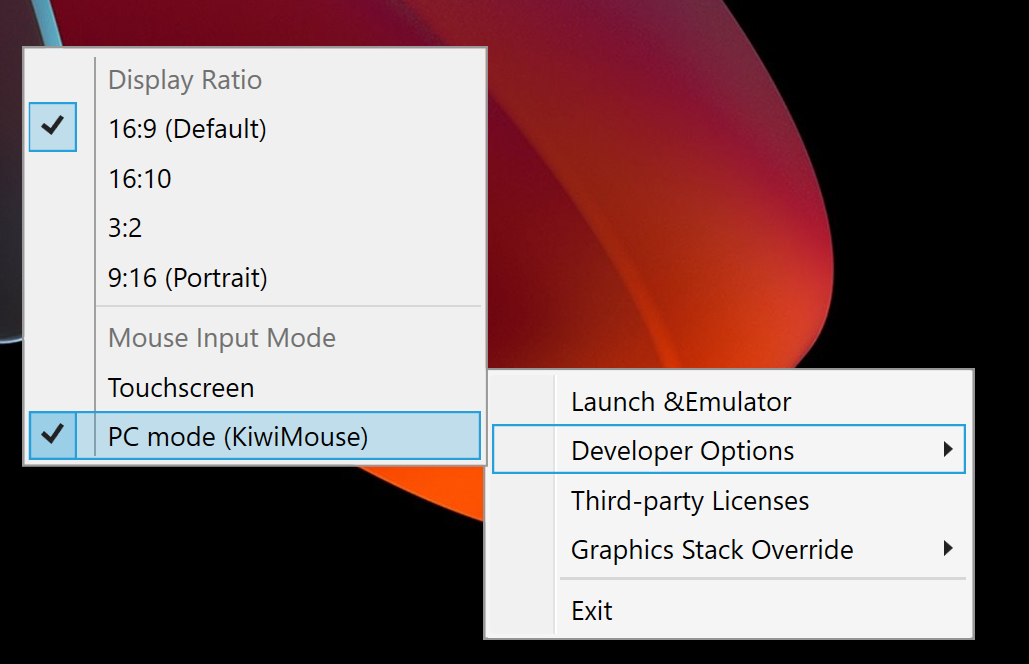
Google Play Games บน PC เวอร์ชันที่ใช้งานจริงจะเปลี่ยนไปใช้โหมดที่ถูกต้อง เมื่อเกมเปิดตัว เมื่อเรียกใช้ในโปรแกรมจำลองสำหรับนักพัฒนาซอฟต์แวร์ คุณต้อง คลิกขวาที่ไอคอนแถบงาน เลือกตัวเลือกสำหรับนักพัฒนาซอฟต์แวร์ แล้วเลือก โหมด PC(KiwiMouse) เพื่อรับข้อมูลเมาส์ดิบ
หลังจากทำเช่นนี้แล้ว View.onGenericMotionEvent จะรายงานการเคลื่อนไหวของเมาส์โดยมีแหล่งที่มาเป็น SOURCE_MOUSE
ซึ่งบ่งบอกว่าเป็นเหตุการณ์ของเมาส์
Kotlin
gameView.setOnGenericMotionListener { _, motionEvent ->
    var handled = false
    if (motionEvent.isFromSource(InputDevice.SOURCE_CLASS_POINTER)) {
        // handle the mouse event here
        handled = true
    }
    handled
}
Java
gameView.setOnGenericMotionListener((view, motionEvent) -> {
    if (motionEvent.isFromSource(InputDevice.SOURCE_CLASS_POINTER)) {
        // handle the mouse event here
        return true;
    }
    return false;
});
ดูรายละเอียดเกี่ยวกับการจัดการอินพุตของเมาส์ได้ที่เอกสารประกอบของ ChromeOS
การจัดการการเคลื่อนไหวของเมาส์
หากต้องการตรวจจับการเคลื่อนไหวของเมาส์ ให้ฟังเหตุการณ์ ACTION_HOVER_ENTER, ACTION_HOVER_EXIT และ ACTION_HOVER_MOVE
วิธีนี้เหมาะที่สุดในการตรวจหาผู้ใช้ที่วางเมาส์เหนือปุ่มหรือออบเจ็กต์ในเกม ซึ่งจะช่วยให้คุณมีโอกาสแสดงกล่องคำแนะนำหรือใช้สถานะวางเมาส์เพื่อไฮไลต์สิ่งที่ผู้เล่นกำลังจะเลือก เช่น
Kotlin
gameView.setOnGenericMotionListener { _, motionEvent ->
   var handled = false
   if (motionEvent.isFromSource(InputDevice.SOURCE_CLASS_POINTER)) {
       when(motionEvent.action) {
           MotionEvent.ACTION_HOVER_ENTER -> Log.d("MA", "Mouse entered at ${motionEvent.x}, ${motionEvent.y}")
           MotionEvent.ACTION_HOVER_EXIT -> Log.d("MA", "Mouse exited at ${motionEvent.x}, ${motionEvent.y}")
           MotionEvent.ACTION_HOVER_MOVE -> Log.d("MA", "Mouse hovered at ${motionEvent.x}, ${motionEvent.y}")
       }
       handled = true
   }

   handled
}
Java
gameView.setOnGenericMotionListener((view, motionEvent) -> {
    if (motionEvent.isFromSource(InputDevice.SOURCE_CLASS_POINTER)) {
        switch (motionEvent.getAction()) {
            case MotionEvent.ACTION_HOVER_ENTER:
                Log.d("MA", "Mouse entered at " + motionEvent.getX() + ", " + motionEvent.getY());
                break;
            case MotionEvent.ACTION_HOVER_EXIT:
                Log.d("MA", "Mouse exited at " + motionEvent.getX() + ", " + motionEvent.getY());
                break;
            case MotionEvent.ACTION_HOVER_MOVE:
                Log.d("MA", "Mouse hovered at " + motionEvent.getX() + ", " + motionEvent.getY());
                break;
        }
        return true;
    }
    return false;
});
การจัดการปุ่มเมาส์
PC มีทั้งปุ่มเมาส์ซ้ายและขวามานานแล้ว ซึ่งทำให้องค์ประกอบแบบอินเทอร์แอกทีฟมีทั้งการดำเนินการหลักและการดำเนินการรอง ในการเล่นเกม การแตะการดำเนินการต่างๆ เช่น การแตะปุ่ม ควรแมปกับคลิกซ้าย ส่วนการแตะค้างจะเหมาะกับคลิกขวามากที่สุด ในเกมกลยุทธ์แบบเรียลไทม์ คุณอาจใช้ คลิกซ้ายเพื่อเลือกและคลิกขวาเพื่อย้าย เกมยิงมุมมองบุคคลที่หนึ่งอาจกำหนดการยิงหลักและรองเป็นการคลิกซ้ายและคลิกขวา เกมวิ่งไม่รู้จบอาจ ใช้การคลิกซ้ายเพื่อกระโดดและคลิกขวาเพื่อพุ่ง เรายังไม่รองรับ เหตุการณ์การคลิกตรงกลาง
หากต้องการจัดการการกดปุ่ม ให้ใช้ ACTION_DOWN และ ACTION_UP จากนั้นใช้
getActionButtonเพื่อระบุว่าปุ่มใดทริกเกอร์การดำเนินการ หรือ
getButtonStateเพื่อรับสถานะของปุ่มทั้งหมด
ในตัวอย่างนี้ เราใช้การแจงนับเพื่อช่วยแสดงผลลัพธ์ของ
getActionButton ดังนี้
Kotlin
enum class MouseButton {
   LEFT,
   RIGHT,
   UNKNOWN;
   companion object {
       fun fromMotionEvent(motionEvent: MotionEvent): MouseButton {
           return when (motionEvent.actionButton) {
               MotionEvent.BUTTON_PRIMARY -> LEFT
               MotionEvent.BUTTON_SECONDARY -> RIGHT
               else -> UNKNOWN
           }
       }
   }
}
Java
enum MouseButton {
    LEFT,
    RIGHT,
    MIDDLE,
    UNKNOWN;
    static MouseButton fromMotionEvent(MotionEvent motionEvent) {
        switch (motionEvent.getActionButton()) {
            case MotionEvent.BUTTON_PRIMARY:
                return MouseButton.LEFT;
            case MotionEvent.BUTTON_SECONDARY:
                return MouseButton.RIGHT;
            default:
                return MouseButton.UNKNOWN;
        }
    }
}
ในตัวอย่างนี้ ระบบจะจัดการการดำเนินการในลักษณะเดียวกับเหตุการณ์เมื่อวางเมาส์
Kotlin
// Handle the generic motion event
gameView.setOnGenericMotionListener { _, motionEvent ->
   var handled = false
   if (motionEvent.isFromSource(InputDevice.SOURCE_CLASS_POINTER)) {
       when (motionEvent.action) {
           MotionEvent.ACTION_BUTTON_PRESS -> Log.d(
               "MA",
               "${MouseButton.fromMotionEvent(motionEvent)} pressed at ${motionEvent.x}, ${motionEvent.y}"
           )
           MotionEvent.ACTION_BUTTON_RELEASE -> Log.d(
               "MA",
               "${MouseButton.fromMotionEvent(motionEvent)} released at ${motionEvent.x}, ${motionEvent.y}"
           )
       }
       handled = true
   }

   handled
}
Java
gameView.setOnGenericMotionListener((view, motionEvent) -> {
    if (motionEvent.isFromSource(InputDevice.SOURCE_CLASS_POINTER)) {
        switch (motionEvent.getAction()) {
            case MotionEvent.ACTION_BUTTON_PRESS:
                Log.d("MA", MouseButton.fromMotionEvent(motionEvent) + " pressed at " + motionEvent.getX() + ", " + motionEvent.getY());
                break;
            case MotionEvent.ACTION_BUTTON_RELEASE:
                Log.d("MA", MouseButton.fromMotionEvent(motionEvent) + " released at " + motionEvent.getX() + ", " + motionEvent.getY());
                break;
        }
        return true;
    }
    return false;
});
จัดการการเลื่อนด้วยล้อเมาส์
เราขอแนะนำให้ใช้ปุ่มลูกกลิ้งของเมาส์แทนการใช้ท่าทางสัมผัสการบีบนิ้วเพื่อซูม หรือการแตะและลากพื้นที่เลื่อนในเกม
หากต้องการอ่านค่าของวงล้อเลื่อน ให้รอรับฟังACTION_SCROLLเหตุการณ์ คุณสามารถดึงเดลต้า
ตั้งแต่เฟรมสุดท้ายได้โดยใช้ getAxisValue กับ AXIS_VSCROLL
สำหรับออฟเซ็ตแนวตั้ง และ AXIS_HSCROLL สำหรับออฟเซ็ตแนวนอน เช่น
Kotlin
gameView.setOnGenericMotionListener { _, motionEvent ->
   var handled = false
   if (motionEvent.isFromSource(InputDevice.SOURCE_CLASS_POINTER)) {
       when (motionEvent.action) {
           MotionEvent.ACTION_SCROLL -> {
               val scrollX = motionEvent.getAxisValue(MotionEvent.AXIS_HSCROLL)
               val scrollY = motionEvent.getAxisValue(MotionEvent.AXIS_VSCROLL)
               Log.d("MA", "Mouse scrolled $scrollX, $scrollY")
           }
       }
       handled = true
   }
   handled
}
Java
gameView.setOnGenericMotionListener((view, motionEvent) -> {
    if (motionEvent.isFromSource(InputDevice.SOURCE_CLASS_POINTER)) {
        switch (motionEvent.getAction()) {
            case MotionEvent.ACTION_SCROLL:
                float scrollX = motionEvent.getAxisValue(MotionEvent.AXIS_HSCROLL);
                float scrollY = motionEvent.getAxisValue(MotionEvent.AXIS_VSCROLL);
                Log.d("MA", "Mouse scrolled " + scrollX + ", " + scrollY);
                break;
        }
        return true;
    }
    return false;
});
บันทึกอินพุตจากเมาส์
บางเกมจำเป็นต้องควบคุมเคอร์เซอร์เมาส์อย่างเต็มที่ เช่น เกมแอ็กชันมุมมองบุคคลที่หนึ่งหรือสาม
ซึ่งแมปการเคลื่อนไหวของเมาส์กับการเคลื่อนไหวของกล้อง หากต้องการควบคุมเมาส์แต่เพียงผู้เดียว ให้เรียกใช้ View.requestPointerCapture()
requestPointerCapture() จะทำงานได้ก็ต่อเมื่อลำดับชั้นของมุมมองที่มี
มุมมองของคุณมีโฟกัส ด้วยเหตุนี้ คุณจึงรับการจับภาพเคอร์เซอร์ในแฮนเดิล
onCreateไม่ได้ คุณควรรอให้ผู้เล่นโต้ตอบเพื่อจับเคอร์เซอร์เมาส์ เช่น เมื่อโต้ตอบกับเมนูหลัก หรือใช้แฮนเดิลonWindowFocusChanged
เช่น
Kotlin
override fun onWindowFocusChanged(hasFocus: Boolean) {
   super.onWindowFocusChanged(hasFocus)

   if (hasFocus) {
       gameView.requestPointerCapture()
   }
}
Java
@Override
public void onWindowFocusChanged(boolean hasFocus) {
    super.onWindowFocusChanged(hasFocus);

    if (hasFocus) {
        View gameView = findViewById(R.id.game_view);
        gameView.requestPointerCapture();
    }
}
เหตุการณ์ที่ requestPointerCapture() จับได้
จะส่งไปยังมุมมองที่โฟกัสได้ซึ่งลงทะเบียน OnCapturedPointerListener เช่น
Kotlin
gameView.focusable = View.FOCUSABLE
gameView.setOnCapturedPointerListener { _, motionEvent ->
    Log.d("MA", "${motionEvent.x}, ${motionEvent.y}, ${motionEvent.actionButton}")
    true
}
Java
gameView.setFocusable(true);
gameView.setOnCapturedPointerListener((view, motionEvent) -> {
    Log.d("MA", motionEvent.getX() + ", " + motionEvent.getY() + ", " + motionEvent.getActionButton());
    return true;
});
หากต้องการปล่อยการจับเมาส์แบบพิเศษ เช่น เพื่ออนุญาตให้ผู้เล่น
โต้ตอบกับเมนูหยุดชั่วคราว ให้เรียกใช้ View.releasePointerCapture()