

このページでは、さまざまな触覚 API を使用して、Android アプリで標準の振動波形以外のカスタム効果を作成する方法の例について説明します。
このページには、次の例を記載しています。
VibrationEffect.Builderを使用したタイムライン アンカー コンポジション- プリセットを使用して作成する: 事前定義された触覚をシーケンス化します。
- エンベロープとプリセットを使用して作成する: タイムラインに沿ってエンベロープとプリセットを組み合わせます。
- イベントの再利用とシフト: 既存のコンポジション イベントをシフトして再利用します。
- コンポジションの繰り返し: タイムライン エフェクトを繰り返し作成します。
- カスタム バイブレーション パターン
- ランプアップ パターン: スムーズに始まるパターン。
- 繰り返しのパターン: 終わりのないパターン。
- フォールバックを含むパターン: フォールバックのデモ。
- バイブレーション プリミティブのコンポジション
- エンベロープ付きのバイブレーション波形
その他の例については、イベントに触覚フィードバックを追加するをご覧ください。また、常に触覚デザインの原則に従ってください。
フォールバックを使用してデバイスの互換性を処理する
カスタム触覚効果を実装する場合、デバイスの互換性とフォールバック動作は、選択した API サーフェスによって異なります。
VibrationEffect.Builder(推奨): Android 16(26Q4)以降、VibrationEffect.Builderを使用して作成されたエフェクトには、自動フレームワーク レベルのフォールバックが含まれます。リクエストされたPresetまたは基本的なEnvelopeをデバイスがネイティブにサポートしていない場合、フレームワークは再生時にベスト エフォートで適切な代替に自動的に変換します。VibrationEffect.Builderで構成されたエフェクトを再生する前に、プリミティブごとのデバイス機能を手動で確認する必要はありません。- 例外:
WaveformEnvelopeBuilderで作成された高度な波形エンベロープは、特定のハードウェア周波数マッピング(FOAM)に依存するため、自動フォールバックをサポートしていません。サポートされていない場合、再生されません。
- 例外:
VibrationEffect.Composition:startComposition()API で作成されたコンポジションには、自動フォールバックがありません。コンポジションにサポートされていないプリミティブが 1 つでも含まれている場合、バイブレーション全体が再生されません。vibrator.arePrimitivesSupported()を使用して、機能を手動で確認する必要があります。- 振幅制御付きの波形: 振幅制御のないデバイスでは、ゼロ以外の振幅は 100% に切り上げられます。
vibrator.hasAmplitudeControl()を確認し、必要に応じて、明示的に設計された ON/OFF パターンにフォールバックします。
ハプティクス プリミティブの使用
Android には、振幅と周波数の両方が異なる複数の触覚プリミティブが含まれています。1 つのプリミティブを単独で使用することも、複数のプリミティブを組み合わせて使用することもできます。
- 2 つのプリミティブ間のギャップを識別できるように、50 ミリ秒以上の遅延を使用します。可能であれば、プリミティブの持続時間も考慮します。
- 強度の違いをより明確に認識できるように、1.4 以上の比率で異なるスケールを使用します。
0.5、0.7、1.0 のスケールを使用して、プリミティブの低強度、中強度、高強度のバージョンを作成します。
カスタムのバイブレーション パターンを作成する
バイブレーション パターンは、通知や着信音など、注意を引くための触覚フィードバックでよく使用されます。Vibrator サービスは、時間の経過とともに振動の振幅が変化する長い振動パターンを再生できます。このような効果は波形と呼ばれます。
波形効果は通常、知覚可能ですが、静かな環境で再生されると、突然の長い振動がユーザーを驚かせる可能性があります。目標振幅へのランプが速すぎると、ブーンというノイズが発生することもあります。振幅の遷移を滑らかにして、ランプアップ効果とランプダウン効果を作成するように波形パターンを設計します。
バイブレーション パターンの例
以降のセクションでは、バイブレーション パターンの例をいくつか紹介します。
拡大パターン
波形は、次の 3 つのパラメータを持つ VibrationEffect として表されます。
- タイミング: 各波形セグメントの継続時間(ミリ秒単位)の配列。
- 振幅: 最初の引数で指定された各期間に望ましいバイブレーションの振幅。0 ~ 255 の整数値で表され、0 はバイブレータの「オフ状態」、255 はデバイスの最大振幅を表します。
- 繰り返しインデックス: 最初の引数で指定された配列内のインデックス。波形の繰り返しを開始します。パターンを 1 回だけ再生する場合は -1。
以下に、パルス間に 350 ミリ秒の一時停止を挟んで 2 回パルスする波形の例を示します。最初のパルスは最大振幅まで滑らかに上昇し、2 番目のパルスは最大振幅を維持するために急速に上昇します。末尾で停止することは、負の繰り返しインデックス値によって定義されます。
val timings: LongArray = longArrayOf( 50, 50, 50, 50, 50, 100, 350, 25, 25, 25, 25, 200 ) val amplitudes: IntArray = intArrayOf( 33, 51, 75, 113, 170, 255, 0, 38, 62, 100, 160, 255 ) val repeatIndex = -1 // Don't repeat. vibrator.vibrate( VibrationEffect.createWaveform( timings, amplitudes, repeatIndex ) )
繰り返されるパターン
波形は、キャンセルされるまで繰り返し再生することもできます。繰り返しの波形を作成するには、負でない repeat パラメータを設定します。繰り返し波形を再生すると、サービスで明示的にキャンセルされるまで振動が続きます。
fun startVibrating() { val timings: LongArray = longArrayOf(50, 50, 100, 50, 50) val amplitudes: IntArray = intArrayOf(64, 128, 255, 128, 64) val repeat = 1 // Repeat from the second entry, index = 1. val repeatingEffect: VibrationEffect = VibrationEffect.createWaveform( timings, amplitudes, repeat ) // repeatingEffect can be used in multiple places. vibrator.vibrate(repeatingEffect) } fun stopVibrating() { vibrator.cancel() }
これは、ユーザーが確認する必要がある断続的なイベントに非常に役立ちます。このようなイベントの例としては、着信やアラームのトリガーなどがあります。
フォールバックを含むパターン
バイブレーションの振幅の制御は、ハードウェアに依存する機能です。この機能のないローエンド デバイスで波形を再生すると、振幅配列の正のエントリごとに最大振幅でデバイスが振動します。アプリがこのようなデバイスに対応する必要がある場合は、その状態で再生してもバズ効果が発生しないパターンを使用するか、代わりにフォールバックとして再生できるシンプルなオン/オフ パターンを設計します。
if (vibrator.hasAmplitudeControl()) { vibrator.vibrate( VibrationEffect.createWaveform( smoothTimings, amplitudes, smoothRepeatIdx ) ) } else { vibrator.vibrate( VibrationEffect.createWaveform( onOffTimings, onOffRepeatIdx ) ) }
VibrationEffect.Builder を使用したタイムライン アンカー コンポジション
Android 16(26Q4)以降、複雑な振動効果とコンポジションを作成するための推奨 API は VibrationEffect.Builder です。startTimeMillis を使用して、絶対的なタイムラインに沿って個別の触覚要素をシーケンス化することで、表現力豊かな触覚を構築できます。
VibrationEffect.Builder は、複数のバイブレーション タイプの組み合わせをサポートしています。
- プリセット: クリックやティックなど、事前定義された触覚パルス(
VibrationEffect.Preset)。 - エンベロープ: 動的な連続波形。ハードウェアに依存しない基本的なエンベロープ(
BasicEnvelopeBuilder)と、高度な周波数変調エンベロープ(WaveformEnvelopeBuilder)が含まれます。 - 既存の VibrationEffects:
addEvents()またはコンストラクタのコピーを使用してインポートされた、プリミティブ コンポジション(VibrationEffect.Composition)、ステップ波形(VibrationEffect.createWaveform)、事前定義されたエフェクト(VibrationEffect.createPredefined)、ワンショット(VibrationEffect.createOneShot)。 - 繰り返しシーケンス:
setRepeatingEffect()で構成された連続パターン。
VibrationEffect.Builder で作成されたバイブレーションには、要素(プリセット、基本的なエンベロープ、複合バイブレーション効果など)全体にフレームワーク レベルの自動フォールバックが組み込まれているため、手動で機能をチェックしなくても、さまざまなデバイスで一貫したユーザー エクスペリエンスを実現できます。(WaveformEnvelopeBuilder で作成された高度な波形エンベロープにはハードウェア サポートが必要であり、自動フォールバック サポートはありません)。
プリセットを使用して作成する
VibrationEffect.Preset を使用して、一般的な事前定義の短い触覚パルス(PRESET_CLICK、PRESET_TICK、PRESET_LOW_TICK など)をコンポジションに追加します。プリセットは、クリア ハプティクスのハプティクス原則に沿った、歯切れがよく、短く、心地よい振動を提供するために、デバイス メーカーによって実装されます。これらの機能とその仕組みの詳細については、振動アクチュエータの概要をご覧ください。
プリセットは、VibrationEffect.Composition API の短いプリミティブに代わるものです。ランプアップやランプダウンなど、より長いまたは連続的な触覚フィードバックには、代わりにエンベロープ波形(PWLE)を使用します。
各プリセットには、0.0f~1.0f の範囲でオプションのスケールを割り当てることができ、コンポジションの開始から明示的な開始時間(ミリ秒単位)に配置されます。
Kotlin
val clickPreset = VibrationEffect.Preset.create(
    VibrationEffect.Preset.PRESET_CLICK, /* scale= */ 0.8f
)
val tickPreset = VibrationEffect.Preset.create(
    VibrationEffect.Preset.PRESET_TICK, /* scale= */ 0.5f
)

val effect = VibrationEffect.Builder()
    .addPreset(/* startTimeMillis= */ 0L, clickPreset)
    .addPreset(/* startTimeMillis= */ 100L, tickPreset)
    .build()

vibrator.vibrate(effect)
Java
VibrationEffect.Preset clickPreset = VibrationEffect.Preset.create(
    VibrationEffect.Preset.PRESET_CLICK, /* scale= */ 0.8f
);
VibrationEffect.Preset tickPreset = VibrationEffect.Preset.create(
    VibrationEffect.Preset.PRESET_TICK, /* scale= */ 0.5f
);

VibrationEffect effect = new VibrationEffect.Builder()
    .addPreset(/* startTimeMillis= */ 0L, clickPreset)
    .addPreset(/* startTimeMillis= */ 100L, tickPreset)
    .build();

vibrator.vibrate(effect);
エンベロープとプリセットを使用して作成する
VibrationEffect.Envelope インスタンス(BasicEnvelopeBuilder または WaveformEnvelopeBuilder を使用して作成)とプリセットをシームレスに組み合わせて、リッチなマルチセグメントの触覚パターンを作成できます。
次の例では、滑らかな立ち上がりとフェードアウトのエンベロープを再生した後、シャープなクリック プリセットを再生します。
Kotlin
val basicEnvelope = VibrationEffect.Envelope.create(
    VibrationEffect.BasicEnvelopeBuilder()
        .setInitialSharpness(0.0f)
        .addControlPoint(1.0f, 1.0f, 300L)
        .addControlPoint(0.0f, 0.5f, 100L)
)
val clickPreset = VibrationEffect.Preset.create(
    VibrationEffect.Preset.PRESET_CLICK, 0.9f
)

val mixedEffect = VibrationEffect.Builder()
    .addEnvelope(/* startTimeMillis= */ 0L, basicEnvelope)
    .addPreset(/* startTimeMillis= */ 450L, clickPreset)
    .build()

vibrator.vibrate(mixedEffect)
Java
VibrationEffect.Envelope basicEnvelope = VibrationEffect.Envelope.create(
    new VibrationEffect.BasicEnvelopeBuilder()
        .setInitialSharpness(0.0f)
        .addControlPoint(1.0f, 1.0f, 300L)
        .addControlPoint(0.0f, 0.5f, 100L)
);
VibrationEffect.Preset clickPreset = VibrationEffect.Preset.create(
    VibrationEffect.Preset.PRESET_CLICK, 0.9f
);

VibrationEffect mixedEffect = new VibrationEffect.Builder()
    .addEnvelope(/* startTimeMillis= */ 0L, basicEnvelope)
    .addPreset(/* startTimeMillis= */ 450L, clickPreset)
    .build();

vibrator.vibrate(mixedEffect);
既存のイベントを再利用してシフトする
既存の VibrationEffect(VibrationEffect.Composition を含む)を再利用または連結するには、getEvents() を使用して VibrationEffect.Event オブジェクトのリストを取得し、addEvents(startTimeShiftMillis, events) を使用してオフセット付きで追加します(または、エフェクトを VibrationEffect.Builder(effect) コンストラクタに直接渡します)。この方法で VibrationEffect.Composition インスタンスをインポートすると、フレームワークはプリミティブをプリセットに自動的に変換し、ランタイム フォールバックをサポートします。
Kotlin
val existingEffect = VibrationEffect.Builder()
    .addPreset(
        0L,
        VibrationEffect.Preset.create(VibrationEffect.Preset.PRESET_CLICK)
    )
    .addPreset(
        80L,
        VibrationEffect.Preset.create(VibrationEffect.Preset.PRESET_TICK)
    )
    .build()

// Shift and append the existing events 200ms into the new composition.
val combinedEffect = VibrationEffect.Builder()
    .addEvents(/* startTimeShiftMillis= */ 200L, existingEffect.events)
    .build()

vibrator.vibrate(combinedEffect)
Java
VibrationEffect existingEffect = new VibrationEffect.Builder()
    .addPreset(
        0L,
        VibrationEffect.Preset.create(VibrationEffect.Preset.PRESET_CLICK)
    )
    .addPreset(
        80L,
        VibrationEffect.Preset.create(VibrationEffect.Preset.PRESET_TICK)
    )
    .build();

// Shift and append the existing events 200ms into the new composition.
VibrationEffect combinedEffect = new VibrationEffect.Builder()
    .addEvents(/* startTimeShiftMillis= */ 200L, existingEffect.getEvents())
    .build();

vibrator.vibrate(combinedEffect);
繰り返しのコンポジションを作成する
setRepeatingEffect(startTimeMillis, repeatingEffect, durationMillis) を使用して、コンポジションに繰り返しパターンを追加します。
Kotlin
val repeatingPattern = VibrationEffect.Builder()
    .addPreset(
        0L,
        VibrationEffect.Preset.create(
            VibrationEffect.Preset.PRESET_CLICK, 1.0f
        )
    )
    .addPreset(
        150L,
        VibrationEffect.Preset.create(
            VibrationEffect.Preset.PRESET_LOW_TICK, 0.6f
        )
    )
    .build()

val repeatingEffect = VibrationEffect.Builder()
    .setRepeatingEffect(
        /* startTimeMillis= */ 0L,
        /* effect= */ repeatingPattern,
        /* durationMillis= */ 300L
    )
    .build()

vibrator.vibrate(repeatingEffect)
Java
VibrationEffect repeatingPattern = new VibrationEffect.Builder()
    .addPreset(
        0L,
        VibrationEffect.Preset.create(
            VibrationEffect.Preset.PRESET_CLICK, 1.0f
        )
    )
    .addPreset(
        150L,
        VibrationEffect.Preset.create(
            VibrationEffect.Preset.PRESET_LOW_TICK, 0.6f
        )
    )
    .build();

VibrationEffect repeatingEffect = new VibrationEffect.Builder()
    .setRepeatingEffect(
        /* startTimeMillis= */ 0L,
        /* effect= */ repeatingPattern,
        /* durationMillis= */ 300L
    )
    .build();

vibrator.vibrate(repeatingEffect);
タイミング、検証、ドリフト管理
VibrationEffect.Builder を使用してコンポジションを設計する場合は、次のタイミングと検証ルールに留意してください。
- 開始時刻の厳密な増加: ビルダーに追加されるすべての要素には、前の要素の開始時刻以上の
startTimeMillisが必要です。 - ビルド時の検証: ビルダーは、既知の要素の長さ(またはプリセットの最小値 1 ミリ秒)を使用して、
build()時にベスト エフォート型の検証を行います。不可能な重複が検出されると、IllegalArgumentExceptionがスローされます。 - 再生の順次シフト: 次の要素の開始時刻に前の振動要素がまだ物理的に再生されている場合、フレームワークは次の要素を最も早い利用可能なタイムスロットに自動的にシフトします。これにより、イベントが重複せず、バイブレーションがドロップされることもありません。ただし、イベントが近すぎるタイミングでスケジュールされている場合、わずかなタイミングのずれが生じる可能性があります。ドリフトを最小限に抑えるには、連続する触覚イベントの間に十分な時間(50 ミリ秒以上など)を確保します。
バイブレーション プリミティブ コンポジションを作成する
このセクションでは、VibrationEffect.Composition を使用してバイブレーションを作成する方法について説明します。このページで前述したコンポジション プリミティブは、デバイス メーカーによって実装されます。クリア ハプティクスのハプティクスの原則に沿った、歯切れがよく、短く、心地よい振動を提供します。これらの機能とその仕組みの詳細については、振動アクチュエータの概要をご覧ください。
VibrationEffect.Builder とは異なり、VibrationEffect.Composition API には、サポートされていないプリミティブの自動フォールバックがありません。次のようになります。
高度な触覚を有効にする前に、使用しているすべてのプリミティブがデバイスでサポートされていることを確認してください。
プリミティブが欠落しているエフェクトだけでなく、サポートされていない一貫したエクスペリエンスのセットを無効にします。
- Kotlin:
val fallbackEffect = VibrationEffect.Builder(compositionEffect).build()(または.addEvents(0L, compositionEffect.events)) - Java:
VibrationEffect fallbackEffect =new VibrationEffect.Builder(compositionEffect).build();(または.addEvents(0L, compositionEffect.getEvents()))
VibrationEffect.Builder を使用して構築すると、フレームワークはコンポジション プリミティブをプリセットに変換し、ユーザーのデバイスでサポートされていないプリミティブがある場合は、自動的にランタイム フォールバックを提供します。
合成バイブレーション効果
VibrationEffect.Composition を使用して、複合バイブレーション効果を作成できます。次に、ゆっくりと上昇する効果の後に、鋭いクリック効果が続く例を示します。
vibrator.vibrate( VibrationEffect.startComposition().addPrimitive( VibrationEffect.Composition.PRIMITIVE_SLOW_RISE ).addPrimitive( VibrationEffect.Composition.PRIMITIVE_CLICK ).compose() )
コンポジションは、順番に再生されるプリミティブを追加することで作成されます。各プリミティブはスケーラブルでもあるため、各プリミティブによって生成される振動の振幅を制御できます。スケールは 0 ~ 1 の値として定義されます。0 は、このプリミティブをユーザーが(かろうじて)感じることができる最小の振幅にマッピングされます。
バイブレーション プリミティブのバリエーションを作成する
同じプリミティブの弱いバージョンと強いバージョンを作成する場合は、強度の違いを簡単に認識できるように、強度比を 1.4 以上にしてください。同じプリミティブの強度レベルを 4 つ以上作成しないでください。知覚的に区別できないためです。たとえば、0.5、0.7、1.0 のスケールを使用して、プリミティブの低、中、高の強度のバージョンを作成します。
バイブレーション プリミティブ間にギャップを追加する
コンポジションでは、連続するプリミティブの間に追加する遅延を指定することもできます。この遅延は、前のプリミティブの終了からのミリ秒数で表されます。一般に、2 つのプリミティブ間の 5 ~ 10 ミリ秒のギャップは短すぎて検出できません。2 つのプリミティブの間に識別可能なギャップを作成する場合は、50 ミリ秒以上のギャップを使用します。遅延を伴うコンポジションの例を次に示します。
val delayMs = 100 vibrator.vibrate( VibrationEffect.startComposition().addPrimitive( VibrationEffect.Composition.PRIMITIVE_SPIN, 0.8f ).addPrimitive( VibrationEffect.Composition.PRIMITIVE_SPIN, 0.6f ).addPrimitive( VibrationEffect.Composition.PRIMITIVE_THUD, 1.0f, delayMs ).compose() )
サポートされているプリミティブを確認する
次の API を使用して、特定のプリミティブに対するデバイスのサポートを検証できます。
val primitive = VibrationEffect.Composition.PRIMITIVE_LOW_TICK if (vibrator.areAllPrimitivesSupported(primitive)) { vibrator.vibrate( VibrationEffect.startComposition() .addPrimitive(primitive).compose() ) } else { // Play a predefined effect or custom pattern as a fallback. }
複数のプリミティブをチェックして、デバイスのサポートレベルに基づいて、どのプリミティブを構成するかを決定することもできます。
val primitives: IntArray = intArrayOf( VibrationEffect.Composition.PRIMITIVE_LOW_TICK, VibrationEffect.Composition.PRIMITIVE_TICK, VibrationEffect.Composition.PRIMITIVE_CLICK ) val supported: BooleanArray = vibrator.arePrimitivesSupported(*primitives)
バイブレーション コンポジションの例
以下のセクションでは、GitHub のハプティクス サンプルアプリから抜粋した、バイブレーション コンポジションの例をいくつか紹介します。
抵抗(低ティック)
プリミティブ バイブレーションの振幅を制御して、進行中のアクションに有用なフィードバックを伝えることができます。間隔の狭いスケール値を使用すると、プリミティブの滑らかなクレッシェンド効果を作成できます。連続するプリミティブ間の遅延も、ユーザー操作に基づいて動的に設定できます。次の例は、ドラッグ操作で制御され、ハプティクスで拡張されたビュー アニメーションを示しています。

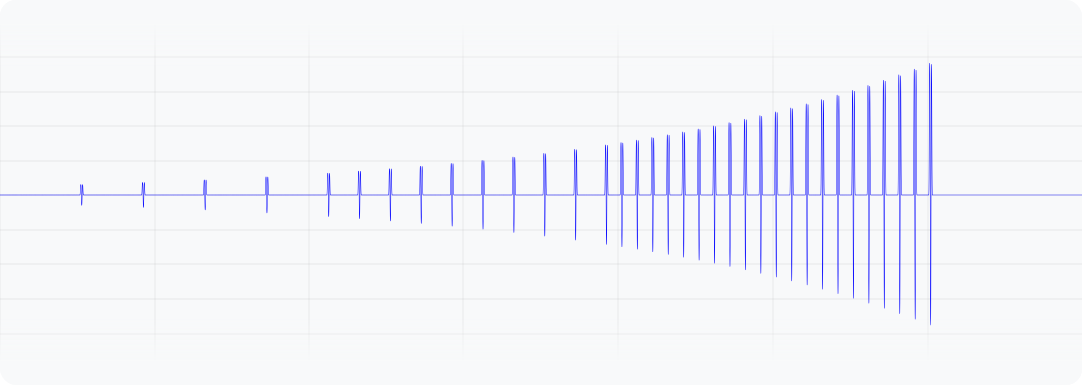
図 1. この波形は、デバイスの振動の出力加速度を表しています。
@Composable fun ResistScreen() { // Control variables for the dragging of the indicator. var isDragging by remember { mutableStateOf(false) } var dragOffset by remember { mutableFloatStateOf(0f) } // Only vibrates while the user is dragging LaunchedEffect(isDragging) { // Continuously run the effect for vibration to occur even when the view // is not being drawn, when user stops dragging midway through gesture. while (isDragging) { // Calculate the interval inversely proportional to the drag offset. val vibrationInterval = calculateVibrationInterval(dragOffset) // Calculate the scale directly proportional to the drag offset. val vibrationScale = calculateVibrationScale(dragOffset) delay(vibrationInterval) vibrator.vibrate( VibrationEffect.startComposition().addPrimitive( VibrationEffect.Composition.PRIMITIVE_LOW_TICK, vibrationScale ).compose() ) } } Column( Modifier .draggable( orientation = Orientation.Vertical, onDragStarted = { isDragging = true }, onDragStopped = { isDragging = false }, state = rememberDraggableState { delta -> dragOffset += delta } ) ) { // Build the indicator UI based on how much the user has dragged it. ResistIndicator(dragOffset) } }
拡大(上昇と下降)
知覚されるバイブレーションの強度を上げるためのプリミティブには、PRIMITIVE_QUICK_RISE と PRIMITIVE_SLOW_RISE の 2 つがあります。どちらも同じ目標を達成しますが、期間が異なります。ランプダウン用のプリミティブは PRIMITIVE_QUICK_FALL の 1 つだけです。これらのプリミティブを組み合わせると、強度が徐々に高まり、その後消えていく波形セグメントを作成できます。スケーリングされたプリミティブを整列させて、プリミティブ間の振幅が急激に変化しないようにすることができます。これは、エフェクト全体の持続時間を延長する場合にも有効です。知覚的には、上昇部分の方が下降部分よりも常に目立つため、上昇部分を下降部分よりも短くすることで、下降部分を強調できます。
以下は、円を拡大および縮小するコンポジションの例です。上昇効果により、アニメーション中の拡大感を高めることができます。上昇効果と下降効果を組み合わせることで、アニメーションの最後で崩壊する様子を強調できます。

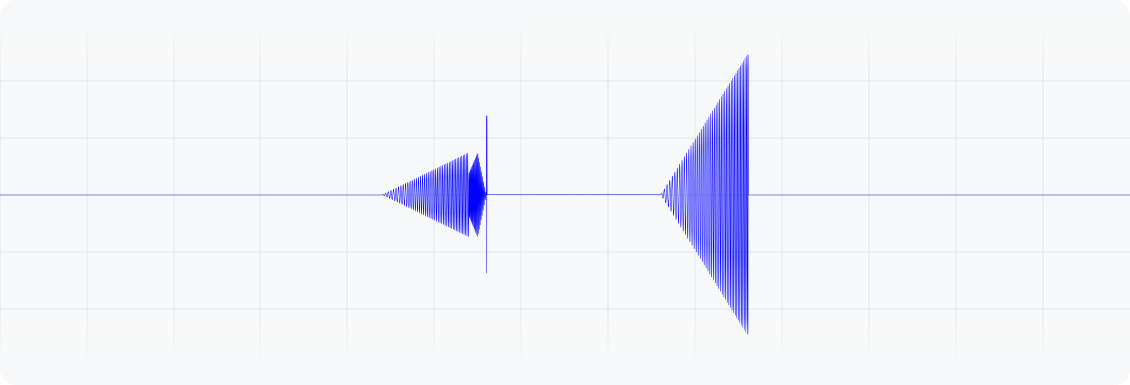
図 2. この波形は、デバイスの振動の出力加速度を表しています。
enum class ExpandShapeState { Collapsed, Expanded } @Composable fun ExpandScreen() { // Control variable for the state of the indicator. var currentState by remember { mutableStateOf(ExpandShapeState.Collapsed) } // Animation between expanded and collapsed states. val transitionData = updateTransitionData(currentState) Column( Modifier .clickable( onClick = { if (currentState == ExpandShapeState.Collapsed) { currentState = ExpandShapeState.Expanded vibrator.vibrate( VibrationEffect.startComposition().addPrimitive( VibrationEffect.Composition.PRIMITIVE_SLOW_RISE, 0.3f ).addPrimitive( VibrationEffect.Composition.PRIMITIVE_QUICK_FALL, 0.3f ).compose() ) } else { currentState = ExpandShapeState.Collapsed vibrator.vibrate( VibrationEffect.startComposition().addPrimitive( VibrationEffect.Composition.PRIMITIVE_SLOW_RISE ).compose() ) } } ) ) { // Build the indicator UI based on the current state. ExpandIndicator(transitionData) } }
ぐらつき(回転あり)
ハプティクスの原則の 1 つは、ユーザーに満足してもらうことです。PRIMITIVE_SPIN を使用すると、心地よい予期しないバイブレーション効果を楽しく導入できます。このプリミティブは、複数回呼び出される場合に最も効果的です。複数のスピンを連結すると、ぐらつきや不安定な効果が生まれます。これは、各プリミティブにランダムなスケーリングを適用することでさらに強化できます。連続するスピンプリミティブ間のギャップを試すこともできます。2 回のスピンを間隔なし(0 ミリ秒)で実行すると、タイトなスピン感覚が生まれます。スピン間のギャップを 10 ミリ秒から 50 ミリ秒に増やすと、スピンの感覚が緩くなり、動画やアニメーションの長さに合わせることができます。
100 ミリ秒を超えるギャップは使用しないでください。連続するスピンがうまく統合されず、個別のエフェクトのように感じられるようになります。
以下は、下にドラッグして離すと跳ね返る弾性シェイプの例です。アニメーションは、バウンスの変位に比例してさまざまな強度で再生される一対のスピン効果で強化されています。

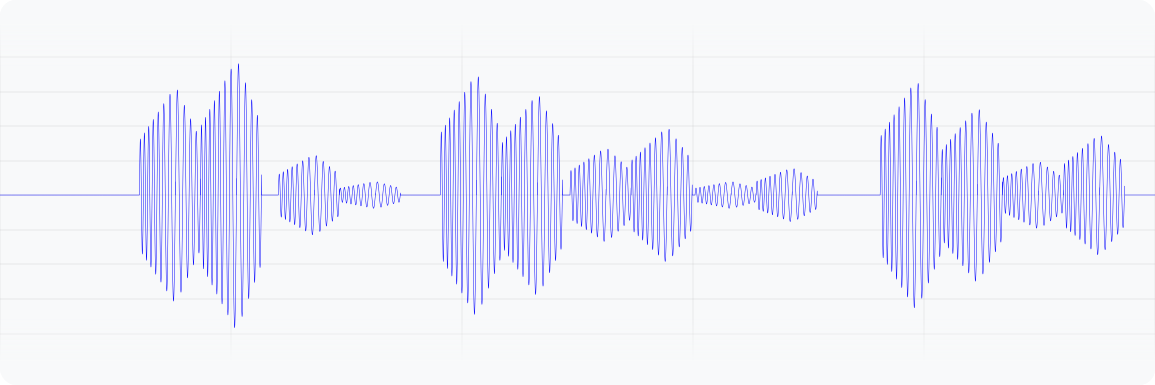
図 3. この波形は、デバイスの振動の出力加速度を表しています。
@Composable fun WobbleScreen() { // Control variables for the dragging and animating state of the elastic. var dragDistance by remember { mutableFloatStateOf(0f) } var isWobbling by remember { mutableStateOf(false) } // Use drag distance to create an animated float value behaving like a spring. val dragDistanceAnimated by animateFloatAsState( targetValue = if (dragDistance > 0f) dragDistance else 0f, animationSpec = spring( dampingRatio = Spring.DampingRatioHighBouncy, stiffness = Spring.StiffnessMedium ), // The spring ends on its target. An end value of 0f means that the // shape is back at rest, so the wobble is over. finishedListener = { endValue -> if (endValue == 0f) isWobbling = false }, ) LaunchedEffect(isWobbling) { while (isWobbling) { val displacement = dragDistanceAnimated / MAX_DRAG_DISTANCE // Use some sort of minimum displacement so the final few frames // of animation don't generate a vibration. if (displacement > SPIN_MIN_DISPLACEMENT) { vibrator.vibrate( VibrationEffect.startComposition().addPrimitive( VibrationEffect.Composition.PRIMITIVE_SPIN, nextSpinScale(displacement) ).addPrimitive( VibrationEffect.Composition.PRIMITIVE_SPIN, nextSpinScale(displacement) ).compose() ) } // Delay the next check for a sufficient duration until the // current composition finishes. Note that you can use // Vibrator.getPrimitiveDurations API to calculcate the delay. delay(VIBRATION_DURATION) } } Box( Modifier .fillMaxSize() .draggable( onDragStopped = { // Wobble only if the shape is far enough from rest to vibrate. // It then springs back to 0f, and the finishedListener ends // the wobble. val displacement = dragDistanceAnimated / MAX_DRAG_DISTANCE isWobbling = displacement > SPIN_MIN_DISPLACEMENT dragDistance = 0f }, orientation = Orientation.Vertical, state = rememberDraggableState { delta -> isWobbling = false dragDistance += delta } ) ) { // Draw the wobbling shape using the animated spring-like value. The // lambda defers the read to the draw phase, so the animation doesn't // recompose this screen on every frame. WobbleShape { dragDistanceAnimated } } } // Calculate a random scale for each spin to vary the full effect. fun nextSpinScale(displacement: Float): Float { // Generate a random offset in the range [-0.1, +0.1] to be added to the // vibration scale so the spin effects have slightly different values. val randomOffset: Float = Random.Default.nextFloat() * 0.2f - 0.1f return (displacement + randomOffset).absoluteValue.coerceIn(0f, 1f) }
バウンス(ドスンという音あり)
バイブレーション効果のもう一つの高度な用途は、物理的なインタラクションをシミュレートすることです。PRIMITIVE_THUD は、強力で反響する効果を生み出すことができます。たとえば、動画やアニメーションで、衝撃の視覚化と組み合わせることで、全体的なエクスペリエンスを向上させることができます。
以下は、ボールが画面の下部で跳ね返るたびにドスンという効果音が再生される、ボールが落ちるアニメーションの例です。

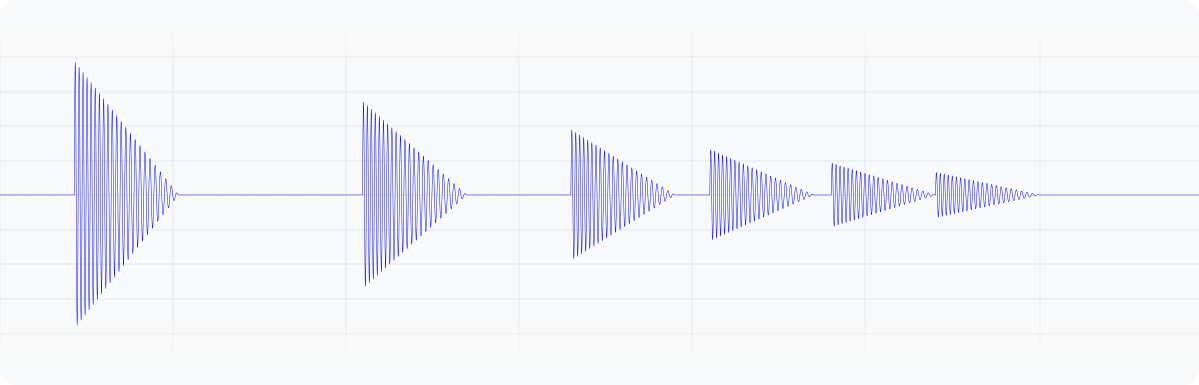
図 4. この波形は、デバイスの振動の出力加速度を表しています。
enum class BallPosition { Start, End } @Composable fun BounceScreen() { // Control variable for the state of the ball. var ballPosition by remember { mutableStateOf(BallPosition.Start) } // Plain holder for the bounce count. It's read only in the effect and in // the click handler, never in composition, so it needs no snapshot state. val bounceCount = remember { intArrayOf(0) } // Animation for the bouncing ball. val transitionData = updateTransitionData(ballPosition) val collisionData = updateCollisionData(transitionData) // Ball is about to contact floor. The effect runs only when the collision // state changes, so it vibrates once per collision. Nothing here suspends, // so a keyed SideEffect does the job without launching a coroutine. SideEffect(collisionData.collisionWithFloor) { if (collisionData.collisionWithFloor) { val vibrationScale = 0.7.pow(bounceCount[0]++).toFloat() vibrator.vibrate( VibrationEffect.startComposition().addPrimitive( VibrationEffect.Composition.PRIMITIVE_THUD, vibrationScale ).compose() ) } } Box( Modifier .fillMaxSize() .clickable { if (transitionData.isAtStart) { ballPosition = BallPosition.End } else { ballPosition = BallPosition.Start bounceCount[0] = 0 } }, ) { // Build the ball UI based on the current state. BouncingBall(transitionData) } }
エンベロープを含むバイブレーション波形
カスタム バイブレーション パターンを作成するプロセスでは、バイブレーションの振幅を制御して、ランプアップとランプダウンの滑らかな効果を作成できます。このセクションでは、波形エンベロープを使用して動的な触覚効果を作成する方法について説明します。これにより、振動の振幅と周波数を時間の経過とともに正確に制御できます。これにより、より豊かで繊細な触覚エクスペリエンスを作成できます。
Android 16(API レベル 36)以降、システムは、一連の制御点を定義して振動波形エンベロープを作成する次の API を提供します。
BasicEnvelopeBuilder: ハードウェアに依存しない触覚効果を作成するための、利用しやすいアプローチ。WaveformEnvelopeBuilder: 触覚効果を作成するためのより高度なアプローチ。触覚ハードウェアに精通している必要があります。
Android には、エンベロープ効果のフォールバックは用意されていません。このサポートが必要な場合は、次の手順を行います。
Vibrator.areEnvelopeEffectsSupported()を使用して、特定のデバイスがエンベロープ エフェクトをサポートしているかどうかを確認します。- サポートされていない一貫したエクスペリエンス セットを無効にするか、カスタム バイブレーション パターンまたはコンポジションを代替手段として使用します。
より基本的なエンベロープ効果を作成するには、次のパラメータを指定して BasicEnvelopeBuilder を使用します。
- \( [0, 1] \)の範囲の強度値。これは、認識される振動の強さを表します。たとえば、 \( 0.5 \)の値は、デバイスで達成可能なグローバル最大強度の半分として認識されます。
\( [0, 1] \)の範囲のシャープネス値。振動の鮮明さを表します。値が小さいほど振動が滑らかになり、値が大きいほど振動が鋭くなります。
duration 値。最後のコントロール ポイント(強度とシャープネスのペア)から新しいコントロール ポイントに移行するまでにかかる時間をミリ秒単位で表します。
以下に、500 ミリ秒かけて低ピッチから高ピッチ、最大強度の振動に強度を上げ、100 ミリ秒かけて\( 0 \) (オフ)に戻す波形の例を示します。
vibrator.vibrate( VibrationEffect.BasicEnvelopeBuilder() .setInitialSharpness(0.0f) .addControlPoint(1.0f, 1.0f, 500) .addControlPoint(0.0f, 1.0f, 100) .build() )
ハプティクスに関する高度な知識がある場合は、WaveformEnvelopeBuilder を使用してエンベロープ効果を定義できます。このオブジェクトを使用すると、VibratorFrequencyProfile を介して周波数から出力加速度へのマッピング(FOAM)にアクセスできます。
- \( [0, 1] \)の範囲の振幅値。デバイスの FOAM によって決定される、特定の周波数で達成可能な振動強度を表します。たとえば、 \( 0.5 \) の値を指定すると、特定の周波数で達成可能な最大出力加速度の半分が生成されます。
周波数値(ヘルツ単位)。
duration 値。最後のコントロール ポイントから新しいコントロール ポイントに移行するまでにかかる時間をミリ秒単位で表します。
次のコードは、400 ミリ秒のバイブレーション効果を定義する波形の例を示しています。まず、60 Hz の一定の周波数で、50 ミリ秒の振幅ランプがオフからフルまで行われます。次に、周波数が次の 100 ミリ秒で 120 Hz まで上昇し、そのレベルが 200 ミリ秒間維持されます。最後に、振幅が \( 0 \)まで低下し、最後の 50 ミリ秒で周波数が 60 Hz に戻ります。
vibrator.vibrate( VibrationEffect.WaveformEnvelopeBuilder() .addControlPoint(1.0f, 60f, 50) .addControlPoint(1.0f, 120f, 100) .addControlPoint(1.0f, 120f, 200) .addControlPoint(0.0f, 60f, 50) .build() )
以降のセクションでは、エンベロープを使用した振動波形の例をいくつか紹介します。
バウンス スプリング
前のサンプルでは、PRIMITIVE_THUD を使用して物理的なバウンス インタラクションをシミュレートしています。基本的なエンベロープ API を使用すると、より細かく制御できるため、バイブレーションの強度とシャープネスを正確に調整できます。これにより、アニメーション イベントをより正確に追跡する触覚フィードバックが実現します。
次の例は、自由落下するばねのアニメーションを、ばねが画面の下部で跳ね返るたびに再生される基本的なエンベロープ効果で強化したものです。
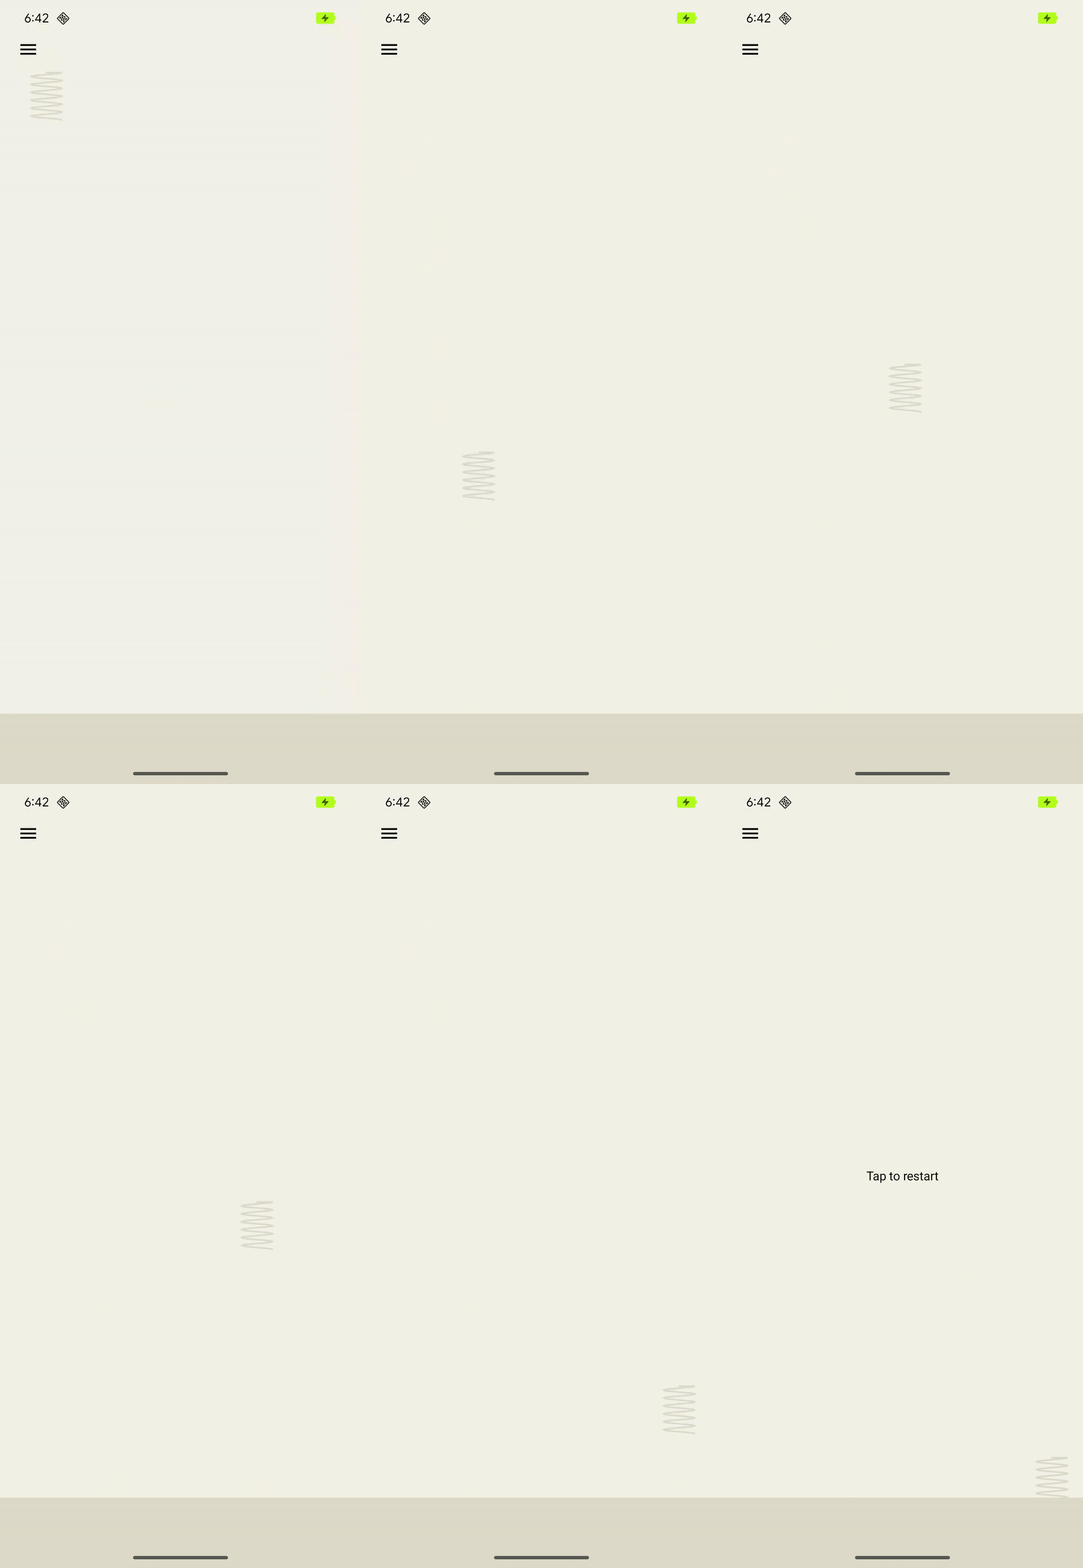
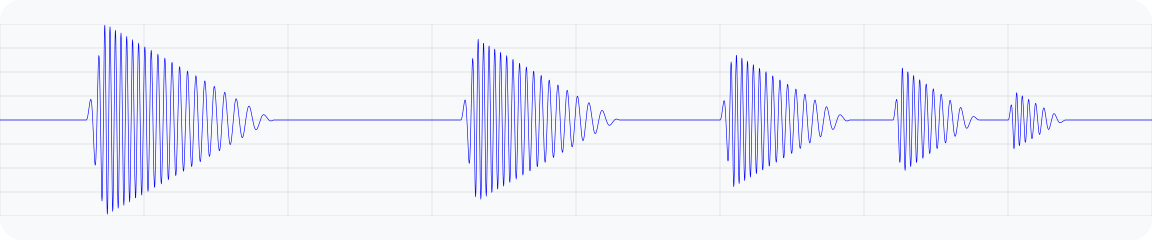
図 5. 跳ねるバネをシミュレートする振動の出力加速度波形グラフ。
@Composable fun BouncingSpringAnimation() { // The spring's height above the floor: 1f is the drop height, 0f is the floor. val springHeight = remember { Animatable(1f) } var isAnimating by remember { mutableStateOf(true) } LaunchedEffect(isAnimating) { if (!isAnimating) return@LaunchedEffect springHeight.snapTo(1f) // Each bounce reaches a fraction of the previous height. var bounceHeight = 1f while (bounceHeight > MIN_BOUNCE_HEIGHT) { // Fall to the floor, speeding up like a falling object. A fall from // a greater height takes longer. val fallDurationMs = (DROP_DURATION_MS * sqrt(bounceHeight)).toInt() springHeight.animateTo(0f, tween(fallDurationMs, easing = EaseInQuad)) // The spring hits the floor: play a "boing" envelope effect that fades // out. A higher bounce gives a stronger and sharper vibration. vibrator.vibrate( VibrationEffect.BasicEnvelopeBuilder() // Starting from zero sharpness here, will simulate a smoother // "boing" effect. .setInitialSharpness(0f) // Add a control point to reach the target intensity and // sharpness very quickly. .addControlPoint(bounceHeight, bounceHeight * MAX_SHARPNESS, 20L) // Add a control point to fade out the vibration intensity while // maintaining sharpness. .addControlPoint(0f, bounceHeight * MAX_SHARPNESS, fallDurationMs.toLong()) .build() ) // Bounce back up to a lower height, slowing down like a thrown object. // When the next bounce is too small, the spring stays on the floor. bounceHeight *= BOUNCE_DAMPING if (bounceHeight > MIN_BOUNCE_HEIGHT) { val riseDurationMs = (DROP_DURATION_MS * sqrt(bounceHeight)).toInt() springHeight.animateTo(bounceHeight, tween(riseDurationMs, easing = EaseOutQuad)) } } isAnimating = false } Box( modifier = Modifier .fillMaxSize() .clickable(enabled = !isAnimating) { isAnimating = true } .drawBehind { // Read the height in the draw phase, and scale it to the distance // between the top of the box and the floor. val floorTop = size.height - FLOOR_HEIGHT.toPx() val dropDistance = floorTop - SPRING_HEIGHT.toPx() drawSpring(topY = dropDistance * (1f - springHeight.value)) drawFloor(top = floorTop) } ) { if (!isAnimating) { Text("Tap to restart", Modifier.align(Alignment.Center)) } } }
ロケットの打ち上げ
前のサンプルでは、基本的なエンベロープ API を使用して、弾むようなバネの反応をシミュレートする方法を示しました。WaveformEnvelopeBuilder を使用すると、デバイスの全周波数範囲を正確に制御できるため、高度にカスタマイズされた触覚効果を実現できます。これを FOAM データと組み合わせることで、特定の周波数機能に合わせて振動を調整できます。
以下に、動的なバイブレーション パターンを使用したロケット打ち上げシミュレーションの例を示します。このエフェクトは、サポートされている最小周波数加速度出力(0.1 G)から共振周波数まで、常に 10% の振幅入力を維持します。これにより、駆動振幅が同じであっても、効果は適度に強い出力で開始され、知覚される強度とシャープネスが増加します。共振に達すると、エフェクトの周波数は最小値まで下がり、強度とシャープネスが低下しているように感じられます。これにより、最初は抵抗を感じ、その後解放されるという、宇宙への打ち上げを模した感覚が生まれます。
この効果は、基本的なエンベロープ API では実現できません。共振周波数と出力加速度曲線に関するデバイス固有の情報が抽象化されるためです。シャープネスを上げると、等価周波数が共振を超える可能性があり、意図しない加速度の低下を引き起こす可能性があります。
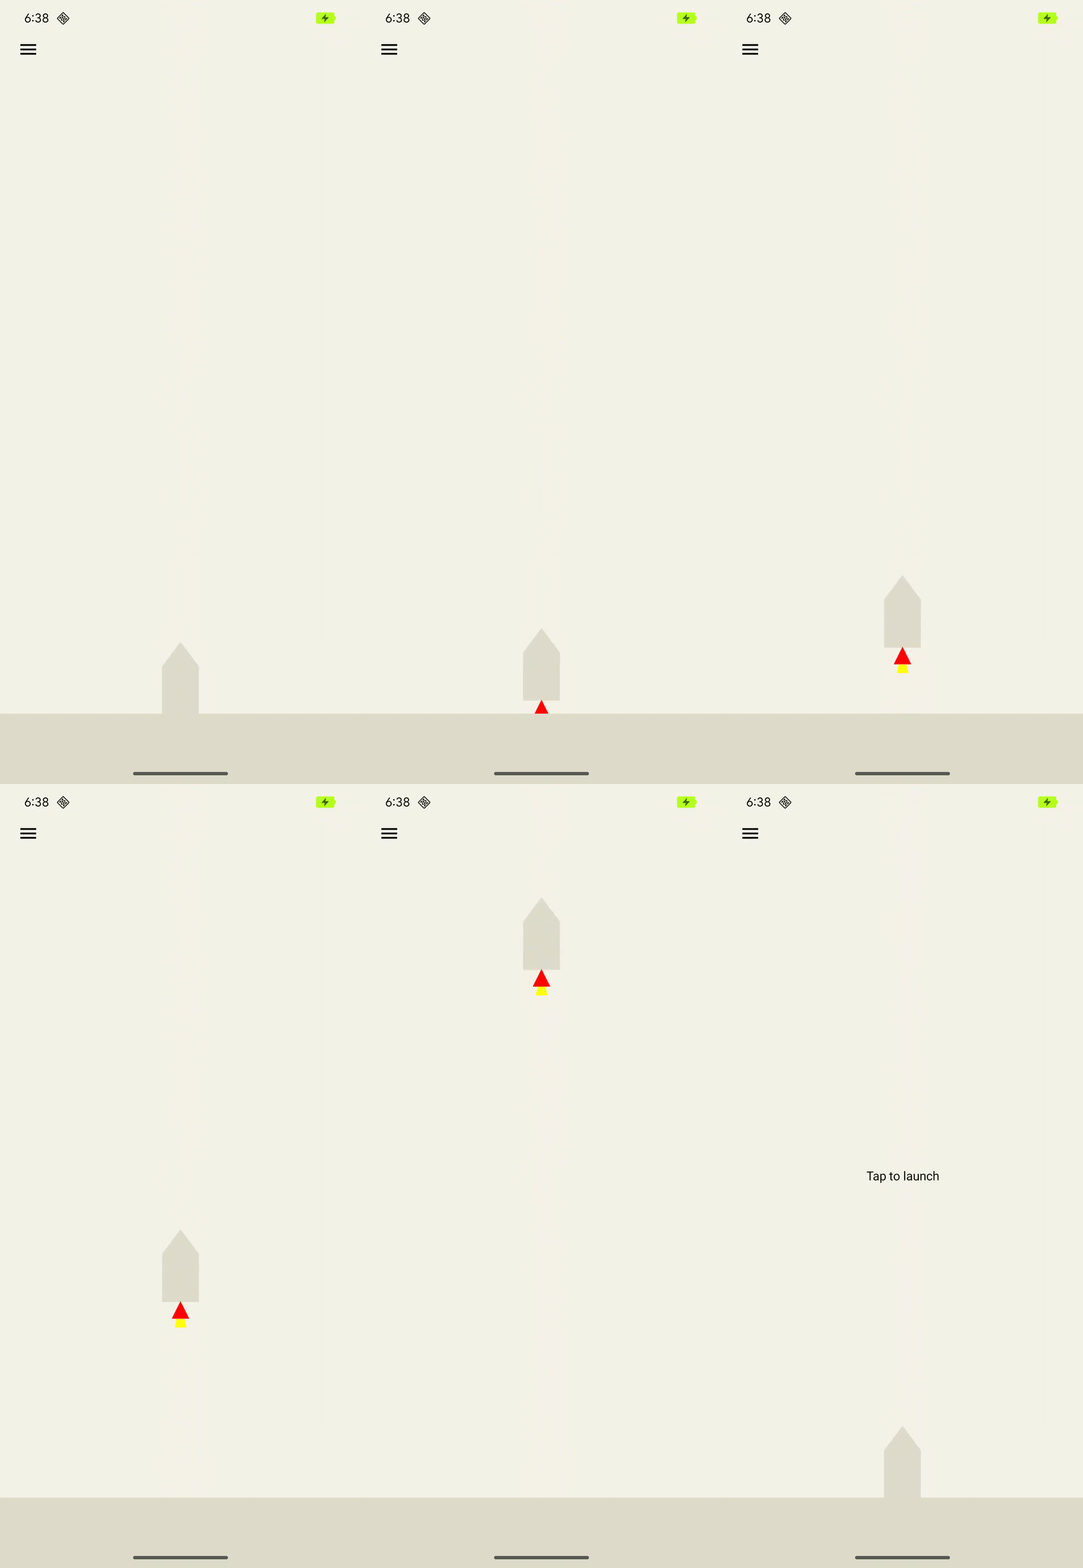
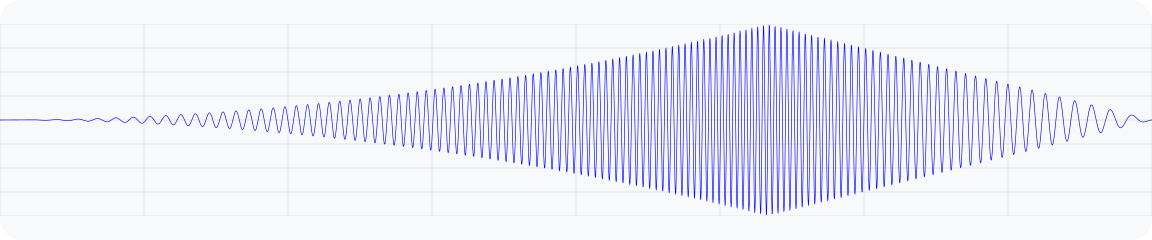
図 6. ロケットの打ち上げをシミュレートする振動の出力加速度波形グラフ。
@Composable fun RocketLaunchAnimation() { var isLaunched by remember { mutableStateOf(false) } val animation = remember { Animatable(0f) } val animationDuration = 3000 LaunchedEffect(isLaunched) { if (isLaunched) { animation.animateTo( 1.2f, // Overshoot so that the rocket goes off the screen. animationSpec = tween( durationMillis = animationDuration, // Applies an easing curve with a slow start and rapid acceleration // towards the end. easing = CubicBezierEasing(1f, 0f, 0.75f, 1f) ) ) animation.snapTo(0f) isLaunched = false } } Canvas( modifier = Modifier .fillMaxSize() .clickable { if (!isLaunched) { // Play vibration with same duration as the animation, using 70% of // the time for the rise of the vibration, to match the easing curve // defined previously. playVibration(vibrator, animationDuration.toLong(), 0.7f) isLaunched = true } } .background(colorResource(R.color.background)) ) { // Read the animation in the draw phase, and scale it to the canvas height. drawRocket(size.height * animation.value) } } private fun playVibration( vibrator: Vibrator, totalDurationMs: Long, riseBias: Float, minOutputAccelerationGs: Float = 0.1f, ) { require(riseBias in 0f..1f) { "Rise bias must be between 0 and 1." } if (!vibrator.areEnvelopeEffectsSupported()) { return } val resonantFrequency = vibrator.resonantFrequency if (resonantFrequency.isNaN()) { // Device doesn't have or expose a resonant frequency. return } val startFrequency = vibrator.frequencyProfile?.getFrequencyRange(minOutputAccelerationGs)?.lower ?: return if (startFrequency >= resonantFrequency) { // Vibrator can't generate the minimum required output at lower frequencies. return } val minDurationMs = vibrator.envelopeEffectInfo.minControlPointDurationMillis val rampUpDurationMs = (riseBias * totalDurationMs).toLong() - minDurationMs val rampDownDurationMs = totalDurationMs - rampUpDurationMs - minDurationMs vibrator.vibrate( VibrationEffect.WaveformEnvelopeBuilder() // Quickly reach the target output at the start frequency .addControlPoint(0.1f, startFrequency, minDurationMs) .addControlPoint(0.1f, resonantFrequency, rampUpDurationMs) .addControlPoint(0.1f, startFrequency, rampDownDurationMs) // Controlled ramp down to zero to avoid ringing after the vibration. .addControlPoint(0.0f, startFrequency, minDurationMs) .build() ) }
LavaBeats
ロケットの打ち上げの例のように、WaveformEnvelopeBuilder API を使用すると、振動の振幅と周波数のセグメントを制御できるため、多くの複雑な触覚効果を設計できます。このような設計のもう 1 つの例は、「活気」などのより抽象的な物理感覚のエミュレーションです。
これは、一般的な心電図(ECG)信号のバイオマーカーを、特定の振幅と周波数の振動セグメントで表すことで実現できます。LavaBeats は、ECG 記録の 2 つの特徴的なセグメントが、時間遅延で区切られた 2 つのパルスとして表される例です。最初の特徴的なパルスは QRS 群です。これは、振幅が大きく持続時間が短い鋭いピークとして表示されます。2 つ目のパルスは T 波で、振幅が小さく、持続時間が長く、形状が滑らかです(図 7 を参照)。
WaveformEnvelopeBuilder を使用して、固定の最初のパルスから 2 番目のパルスまでの遅延で区切られた、これら 2 つのパルスのさまざまな繰り返しを構築します。最初のパルスは、低周波数で始まり、短時間で高周波数で終わるチャープ信号にすることができます。2 番目のパルスは、低周波数の正弦波の 1 周期として表すことができます。2 つのパルスを 1 つのビートに合成し、一般的な 1 分あたりのビート数(bpm)に従って、合成を数回繰り返します。その結果、心臓の鼓動に似た触覚効果が得られます。
GitHub の触覚サンプルアプリで LavaBeats を試すことができます。触覚効果と同じリズムでビートするラバランプのビジュアリゼーションとともに、効果を体感できます。2 つのパルスの振幅、周波数、持続時間、遅延を変更することで、エフェクトの設定を変更して、異なるビート感覚を作成することもできます。


図 7. QRS 複合波と T 波を含む心電図記録のセグメント
private fun createEnvelopeEffect( beatParameters: List<BeatParameter> ): VibrationEffect = VibrationEffect.WaveformEnvelopeBuilder() .apply { repeat(beatParameters.getNumBeats()) { // First pulse chirp addControlPoint( beatParameters.getFirstPulseAmplitude(), beatParameters.getFirstPulseStartFreq(), ENVELOPE_RAMP_DURATION_MILLIS, ) addControlPoint( beatParameters.getFirstPulseAmplitude(), beatParameters.getFirstPulseEndFreq(), beatParameters.getFirstPulseDurationMillis().toLong(), ) addControlPoint( 0f, beatParameters.getFirstPulseEndFreq(), ENVELOPE_RAMP_DURATION_MILLIS, ) // Delay between first and second pulse addControlPoint( 0f, beatParameters.getFirstPulseEndFreq(), beatParameters.getFirstToSecondPulseDelayMillis().toLong(), ) // Second pulse addControlPoint( beatParameters.getSecondPulseAmplitude(), beatParameters.getSecondPulseFreq(), ENVELOPE_RAMP_DURATION_MILLIS, ) addControlPoint( beatParameters.getSecondPulseAmplitude(), beatParameters.getSecondPulseFreq(), (1_000 / (2f * beatParameters.getSecondPulseFreq())).toLong(), ) addControlPoint( 0f, beatParameters.getSecondPulseFreq(), ENVELOPE_RAMP_DURATION_MILLIS, ) addControlPoint( 0f, beatParameters.getSecondPulseFreq(), beatParameters.getBeatDelayMillis().toLong(), ) } } .build() /** A parameter of a haptic beat effect that represents an ECG signal parameter */ data class BeatParameter( val description: String = "", val value: Float = 0f, val range: ClosedFloatingPointRange<Float> = 0f..1f, val steps: Int = 0, val isFrequencyType: Boolean = false, )