

นอกจากฟังก์ชันที่ประกอบกันได้ Canvas แล้ว Compose ยังมีModifiersกราฟิกที่มีประโยชน์หลายอย่างซึ่งช่วยในการวาดเนื้อหาที่กำหนดเอง ตัวแก้ไขเหล่านี้มีประโยชน์
เนื่องจากสามารถใช้กับ Composable ใดก็ได้
ตัวปรับแต่งการวาด
คำสั่งการวาดทั้งหมดจะดำเนินการด้วยตัวแก้ไขการวาดใน Compose ตัวแก้ไขการวาดหลักๆ ใน Compose มี 3 รายการดังนี้
ตัวแก้ไขพื้นฐานสำหรับการวาดคือ drawWithContent ซึ่งคุณสามารถกำหนดลำดับการวาดของ Composable และคำสั่งการวาดที่ออกภายในตัวแก้ไขได้ drawBehind เป็น Wrapper ที่สะดวกสำหรับ drawWithContent ซึ่งมีการตั้งค่าลำดับการวาดไว้ด้านหลังเนื้อหาของ Composable drawWithCache
เรียกใช้ onDrawBehind หรือ onDrawWithContent ภายใน และมีกลไกสำหรับการแคชออบเจ็กต์ที่สร้างขึ้นในนั้น
Modifier.drawWithContent: เลือกลำดับการวาด
Modifier.drawWithContent ช่วยให้คุณดำเนินการ DrawScope ก่อนหรือหลังเนื้อหาของ Composable ได้ อย่าลืมเรียกใช้ drawContent เพื่อแสดงผลเนื้อหาจริงของ Composable ตัวแก้ไขนี้ช่วยให้คุณกำหนดลำดับการดำเนินการได้ หากต้องการให้วาดเนื้อหาก่อนหรือหลังการดำเนินการวาดที่กำหนดเอง
ตัวอย่างเช่น หากต้องการแสดงผลการไล่ระดับสีแบบรัศมีที่ด้านบนของเนื้อหาเพื่อสร้างเอฟเฟกต์รูส่องไฟฉายใน UI คุณสามารถทำดังนี้
var pointerOffset by remember { mutableStateOf(Offset(0f, 0f)) } Column( modifier = Modifier .fillMaxSize() .pointerInput("dragging") { detectDragGestures { change, dragAmount -> pointerOffset += dragAmount } } .onSizeChanged { pointerOffset = Offset(it.width / 2f, it.height / 2f) } .drawWithContent { drawContent() // draws a fully black area with a small keyhole at pointerOffset that’ll show part of the UI. drawRect( Brush.radialGradient( listOf(Color.Transparent, Color.Black), center = pointerOffset, radius = 100.dp.toPx(), ) ) } ) { // Your composables here }
Modifier.drawBehind: การวาดด้านหลัง Composable
Modifier.drawBehind ช่วยให้คุณดำเนินการ DrawScope เบื้องหลังเนื้อหา Composable ที่วาดบนหน้าจอได้ หากดูการติดตั้งใช้งาน Canvas คุณอาจสังเกตเห็นว่า Wrapper ที่สะดวกสบายรอบๆ Modifier.drawBehind
วิธีวาดสี่เหลี่ยมผืนผ้ามุมมนด้านหลัง Text
Text( "Hello Compose!", modifier = Modifier .drawBehind { drawRoundRect( Color(0xFFBBAAEE), cornerRadius = CornerRadius(10.dp.toPx()) ) } .padding(4.dp) )
ซึ่งจะให้ผลลัพธ์ต่อไปนี้

Modifier.drawWithCache: การวาดและการแคชออบเจ็กต์การวาด
Modifier.drawWithCache จะเก็บออบเจ็กต์ที่สร้างไว้ภายในแคช ระบบจะแคชออบเจ็กต์ไว้ตราบใดที่ขนาดของพื้นที่วาดภาพยังคงเท่าเดิม หรือออบเจ็กต์สถานะที่อ่านไม่มีการเปลี่ยนแปลง ตัวแก้ไขนี้มีประโยชน์ในการปรับปรุงประสิทธิภาพของคำสั่งประมวลผล เนื่องจากช่วยหลีกเลี่ยงความจำเป็นในการจัดสรรออบเจ็กต์ใหม่ (เช่น Brush, Shader, Path เป็นต้น) ที่สร้างขึ้นในการวาด
หรือจะแคชออบเจ็กต์โดยใช้ remember นอกตัวแก้ไขก็ได้ อย่างไรก็ตาม วิธีนี้อาจทำไม่ได้เสมอไปเนื่องจากคุณอาจไม่มีสิทธิ์เข้าถึงการเรียบเรียงเสมอไป การใช้ drawWithCache จะมีประสิทธิภาพมากกว่าหากใช้ออบเจ็กต์สำหรับการวาดเท่านั้น
เช่น หากคุณสร้าง Brush เพื่อวาดการไล่ระดับสีด้านหลัง Text การใช้ drawWithCache จะแคชออบเจ็กต์ Brush จนกว่าขนาดของพื้นที่วาดจะเปลี่ยนแปลง:
Text( "Hello Compose!", modifier = Modifier .drawWithCache { val brush = Brush.linearGradient( listOf( Color(0xFF9E82F0), Color(0xFF42A5F5) ) ) onDrawBehind { drawRoundRect( brush, cornerRadius = CornerRadius(10.dp.toPx()) ) } } )

ตัวปรับแต่งกราฟิก
Modifier.graphicsLayer: ใช้การเปลี่ยนรูปแบบกับ Composable
Modifier.graphicsLayer
เป็นตัวแก้ไขที่ทำให้เนื้อหาของ Composable วาดลงในเลเยอร์การวาด เลเยอร์มีฟังก์ชันการทำงานที่แตกต่างกัน 2-3 อย่าง เช่น
- การแยกสำหรับคำสั่งการวาด (คล้ายกับ
RenderNode) คำสั่งการวาดที่บันทึกเป็นส่วนหนึ่งของเลเยอร์สามารถออกใหม่ได้อย่างมีประสิทธิภาพโดยไปป์ไลน์การแสดงผลโดยไม่ต้องเรียกใช้โค้ดของแอปพลิเคชันอีกครั้ง - การเปลี่ยนรูปแบบที่ใช้กับคำสั่งการวาดทั้งหมดที่อยู่ในเลเยอร์
- ความสามารถในการแรสเตอร์สำหรับการจัดองค์ประกอบ เมื่อเลเยอร์ได้รับการแรสเตอร์ ระบบจะดำเนินการตามวิธีการวาดและบันทึกเอาต์พุตลงในบัฟเฟอร์นอกหน้าจอ การจัดองค์ประกอบบัฟเฟอร์ดังกล่าวสำหรับเฟรมต่อๆ ไปจะเร็วกว่าการดำเนินการตามคำสั่งแต่ละรายการ แต่จะทำงานเป็นบิตแมปเมื่อใช้การเปลี่ยนรูปแบบ เช่น การปรับขนาดหรือการหมุน
การแปลงโฉม
Modifier.graphicsLayer ให้การแยกสำหรับคำสั่งการวาด เช่น สามารถใช้การเปลี่ยนรูปแบบต่างๆ โดยใช้ Modifier.graphicsLayer ซึ่งสามารถเคลื่อนไหวหรือแก้ไขได้โดยไม่ต้องเรียกใช้ Lambda การวาดซ้ำ
Modifier.graphicsLayer ไม่ได้เปลี่ยนขนาดหรือตำแหน่งที่วัดได้ของ Composable เนื่องจากมีผลกับระยะการวาดเท่านั้น ซึ่งหมายความว่า Composable อาจทับซ้อนกับรายการอื่นๆ หากวาดนอกขอบเขตเลย์เอาต์
คุณใช้การเปลี่ยนรูปแบบต่อไปนี้กับตัวแก้ไขนี้ได้
ปรับขนาด - เพิ่มขนาด
scaleX และ scaleY จะขยายหรือย่อเนื้อหาในแนวนอนหรือแนวตั้งตามลำดับ ค่า 1.0f หมายถึงไม่มีการเปลี่ยนแปลงขนาด ค่า 0.5f หมายถึงครึ่งหนึ่งของมิติข้อมูล
Image( painter = painterResource(id = R.drawable.sunset), contentDescription = "Sunset", modifier = Modifier .graphicsLayer { this.scaleX = 1.2f this.scaleY = 0.8f } )
Translation
translationX และ translationY สามารถเปลี่ยนได้ด้วย graphicsLayer
translationX จะย้าย Composable ไปทางซ้ายหรือขวา translationY จะย้าย Composable ขึ้นหรือลง
Image( painter = painterResource(id = R.drawable.sunset), contentDescription = "Sunset", modifier = Modifier .graphicsLayer { this.translationX = 100.dp.toPx() this.translationY = 10.dp.toPx() } )
การหมุน
ตั้งค่า rotationX เพื่อหมุนในแนวนอน rotationY เพื่อหมุนในแนวตั้ง และ rotationZ เพื่อหมุนบนแกน Z (การหมุนมาตรฐาน) ค่านี้ระบุเป็นองศา (0-360)
Image( painter = painterResource(id = R.drawable.sunset), contentDescription = "Sunset", modifier = Modifier .graphicsLayer { this.rotationX = 90f this.rotationY = 275f this.rotationZ = 180f } )
ต้นทาง
ระบุ transformOrigin ได้ จากนั้นระบบจะใช้จุดนี้เป็นจุดที่เกิดการเปลี่ยนรูปแบบ ตัวอย่างทั้งหมดที่ผ่านมาใช้ TransformOrigin.Center ซึ่งอยู่ที่ (0.5f, 0.5f) หากคุณระบุต้นทางที่ (0f, 0f) การเปลี่ยนรูปแบบจะเริ่มจากมุมซ้ายบนของ Composable
หากเปลี่ยนจุดเริ่มต้นด้วยการเปลี่ยนรูปแบบ rotationZ คุณจะเห็นว่ารายการหมุนรอบด้านซ้ายบนของ Composable ดังนี้
Image( painter = painterResource(id = R.drawable.sunset), contentDescription = "Sunset", modifier = Modifier .graphicsLayer { this.transformOrigin = TransformOrigin(0f, 0f) this.rotationX = 90f this.rotationY = 275f this.rotationZ = 180f } )
คลิปและรูปร่าง
รูปร่างจะระบุโครงร่างที่เนื้อหาจะถูกตัดเมื่อ clip = true ในตัวอย่างนี้ เราตั้งค่ากล่อง 2 กล่องให้มีคลิปที่แตกต่างกัน 2 คลิป โดยคลิปหนึ่งใช้ตัวแปรคลิป graphicsLayer และอีกคลิปใช้ Wrapper Modifier.clip ที่สะดวก
Column(modifier = Modifier.padding(16.dp)) { Box( modifier = Modifier .size(200.dp) .graphicsLayer { clip = true shape = CircleShape } .background(Color(0xFFF06292)) ) { Text( "Hello Compose", style = TextStyle(color = Color.Black, fontSize = 46.sp), modifier = Modifier.align(Alignment.Center) ) } Box( modifier = Modifier .size(200.dp) .clip(CircleShape) .background(Color(0xFF4DB6AC)) ) }
เนื้อหาของกล่องแรก (ข้อความที่ระบุว่า "Hello Compose") จะถูกตัดเป็นรูปวงกลม

หากคุณใช้ translationY กับวงกลมสีชมพูด้านบน คุณจะเห็นว่าขอบเขตของ Composable ยังคงเหมือนเดิม แต่วงกลมจะวาดอยู่ใต้วงกลมด้านล่าง (และอยู่นอกขอบเขต)

หากต้องการคลิป Composable ไปยังขอบเขตที่วาดไว้ คุณสามารถเพิ่ม Modifier.clip(RectangleShape) อีกรายการที่จุดเริ่มต้นของเชนตัวแก้ไข จากนั้นเนื้อหาจะยังคงอยู่ภายในขอบเขตเดิม
Column(modifier = Modifier.padding(16.dp)) { Box( modifier = Modifier .clip(RectangleShape) .size(200.dp) .border(2.dp, Color.Black) .graphicsLayer { clip = true shape = CircleShape translationY = 50.dp.toPx() } .background(Color(0xFFF06292)) ) { Text( "Hello Compose", style = TextStyle(color = Color.Black, fontSize = 46.sp), modifier = Modifier.align(Alignment.Center) ) } Box( modifier = Modifier .size(200.dp) .clip(RoundedCornerShape(500.dp)) .background(Color(0xFF4DB6AC)) ) }

อัลฟ่า
คุณใช้ Modifier.graphicsLayer เพื่อตั้งค่า alpha (ความทึบแสง) สำหรับทั้งเลเยอร์ได้ 1.0f คือทึบแสงทั้งหมด และ 0.0f คือมองไม่เห็น
Image( painter = painterResource(id = R.drawable.sunset), contentDescription = "clock", modifier = Modifier .graphicsLayer { this.alpha = 0.5f } )

กลยุทธ์การจัดองค์ประกอบ
การทำงานกับอัลฟ่าและความโปร่งใสไม่ได้ตรงไปตรงมาเหมือนกับการเปลี่ยนค่าอัลฟ่าค่าเดียวเสมอไป นอกจากการเปลี่ยนอัลฟาแล้ว ยังมีตัวเลือกในการตั้งค่า CompositingStrategy ใน graphicsLayer ด้วย CompositingStrategy จะกำหนดวิธีจัดองค์ประกอบ (รวมเข้าด้วยกัน) ของเนื้อหาของ Composable กับเนื้อหาอื่นๆ ที่วาดบนหน้าจอแล้ว
กลยุทธ์ต่างๆ มีดังนี้
อัตโนมัติ (ค่าเริ่มต้น)
กลยุทธ์การจัดองค์ประกอบจะกำหนดโดยพารามิเตอร์ graphicsLayer ที่เหลือ โดยจะแสดงผลเลเยอร์เป็นบัฟเฟอร์นอกหน้าจอหากอัลฟ่าน้อยกว่า 1.0f หรือมีการตั้งค่า RenderEffect เมื่อใดก็ตามที่อัลฟ่าน้อยกว่า 1f ระบบจะสร้างเลเยอร์การจัดองค์ประกอบโดยอัตโนมัติเพื่อแสดงผลเนื้อหา แล้ววาดบัฟเฟอร์นอกหน้าจอนี้ไปยังปลายทางด้วยอัลฟ่าที่เกี่ยวข้อง การตั้งค่า RenderEffect หรือการเลื่อนเกินจะแสดงผลเนื้อหาในบัฟเฟอร์นอกหน้าจอเสมอ ไม่ว่าจะตั้งค่า CompositingStrategy ไว้เป็นค่าใดก็ตาม
นอกหน้าจอ
เนื้อหาของ Composable จะได้รับการแรสเตอร์เป็นพื้นผิวหรือบิตแมปนอกหน้าจอเสมอก่อนที่จะแสดงผลไปยังปลายทาง ซึ่งมีประโยชน์สำหรับการใช้การดำเนินการ BlendMode เพื่อมาสก์เนื้อหา และเพื่อประสิทธิภาพเมื่อแสดงผลชุดคำสั่งการวาดที่ซับซ้อน
ตัวอย่างการใช้ CompositingStrategy.Offscreen คือใช้กับ BlendModes
ในตัวอย่างต่อไปนี้ สมมติว่าคุณต้องการนำบางส่วนของ Image
composable ออกโดยใช้คำสั่งวาดที่ใช้ BlendMode.Clear หากคุณไม่ได้ตั้งค่า compositingStrategy เป็น CompositingStrategy.Offscreen BlendMode จะโต้ตอบกับเนื้อหาพื้นหลังทั้งหมด
Image( painter = painterResource(id = R.drawable.dog), contentDescription = "Dog", contentScale = ContentScale.Crop, modifier = Modifier .size(120.dp) .aspectRatio(1f) .background( Brush.linearGradient( listOf( Color(0xFFC5E1A5), Color(0xFF80DEEA) ) ) ) .padding(8.dp) .graphicsLayer { compositingStrategy = CompositingStrategy.Offscreen } .drawWithCache { val path = Path() path.addOval( Rect( topLeft = Offset.Zero, bottomRight = Offset(size.width, size.height) ) ) onDrawWithContent { clipPath(path) { // this draws the actual image - if you don't call drawContent, it wont // render anything this@onDrawWithContent.drawContent() } val dotSize = size.width / 8f // Clip a white border for the content drawCircle( Color.Black, radius = dotSize, center = Offset( x = size.width - dotSize, y = size.height - dotSize ), blendMode = BlendMode.Clear ) // draw the red circle indication drawCircle( Color(0xFFEF5350), radius = dotSize * 0.8f, center = Offset( x = size.width - dotSize, y = size.height - dotSize ) ) } } )
การตั้งค่า CompositingStrategy เป็น Offscreen จะสร้างพื้นผิวนอกหน้าจอเพื่อเรียกใช้คำสั่ง (ใช้ BlendMode กับเนื้อหาของ Composable นี้เท่านั้น) จากนั้นจะแสดงผลที่ด้านบนของสิ่งที่แสดงผลบนหน้าจออยู่แล้ว โดยไม่ส่งผลต่อเนื้อหาที่วาดไว้แล้ว

หากคุณไม่ได้ใช้ CompositingStrategy.Offscreen ผลลัพธ์ของการใช้ BlendMode.Clear จะล้างพิกเซลทั้งหมดในปลายทาง ไม่ว่าจะตั้งค่าอะไรไว้ก็ตาม โดยจะปล่อยให้บัฟเฟอร์การแสดงผลของหน้าต่าง (สีดำ) ปรากฏอยู่ BlendModes หลายรายการที่เกี่ยวข้องกับอัลฟ่าจะไม่ทำงานตามที่คาดไว้หากไม่มีบัฟเฟอร์นอกหน้าจอ โปรดสังเกตวงแหวนสีดำรอบสัญญาณบอกสถานะวงกลมสีแดง

เพื่อให้เข้าใจเรื่องนี้มากขึ้น หากแอปมีพื้นหลังหน้าต่างโปร่งแสงและคุณไม่ได้ใช้ CompositingStrategy.Offscreen BlendMode จะโต้ตอบกับทั้งแอป โดยจะล้างพิกเซลทั้งหมดเพื่อแสดงแอปหรือวอลเปเปอร์ที่อยู่ด้านล่าง ดังตัวอย่างนี้
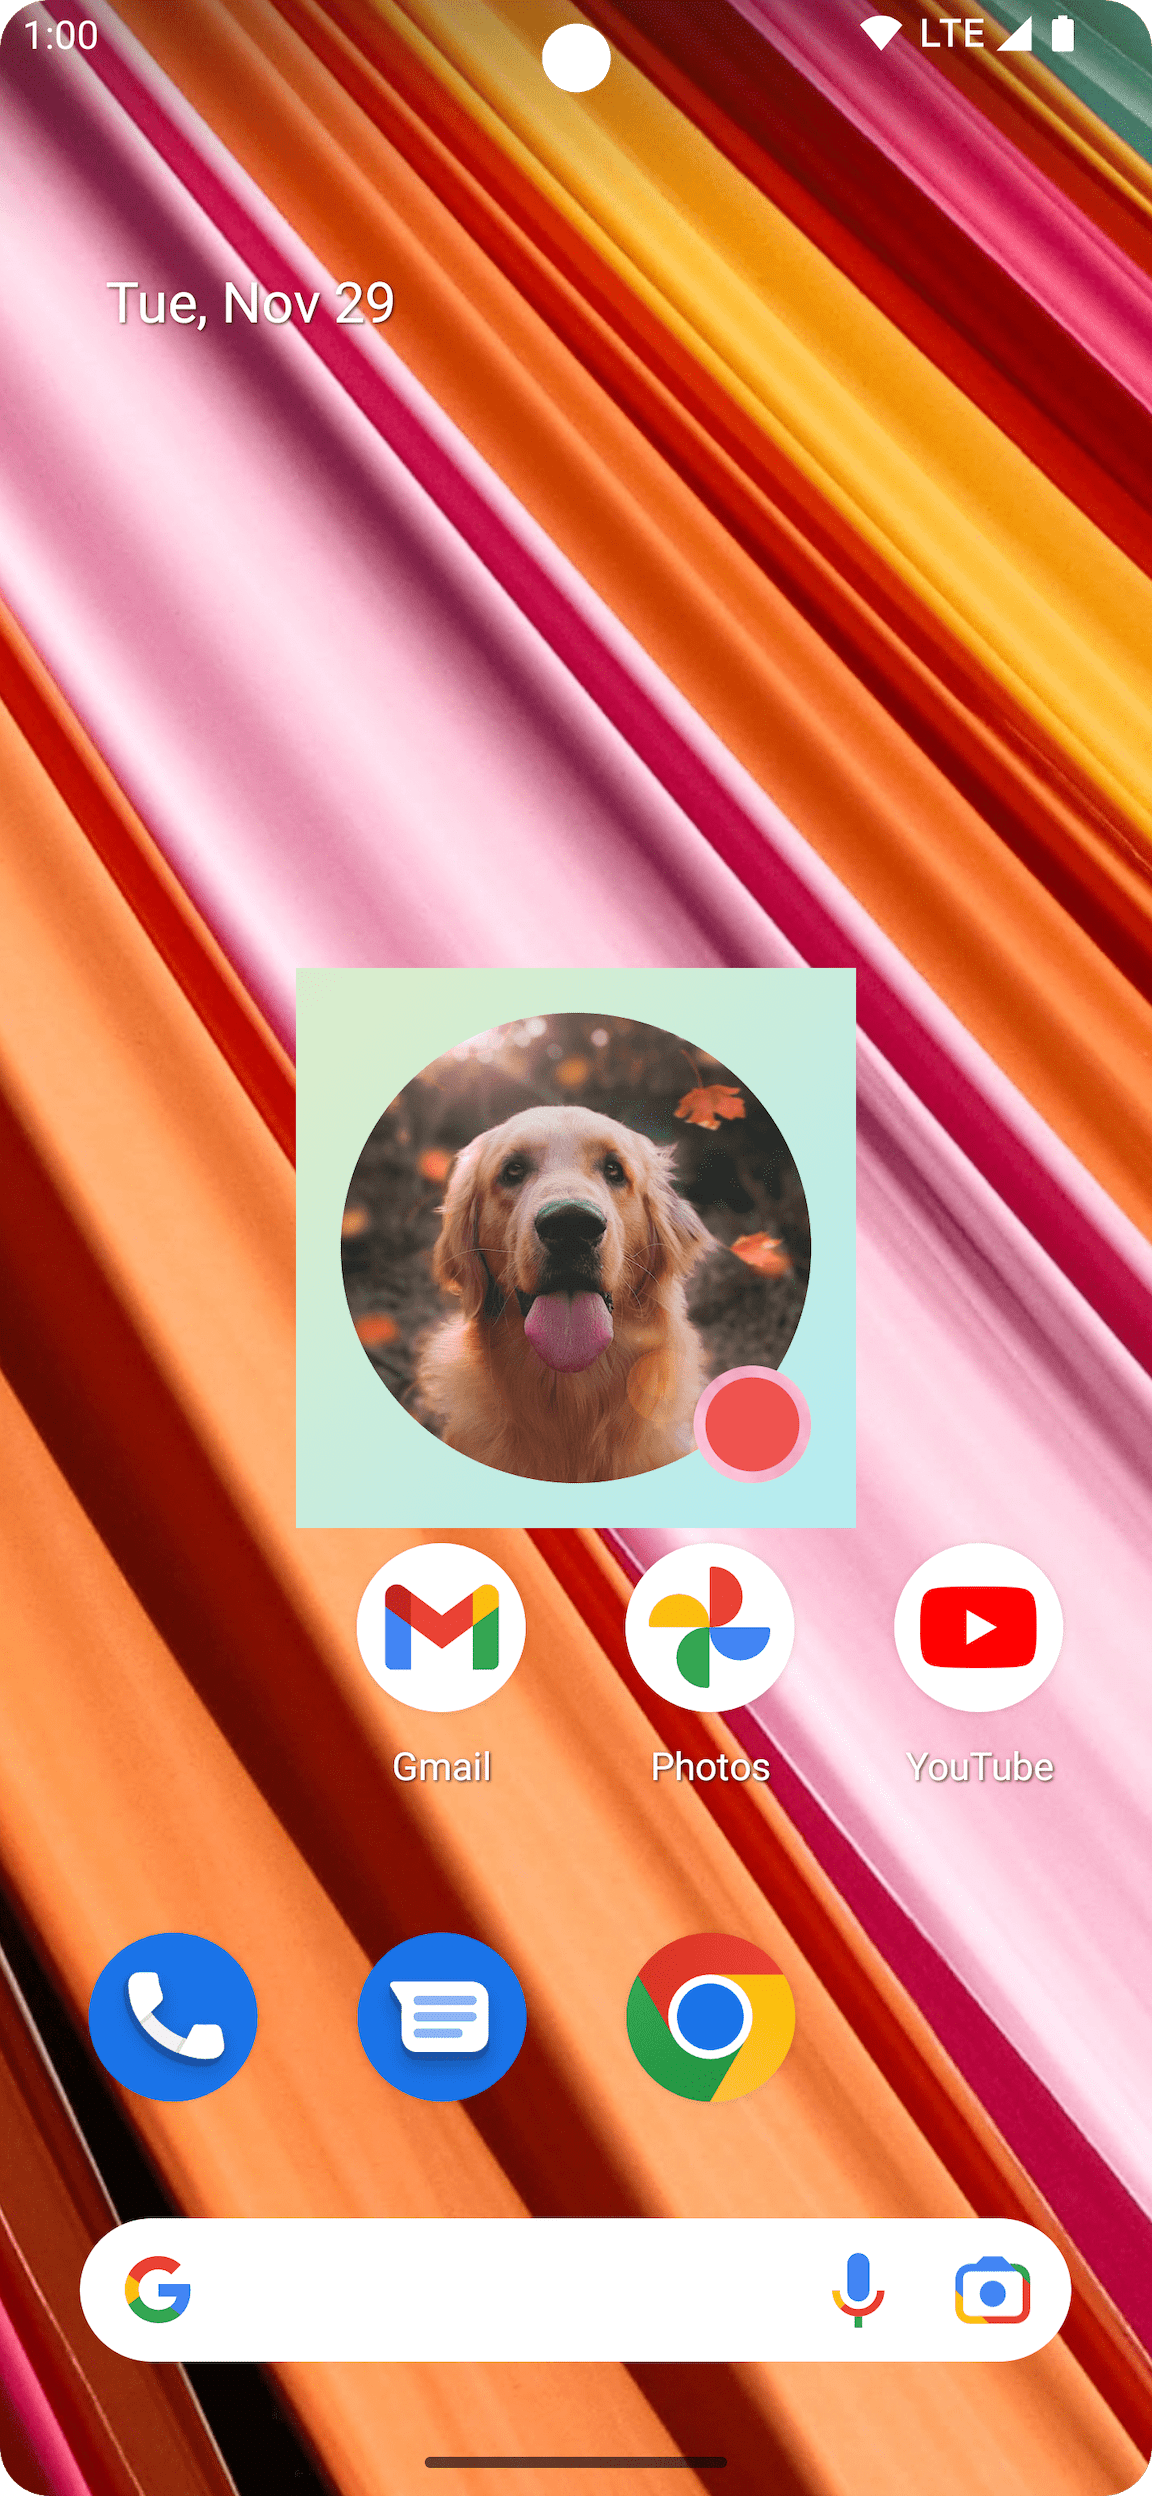
โปรดทราบว่าเมื่อใช้ CompositingStrategy.Offscreen ระบบจะสร้างพื้นผิวนอกหน้าจอที่มีขนาดเท่ากับพื้นที่วาดภาพและแสดงผลกลับบนหน้าจอ คำสั่งการวาดใดๆ ที่ดำเนินการด้วยกลยุทธ์นี้จะถูกตัดออกไปยังขอบเขตนี้โดยค่าเริ่มต้น ข้อมูลโค้ดต่อไปนี้แสดงความแตกต่างเมื่อเปลี่ยนไปใช้พื้นผิวนอกหน้าจอ
@Composable fun CompositingStrategyExamples() { Column( modifier = Modifier .fillMaxSize() .wrapContentSize(Alignment.Center) ) { // Does not clip content even with a graphics layer usage here. By default, graphicsLayer // does not allocate + rasterize content into a separate layer but instead is used // for isolation. That is draw invalidations made outside of this graphicsLayer will not // re-record the drawing instructions in this composable as they have not changed Canvas( modifier = Modifier .graphicsLayer() .size(100.dp) // Note size of 100 dp here .border(2.dp, color = Color.Blue) ) { // ... and drawing a size of 200 dp here outside the bounds drawRect(color = Color.Magenta, size = Size(200.dp.toPx(), 200.dp.toPx())) } Spacer(modifier = Modifier.size(300.dp)) /* Clips content as alpha usage here creates an offscreen buffer to rasterize content into first then draws to the original destination */ Canvas( modifier = Modifier // force to an offscreen buffer .graphicsLayer(compositingStrategy = CompositingStrategy.Offscreen) .size(100.dp) // Note size of 100 dp here .border(2.dp, color = Color.Blue) ) { /* ... and drawing a size of 200 dp. However, because of the CompositingStrategy.Offscreen usage above, the content gets clipped */ drawRect(color = Color.Red, size = Size(200.dp.toPx(), 200.dp.toPx())) } } }

ModulateAlpha
กลยุทธ์การจัดองค์ประกอบนี้จะปรับอัลฟาสำหรับคำสั่งการวาดแต่ละรายการที่บันทึกไว้ภายใน graphicsLayer โดยจะไม่สร้างบัฟเฟอร์นอกหน้าจอสำหรับอัลฟ่าที่น้อยกว่า 1.0f เว้นแต่จะมีการตั้งค่า RenderEffect เพื่อให้การแสดงผลอัลฟ่ามีประสิทธิภาพมากขึ้น อย่างไรก็ตาม อาจให้ผลลัพธ์ที่แตกต่างกันสำหรับเนื้อหาที่ทับซ้อนกัน สำหรับกรณีการใช้งานที่ทราบล่วงหน้าว่าเนื้อหาไม่ทับซ้อนกัน วิธีนี้จะให้ประสิทธิภาพที่ดีกว่า CompositingStrategy.Auto ที่มีค่าอัลฟ่าน้อยกว่า 1
ตัวอย่างต่อไปนี้แสดงกลยุทธ์การจัดองค์ประกอบที่แตกต่างกัน โดยใช้ค่าอัลฟาที่แตกต่างกันกับส่วนต่างๆ ของ Composable และใช้กลยุทธ์ Modulate
@Preview @Composable fun CompositingStrategy_ModulateAlpha() { Column( modifier = Modifier .fillMaxSize() .padding(32.dp) ) { // Base drawing, no alpha applied Canvas( modifier = Modifier.size(200.dp) ) { drawSquares() } Spacer(modifier = Modifier.size(36.dp)) // Alpha 0.5f applied to whole composable Canvas( modifier = Modifier .size(200.dp) .graphicsLayer { alpha = 0.5f } ) { drawSquares() } Spacer(modifier = Modifier.size(36.dp)) // 0.75f alpha applied to each draw call when using ModulateAlpha Canvas( modifier = Modifier .size(200.dp) .graphicsLayer { compositingStrategy = CompositingStrategy.ModulateAlpha alpha = 0.75f } ) { drawSquares() } } } private fun DrawScope.drawSquares() { val size = Size(100.dp.toPx(), 100.dp.toPx()) drawRect(color = Red, size = size) drawRect( color = Purple, size = size, topLeft = Offset(size.width / 4f, size.height / 4f) ) drawRect( color = Yellow, size = size, topLeft = Offset(size.width / 4f * 2f, size.height / 4f * 2f) ) } @Preview @Composable fun ModifierGraphicsLayerOutsets() { Column( modifier = Modifier .background(Color(0xFF0A0E14)) .padding(48.dp), verticalArrangement = Arrangement.spacedBy(48.dp), horizontalAlignment = Alignment.CenterHorizontally ) { val pillShape = RoundedCornerShape(percent = 50) // Without outsets: alpha = 0.5f creates an offscreen buffer that clips the 24.dp glow Box( modifier = Modifier .size( width = 140.dp, height = 56.dp ) .graphicsLayer( alpha = 0.5f, clip = false ) .dropShadow( shape = pillShape, shadow = Shadow(radius = 24.dp, color = Color.Cyan) ) .background(color = Color(0xFF141824), shape = pillShape), contentAlignment = Alignment.Center ) { Text( text = "✨ Glow", color = Color.White, fontSize = 18.sp ) } Box( modifier = Modifier .size( width = 140.dp, height = 56.dp ) .graphicsLayer( alpha = 0.5f, outsets = LayerOutsets(24.dp), clip = false ) .dropShadow( shape = pillShape, shadow = Shadow(radius = 24.dp, color = Color.Cyan) ) .background(color = Color(0xFF141824), shape = pillShape), contentAlignment = Alignment.Center ) { Text( text = "✨ Glow", color = Color.White, fontSize = 18.sp ) } } } val Purple = Color(0xFF7E57C2) val Yellow = Color(0xFFFFCA28) val Red = Color(0xFFEF5350)

ส่วนที่ยื่นออกมาของเลเยอร์
เมื่อวาด Composable ลงในบัฟเฟอร์นอกหน้าจอ (เช่น เมื่อ alpha น้อยกว่า 1.0f, มีการตั้งค่า RenderEffect หรือใช้ CompositingStrategy.Offscreen) พื้นผิวนอกหน้าจอจะใช้ขอบเขตเลย์เอาต์ที่วัดได้ของ Composable เป็นค่าเริ่มต้น ภาพวาดหรือเงาภายในเลเยอร์ที่ขยายออกนอกขอบเขตเลย์เอาต์ของ Composable (เช่น แสงเรืองภายนอกที่วาดด้วย Modifier.dropShadow) จะถูกตัดออกโดยนัยที่ขอบเขตของบัฟเฟอร์นอกหน้าจอ
แทนที่จะเพิ่ม Modifier.padding() (ซึ่งจะเปลี่ยนการวัดเลย์เอาต์ขององค์ประกอบ UI ที่อยู่ติดกัน) ให้ส่ง LayerOutsets ไปยังพารามิเตอร์ outsets ของ Modifier.graphicsLayer ซึ่งจะขยายขอบเขตภาพของบัฟเฟอร์นอกหน้าจอในแต่ละด้านโดยไม่เปลี่ยนแปลงขนาดเลย์เอาต์ที่วัดได้ของ Composable โปรดทราบว่า
LayerOutsets ไม่ได้ขยายรูปร่างคลิปหรือขอบเขตเงาของเลเยอร์ ซึ่ง
ยังคงอิงตามขนาดที่วัดได้เดิมของ Composable (ดังนั้นให้เก็บ clip = false
ไว้ใน graphicsLayer เพื่อหลีกเลี่ยงการตัดคลิปตามขอบเขตเดิม)
Box( modifier = Modifier .size( width = 140.dp, height = 56.dp ) .graphicsLayer( alpha = 0.5f, outsets = LayerOutsets(24.dp), clip = false ) .dropShadow( shape = pillShape, shadow = Shadow(radius = 24.dp, color = Color.Cyan) ) .background(color = Color(0xFF141824), shape = pillShape), contentAlignment = Alignment.Center ) { Text( text = "✨ Glow", color = Color.White, fontSize = 18.sp ) }

LayerOutsets (ด้านบน ถูกตัดที่ขอบเขตเลย์เอาต์สี่เหลี่ยมผืนผ้าของ Composable) เทียบกับที่มี LayerOutsets(24.dp) (ด้านล่าง ไม่ถูกตัด)เขียนเนื้อหาของ Composable ลงในบิตแมป
Use Case ทั่วไปคือการสร้าง Bitmap จาก Composable หากต้องการคัดลอกเนื้อหาของ Composable ไปยัง Bitmap ให้สร้าง GraphicsLayer โดยใช้ rememberGraphicsLayer()
เปลี่ยนเส้นทางคำสั่งการวาดไปยังเลเยอร์ใหม่โดยใช้ drawWithContent() และ graphicsLayer.record{} จากนั้นวาดเลเยอร์ใน Canvas ที่มองเห็นได้โดยใช้ drawLayer:
val coroutineScope = rememberCoroutineScope() val graphicsLayer = rememberGraphicsLayer() Box( modifier = Modifier .drawWithContent { // call record to capture the content in the graphics layer graphicsLayer.record { // draw the contents of the composable into the graphics layer this@drawWithContent.drawContent() } // draw the graphics layer on the visible canvas drawLayer(graphicsLayer) } .clickable { coroutineScope.launch { val bitmap = graphicsLayer.toImageBitmap() // do something with the newly acquired bitmap } } .background(Color.White) ) { Text("Hello Android", fontSize = 26.sp) }
คุณสามารถบันทึกบิตแมปลงในดิสก์และแชร์ได้ ดูรายละเอียดเพิ่มเติมได้ที่ข้อมูลโค้ดตัวอย่างแบบเต็ม โปรดตรวจสอบสิทธิ์ในอุปกรณ์ก่อนพยายามบันทึกลงในดิสก์
ตัวปรับแต่งการวาดที่กำหนดเอง
หากต้องการสร้างตัวแก้ไขที่กำหนดเอง ให้ใช้อินเทอร์เฟซ DrawModifier ซึ่งจะช่วยให้คุณเข้าถึง ContentDrawScope ซึ่งเหมือนกับสิ่งที่แสดงเมื่อใช้ Modifier.drawWithContent() จากนั้นคุณสามารถแยกการดำเนินการวาดทั่วไปไปยังตัวแก้ไขการวาดที่กำหนดเองเพื่อล้างโค้ดและจัดเตรียม Wrapper ที่สะดวก เช่น Modifier.background() เป็น DrawModifier ที่สะดวก
ตัวอย่างเช่น หากต้องการใช้ Modifier ที่พลิกเนื้อหาในแนวตั้ง คุณสามารถสร้างได้ดังนี้
class FlippedModifier : DrawModifier { override fun ContentDrawScope.draw() { scale(1f, -1f) { this@draw.drawContent() } } } fun Modifier.flipped() = this.then(FlippedModifier())
จากนั้นใช้ตัวแก้ไขที่พลิกกลับนี้กับ Text:
Text( "Hello Compose!", modifier = Modifier .flipped() )

แหล่งข้อมูลเพิ่มเติม
ดูตัวอย่างเพิ่มเติมเกี่ยวกับการใช้ graphicsLayer และการวาดภาพที่กำหนดเองได้จากแหล่งข้อมูลต่อไปนี้
แนะนำสำหรับคุณ
- หมายเหตุ: ข้อความลิงก์จะแสดงเมื่อ JavaScript ปิดอยู่
- กราฟิกใน Compose
- ปรับแต่งรูปภาพ {:#customize-image}
- Kotlin สำหรับ Jetpack Compose