
自适应图标(即 AdaptiveIconDrawable)会根据各个设备的功能和用户设置的主题显示不同效果,自适应图标主要用于主屏幕启动器,但也可以用于快捷方式、“设置”应用、分享对话框和概览屏幕。自适应图标适用于所有 Android 设备规格。
与位图图像不同,自适应图标可以适应不同的使用情形:
不同形状:自适应图标可在不同型号的设备上显示各种形状。例如,在一台原始设备制造商 (OEM) 设备上,自适应启动器图标可显示为圆形,而在其他设备上则可显示为方圆形(介于方形和圆形之间的形状)。每个设备的 OEM 必须提供一个蒙版,系统使用该蒙版渲染所有具有相同形状的自适应图标。

图 1. 自适应图标支持各种蒙版,这些蒙版因设备而异。 视觉效果:自适应图标支持多种富有吸引力的视觉效果,当用户在主屏幕上放置或移动图标时,就会看到这些效果。

图 2. 自适应图标显示的视觉效果示例。 用户主题化:从 Android 13(API 级别 33)开始,用户可以为自适应图标设置主题。如果用户在系统设置中启用了带主题的应用图标,且启动器支持此功能,那么系统会根据用户选择的壁纸和主题的配色来调整具有自适应图标中包含
monochrome图层的应用的图标的色调。从 Android 16 QPR 2 开始,Android 会自动为未提供自有主题的应用设置应用图标主题。
图 3. 从用户壁纸和主题继承的自适应图标。 在以下情况下,主屏幕不会显示带主题的应用图标,而是显示自适应或标准应用图标:
- 如果用户未启用带主题的应用图标。
- 如果您的应用不提供单色应用图标,并且用户设备搭载的 Android 版本低于 Android 16 QPR 2。
- 如果启动器不支持带主题的应用图标。
设计自适应图标
如要确保您的自适应图标支持不同形状、视觉效果和用户主题设置,则设计必须满足以下要求:
您必须针对图标的彩色版本提供两个图层,分别用于前景和背景。图层可以是矢量图层,也可以是位图图层,但最好是矢量图层。
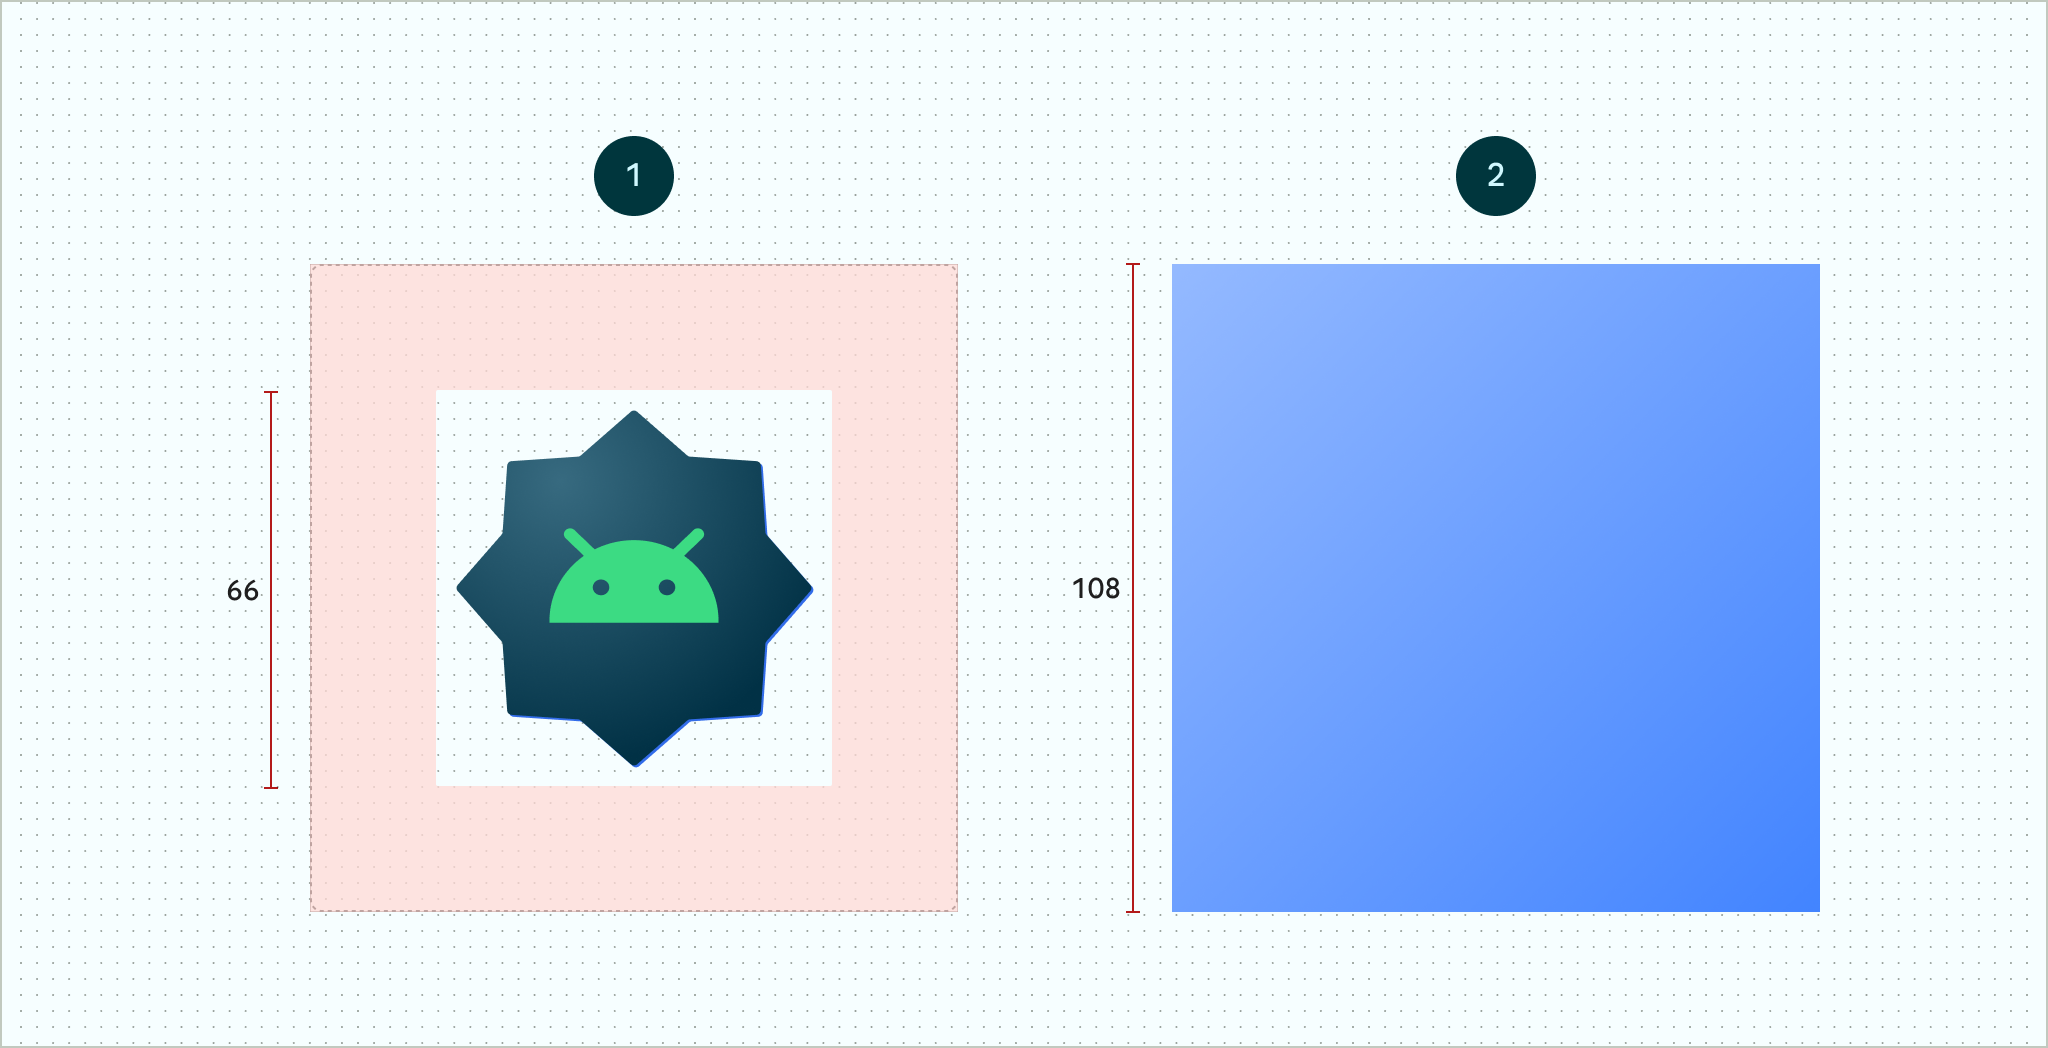
图 4.使用前景和背景图层定义的自适应图标。图中所示的 66x66 安全区是永远不会被 OEM 设定的形状蒙版裁剪掉的区域。 
图 5.应用圆形遮罩后,前景图层和背景图层组合在一起的效果示例。 如果您想让应用图标支持用户主题设置,请为图标的单色版本提供一个图层。

图 6.单色图标层(左侧)以及颜色预览示例(右侧)。 将所有图层的大小调整为 108x108 dp。
使用边缘清晰的图标。图层不得使用图标轮廓周围的蒙版或背景阴影。
使用不低于 48x48 dp 的徽标。它不得超过 66x66 dp,因为已屏蔽的视口中显示的图标的内层为 66x66 dp。
图层四面中每一面的外层 18 dp 会预留用于遮盖,并创建视差或脉动等视觉效果。
如需了解如何使用 Android Studio 创建自适应图标,请参阅 Android 应用图标 Figma 模板或有关创建启动器图标的 Android Studio 文档。另请参阅博文设计自适应图标。
将自适应图标添加到应用中
与非自适应图标一样,自适应图标使用应用清单中的 android:icon 属性指定。
启动器使用可选属性 android:roundIcon 来表示具有圆形图标的应用,如果应用的图标包含圆形背景作为其设计的主要部分,则此属性可能很有用。此类启动器必须通过向 android:roundIcon 应用圆形蒙版来生成应用图标,而此保证可让您优化应用图标的外观,例如略微放大徽标,并确保在裁剪时,圆形背景完全出血。
以下代码段演示了这两种属性,但大多数应用仅指定 android:icon:
<application
    ...
    android:icon="@mipmap/ic_launcher"
    android:roundIcon="@mipmap/ic_launcher_round"
    ...>
</application>
接下来,将自适应图标保存到 res/mipmap-anydpi-v26/ic_launcher.xml。使用 <adaptive-icon> 元素为图标定义前景、背景和单色图层资源。<foreground>、<background> 和 <monochrome> 内部元素同时支持矢量图片和位图图片。
以下示例展示了如何在 <adaptive-icon> 内定义 <foreground>、<background> 和 <monochrome> 元素:
<?xml version="1.0" encoding="utf-8"?>
...
<adaptive-icon xmlns:android="http://schemas.android.com/apk/res/android">
    <background android:drawable="@drawable/ic_launcher_background" />
    <foreground android:drawable="@drawable/ic_launcher_foreground" />
    <monochrome android:drawable="@drawable/ic_launcher_foreground" />
</adaptive-icon>
...
前台层和单色层使用的是同一可绘制对象。不过,您可以根据需要为每个层创建单独的可绘制对象。
您还可以通过将可绘制对象内嵌到 <foreground>、<background> 和 <monochrome> 元素中,将可绘制对象定义为元素。以下代码段展示了如何使用前台可绘制对象执行此操作。
<?xml version="1.0" encoding="utf-8"?>
...
<foreground>
   <inset
       android:insetBottom="18dp"
       android:insetLeft="18dp"
       android:insetRight="18dp"
       android:insetTop="18dp">
       <shape android:shape="oval">
           <solid android:color="#0000FF" />
       </shape>
   </inset>
</foreground>
...
如果您要将相同的蒙版和视觉效果应用于常规自适应图标的快捷方式,请使用以下技术之一:
- 对于静态快捷方式,请使用
<adaptive-icon>元素。 - 对于动态快捷方式,请在创建它们时调用
createWithAdaptiveBitmap()方法。
如需详细了解如何实现自适应图标,请参阅实现自适应图标。 如需详细了解快捷方式,请参阅应用快捷方式概览。
其他资源
如需详细了解如何设计和实现自适应图标,请参阅以下资源。