
「Dagger 基本概念」頁面說明了 Dagger 如何協助您在應用程式中自動插入依附元件。有了 Dagger,您就無須編寫繁瑣且容易出錯的樣板程式碼。
最佳做法摘要
- 盡可能透過
@Inject使用建構函式的插入功能,在 Dagger 圖形中新增類型。如果不方便的話,請執行以下操作:- 使用
@Binds告知 Dagger 介面應採用哪些實作方法。 - 使用
@Provides向 Dagger 說明如何提供專案所沒有的類別。
- 使用
- 您只能在每個元件中宣告一次模組。
- 根據使用該註解的生命週期,為範圍註解命名,例如
@ApplicationScope、@LoggedUserScope和@ActivityScope。
新增依附元件
如要在專案中使用 Dagger,請對 build.gradle 檔案中的應用程式新增以下依附元件。您可以在這個 GitHub 專案中找到最新版本的 Dagger。
Kotlin
plugins {
  id 'kotlin-kapt'
}

dependencies {
    implementation 'com.google.dagger:dagger:2.x'
    kapt 'com.google.dagger:dagger-compiler:2.x'
}
Java
dependencies {
    implementation 'com.google.dagger:dagger:2.x'
    annotationProcessor 'com.google.dagger:dagger-compiler:2.x'
}
Android 中的 Dagger
假設有一個 Android 的範例應用程式,其中的依附元件關係如圖 1 所示。
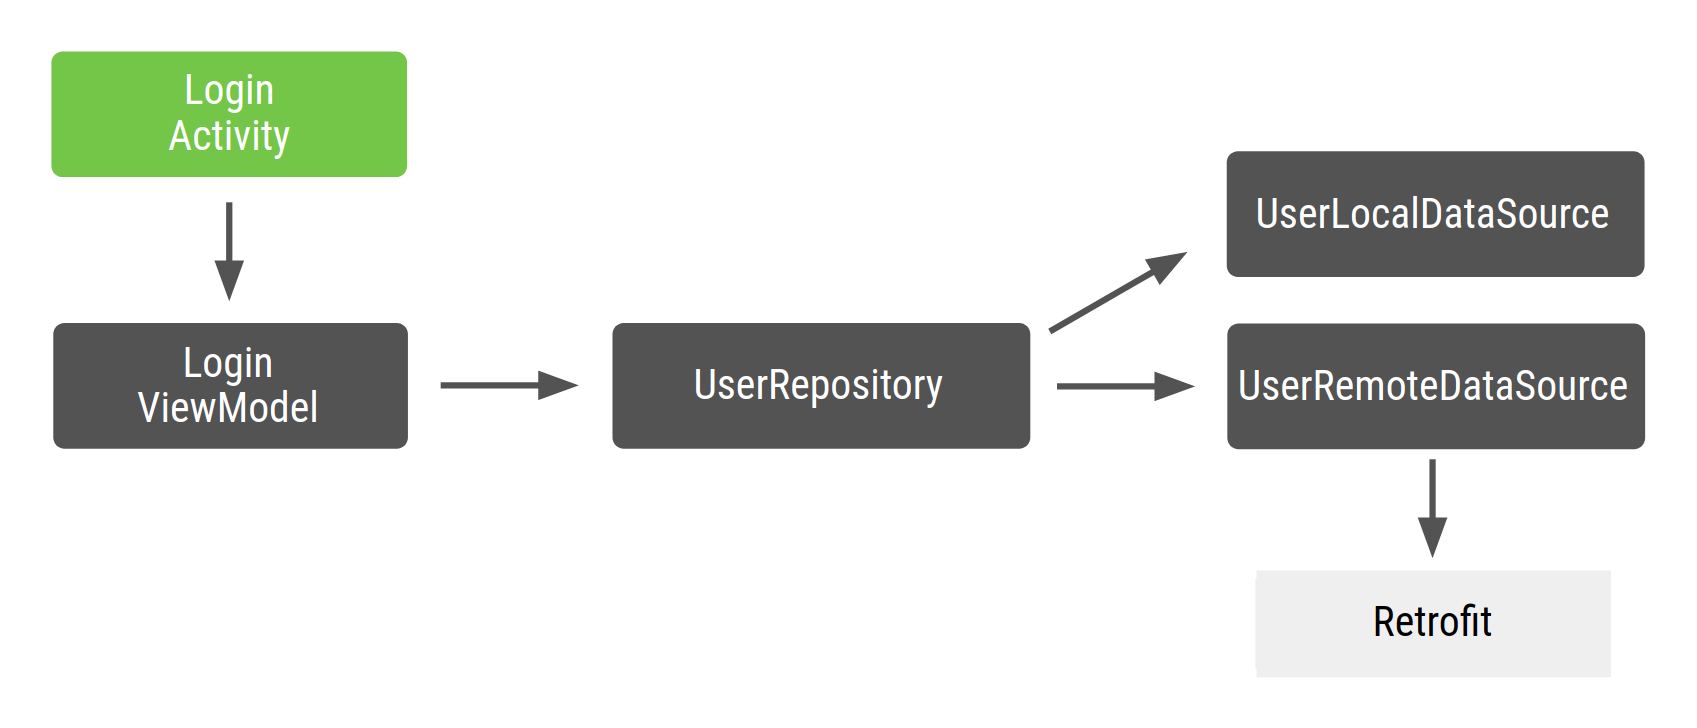
圖 1 範例程式碼的依附元件圖
在 Android 中,您通常會建立一個位於應用程式類別中的 Dagger 圖,因為您希望只要應用程式處於執行狀態時,該圖的例項就要位於記憶體中。這樣一來,這個圖表就會連結至應用程式生命週期。而在某些情況下,您可能也會希望在圖中提供應用程式結構定義。為此,您需將圖表一併置於 Application 類別中。這種做法的優點之一,是該圖可供其他 Android 架構類別使用。此外,這也可以讓您在測試中使用自訂的 Application 類別,藉此簡化測試作業。
由於產生圖表的介面已加上 @Component 註解,因此您可以將其稱為 ApplicationComponent 或 ApplicationGraph。一般來說,您會將該元件的例項保留在自訂的 Application 類別中,並在每次需要應用程式圖表時呼叫這個例項,如以下程式碼片段所示:
Kotlin
// Definition of the Application graph
@Component
interface ApplicationComponent { ... }

// appComponent lives in the Application class to share its lifecycle
class MyApplication: Application() {
    // Reference to the application graph that is used across the whole app
    val appComponent = DaggerApplicationComponent.create()
}
Java
// Definition of the Application graph
@Component
public interface ApplicationComponent {
}

// appComponent lives in the Application class to share its lifecycle
public class MyApplication extends Application {

    // Reference to the application graph that is used across the whole app
    ApplicationComponent appComponent = DaggerApplicationComponent.create();
}
特定 Android 架構類別 (例如活動和片段) 會由系統例項化,因此 Dagger 無法為您建立這些類別。特別是對活動來說,任何初始化程式碼都需放入 onCreate() 方法中。也就是說,您不能像上述範例那樣,在類別的建構函式中使用 @Inject 註解 (建構函式插入功能),而需改用欄位插入。
您需要 Dagger 為您填入活動所需的依附元件,而非在 onCreate() 方法中建立這些依附元件。如要插入欄位,請改為將 @Inject 註解套用至要從 Dagger 圖表取得的欄位。
Kotlin
class LoginActivity: Activity() {
    // You want Dagger to provide an instance of LoginViewModel from the graph
    @Inject lateinit var loginViewModel: LoginViewModel
}
Java
public class LoginActivity extends Activity {

    // You want Dagger to provide an instance of LoginViewModel from the graph
    @Inject
    LoginViewModel loginViewModel;
}
為求簡單,LoginViewModel 不會是 Android 架構元件 ViewModel;而只是做為 ViewModel 的一般類別。如要進一步瞭解如何插入這些類別,請查看程式碼
請參閱官方的 Android Blueprints Dagger 實作,
dev-dagger 分支版本。
Dagger 的其中一個考量點是,插入的欄位無法設為不公開。這些欄位至少須具備私人套件的瀏覽權限,如前面的程式碼所示。
插入活動
Dagger 需得知 LoginActivity 必須存取圖表,才能提供所需的 ViewModel。在「Dagger 基本概念」頁面,您已學過如何依據想從圖表獲取的內容,公開具有相應傳回類型的函數,進而使用 @Component 介面來取得圖表中的物件。在這種情況下,您需要向 Dagger 說明需要插入依附元件的物件 (在本例中為 LoginActivity)。為此,您應公開一個函式,讓函式將要求插入的物件做為參數。
Kotlin
@Component
interface ApplicationComponent {
    // This tells Dagger that LoginActivity requests injection so the graph needs to
    // satisfy all the dependencies of the fields that LoginActivity is requesting.
    fun inject(activity: LoginActivity)
}
Java
@Component
public interface ApplicationComponent {
    // This tells Dagger that LoginActivity requests injection so the graph needs to
    // satisfy all the dependencies of the fields that LoginActivity is injecting.
    void inject(LoginActivity loginActivity);
}
這個函式會向 Dagger 指出,LoginActivity 想要存取圖表並要求插入。Dagger 需滿足 LoginActivity 所需的所有依附元件 (LoginViewModel 具有自己的依附元件)。如果您有多個要求插入的類別,則須在元件中明確宣告這些類別,指出類別的確切類型。舉例來說,如果您擁有要求插入的 LoginActivity 和 RegistrationActivity,您會有兩個 inject() 方法,而不是涵蓋這兩種情況的一般方法。一般的 inject() 方法不會向 Dagger 說明要提供哪些資訊。介面中的函式可以擁有任何名稱,但在接收要做為參數插入的物件時,稱其為 inject() 是 Dagger 的慣例。
如要在活動中插入物件,請使用 Application 類別中定義的 appComponent 並呼叫 inject() 方法,傳入要求插入的活動的例項。
使用活動時,請在呼叫 super.onCreate() 之前,在活動的 onCreate() 方法中插入 Dagger,以免發生片段還原的問題。在 super.onCreate() 的還原階段,活動會附加可能需存取活動繫結的片段。
當您使用片段時,請在片段的 onAttach() 方法中插入 Dagger。在本例中,您可以在呼叫 super.onAttach() 前後執行此操作。
Kotlin
class LoginActivity: Activity() {
    // You want Dagger to provide an instance of LoginViewModel from the graph
    @Inject lateinit var loginViewModel: LoginViewModel

    override fun onCreate(savedInstanceState: Bundle?) {
        // Make Dagger instantiate @Inject fields in LoginActivity
        (applicationContext as MyApplication).appComponent.inject(this)
        // Now loginViewModel is available

        super.onCreate(savedInstanceState)
    }
}

// @Inject tells Dagger how to create instances of LoginViewModel
class LoginViewModel @Inject constructor(
    private val userRepository: UserRepository
) { ... }
Java
public class LoginActivity extends Activity {

    // You want Dagger to provide an instance of LoginViewModel from the graph
    @Inject
    LoginViewModel loginViewModel;

    @Override
    protected void onCreate(Bundle savedInstanceState) {
        // Make Dagger instantiate @Inject fields in LoginActivity
        ((MyApplication) getApplicationContext()).appComponent.inject(this);
        // Now loginViewModel is available

        super.onCreate(savedInstanceState);
    }
}

public class LoginViewModel {

    private final UserRepository userRepository;

    // @Inject tells Dagger how to create instances of LoginViewModel
    @Inject
    public LoginViewModel(UserRepository userRepository) {
        this.userRepository = userRepository;
    }
}
告知 Dagger 如何提供其他依附元件以建立圖表:
Kotlin
class UserRepository @Inject constructor(
    private val localDataSource: UserLocalDataSource,
    private val remoteDataSource: UserRemoteDataSource
) { ... }

class UserLocalDataSource @Inject constructor() { ... }
class UserRemoteDataSource @Inject constructor(
    private val loginService: LoginRetrofitService
) { ... }
Java
public class UserRepository {

    private final UserLocalDataSource userLocalDataSource;
    private final UserRemoteDataSource userRemoteDataSource;

    @Inject
    public UserRepository(UserLocalDataSource userLocalDataSource, UserRemoteDataSource userRemoteDataSource) {
        this.userLocalDataSource = userLocalDataSource;
        this.userRemoteDataSource = userRemoteDataSource;
    }
}

public class UserLocalDataSource {

    @Inject
    public UserLocalDataSource() {}
}

public class UserRemoteDataSource {

    private final LoginRetrofitService loginRetrofitService;

    @Inject
    public UserRemoteDataSource(LoginRetrofitService loginRetrofitService) {
        this.loginRetrofitService = loginRetrofitService;
    }
}
Dagger 模組
在這個範例中,您使用的是 Retrofit 網路程式庫。UserRemoteDataSource 具有 LoginRetrofitService 的依附元件。不過,建立 LoginRetrofitService 例項的方式與您到目前為止所做的並不相同。此方式不是類別例項化;而是呼叫 Retrofit.Builder() 並傳入不同的參數來設定登入服務。
除了 @Inject 註解之外,您還可以透過其他方式告知 Dagger 如何提供類別的例項,也就是 Dagger 模組中的資訊。Dagger 模組是一種加上 @Module 註解的類別。透過此模組,您可以使用 @Provides 註解定義依附元件。
Kotlin
// @Module informs Dagger that this class is a Dagger Module
@Module
class NetworkModule {

    // @Provides tell Dagger how to create instances of the type that this function
    // returns (i.e. LoginRetrofitService).
    // Function parameters are the dependencies of this type.
    @Provides
    fun provideLoginRetrofitService(): LoginRetrofitService {
        // Whenever Dagger needs to provide an instance of type LoginRetrofitService,
        // this code (the one inside the @Provides method) is run.
        return Retrofit.Builder()
                .baseUrl("https://example.com")
                .build()
                .create(LoginService::class.java)
    }
}
Java
// @Module informs Dagger that this class is a Dagger Module
@Module
public class NetworkModule {

    // @Provides tell Dagger how to create instances of the type that this function
    // returns (i.e. LoginRetrofitService).
    // Function parameters are the dependencies of this type.
    @Provides
    public LoginRetrofitService provideLoginRetrofitService() {
        // Whenever Dagger needs to provide an instance of type LoginRetrofitService,
        // this code (the one inside the @Provides method) is run.
        return new Retrofit.Builder()
                .baseUrl("https://example.com")
                .build()
                .create(LoginService.class);
    }
}
模組可讓您以語意方式封裝如何提供物件的資訊。如您所見,您已呼叫類別 NetworkModule,對提供網路相關物件的邏輯進行分組。當應用程式的大小擴增時,您也可以在模組中新增說明,指出如何提供 OkHttpClient 或如何設定 Gson/Moshi。
@Provides 方法的依附元件是該方法的參數。針對上一個方法,LoginRetrofitService 無需依附元件即可提供,因為該方法沒有任何參數。如果您已宣告 OkHttpClient 做為參數,Dagger 就需提供圖表中的 OkHttpClient 例項,以滿足 LoginRetrofitService 的依附元件。例如:
Kotlin
@Module
class NetworkModule {
    // Hypothetical dependency on LoginRetrofitService
    @Provides
    fun provideLoginRetrofitService(
        okHttpClient: OkHttpClient
    ): LoginRetrofitService { ... }
}
Java
@Module
public class NetworkModule {

    @Provides
    public LoginRetrofitService provideLoginRetrofitService(OkHttpClient okHttpClient) {
        ...
    }
}
為了讓 Dagger 圖表瞭解這個模組,您必須將其新增至 @Component 介面,如下所示:
Kotlin
// The "modules" attribute in the @Component annotation tells Dagger what Modules
// to include when building the graph
@Component(modules = [NetworkModule::class])
interface ApplicationComponent {
    ...
}
Java
// The "modules" attribute in the @Component annotation tells Dagger what Modules
// to include when building the graph
@Component(modules = NetworkModule.class)
public interface ApplicationComponent {
    ...
}
如要在 Dagger 圖表中新增類型,建議您使用建構函式插入功能 (即在類別建構函式中使用 @Inject 註解)。不過,有時此方法並不可行,因此您須使用 Dagger 模組。例如,當您要求 Dagger 使用計算結果來判斷如何建立物件的例項時,就屬於這種情況。每當需要提供該類型的例項時,Dagger 便會在 @Provides 方法中執行程式碼。
範例中的 Dagger 圖現如下所示:
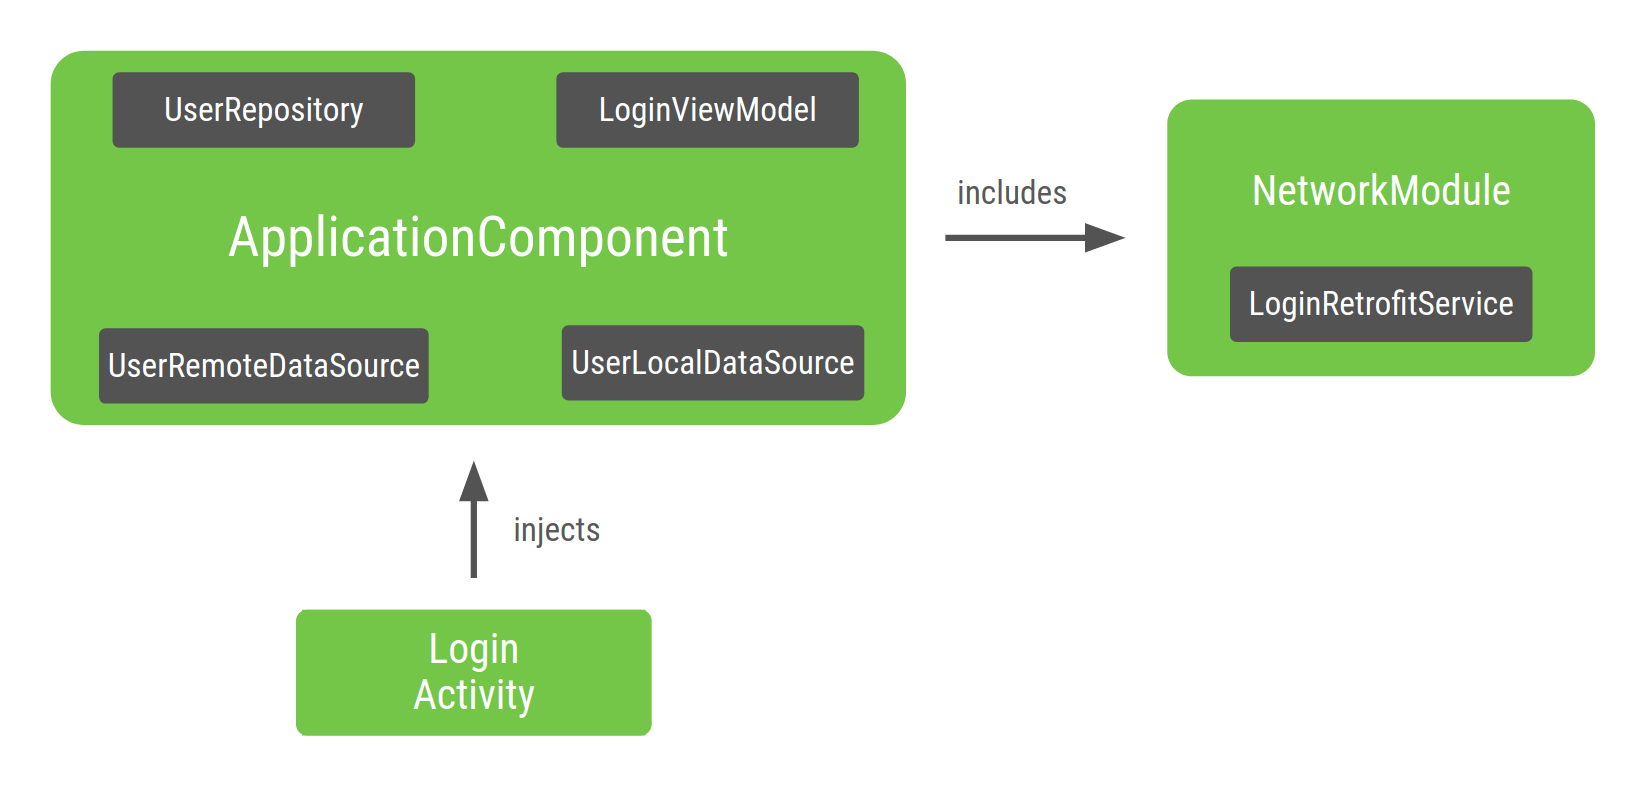
圖 2. 表示 LoginActivity 是由 Dagger 插入的圖表
圖表的進入點為 LoginActivity。由於 LoginActivity 插入了 LoginViewModel,所以 Dagger 建構的圖表會知道如何提供 LoginViewModel 的例項,以及如何以遞迴方式提供其依附元件的例項。由於類別建構函式上的 @Inject 註解,Dagger 會知道如何執行這項操作。
在 Dagger 產生的 ApplicationComponent 中,有一個工廠函式型的方法;如果 Dagger 已知如何提供類別,可透過該方法取得所有類別的例項。在此範例中,Dagger 會委派 ApplicationComponent 中包含的 NetworkModule,以取得 LoginRetrofitService 的例項。
Dagger 範圍
我們已在「Dagger 基本概念」頁面講解過範圍,這是在元件中指定某類專屬例項的方式,也就是「將類型範圍限定為元件生命週期」的意義所在。
您可能會想在應用程式的其他功能中使用 UserRepository,且不希望每次需要時都建立新的物件,因此可以將 UserRepository 指定為整個應用程式的專屬例項。同理,LoginRetrofitService 的建立費用高昂,您也想重複使用該物件的專屬例項,所以同樣可以採取這個做法。相對地,建立 UserRemoteDataSource 例項的成本並不高,就沒有必要將其範圍限定為元件的生命週期。
@Singleton 是 javax.inject 套件隨附的唯一範圍註解。您可以用此來註解 ApplicationComponent 和要在整個應用程式中重複使用的物件。
Kotlin
@Singleton
@Component(modules = [NetworkModule::class])
interface ApplicationComponent {
    fun inject(activity: LoginActivity)
}

@Singleton
class UserRepository @Inject constructor(
    private val localDataSource: UserLocalDataSource,
    private val remoteDataSource: UserRemoteDataSource
) { ... }

@Module
class NetworkModule {
    // Way to scope types inside a Dagger Module
    @Singleton
    @Provides
    fun provideLoginRetrofitService(): LoginRetrofitService { ... }
}
Java
@Singleton
@Component(modules = NetworkModule.class)
public interface ApplicationComponent {
    void inject(LoginActivity loginActivity);
}

@Singleton
public class UserRepository {

    private final UserLocalDataSource userLocalDataSource;
    private final UserRemoteDataSource userRemoteDataSource;

    @Inject
    public UserRepository(UserLocalDataSource userLocalDataSource, UserRemoteDataSource userRemoteDataSource) {
        this.userLocalDataSource = userLocalDataSource;
        this.userRemoteDataSource = userRemoteDataSource;
    }
}

@Module
public class NetworkModule {

    @Singleton
    @Provides
    public LoginRetrofitService provideLoginRetrofitService() { ... }
}
將範圍套用至物件時,請小心不要引發記憶體流失。只要限定範圍的元件位於記憶體中,已建立的物件也會位於記憶體中。由於 ApplicationComponent 會在應用程式啟動時建立 (在 Application 類別中),因此會隨應用程式一起刪除。有鑑於此,UserRepository 的專屬例項一律會保留在記憶體中,直到應用程式遭刪除為止。
Dagger 子元件
如果登入流程 (由單一 LoginActivity 管理) 包含多個片段,您應在所有片段中重複使用 LoginViewModel 的相同例項。@Singleton 無法為 LoginViewModel 加註以重複使用例項,原因如下:
流程結束後,
LoginViewModel的例項會保留在記憶體中。您希望每個登入流程使用
LoginViewModel的不同例項。例如,您希望在使用者登出時使用不同的LoginViewModel例項,而不是使用者首次登入時的例項。
如要將 LoginViewModel 的範圍限制為 LoginActivity 的生命週期,您需為登入流程和新範圍建立新的元件 (新的子圖表)。
首先,請建立登入流程專用的圖表。
Kotlin
@Component
interface LoginComponent {}
Java
@Component
public interface LoginComponent {
}
現在 LoginActivity 有登入流程專用的設定,應會從 LoginComponent 插入。這樣即可避免從 ApplicationComponent 類別插入 LoginActivity。
Kotlin
@Component
interface LoginComponent {
    fun inject(activity: LoginActivity)
}
Java
@Component
public interface LoginComponent {
    void inject(LoginActivity loginActivity);
}
LoginComponent 必須能從 ApplicationComponent 存取物件,因為 LoginViewModel 依附於 UserRepository。您可以使用「Dagger 子元件」,讓 Dagger 瞭解您希望新元件使用另一個元件的某些部分。新元件必須是包含共用資源元件的子元件。
「子元件」是沿用和擴充父項元件物件圖表的元件。因此,在父項元件中提供的所有物件也會在子元件中提供。這樣一來,子元件中的物件就能依附於父項元件提供的物件。
如要建立子元件的例項,您需要父項元件的例項。因此,如果是父項元件提供給子元件的物件,範圍仍會限定於父項元件。
在範例中,您必須將 LoginComponent 定義為 ApplicationComponent 的子元件。方法是以 @Subcomponent 註解 LoginComponent:
Kotlin
// @Subcomponent annotation informs Dagger this interface is a Dagger Subcomponent
@Subcomponent
interface LoginComponent {

    // This tells Dagger that LoginActivity requests injection from LoginComponent
    // so that this subcomponent graph needs to satisfy all the dependencies of the
    // fields that LoginActivity is injecting
    fun inject(loginActivity: LoginActivity)
}
Java
// @Subcomponent annotation informs Dagger this interface is a Dagger Subcomponent
@Subcomponent
public interface LoginComponent {

    // This tells Dagger that LoginActivity requests injection from LoginComponent
    // so that this subcomponent graph needs to satisfy all the dependencies of the
    // fields that LoginActivity is injecting
    void inject(LoginActivity loginActivity);
}
您還必須在 LoginComponent 內定義子元件工廠函式,讓 ApplicationComponent 瞭解如何建立 LoginComponent 的例項。
Kotlin
@Subcomponent
interface LoginComponent {

    // Factory that is used to create instances of this subcomponent
    @Subcomponent.Factory
    interface Factory {
        fun create(): LoginComponent
    }

    fun inject(loginActivity: LoginActivity)
}
Java
@Subcomponent
public interface LoginComponent {

    // Factory that is used to create instances of this subcomponent
    @Subcomponent.Factory
    interface Factory {
        LoginComponent create();
    }

    void inject(LoginActivity loginActivity);
}
如要向 Dagger 說明 LoginComponent 是 ApplicationComponent 的子元件,您必須透過下列方式提供指示:
建立新的 Dagger 模組 (例如
SubcomponentsModule),將子元件的類別傳遞至註解的subcomponents屬性。Kotlin
// The "subcomponents" attribute in the @Module annotation tells Dagger what
// Subcomponents are children of the Component this module is included in.
@Module(subcomponents = LoginComponent::class)
class SubcomponentsModule {}
Java
// The "subcomponents" attribute in the @Module annotation tells Dagger what
// Subcomponents are children of the Component this module is included in.
@Module(subcomponents = LoginComponent.class)
public class SubcomponentsModule {
}
將新模組 (例如
SubcomponentsModule) 加到ApplicationComponent中:Kotlin
// Including SubcomponentsModule, tell ApplicationComponent that
// LoginComponent is its subcomponent.
@Singleton
@Component(modules = [NetworkModule::class, SubcomponentsModule::class])
interface ApplicationComponent {
}
Java
// Including SubcomponentsModule, tell ApplicationComponent that
// LoginComponent is its subcomponent.
@Singleton
@Component(modules = {NetworkModule.class, SubcomponentsModule.class})
public interface ApplicationComponent {
}
請注意,
ApplicationComponent不需再插入LoginActivity,因為現在會由LoginComponent負責插入,因此您可從ApplicationComponent移除inject()方法。ApplicationComponent的耗用端需要知道如何建立LoginComponent的例項。父項元件必須在其介面中新增方法,讓耗用端能根據父項元件的例項建立子元件的例項:公開在介面中建立
LoginComponent例項的工廠函式:Kotlin
@Singleton
@Component(modules = [NetworkModule::class, SubcomponentsModule::class])
interface ApplicationComponent {
// This function exposes the LoginComponent Factory out of the graph so consumers
// can use it to obtain new instances of LoginComponent
fun loginComponent(): LoginComponent.Factory
}
Java
@Singleton
@Component(modules = { NetworkModule.class, SubcomponentsModule.class} )
public interface ApplicationComponent {
// This function exposes the LoginComponent Factory out of the graph so consumers
// can use it to obtain new instances of LoginComponent
LoginComponent.Factory loginComponent();
}
將範圍指派給子元件
當您建構專案時,可以建立 ApplicationComponent 和 LoginComponent 的例項。由於您希望只要應用程式在記憶體中,就使用圖表的同一個例項,因此 ApplicationComponent 會附加至應用程式的生命週期。
不妨思考一下 LoginComponent 的生命週期為何?需要 LoginComponent 的其中一個原因是,您需在與登入程序相關的片段之間共用 LoginViewModel 的同一個例項。但同樣地,每當有新的登入流程時,您都希望使用不同的 LoginViewModel 例項。因此,LoginActivity 是 LoginComponent 的正確生命週期,也就是對每個新活動來說,您需要 LoginComponent 的新例項,以及可使用該 LoginComponent 例項的片段。
因為 LoginComponent 會附加至 LoginActivity 生命週期,您必須在活動中保留對元件的參照,方法與在 Application 類別中保留對 applicationComponent 的參照相同。如此一來,片段就可以存取該元件。
Kotlin
class LoginActivity: Activity() {
    // Reference to the Login graph
    lateinit var loginComponent: LoginComponent
    ...
}
Java
public class LoginActivity extends Activity {

    // Reference to the Login graph
    LoginComponent loginComponent;

    ...
}
請注意,loginComponent 變數不會有 @Inject 的註解,原因是您不希望由 Dagger 提供此變數。
您可以使用 ApplicationComponent 取得 LoginComponent 的參照,然後插入 LoginActivity,如下所示:
Kotlin
class LoginActivity: Activity() {
    // Reference to the Login graph
    lateinit var loginComponent: LoginComponent

    // Fields that need to be injected by the login graph
    @Inject lateinit var loginViewModel: LoginViewModel

    override fun onCreate(savedInstanceState: Bundle?) {
        // Creation of the login graph using the application graph
        loginComponent = (applicationContext as MyDaggerApplication)
                            .appComponent.loginComponent().create()

        // Make Dagger instantiate @Inject fields in LoginActivity
        loginComponent.inject(this)

        // Now loginViewModel is available

        super.onCreate(savedInstanceState)
    }
}
Java
public class LoginActivity extends Activity {

    // Reference to the Login graph
    LoginComponent loginComponent;

    // Fields that need to be injected by the login graph
    @Inject
    LoginViewModel loginViewModel;

    @Override
    protected void onCreate(Bundle savedInstanceState) {
        // Creation of the login graph using the application graph
        loginComponent = ((MyApplication) getApplicationContext())
                                .appComponent.loginComponent().create();

        // Make Dagger instantiate @Inject fields in LoginActivity
        loginComponent.inject(this);

        // Now loginViewModel is available

        super.onCreate(savedInstanceState);
    }
}
LoginComponent 會在活動的 onCreate() 方法中建立,且在活動遭刪除時默默刪除。
每次要求時,LoginComponent 都必須提供 LoginViewModel 的同一個例項。為了確保這一點,您可以建立自訂註解範圍,並以此範圍為 LoginComponent 和 LoginViewModel 加註。請注意,由於 @Singleton 註解已用於父項元件,系統會將物件設為應用程式單例模式 (整個應用程式的專屬例項),因此您無法使用該註解,而需建立其他註解範圍。
在本例中,您可以將此範圍命名為 @LoginScope,但我們不建議這麼做。範圍註解的名稱不應明確指出其用途。請改為根據範圍註解的生命週期命名,因為註解可由 RegistrationComponent 和 SettingsComponent 這類同層元件重複使用。這也是我們建議您將其命名為 @ActivityScope (而非 @LoginScope) 的原因。
Kotlin
// Definition of a custom scope called ActivityScope
@Scope
@Retention(value = AnnotationRetention.RUNTIME)
annotation class ActivityScope

// Classes annotated with @ActivityScope are scoped to the graph and the same
// instance of that type is provided every time the type is requested.
@ActivityScope
@Subcomponent
interface LoginComponent { ... }

// A unique instance of LoginViewModel is provided in Components
// annotated with @ActivityScope
@ActivityScope
class LoginViewModel @Inject constructor(
    private val userRepository: UserRepository
) { ... }
Java
// Definition of a custom scope called ActivityScope
@Scope
@Retention(RetentionPolicy.RUNTIME)
public @interface ActivityScope {}

// Classes annotated with @ActivityScope are scoped to the graph and the same
// instance of that type is provided every time the type is requested.
@ActivityScope
@Subcomponent
public interface LoginComponent { ... }

// A unique instance of LoginViewModel is provided in Components
// annotated with @ActivityScope
@ActivityScope
public class LoginViewModel {

    private final UserRepository userRepository;

    @Inject
    public LoginViewModel(UserRepository userRepository) {
        this.userRepository = userRepository;
    }
}
現在,如果您有兩個片段需要 LoginViewModel,這兩個片段都會有相同的例項。舉例來說,如果您有 LoginUsernameFragment 和 LoginPasswordFragment,則需由 LoginComponent 插入:
Kotlin
@ActivityScope
@Subcomponent
interface LoginComponent {

    @Subcomponent.Factory
    interface Factory {
        fun create(): LoginComponent
    }

    // All LoginActivity, LoginUsernameFragment and LoginPasswordFragment
    // request injection from LoginComponent. The graph needs to satisfy
    // all the dependencies of the fields those classes are injecting
    fun inject(loginActivity: LoginActivity)
    fun inject(usernameFragment: LoginUsernameFragment)
    fun inject(passwordFragment: LoginPasswordFragment)
}
Java
@ActivityScope
@Subcomponent
public interface LoginComponent {

    @Subcomponent.Factory
    interface Factory {
        LoginComponent create();
    }

    // All LoginActivity, LoginUsernameFragment and LoginPasswordFragment
    // request injection from LoginComponent. The graph needs to satisfy
    // all the dependencies of the fields those classes are injecting
    void inject(LoginActivity loginActivity);
    void inject(LoginUsernameFragment loginUsernameFragment);
    void inject(LoginPasswordFragment loginPasswordFragment);
}
元件會存取 LoginActivity 物件中元件的例項。LoginUserNameFragment 程式碼範例如以下程式碼片段所示:
Kotlin
class LoginUsernameFragment: Fragment() {

    // Fields that need to be injected by the login graph
    @Inject lateinit var loginViewModel: LoginViewModel

    override fun onAttach(context: Context) {
        super.onAttach(context)

        // Obtaining the login graph from LoginActivity and instantiate
        // the @Inject fields with objects from the graph
        (activity as LoginActivity).loginComponent.inject(this)

        // Now you can access loginViewModel here and onCreateView too
        // (shared instance with the Activity and the other Fragment)
    }
}
Java
public class LoginUsernameFragment extends Fragment {

    // Fields that need to be injected by the login graph
    @Inject
    LoginViewModel loginViewModel;

    @Override
    public void onAttach(Context context) {
        super.onAttach(context);

        // Obtaining the login graph from LoginActivity and instantiate
        // the @Inject fields with objects from the graph
        ((LoginActivity) getActivity()).loginComponent.inject(this);

        // Now you can access loginViewModel here and onCreateView too
        // (shared instance with the Activity and the other Fragment)
    }
}
LoginPasswordFragment 也是一樣:
Kotlin
class LoginPasswordFragment: Fragment() {

    // Fields that need to be injected by the login graph
    @Inject lateinit var loginViewModel: LoginViewModel

    override fun onAttach(context: Context) {
        super.onAttach(context)

        (activity as LoginActivity).loginComponent.inject(this)

        // Now you can access loginViewModel here and onCreateView too
        // (shared instance with the Activity and the other Fragment)
    }
}
Java
public class LoginPasswordFragment extends Fragment {

    // Fields that need to be injected by the login graph
    @Inject
    LoginViewModel loginViewModel;

    @Override
    public void onAttach(Context context) {
        super.onAttach(context);

        ((LoginActivity) getActivity()).loginComponent.inject(this);

        // Now you can access loginViewModel here and onCreateView too
        // (shared instance with the Activity and the other Fragment)
    }
}
圖 3 是新子元件的 Dagger 圖。類別若標有白點 (UserRepository、LoginRetrofitService 和 LoginViewModel),代表其專屬例項的範圍限定為各自的元件。
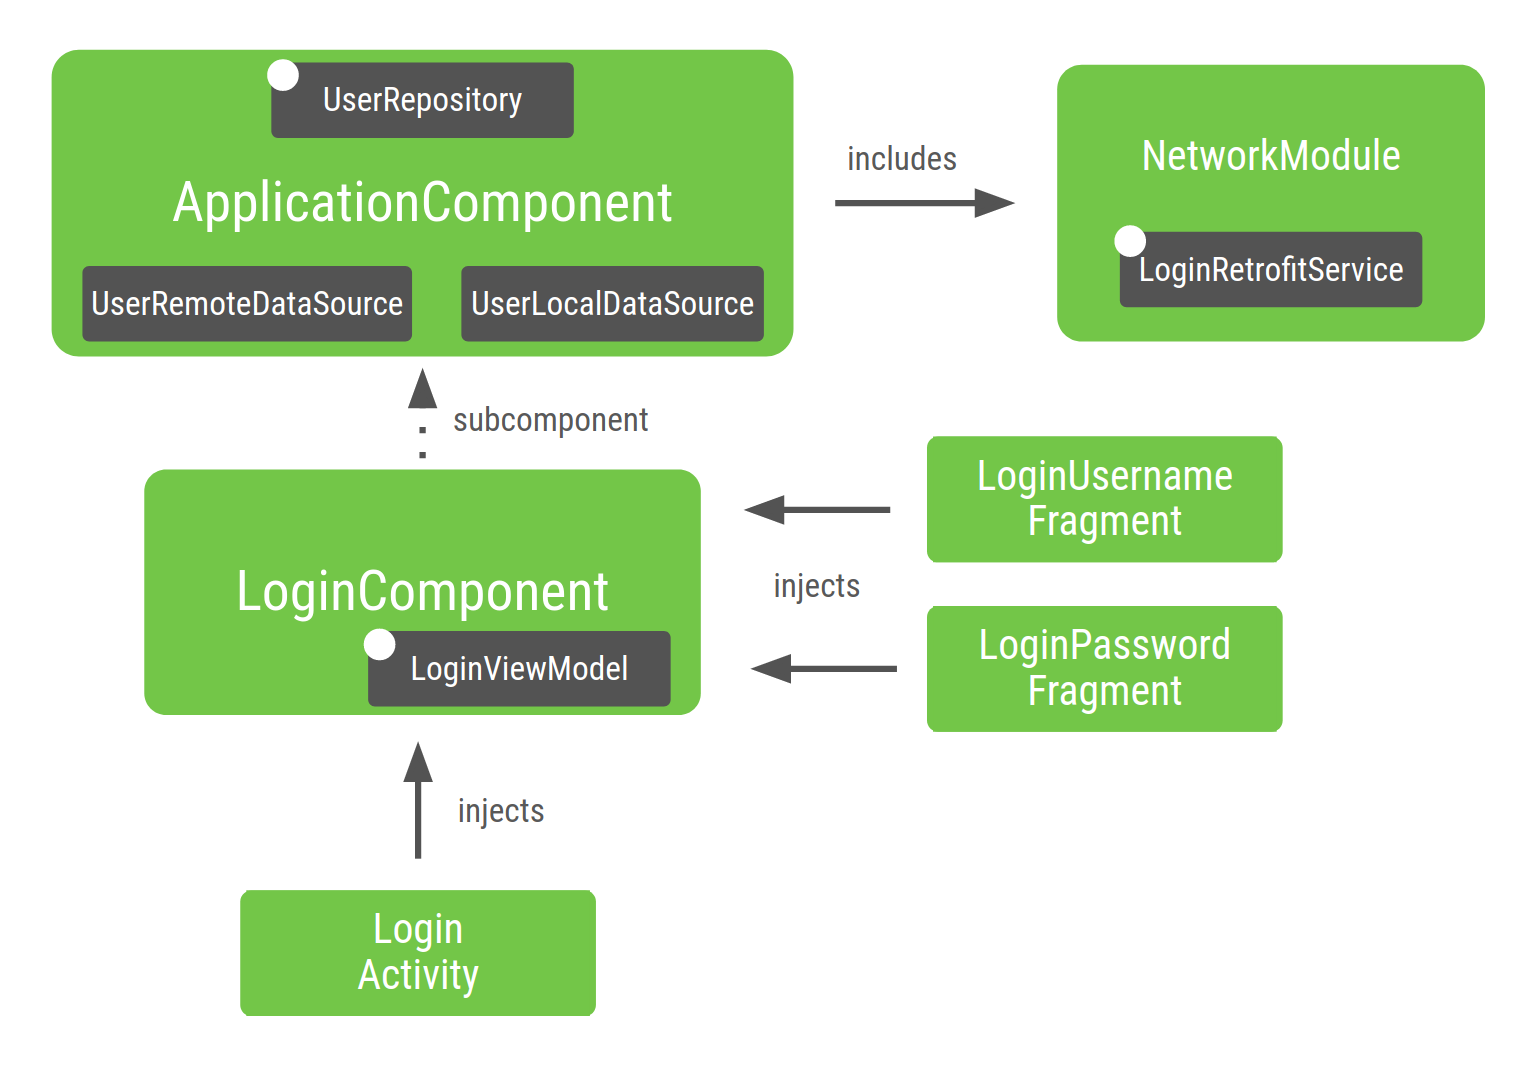
圖 3. 您為 Android 應用程式範例建構的圖表
現在我們來解析圖表的各個部分:
ApplicationComponent中已納入NetworkModule(以及因此產生的LoginRetrofitService),因為您在元件中指明了這點。UserRepository保留在ApplicationComponent中,因為其範圍限制為ApplicationComponent。如果專案規模擴大,您會需要在不同功能 (例如註冊) 之間共用相同的例項。因為
UserRepository是ApplicationComponent的一部分,其依附元件 (即UserLocalDataSource和UserRemoteDataSource) 也需位於這個元件中,才能提供UserRepository的例項。LoginViewModel包含在LoginComponent中,因為只有由LoginComponent插入的類別才需要 LoginViewModel。LoginViewModel未包含在ApplicationComponent中,因為ApplicationComponent中沒有任何依附元件需要LoginViewModel。同樣地,如果您尚未將
UserRepository範圍限制為ApplicationComponent,Dagger 會自動納入UserRepository及其依附元件做為LoginComponent的一部分,因為這是目前唯一使用UserRepository的地方。
除了將物件範圍限定為不同的生命週期,建立子元件也是封裝應用程式不同部分的好方法。
如果您能在建構應用程式時,根據應用程式流程建立不同的 Dagger 子圖表,將有助於打造在記憶體和啟動時間方面,效能更高且可擴充的應用程式。
建構 Dagger 圖表的最佳做法
為應用程式建構 Dagger 圖時,請遵循以下做法:
您應在建立元件時,考量影響元件生命週期的元素為何。在本例中,
Application類別負責ApplicationComponent,LoginActivity則負責LoginComponent。請僅在適當情況下使用限定範圍。過度限定範圍可能會對應用程式執行階段效能造成負面影響:亦即只要元件位於記憶體中,物件就會留存在記憶體中,因此取得限定範圍的物件成本就比較高。請注意,Dagger 提供物件時,會使用
DoubleCheck鎖定,而非工廠函式型的提供程序。
測試使用 Dagger 的專案
使用 Dagger 這類依附元件插入架構的好處之一,是可更輕鬆地測試程式碼。
單元測試
您不必使用 Dagger 進行「單元測試」。如果您測試的類別採用建構函式插入功能,您不需要使用 Dagger 將該類別例項化,而是可以直接呼叫其建構函式,逕自傳入虛假或模擬的依附元件,方法與未加上註解時一樣。
舉例來說,在測試 LoginViewModel 時,程式碼會像這樣:
Kotlin
@ActivityScope
class LoginViewModel @Inject constructor(
    private val userRepository: UserRepository
) { ... }

class LoginViewModelTest {

    @Test
    fun `Happy path`() {
        // You don't need Dagger to create an instance of LoginViewModel
        // You can pass a fake or mock UserRepository
        val viewModel = LoginViewModel(fakeUserRepository)
        assertEquals(...)
    }
}
Java
@ActivityScope
public class LoginViewModel {

    private final UserRepository userRepository;

    @Inject
    public LoginViewModel(UserRepository userRepository) {
        this.userRepository = userRepository;
    }
}

public class LoginViewModelTest {

    @Test
    public void happyPath() {
        // You don't need Dagger to create an instance of LoginViewModel
        // You can pass a fake or mock UserRepository
        LoginViewModel viewModel = new LoginViewModel(fakeUserRepository);
        assertEquals(...);
    }
}
端對端測試
針對「整合測試」,最佳做法是建立用於測試的 TestApplicationComponent。而「正式版和測試會使用不同的元件設定」。
這需要在應用程式中進行更多前期的模組設計。測試元件會擴充正式版元件,並安裝不同的模組組合。
Kotlin
// TestApplicationComponent extends from ApplicationComponent to have them both
// with the same interface methods. You need to include the modules of the
// component here as well, and you can replace the ones you want to override.
// This sample uses FakeNetworkModule instead of NetworkModule
@Singleton
@Component(modules = [FakeNetworkModule::class, SubcomponentsModule::class])
interface TestApplicationComponent : ApplicationComponent {
}
Java
// TestApplicationComponent extends from ApplicationComponent to have them both
// with the same interface methods. You need to include the modules of the
// Component here as well, and you can replace the ones you want to override.
// This sample uses FakeNetworkModule instead of NetworkModule
@Singleton
@Component(modules = {FakeNetworkModule.class, SubcomponentsModule.class})
public interface TestApplicationComponent extends ApplicationComponent {
}
FakeNetworkModule 具有 NetworkModule 原始版本的虛假實作。您可以在其中提供要替換的虛假例項或模擬例項。
Kotlin
// In the FakeNetworkModule, pass a fake implementation of LoginRetrofitService
// that you can use in your tests.
@Module
class FakeNetworkModule {
    @Provides
    fun provideLoginRetrofitService(): LoginRetrofitService {
        return FakeLoginService()
    }
}
Java
// In the FakeNetworkModule, pass a fake implementation of LoginRetrofitService
// that you can use in your tests.
@Module
public class FakeNetworkModule {

    @Provides
    public LoginRetrofitService provideLoginRetrofitService() {
        return new FakeLoginService();
    }
}
在整合測試或端對端測試中,您將使用建立 TestApplicationComponent 的 TestApplication,而非 ApplicationComponent。
Kotlin
// Your test application needs an instance of the test graph
class MyTestApplication: MyApplication() {
    override val appComponent = DaggerTestApplicationComponent.create()
}
Java
// Your test application needs an instance of the test graph
public class MyTestApplication extends MyApplication {
    ApplicationComponent appComponent = DaggerTestApplicationComponent.create();
}
接著,這個測試應用程式將用於自訂的 TestRunner,這可在您執行檢測設備測試時派上用場。如要進一步瞭解相關資訊,請參閱「在 Android 應用程式中使用 Dagger」程式碼研究室。
使用 Dagger 模組
Dagger 模組可讓您以語意方式封裝如何提供物件的資訊。您可以將模組新增至元件中,也可將模組納入其他模組。這項功能很強大,但很容易遭到濫用。
將模組新增至元件或其他模組後,模組就已經在 Dagger 圖表中;表示 Dagger 可在該元件中提供這些物件。在新增模組之前,請檢查該模組是否已加入元件中,或是透過編譯專案,看看 Dagger 能否找到該模組所需的依附元件,確認模組是否已加入 Dagger 圖表中。
最佳做法是規定模組只應在元件中宣告一次 (特定進階 Dagger 用途除外)。
假設您以這種方式設定圖表。ApplicationComponent 包含 Module1 和 Module2,而 Module1 包含 ModuleX。
Kotlin
@Component(modules = [Module1::class, Module2::class])
interface ApplicationComponent { ... }

@Module(includes = [ModuleX::class])
class Module1 { ... }

@Module
class Module2 { ... }
Java
@Component(modules = {Module1.class, Module2.class})
public interface ApplicationComponent { ... }

@Module(includes = {ModuleX.class})
public class Module1 { ... }

@Module
public class Module2 { ... }
假設現在 Module2 依附於 ModuleX 提供的類別。錯誤的做法是將 ModuleX 包含在 Module2 中,因為這樣 ModuleX 在圖中就已納入兩次,如以下程式碼片段所示:
Kotlin
// Bad practice: ModuleX is declared multiple times in this Dagger graph
@Component(modules = [Module1::class, Module2::class])
interface ApplicationComponent { ... }

@Module(includes = [ModuleX::class])
class Module1 { ... }

@Module(includes = [ModuleX::class])
class Module2 { ... }
Java
// Bad practice: ModuleX is declared multiple times in this Dagger graph.
@Component(modules = {Module1.class, Module2.class})
public interface ApplicationComponent { ... }

@Module(includes = ModuleX.class)
public class Module1 { ... }

@Module(includes = ModuleX.class)
public class Module2 { ... }
建議改用下列方法:
- 重構模組,並將通用模組擷取到元件中。
- 使用兩個模組共用的物件建立新模組,並將其擷取到元件中。
如果不以這種方式重構,就會導致許多模組因相互納入而沒有清楚的組織架構,因此會難以查看各個依附元件的來源。
建議做法 (方法 1):在 Dagger 圖中宣告 ModuleX 一次。
Kotlin
@Component(modules = [Module1::class, Module2::class, ModuleX::class])
interface ApplicationComponent { ... }

@Module
class Module1 { ... }

@Module
class Module2 { ... }
Java
@Component(modules = {Module1.class, Module2.class, ModuleX.class})
public interface ApplicationComponent { ... }

@Module
public class Module1 { ... }

@Module
public class Module2 { ... }
建議做法 (方法 2):將 ModuleX 中 Module1 和 Module2 的共同依附元件擷取到名為 ModuleXCommon 的新模組中,此模組同樣也包含在元件中。然後透過每個模組專屬的依附元件來建立名為 ModuleXWithModule1Dependencies 和 ModuleXWithModule2Dependencies 的另外兩個模組。所有模組在 Dagger 圖中都只宣告一次。
Kotlin
@Component(modules = [Module1::class, Module2::class, ModuleXCommon::class])
interface ApplicationComponent { ... }

@Module
class ModuleXCommon { ... }

@Module
class ModuleXWithModule1SpecificDependencies { ... }

@Module
class ModuleXWithModule2SpecificDependencies { ... }

@Module(includes = [ModuleXWithModule1SpecificDependencies::class])
class Module1 { ... }

@Module(includes = [ModuleXWithModule2SpecificDependencies::class])
class Module2 { ... }
Java
@Component(modules = {Module1.class, Module2.class, ModuleXCommon.class})
public interface ApplicationComponent { ... }

@Module
public class ModuleXCommon { ... }

@Module
public class ModuleXWithModule1SpecificDependencies { ... }

@Module
public class ModuleXWithModule2SpecificDependencies { ... }

@Module(includes = ModuleXWithModule1SpecificDependencies.class)
public class Module1 { ... }

@Module(includes = ModuleXWithModule2SpecificDependencies.class)
public class Module2 { ... }
輔助插入
輔助插入是一種用於建構物件的 DI 模式,此物件中的部分參數可由 DI 架構提供,其餘參數則須在建立時由使用者傳入。
在 Android 中,此模式常見於「詳細資料」畫面中,因為系統要顯示的元素 ID 只有在執行階段才能得知,而無法在 Dagger 產生 DI 圖形的編譯期間得知。如要進一步瞭解如何透過 Dagger 輔助插入,請參閱 Dagger 說明文件。
結語
如果您還沒做好準備,請參閱最佳做法相關章節。如要瞭解如何在 Android 應用程式中使用 Dagger,請參閱「在 Android 應用程式中使用 Dagger」程式碼研究室。