
במסמך הזה מתואר איך להגדיר מגוון של בדיקות אספרסו נפוצות.
התאמה בין תצוגה לצד תצוגה אחרת
פריסה יכולה להכיל תצוגות מסוימות שאינן ייחודיות בפני עצמן. עבור
לדוגמה, לחצן שיחה חוזר בטבלה של אנשי קשר יכול להיות זהה
R.id, מכילות את אותו טקסט ובעלי מאפיינים זהים לאלה של קריאה אחרת
בהיררכיית התצוגות.
לדוגמה, בפעילות הזו, התצוגה עם הטקסט "7" חוזרת על עצמה
שורות:
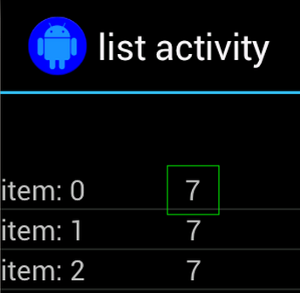
לעיתים קרובות, התצוגה הלא ייחודית תשויך לתווית ייחודית
שלצידו, למשל השם של איש הקשר שמופיע ליד לחצן השיחה. במקרה הזה,
אפשר להשתמש בהתאמה מסוג hasSibling() כדי לצמצם את הבחירה:
Kotlin
onView(allOf(withText("7"), hasSibling(withText("item: 0"))))
    .perform(click())
Java
onView(allOf(withText("7"), hasSibling(withText("item: 0"))))
    .perform(click());
התאמה לתצוגה שנמצאת בתוך סרגל פעולות
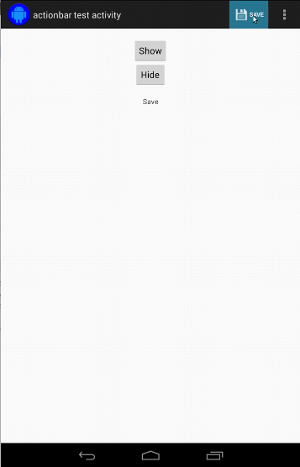
בActionBarTestActivity יש שני סרגלי פעולה שונים: רגיל
את סרגל הפעולות ואת סרגל הפעולות לפי ההקשר שנוצר מתוך תפריט האפשרויות. שתי השיטות
סרגלי הפעולות כוללים פריט אחד תמיד גלוי ושני פריטים בלבד
גלוי בתפריט האפשרויות הנוספות. כשמשתמש לוחץ על פריט, הוא משנה את TextView
תוכן של הפריט שעליו לחץ המשתמש.
התאמת הסמלים הגלויים בשני סרגלי הפעולות היא פשוטה, כפי שמוצג בקטע הקוד הבא:
Kotlin
fun testClickActionBarItem() {
    // We make sure the contextual action bar is hidden.
    onView(withId(R.id.hide_contextual_action_bar))
        .perform(click())

    // Click on the icon - we can find it by the r.Id.
    onView(withId(R.id.action_save))
        .perform(click())

    // Verify that we have really clicked on the icon
    // by checking the TextView content.
    onView(withId(R.id.text_action_bar_result))
        .check(matches(withText("Save")))
}
Java
public void testClickActionBarItem() {
    // We make sure the contextual action bar is hidden.
    onView(withId(R.id.hide_contextual_action_bar))
        .perform(click());

    // Click on the icon - we can find it by the r.Id.
    onView(withId(R.id.action_save))
        .perform(click());

    // Verify that we have really clicked on the icon
    // by checking the TextView content.
    onView(withId(R.id.text_action_bar_result))
        .check(matches(withText("Save")));
}
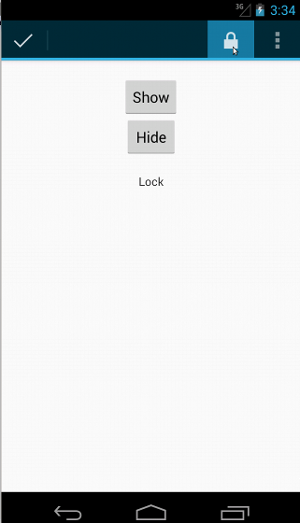
הקוד נראה זהה לסרגל הפעולות לפי ההקשר:
Kotlin
fun testClickActionModeItem() {
    // Make sure we show the contextual action bar.
    onView(withId(R.id.show_contextual_action_bar))
        .perform(click())

    // Click on the icon.
    onView((withId(R.id.action_lock)))
        .perform(click())

    // Verify that we have really clicked on the icon
    // by checking the TextView content.
    onView(withId(R.id.text_action_bar_result))
        .check(matches(withText("Lock")))
}
Java
public void testClickActionModeItem() {
    // Make sure we show the contextual action bar.
    onView(withId(R.id.show_contextual_action_bar))
        .perform(click());

    // Click on the icon.
    onView((withId(R.id.action_lock)))
        .perform(click());

    // Verify that we have really clicked on the icon
    // by checking the TextView content.
    onView(withId(R.id.text_action_bar_result))
        .check(matches(withText("Lock")));
}
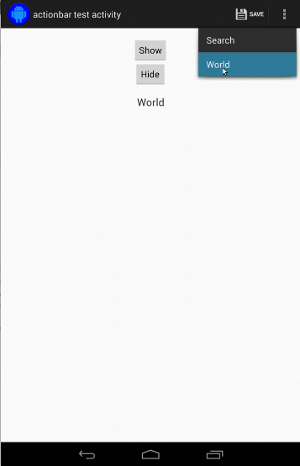
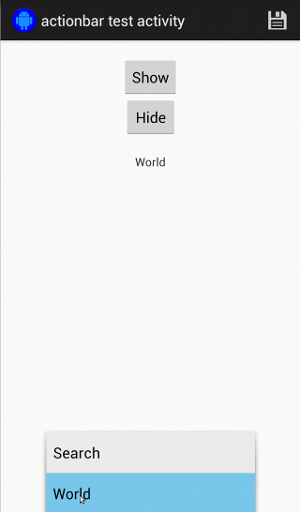
קצת יותר קשה ללחוץ על פריטים בתפריט האפשרויות הנוספות סרגל, כי בחלק מהמכשירים יש לחצן 'אפשרויות נוספות לחומרה', שפותח את פריטים נוספים בתפריט אפשרויות, ולחלק מהמכשירים יש הצפת תוכנה לחצן התפריט, שפותח תפריט רגיל של אפשרויות נוספות. למזלנו, אספרסו מטפל עבורנו.
בסרגל הפעולות הרגיל:
Kotlin
fun testActionBarOverflow() {
    // Make sure we hide the contextual action bar.
    onView(withId(R.id.hide_contextual_action_bar))
        .perform(click())

    // Open the options menu OR open the overflow menu, depending on whether
    // the device has a hardware or software overflow menu button.
    openActionBarOverflowOrOptionsMenu(
            ApplicationProvider.getApplicationContext<Context>())

    // Click the item.
    onView(withText("World"))
        .perform(click())

    // Verify that we have really clicked on the icon by checking
    // the TextView content.
    onView(withId(R.id.text_action_bar_result))
        .check(matches(withText("World")))
}
Java
public void testActionBarOverflow() {
    // Make sure we hide the contextual action bar.
    onView(withId(R.id.hide_contextual_action_bar))
        .perform(click());

    // Open the options menu OR open the overflow menu, depending on whether
    // the device has a hardware or software overflow menu button.
    openActionBarOverflowOrOptionsMenu(
            ApplicationProvider.getApplicationContext());

    // Click the item.
    onView(withText("World"))
        .perform(click());

    // Verify that we have really clicked on the icon by checking
    // the TextView content.
    onView(withId(R.id.text_action_bar_result))
        .check(matches(withText("World")));
}
כך זה נראה במכשירים עם לחצן 'אפשרויות נוספות לחומרה':
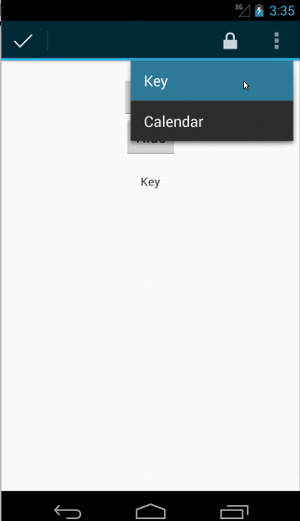
עבור סרגל הפעולות לפי ההקשר, קל שוב מאוד:
Kotlin
fun testActionModeOverflow() {
    // Show the contextual action bar.
    onView(withId(R.id.show_contextual_action_bar))
        .perform(click())

    // Open the overflow menu from contextual action mode.
    openContextualActionModeOverflowMenu()

    // Click on the item.
    onView(withText("Key"))
        .perform(click())

    // Verify that we have really clicked on the icon by
    // checking the TextView content.
    onView(withId(R.id.text_action_bar_result))
        .check(matches(withText("Key")))
    }
}
Java
public void testActionModeOverflow() {
    // Show the contextual action bar.
    onView(withId(R.id.show_contextual_action_bar))
        .perform(click());

    // Open the overflow menu from contextual action mode.
    openContextualActionModeOverflowMenu();

    // Click on the item.
    onView(withText("Key"))
        .perform(click());

    // Verify that we have really clicked on the icon by
    // checking the TextView content.
    onView(withId(R.id.text_action_bar_result))
        .check(matches(withText("Key")));
    }
}
כדי לראות את הקוד המלא של הדוגמאות האלה, אפשר לעיין
דוגמה של ActionBarTest.java ב-GitHub.
הצהרה על כך שתצוגה לא מוצגת
לאחר ביצוע סדרה של פעולות, בהחלט כדאי להצהיר
במצב של ממשק המשתמש בבדיקה. לפעמים זה יכול להיות מקרה שלילי, כמו
משהו לא קורה. חשוב לזכור שאפשר להפוך כל תצוגה של תל אביב
תואם ל-ViewAssertion באמצעות ViewAssertions.matches().
בדוגמה הבאה, אנחנו לוקחים את ההתאמה isDisplayed() והופכים אותה באמצעות
ערך ההתאמה הרגיל של not():
Kotlin
import androidx.test.espresso.Espresso.onView
import androidx.test.espresso.assertion.ViewAssertions.matches
import androidx.test.espresso.matcher.ViewMatchers.isDisplayed
import androidx.test.espresso.matcher.ViewMatchers.withId
import org.hamcrest.Matchers.not

onView(withId(R.id.bottom_left))
    .check(matches(not(isDisplayed())))
Java
import static androidx.test.espresso.Espresso.onView;
import static androidx.test.espresso.assertion.ViewAssertions.matches;
import static androidx.test.espresso.matcher.ViewMatchers.isDisplayed;
import static androidx.test.espresso.matcher.ViewMatchers.withId;
import static org.hamcrest.Matchers.not;

onView(withId(R.id.bottom_left))
    .check(matches(not(isDisplayed())));
הגישה שלמעלה פועלת אם התצוגה המפורטת עדיין היא חלק מההיררכיה. אם הוא
לא, מקבלים NoMatchingViewException וצריך להשתמש
ViewAssertions.doesNotExist().
הצהרה על כך שלא קיימת תצוגה
אם התצוגה לא מופיעה יותר מהיררכיית התצוגות, דבר שיכול לקרות כאשר
פעולה אחרת גרמה למעבר לפעילות אחרת – צריך להשתמש
ViewAssertions.doesNotExist():
Kotlin
import androidx.test.espresso.Espresso.onView
import androidx.test.espresso.assertion.ViewAssertions.doesNotExist
import androidx.test.espresso.matcher.ViewMatchers.withId

onView(withId(R.id.bottom_left))
    .check(doesNotExist())
Java
import static androidx.test.espresso.Espresso.onView;
import static androidx.test.espresso.assertion.ViewAssertions.doesNotExist;
import static androidx.test.espresso.matcher.ViewMatchers.withId;

onView(withId(R.id.bottom_left))
    .check(doesNotExist());
טענה שפריט נתונים לא נמצא במתאם
כדי להוכיח שפריט נתונים מסוים לא נמצא בתוך AdapterView, צריך לעשות זאת
את הדברים קצת אחרת. אנחנו צריכים למצוא את AdapterView שמעניינים אותנו
ולחקור את הנתונים שבהם הוא מכיל. אנחנו לא צריכים להשתמש בonData().
במקום זאת, אנחנו משתמשים ב-onView() כדי למצוא את AdapterView, ואז משתמשים
כדי לעבוד על הנתונים בתוך התצוגה.
ההתאמה הראשונה:
Kotlin
private fun withAdaptedData(dataMatcher: Matcher<Any>): Matcher<View> {
    return object : TypeSafeMatcher<View>() {

        override fun describeTo(description: Description) {
            description.appendText("with class name: ")
            dataMatcher.describeTo(description)
        }

        public override fun matchesSafely(view: View) : Boolean {
            if (view !is AdapterView<*>) {
                return false
            }

            val adapter = view.adapter
            for (i in 0 until adapter.count) {
                if (dataMatcher.matches(adapter.getItem(i))) {
                    return true
                }
            }

            return false
        }
    }
}
Java
private static Matcher<View> withAdaptedData(final Matcher<Object> dataMatcher) {
    return new TypeSafeMatcher<View>() {

        @Override
        public void describeTo(Description description) {
            description.appendText("with class name: ");
            dataMatcher.describeTo(description);
        }

        @Override
        public boolean matchesSafely(View view) {
            if (!(view instanceof AdapterView)) {
                return false;
            }

            @SuppressWarnings("rawtypes")
            Adapter adapter = ((AdapterView) view).getAdapter();
            for (int i = 0; i < adapter.getCount(); i++) {
                if (dataMatcher.matches(adapter.getItem(i))) {
                    return true;
                }
            }

            return false;
        }
    };
}
כל מה שאנחנו צריכים הוא onView() כדי למצוא את AdapterView:
Kotlin
fun testDataItemNotInAdapter() {
    onView(withId(R.id.list))
          .check(matches(not(withAdaptedData(withItemContent("item: 168")))))
    }
}
Java
@SuppressWarnings("unchecked")
public void testDataItemNotInAdapter() {
    onView(withId(R.id.list))
          .check(matches(not(withAdaptedData(withItemContent("item: 168")))));
    }
}
ויש לנו טענת נכונות (assertion) תיכשל אם פריט שווה ל-"item: 168" קיים בתצוגת מתאם עם רשימת המזהים.
כדי לראות את הדגימה המלאה, אפשר לעיין ב-method testDataItemNotInAdapter() בתוך
AdapterViewTest.java
ב-GitHub.
שימוש במטפל בכשלים בהתאמה אישית
החלפת הערך של FailureHandler שמוגדר כברירת מחדל ב-Espresso בערך בהתאמה אישית מאפשרת:
טיפול בשגיאות נוספות או שונות, למשל צילום מסך או העברה
ומידע נוסף על תוצאות ניפוי הבאגים.
הדוגמה CustomFailureHandlerTest ממחישה איך להטמיע תג מותאם אישית
מטפל בכשלים:
Kotlin
private class CustomFailureHandler(targetContext: Context) : FailureHandler {
    private val delegate: FailureHandler

    init {
        delegate = DefaultFailureHandler(targetContext)
    }

    override fun handle(error: Throwable, viewMatcher: Matcher<View>) {
        try {
            delegate.handle(error, viewMatcher)
        } catch (e: NoMatchingViewException) {
            throw MySpecialException(e)
        }

    }
}
Java
private static class CustomFailureHandler implements FailureHandler {
    private final FailureHandler delegate;

    public CustomFailureHandler(Context targetContext) {
        delegate = new DefaultFailureHandler(targetContext);
    }

    @Override
    public void handle(Throwable error, Matcher<View> viewMatcher) {
        try {
            delegate.handle(error, viewMatcher);
        } catch (NoMatchingViewException e) {
            throw new MySpecialException(e);
        }
    }
}
המטפל בכשלים הזה זורק MySpecialException במקום
NoMatchingViewException ואת כל שאר הכשלים
DefaultFailureHandler. אפשר לרשום את CustomFailureHandler אצל
אספרסו בשיטת setUp() של הבדיקה:
Kotlin
@Throws(Exception::class)
override fun setUp() {
    super.setUp()
    getActivity()
    setFailureHandler(CustomFailureHandler(
            ApplicationProvider.getApplicationContext<Context>()))
}
Java
@Override
public void setUp() throws Exception {
    super.setUp();
    getActivity();
    setFailureHandler(new CustomFailureHandler(
            ApplicationProvider.getApplicationContext()));
}
מידע נוסף זמין במאמר
FailureHandler
ו-
Espresso.setFailureHandler()
טירגוט לחלונות שלא מוגדרים כברירת מחדל
מערכת Android תומכת בחלונות מרובים. בדרך כלל מדובר בשקיפות למשתמשים
אך במקרים מסוימים ניתן לראות מספר חלונות,
כמו כשחלון השלמה אוטומטית מוצג מעל חלון האפליקציה הראשי
מווידג'ט החיפוש. כדי לפשט את הדברים, כברירת מחדל Espresso משתמשת בשיטה היוריסטיקה
לנחש עם איזה Window התכוונת ליצור אינטראקציה. היוריסטיקה הזו כמעט
תמיד טוב מספיק, עם זאת, במקרים נדירים תצטרכו לציין
אינטראקציה צריכה להתמקד. כדי לעשות את זה צריך לספק חלון בסיס משלכם.
תואם, או תואם Root:
Kotlin
onView(withText("South China Sea"))
    .inRoot(withDecorView(not(`is`(getActivity().getWindow().getDecorView()))))
    .perform(click())
Java
onView(withText("South China Sea"))
    .inRoot(withDecorView(not(is(getActivity().getWindow().getDecorView()))))
    .perform(click());
כפי שקורה ב-
ViewMatchers
אנחנו מספקים סדרה של
RootMatchers
כמובן שתמיד תוכלו להטמיע אובייקט Matcher משלכם.
לעיון ב-MultipleWindowTest קטע לדוגמה ב-GitHub.
התאמת כותרת עליונה או כותרת תחתונה בתצוגת רשימה
כותרות עליונות ותחתונות מתווספות אל ListViews באמצעות הלחצנים addHeaderView() וגם
addFooterView() methods. כדי לוודא ש-Espresso.onData() יודע איזה אובייקט נתונים
כדי שיהיה תואם, חשוב להעביר ערך מוגדר מראש של אובייקט נתונים בתור הפרמטר השני
אל addHeaderView() ו-addFooterView(). לדוגמה:
Kotlin
const val FOOTER = "FOOTER"
...
val footerView = layoutInflater.inflate(R.layout.list_item, listView, false)
footerView.findViewById<TextView>(R.id.item_content).text = "count:"
footerView.findViewById<TextView>(R.id.item_size).text
        = data.size.toString
listView.addFooterView(footerView, FOOTER, true)
Java
public static final String FOOTER = "FOOTER";
...
View footerView = layoutInflater.inflate(R.layout.list_item, listView, false);
footerView.findViewById<TextView>(R.id.item_content).setText("count:");
footerView.findViewById<TextView>(R.id.item_size).setText(String.valueOf(data.size()));
listView.addFooterView(footerView, FOOTER, true);
לאחר מכן תוכלו לכתוב התאמה לכותרת התחתונה:
Kotlin
import org.hamcrest.Matchers.allOf
import org.hamcrest.Matchers.instanceOf
import org.hamcrest.Matchers.`is`

fun isFooter(): Matcher<Any> {
    return allOf(`is`(instanceOf(String::class.java)),
            `is`(LongListActivity.FOOTER))
}
Java
import static org.hamcrest.Matchers.allOf;
import static org.hamcrest.Matchers.instanceOf;
import static org.hamcrest.Matchers.is;

@SuppressWarnings("unchecked")
public static Matcher<Object> isFooter() {
    return allOf(is(instanceOf(String.class)), is(LongListActivity.FOOTER));
}
וטעינת התצוגה בבדיקה היא פעולה טריוויאלית:
Kotlin
import androidx.test.espresso.Espresso.onData
import androidx.test.espresso.action.ViewActions.click
import androidx.test.espresso.sample.LongListMatchers.isFooter

fun testClickFooter() {
    onData(isFooter())
        .perform(click())

    // ...
}
Java
import static androidx.test.espresso.Espresso.onData;
import static androidx.test.espresso.action.ViewActions.click;
import static androidx.test.espresso.sample.LongListMatchers.isFooter;

public void testClickFooter() {
    onData(isFooter())
        .perform(click());

    // ...
}
כדאי לבדוק את דוגמת הקוד המלאה שנמצאת בשיטה testClickFooter() של
AdapterViewTest.java
ב-GitHub.